Two-factor authentication using SMS and email with ASP.NET Identity
by Hao Kung, Pranav Rastogi, Rick Anderson, Suhas Joshi
This tutorial will show you how to set up Two-factor authentication (2FA) using SMS and email.
This article was written by Rick Anderson (@RickAndMSFT), Pranav Rastogi (@rustd), Hao Kung, and Suhas Joshi. The NuGet sample was written primarily by Hao Kung.
This topic covers the following:
- Building the Identity sample
- Set up SMS for Two-factor authentication
- Enable Two-factor authentication
- How to register a Two-factor authentication provider
- Combine social and local login accounts
- Account lockout from brute force attacks
Building the Identity sample
In this section, you'll use NuGet to download a sample we will work with. Start by installing and running Visual Studio Express 2013 for Web or Visual Studio 2013. Install Visual Studio 2013 Update 2 or higher.
Note
Warning: You must install Visual Studio 2013 Update 2 to complete this tutorial.
Create a new empty ASP.NET Web project.
In the Package Manager Console, enter the following the following commands:
Install-Package SendGrid
Install-Package -Prerelease Microsoft.AspNet.Identity.SamplesIn this tutorial, we'll use SendGrid to send email and Twilio or ASPSMS for sms texting. The
Identity.Samplespackage installs the code we will be working with.Set the project to use SSL.
Optional: Follow the instructions in my Email confirmation tutorial to hook up SendGrid and then run the app and register an email account.
Optional: Remove the demo email link confirmation code from the sample (The
ViewBag.Linkcode in the account controller. See theDisplayEmailandForgotPasswordConfirmationaction methods and razor views ).Optional: Remove the
ViewBag.Statuscode from the Manage and Account controllers and from the Views\Account\VerifyCode.cshtml and Views\Manage\VerifyPhoneNumber.cshtml razor views. Alternatively, you can keep theViewBag.Statusdisplay to test how this app works locally without having to hook up and send email and SMS messages.
Note
Warning: If you change any of the security settings in this sample, productions apps will need to undergo a security audit that explicitly calls out the changes made.
Set up SMS for Two-factor authentication
This tutorial provides instructions for using either Twilio or ASPSMS but you can use any other SMS provider.
Creating a User Account with an SMS provider
Installing additional packages or adding service references
Twilio:
In the Package Manager Console, enter the following command:
Install-Package TwilioASPSMS:
The following service reference needs to be added: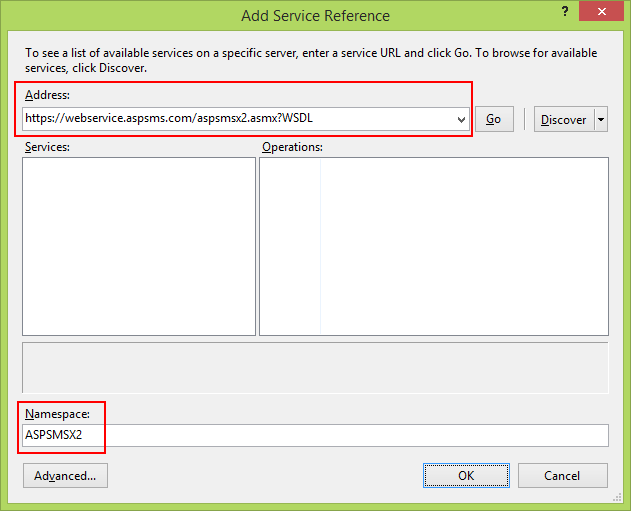
Address:
https://webservice.aspsms.com/aspsmsx2.asmx?WSDLNamespace:
ASPSMSX2Figuring out SMS Provider User credentials
Twilio:
From the Dashboard tab of your Twilio account, copy the Account SID and Auth token.ASPSMS:
From your account settings, navigate to Userkey and copy it together with your self-defined Password.We will later store these values in the variables
SMSAccountIdentificationandSMSAccountPassword.Specifying SenderID / Originator
Twilio:
From the Numbers tab, copy your Twilio phone number.ASPSMS:
Within the Unlock Originators Menu, unlock one or more Originators or choose an alphanumeric Originator (Not supported by all networks).We will later store this value in the variable
SMSAccountFrom.Transferring SMS provider credentials into app
Make the credentials and sender phone number available to the app:
public static class Keys
{
   public static string SMSAccountIdentification = "My Idenfitication";
   public static string SMSAccountPassword = "My Password";
   public static string SMSAccountFrom = "+15555551234";
}
Warning
Security - Never store sensitive data in your source code. The account and credentials are added to the code above to keep the sample simple. See Jon Atten's ASP.NET MVC: Keep Private Settings Out of Source Control.
Implementation of data transfer to SMS provider
Configure the
SmsServiceclass in the App_Start\IdentityConfig.cs file.Depending on the used SMS provider activate either the Twilio or the ASPSMS section:
public class SmsService : IIdentityMessageService
{
    public Task SendAsync(IdentityMessage message)
    {
        // Twilio Begin
        // var Twilio = new TwilioRestClient(
        //   Keys.SMSAccountIdentification,
        //   Keys.SMSAccountPassword);
        // var result = Twilio.SendMessage(
        //   Keys.SMSAccountFrom,
        //   message.Destination, message.Body
        // );
        // Status is one of Queued, Sending, Sent, Failed or null if the number is not valid
        // Trace.TraceInformation(result.Status);
        // Twilio doesn't currently have an async API, so return success.
        // return Task.FromResult(0);
        // Twilio End

        // ASPSMS Begin
        // var soapSms = new WebApplication1.ASPSMSX2.ASPSMSX2SoapClient("ASPSMSX2Soap");
        // soapSms.SendSimpleTextSMS(
        //   Keys.SMSAccountIdentification,
        //   Keys.SMSAccountPassword,
        //   message.Destination,
        //   Keys.SMSAccountFrom,
        //   message.Body);
        // soapSms.Close();
        // return Task.FromResult(0);
        // ASPSMS End
    }
}
Run the app and log in with the account you previously registered.
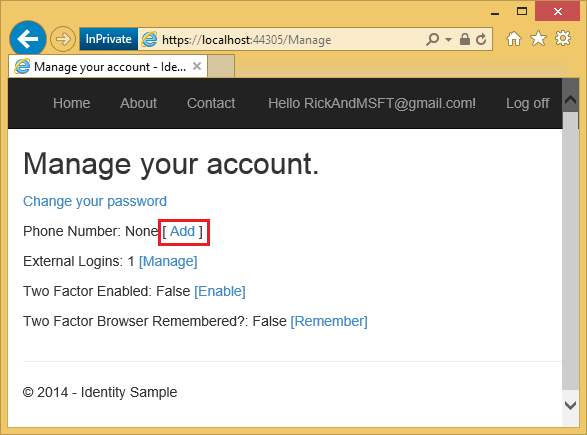
Click on your User ID, which activates the
Indexaction method inManagecontroller.
Click Add.
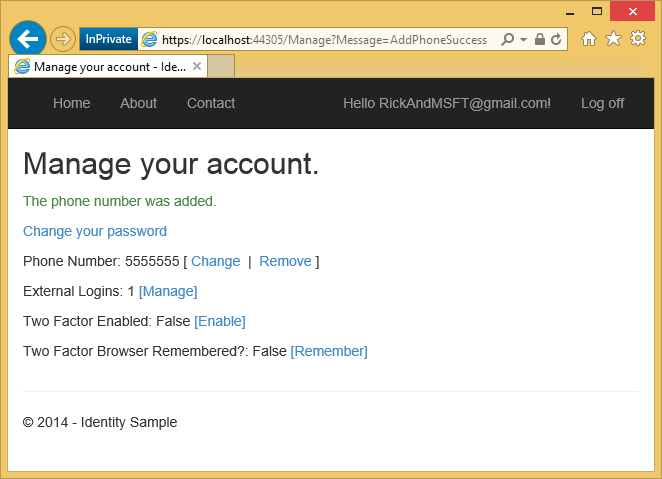
In a few seconds you will get a text message with the verification code. Enter it and press Submit.

The Manage view shows your phone number was added.
Examine the code
// GET: /Account/Index
public async Task<ActionResult> Index(ManageMessageId? message)
{
    ViewBag.StatusMessage =
        message == ManageMessageId.ChangePasswordSuccess ? "Your password has been changed."
        : message == ManageMessageId.SetPasswordSuccess ? "Your password has been set."
        : message == ManageMessageId.SetTwoFactorSuccess ? "Your two factor provider has been set."
        : message == ManageMessageId.Error ? "An error has occurred."
        : message == ManageMessageId.AddPhoneSuccess ? "The phone number was added."
        : message == ManageMessageId.RemovePhoneSuccess ? "Your phone number was removed."
        : "";

    var model = new IndexViewModel
    {
        HasPassword = HasPassword(),
        PhoneNumber = await UserManager.GetPhoneNumberAsync(User.Identity.GetUserId()),
        TwoFactor = await UserManager.GetTwoFactorEnabledAsync(User.Identity.GetUserId()),
        Logins = await UserManager.GetLoginsAsync(User.Identity.GetUserId()),
        BrowserRemembered = await AuthenticationManager.TwoFactorBrowserRememberedAsync(User.Identity.GetUserId())
    };
    return View(model);
}
The Index action method in Manage controller sets the status message based on your previous action and provides links to change your local password or add a local account. The Index method also displays the state or your 2FA phone number, external logins, 2FA enabled, and remember 2FA method for this browser(explained later). Clicking on your user ID (email) in the title bar doesn't pass a message. Clicking on the Phone Number : remove link passes Message=RemovePhoneSuccess as a query string.
https://localhost:44300/Manage?Message=RemovePhoneSuccess
[ ]
]
The AddPhoneNumber action method displays a dialog box to enter a phone number that can receive SMS messages.
// GET: /Account/AddPhoneNumber
public ActionResult AddPhoneNumber()
{
   return View();
}
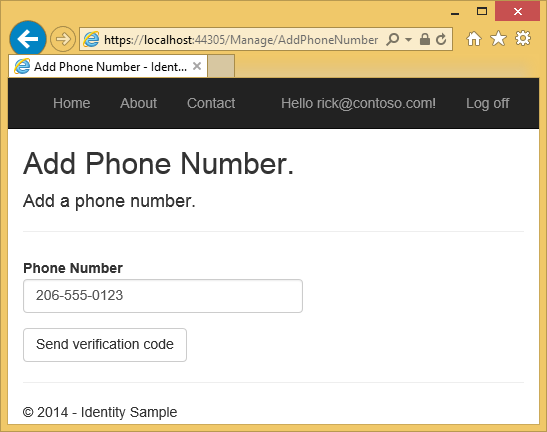
Clicking on the Send verification code button posts the phone number to the HTTP POST AddPhoneNumber action method.
// POST: /Account/AddPhoneNumber
[HttpPost]
[ValidateAntiForgeryToken]
public async Task<ActionResult> AddPhoneNumber(AddPhoneNumberViewModel model)
{
    if (!ModelState.IsValid)
    {
        return View(model);
    }

    // Generate the token
    var code = await UserManager.GenerateChangePhoneNumberTokenAsync(
                               User.Identity.GetUserId(), model.Number);
    if (UserManager.SmsService != null)
    {
        var message = new IdentityMessage
        {
            Destination = model.Number,
            Body = "Your security code is: " + code
        };
        // Send token
        await UserManager.SmsService.SendAsync(message);
    }
    return RedirectToAction("VerifyPhoneNumber", new { PhoneNumber = model.Number });
}
The GenerateChangePhoneNumberTokenAsync method generates the security token which will be set in the SMS message. If the SMS service has been configured, the token is sent as the string "Your security code is <token>". The SmsService.SendAsync method to is called asynchronously, then the app is redirected to the VerifyPhoneNumber action method (which displays the following dialog), where you can enter the verification code.
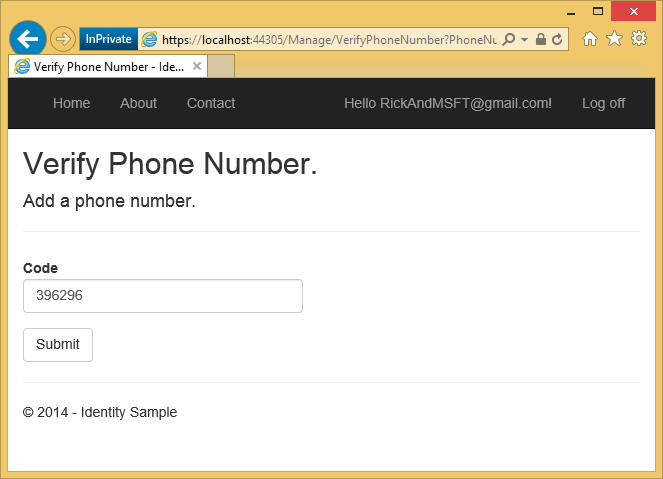
Once you enter the code and click submit, the code is posted to the HTTP POST VerifyPhoneNumber action method.
// POST: /Account/VerifyPhoneNumber
[HttpPost]
[ValidateAntiForgeryToken]
public async Task<ActionResult> VerifyPhoneNumber(VerifyPhoneNumberViewModel model)
{
    if (!ModelState.IsValid)
    {
        return View(model);
    }
    var result = await UserManager.ChangePhoneNumberAsync(User.Identity.GetUserId(), model.PhoneNumber, model.Code);
    if (result.Succeeded)
    {
        var user = await UserManager.FindByIdAsync(User.Identity.GetUserId());
        if (user != null)
        {
            await SignInAsync(user, isPersistent: false);
        }
        return RedirectToAction("Index", new { Message = ManageMessageId.AddPhoneSuccess });
    }
    // If we got this far, something failed, redisplay form
    ModelState.AddModelError("", "Failed to verify phone");
    return View(model);
}
The ChangePhoneNumberAsync method checks the posted security code. If the code is correct, the phone number is added to the PhoneNumber field of the AspNetUsers table. If that call is successful, the SignInAsync method is called:
private async Task SignInAsync(ApplicationUser user, bool isPersistent)
{
   // Clear the temporary cookies used for external and two factor sign ins
    AuthenticationManager.SignOut(DefaultAuthenticationTypes.ExternalCookie,
       DefaultAuthenticationTypes.TwoFactorCookie);
    AuthenticationManager.SignIn(new AuthenticationProperties
    {
       IsPersistent = isPersistent
    },
       await user.GenerateUserIdentityAsync(UserManager));
}
The isPersistent parameter sets whether the authentication session is persisted across multiple requests.
When you change your security profile, a new security stamp is generated and stored in the SecurityStamp field of the AspNetUsers table. Note, the SecurityStamp field is different from the security cookie. The security cookie is not stored in the AspNetUsers table (or anywhere else in the Identity DB). The security cookie token is self-signed using DPAPI and is created with the UserId, SecurityStamp and expiration time information.
The cookie middleware checks the cookie on each request. The SecurityStampValidator method in the Startup class hits the DB and checks security stamp periodically, as specified with the validateInterval. This only happens every 30 minutes (in our sample) unless you change your security profile. The 30 minute interval was chosen to minimize trips to the database.
The SignInAsync method needs to be called when any change is made to the security profile. When the security profile changes, the database is updates the SecurityStamp field, and without calling the SignInAsync method you would stay logged in only until the next time the OWIN pipeline hits the database (the validateInterval). You can test this by changing the SignInAsync method to return immediately, and setting the cookie validateInterval property from 30 minutes to 5 seconds:
private async Task SignInAsync(ApplicationUser user, bool isPersistent)
{
   return;

   // Clear any partial cookies from external or two factor partial sign ins
    AuthenticationManager.SignOut(DefaultAuthenticationTypes.ExternalCookie,
       DefaultAuthenticationTypes.TwoFactorCookie);
    AuthenticationManager.SignIn(new AuthenticationProperties
    {
       IsPersistent = isPersistent
    },
       await user.GenerateUserIdentityAsync(UserManager));
}
public void ConfigureAuth(IAppBuilder app) {
    // Configure the db context, user manager and role manager to use a single instance per request
    app.CreatePerOwinContext(ApplicationDbContext.Create);
    app.CreatePerOwinContext<ApplicationUserManager>(ApplicationUserManager.Create);
    app.CreatePerOwinContext<ApplicationRoleManager>(ApplicationRoleManager.Create);
    app.CreatePerOwinContext<ApplicationSignInManager>(ApplicationSignInManager.Create);

    // Enable the application to use a cookie to store information for the signed in user
    // and to use a cookie to temporarily store information about a user logging in with a
    // third party login provider
    // Configure the sign in cookie
    app.UseCookieAuthentication(new CookieAuthenticationOptions {
        AuthenticationType = DefaultAuthenticationTypes.ApplicationCookie,
        LoginPath = new PathString("/Account/Login"),
        Provider = new CookieAuthenticationProvider {
            // Enables the application to validate the security stamp when the user logs in.
            // This is a security feature which is used when you change a password or add
            // an external login to your account.
            OnValidateIdentity = SecurityStampValidator.OnValidateIdentity<ApplicationUserManager, ApplicationUser>(
                //validateInterval: TimeSpan.FromMinutes(30),
                validateInterval: TimeSpan.FromSeconds(5),
                regenerateIdentity: (manager, user) => user.GenerateUserIdentityAsync(manager))
        }
    });
    app.UseExternalSignInCookie(DefaultAuthenticationTypes.ExternalCookie);
With the above code changes, you can change your security profile (for example, by changing the state of Two Factor Enabled) and you will be logged out in 5 seconds when the SecurityStampValidator.OnValidateIdentity method fails. Remove the return line in the SignInAsync method, make another security profile change and you will not be logged out. The SignInAsync method generates a new security cookie.
Enable two-factor authentication
In the sample app, you need to use the UI to enable two-factor authentication (2FA). To enable 2FA, click on your user ID (email alias) in the navigation bar.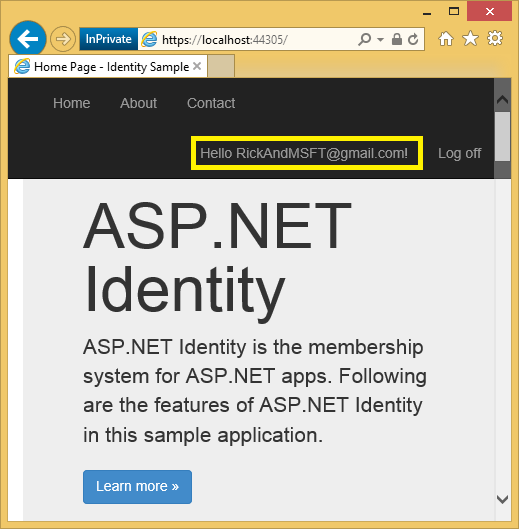
Click on enable 2FA.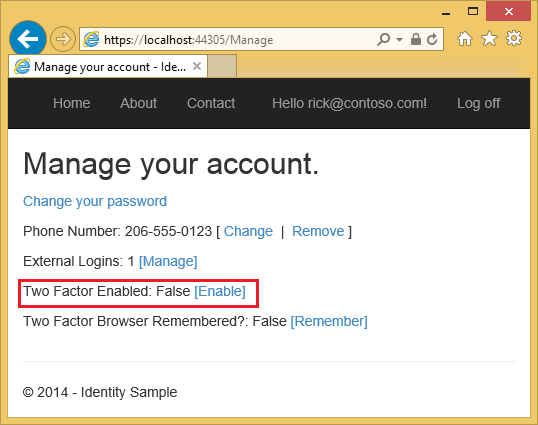 Log out, then log back in. If you've enabled email (see my previous tutorial), you can select the SMS or email for 2FA.
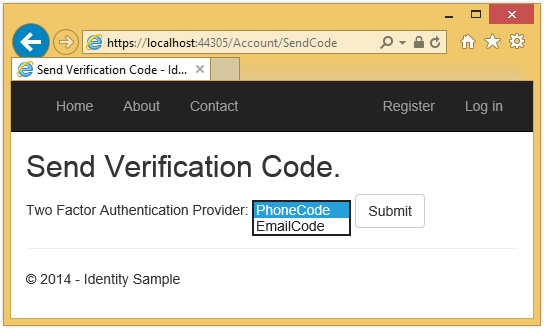 The Verify Code page is displayed where you can enter the code (from SMS or email).
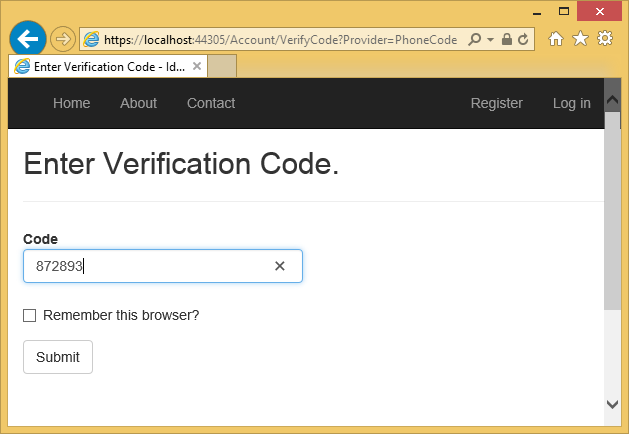 Clicking on the Remember this browser check box will exempt you from needing to use 2FA to log on with that computer and browser. Enabling 2FA and clicking on the Remember this browser will provide you with strong 2FA protection from malicious users trying to access your account, as long as they don't have access to your computer. You can do this on any private machine you regularly use. By setting Remember this browser, you get the added security of 2FA from computers you don't regularly use, and you get the convenience on not having to go through 2FA on your own computers.
How to register a Two-factor authentication provider
When you create a new MVC project, the IdentityConfig.cs file contains the following code to register a Two-factor authentication provider:
public static ApplicationUserManager Create(
   IdentityFactoryOptions<ApplicationUserManager> options,
   IOwinContext context)
{
    var manager = new ApplicationUserManager(
       new UserStore<ApplicationUser>(context.Get<ApplicationDbContext>()));
    // Configure validation logic for usernames
    manager.UserValidator = new UserValidator<ApplicationUser>(manager)
    {
        AllowOnlyAlphanumericUserNames = false,
        RequireUniqueEmail = true
    };
    // Configure validation logic for passwords
    manager.PasswordValidator = new PasswordValidator
    {
        RequiredLength = 6,
        RequireNonLetterOrDigit = true,
        RequireDigit = true,
        RequireLowercase = true,
        RequireUppercase = true,
    };
    // Register two factor authentication providers. This application uses Phone and Emails as a
    // step of receiving a code for verifying the user
    // You can write your own provider and plug it in here.
    manager.RegisterTwoFactorProvider("PhoneCode", new PhoneNumberTokenProvider<ApplicationUser>
    {
        MessageFormat = "Your security code is: {0}"
    });
    manager.RegisterTwoFactorProvider("EmailCode", new EmailTokenProvider<ApplicationUser>
    {
        Subject = "Security Code",
        BodyFormat = "Your security code is: {0}"
    });
    manager.EmailService = new EmailService();
    manager.SmsService = new SmsService();

    var dataProtectionProvider = options.DataProtectionProvider;
    if (dataProtectionProvider != null)
    {
        manager.UserTokenProvider = new DataProtectorTokenProvider<ApplicationUser>
           (dataProtectionProvider.Create("ASP.NET Identity"));
    }
    return manager;
}
Add a phone number for 2FA
The AddPhoneNumber action method in the Manage controller generates a security token and sends it to the phone number you have provided.
[HttpPost]
[ValidateAntiForgeryToken]
public async Task<ActionResult> AddPhoneNumber(AddPhoneNumberViewModel model)
{
    if (!ModelState.IsValid)
    {
        return View(model);
    }
    // Generate the token and send it
    var code = await UserManager.GenerateChangePhoneNumberTokenAsync(
       User.Identity.GetUserId(), model.Number);
    if (UserManager.SmsService != null)
    {
        var message = new IdentityMessage
        {
            Destination = model.Number,
            Body = "Your security code is: " + code
        };
        await UserManager.SmsService.SendAsync(message);
    }
    return RedirectToAction("VerifyPhoneNumber", new { PhoneNumber = model.Number });
}
After sending the token, it redirects to the VerifyPhoneNumber action method, where you can enter the code to register SMS for 2FA. SMS 2FA is not used until you have verified the phone number.
Enabling 2FA
The EnableTFA action method enables 2FA:
// POST: /Manage/EnableTFA
[HttpPost]
public async Task<ActionResult> EnableTFA()
{
    await UserManager.SetTwoFactorEnabledAsync(User.Identity.GetUserId(), true);
    var user = await UserManager.FindByIdAsync(User.Identity.GetUserId());
    if (user != null)
    {
        await SignInAsync(user, isPersistent: false);
    }
    return RedirectToAction("Index", "Manage");
}
Note the SignInAsync must be called because enable 2FA is a change to the security profile. When 2FA is enabled, the user will need to use 2FA to log in, using the 2FA approaches they have registered (SMS and email in the sample).
You can add more 2FA providers such as QR code generators or you can write your own.
Note
The 2FA codes are generated using Time-based One-time Password Algorithm and codes are valid for six minutes. If you take more than six minutes to enter the code, you'll get an Invalid code error message.
Combine social and local login accounts
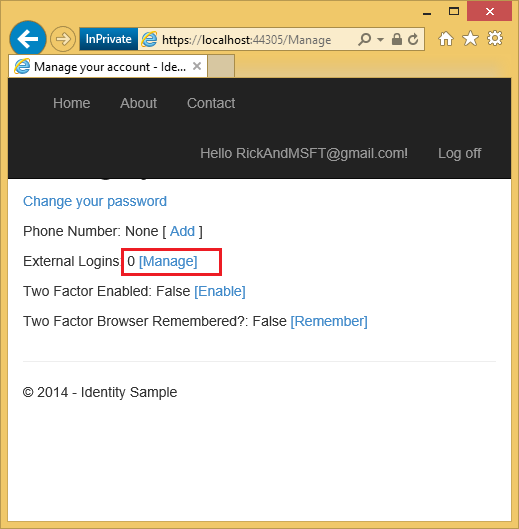
You can combine local and social accounts by clicking on your email link. In the following sequence "RickAndMSFT@gmail.com" is first created as a local login, but you can create the account as a social log in first, then add a local login.

Click on the Manage link. Note the 0 external (social logins) associated with this account.
Click the link to another log in service and accept the app requests. The two accounts have been combined, you will be able to log on with either account. You might want your users to add local accounts in case their social log in authentication service is down, or more likely they have lost access to their social account.
In the following image, Tom is a social log in (which you can see from the External Logins: 1 shown on the page).
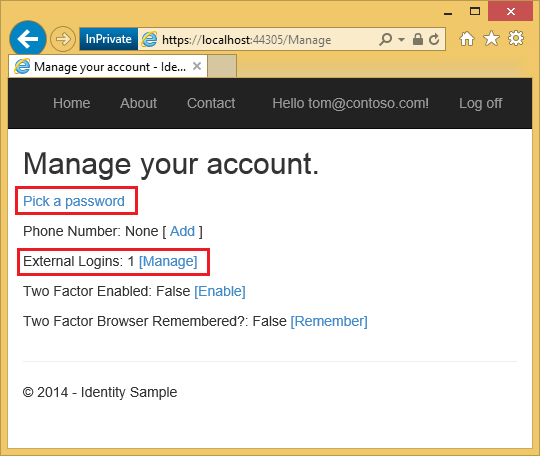
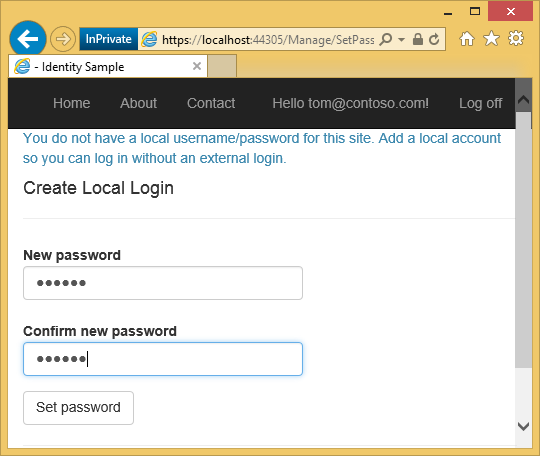
Clicking on Pick a password allows you to add a local log on associated with the same account.
Account lockout from brute force attacks
You can protect the accounts on your app from dictionary attacks by enabling user lockout. The following code in the ApplicationUserManager Create method configures lock out:
// Configure user lockout defaults
manager.UserLockoutEnabledByDefault = true;
manager.DefaultAccountLockoutTimeSpan = TimeSpan.FromMinutes(5);
manager.MaxFailedAccessAttemptsBeforeLockout = 5;
The code above enables lockout for two factor authentication only. While you can enable lock out for logins by changing shouldLockout to true in the Login method of the account controller, we recommend you not enable lock out for logins because it makes the account susceptible to DOS login attacks. In the sample code, lockout is disabled for the admin account created in the ApplicationDbInitializer Seed method:
public static void InitializeIdentityForEF(ApplicationDbContext db)
{
    var userManager = HttpContext.Current.GetOwinContext().GetUserManager<ApplicationUserManager>();
    var roleManager = HttpContext.Current.GetOwinContext().Get<ApplicationRoleManager>();
    const string name = "admin@example.com";
    const string roleName = "Admin";

    //Create Role Admin if it does not exist
    var role = roleManager.FindByName(roleName);
    if (role == null)
    {
        role = new IdentityRole(roleName);
        var roleresult = roleManager.Create(role);
    }

    var user = userManager.FindByName(name);
    if (user == null)
    {
        user = new ApplicationUser { UserName = name, Email = name };
        var result = userManager.Create(user, GetSecurePassword());
        result = userManager.SetLockoutEnabled(user.Id, false);
    }

    // Add user admin to Role Admin if not already added
    var rolesForUser = userManager.GetRoles(user.Id);
    if (!rolesForUser.Contains(role.Name))
    {
        var result = userManager.AddToRole(user.Id, role.Name);
    }
}
Requiring a user to have a validated email account
The following code requires a user to have a validated email account before they can log in:
public async Task<ActionResult> Login(LoginViewModel model, string returnUrl)
{
    if (!ModelState.IsValid)
    {
        return View(model);
    }

   // Require the user to have a confirmed email before they can log on.
    var user = await UserManager.FindByNameAsync(model.Email);
    if (user != null)
    {
       if (!await UserManager.IsEmailConfirmedAsync(user.Id))
       {
          ViewBag.errorMessage = "You must have a confirmed email to log on.";
          return View("Error");
       }
    }
    // This doen't count login failures towards lockout only two factor authentication
    // To enable password failures to trigger lockout, change to shouldLockout: true
    var result = await SignInManager.PasswordSignInAsync(model.Email, model.Password,
       model.RememberMe, shouldLockout: false);
    switch (result)
    {
        case SignInStatus.Success:
            return RedirectToLocal(returnUrl);
        case SignInStatus.LockedOut:
            return View("Lockout");
        case SignInStatus.RequiresVerification:
            return RedirectToAction("SendCode", new { ReturnUrl = returnUrl });
        case SignInStatus.Failure:
        default:
            ModelState.AddModelError("", "Invalid login attempt.");
            return View(model);
    }
}
How SignInManager checks for 2FA requirement
Both the local log in and social log in check to see if 2FA is enabled. If 2FA is enabled, the SignInManager logon method returns SignInStatus.RequiresVerification, and the user will be redirected to the SendCode action method, where they will have to enter the code to complete the log in sequence. If the user has RememberMe is set on the users local cookie, the SignInManager will return SignInStatus.Success and they will not have to go through 2FA.
public async Task<ActionResult> Login(LoginViewModel model, string returnUrl)
{
    if (!ModelState.IsValid)
    {
        return View(model);
    }

   // Require the user to have a confirmed email before they can log on.
    var user = await UserManager.FindByNameAsync(model.Email);
    if (user != null)
    {
       if (!await UserManager.IsEmailConfirmedAsync(user.Id))
       {
          ViewBag.errorMessage = "You must have a confirmed email to log on.";
          return View("Error");
       }
    }
    // This doen't count login failures towards lockout only two factor authentication
    // To enable password failures to trigger lockout, change to shouldLockout: true
    var result = await SignInManager.PasswordSignInAsync(model.Email, model.Password,
       model.RememberMe, shouldLockout: false);
    switch (result)
    {
        case SignInStatus.Success:
            return RedirectToLocal(returnUrl);
        case SignInStatus.LockedOut:
            return View("Lockout");
        case SignInStatus.RequiresVerification:
            return RedirectToAction("SendCode", new { ReturnUrl = returnUrl });
        case SignInStatus.Failure:
        default:
            ModelState.AddModelError("", "Invalid login attempt.");
            return View(model);
    }
}
public async Task<ActionResult> ExternalLoginCallback(string returnUrl)
{
    var loginInfo = await AuthenticationManager.GetExternalLoginInfoAsync();
    if (loginInfo == null)
    {
        return RedirectToAction("Login");
    }

    // Sign in the user with this external login provider if the user already has a login
    var result = await SignInManager.ExternalSignInAsync(loginInfo, isPersistent: false);
    switch (result)
    {
        case SignInStatus.Success:
            return RedirectToLocal(returnUrl);
        case SignInStatus.LockedOut:
            return View("Lockout");
        case SignInStatus.RequiresVerification:
            return RedirectToAction("SendCode", new { ReturnUrl = returnUrl });
        case SignInStatus.Failure:
        default:
            // If the user does not have an account, then prompt the user to create an account
            ViewBag.ReturnUrl = returnUrl;
            ViewBag.LoginProvider = loginInfo.Login.LoginProvider;
            return View("ExternalLoginConfirmation", new ExternalLoginConfirmationViewModel { Email = loginInfo.Email });
    }
}
The following code shows the SendCode action method. A SelectListItem is created with all the 2FA methods enabled for the user. The SelectListItem is passed to the DropDownListFor helper, which allows the user to select the 2FA approach (typically email and SMS).
public async Task<ActionResult> SendCode(string returnUrl)
{
    var userId = await SignInManager.GetVerifiedUserIdAsync();
    if (userId == null)
    {
        return View("Error");
    }
    var userFactors = await UserManager.GetValidTwoFactorProvidersAsync(userId);
    var factorOptions = userFactors.Select(purpose => new SelectListItem { Text = purpose, Value = purpose }).ToList();
    return View(new SendCodeViewModel { Providers = factorOptions, ReturnUrl = returnUrl });
}
Once the user posts the 2FA approach, the HTTP POST SendCode action method is called, the SignInManager sends the 2FA code, and the user is redirected to the VerifyCode action method where they can enter the code to complete the log in.
//
// POST: /Account/SendCode
[HttpPost]
[AllowAnonymous]
[ValidateAntiForgeryToken]
public async Task<ActionResult> SendCode(SendCodeViewModel model)
{
    if (!ModelState.IsValid)
    {
        return View();
    }

    // Generate the token and send it
    if (!await SignInManager.SendTwoFactorCodeAsync(model.SelectedProvider))
    {
        return View("Error");
    }
    return RedirectToAction("VerifyCode", new { Provider = model.SelectedProvider, ReturnUrl = model.ReturnUrl });
}
2FA Lockout
Although you can set account lockout on login password attempt failures, that approach makes your login susceptible to DOS lockouts. We recommend you use account lockout only with 2FA. When the ApplicationUserManager is created, the sample code sets 2FA lockout and MaxFailedAccessAttemptsBeforeLockout to five. Once a user logs in (through local account or social account), each failed attempt at 2FA is stored, and if the maximum attempts is reached, the user is locked out for five minutes (you can set the lock out time with DefaultAccountLockoutTimeSpan).
Additional Resources
- ASP.NET Identity Recommended Resources Complete list of Identity blogs, videos, tutorials and great SO links.
- MVC 5 App with Facebook, Twitter, LinkedIn and Google OAuth2 Sign-on also shows how to add profile information to the users table.
- ASP.NET MVC and Identity 2.0: Understanding the Basics by John Atten.
- Account Confirmation and Password Recovery with ASP.NET Identity
- Introduction to ASP.NET Identity
- Announcing RTM of ASP.NET Identity 2.0.0 by Pranav Rastogi.
- ASP.NET Identity 2.0: Setting Up Account Validation and Two-Factor Authorization by John Atten.
Feedback
Coming soon: Throughout 2024 we will be phasing out GitHub Issues as the feedback mechanism for content and replacing it with a new feedback system. For more information see: https://aka.ms/ContentUserFeedback.
Submit and view feedback for