Connect your Azure Databricks workspace to your on-premises network
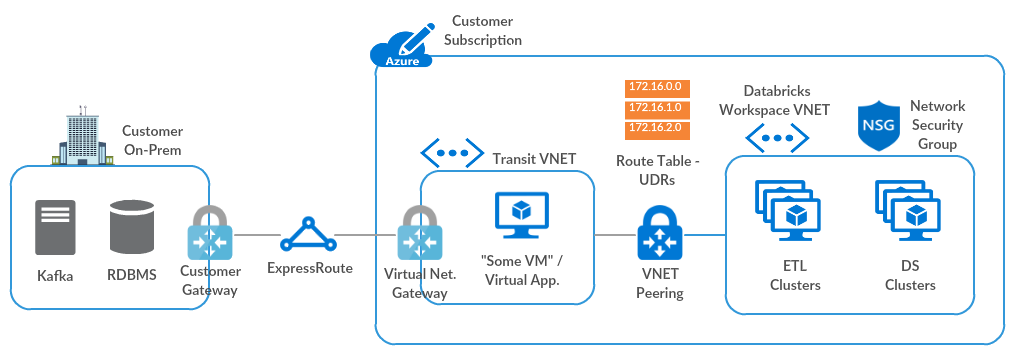
This article shows how to establish connectivity from your Azure Databricks workspace to your on-premises network. Traffic is routed via a transit virtual network (VNet) to the on-premises network, using the following hub-and-spoke topology.
If you need assistance following this guide, contact your Microsoft and Databricks account teams.
Requirements
Your Azure Databricks workspace must be deployed in your own virtual network, also known as VNet injection.
Step 1: Set up a transit virtual network with Azure Virtual Network Gateway
You need an Azure Virtual Network Gateway (ExpressRoute or VPN) in a transit VNet, configured using one of these methods. If you already have an appropriate gateway, skip to Peer the Azure Databricks virtual network with the transit virtual network.
If you already have ExpressRoute set up between your on-premises network and Azure, follow the procedure in Configure a virtual network gateway for ExpressRoute using the Azure portal.
Otherwise, follow steps 1-5 in Configure a VNet-to-VNet VPN gateway connection by using the Azure portal.
If you need assistance, contact your Microsoft account team.
Step 2: Peer the Azure Databricks virtual network with the transit virtual network
If your Azure Databricks workspace is in the same VNet as the Virtual Network Gateway, skip to Create user-defined routes and associate them with your Azure Databricks virtual network subnets.
Otherwise, follow the instructions in Peer virtual networks to peer the Azure Databricks VNet to the transit VNet, selecting the following options:
- Use Remote Gateways on the Azure Databricks VNet side.
- Allow Gateway Transit on the Transit VNet side.
For details, see Create a peering.
Note
If your on-premises network connection to Azure Databricks does not work with the above settings, you can also select the Allow Forwarded Traffic option on both sides of the peering to resolve the issue.
For information about configuring VPN gateway transit for virtual network peering, see Configure VPN gateway transit for virtual network peering.
Step 3: Create user-defined routes and associate them with your Azure Databricks virtual network subnets
After you peer the Azure Databricks VNet with the transit VNet, Azure automatically configures all routes using the transit VNet. The automatic configuration doesn’t include the return route from cluster nodes to the Azure Databricks control plane. You must create these custom routes manually, using user-defined routes.
Create a route table, enabling BGP route propagation.
Note
In some cases, BGP route propagation causes failures when validating the on-premises network connection setup. As a last resort, you can disable BGP route propagation.
Add user-defined routes for the following services, using the instructions in Custom routes.
If secure cluster connectivity (SCC) is enabled for the workspace, use the SCC relay IP rather than the control plane NAT IP.
Source Address prefix Next hop type Default Control plane NAT IP
(Only if SCC is disabled)Internet Default SCC relay IP
(Only if SCC is enabled)Internet Default Webapp IP Internet Default Extended infrastructure IP Internet Default Metastore IP Internet Default Artifact Blob storage IP Internet Default Log Blob storage IP Internet Default DBFS root storage IP (ADLS) Internet Default DBFS root storage IP (Blob) for workspaces created before March 6, 2023. Internet To get the IP addresses for each of these services, follow the instructions in User-defined route settings for Azure Databricks.
If the IP-based route fails when validating the setup, you can create a service endpoint for Microsoft.Storage to route all DBFS root storage traffic through the Azure backbone. If you use this approach, you don’t need to create user-defined routes for DBFS root storage.
Note
To access other PaaS Azure data services, such as Cosmos DB or Azure Synapse Analytics, from Azure Databricks, you must add user-defined routes for those services to the route table. Resolve each endpoint to its IP address using
nslookupor an equivalent command.Associate the route table with your Azure Databricks VNet public and private subnets, using the instructions in Associate a route table to a subnet.
After the custom route table is associated with your Azure Databricks VNet subnets, you don’t need to edit the outbound security rules in the network security group. For example, you don’t need to make the outbound rule more specific, because the routes will control the actual egress.
Step 4: Validate the setup
To validate the setup:
Create a cluster in your Azure Databricks workspace.
If creating a cluster fails, go through the setup instructions, trying the alternate configuration options one by one.
If you still can’t create a cluster, verify that the route table includes all required user-defined routes. If you used service endpoints rather than user-defined routes for ADLS gen2 (for workspaces created before March 6, 2023, Azure Blob Storage), check those endpoints as well.
If you still can’t create a cluster, contact your Microsoft and Databricks account teams for assistance.
Ping an on-premises IP from a notebook using the following command:
%sh
ping <IP>
For more guidance with troubleshooting, see these resources:
Optional configuration steps
Option: Route Azure Databricks traffic using a virtual appliance or firewall
You can filter all outgoing traffic from Azure Databricks cluster nodes using a firewall or DLP appliance, such as Azure Firewall, Palo Alto, or Barracuda. This allows you to inspect outgoing traffic to satisfy security policies, and to add a single NAT-like public IP or CIDR for all clusters to an allow list.
Adjust these steps as needed for your firewall or DLP appliance:
Set up a virtual appliance or firewall within the transit VNet, using the instructions in Create an NVA.
If you need a single firewall configuration for multiple workspaces, you can create the firewall in a secure or DMZ subnet within the Azure Databricks VNet, which is separate from existing private and public subnets.
Create an additional route in the custom route table to 0.0.0.0/0.
Set the Next hop type to “Virtual Appliance”.
Set the Next hop address.
Don’t remove the routes you created in Step 3: Create user-defined routes and associate them with your Azure Databricks virtual network subnets, with one exception: If all Blob traffic needs to be routed through the firewall, you can remove the routes for Blob traffic.
If you use the secure or DMZ subnet approach, you can create an additional route table associated solely with the DMZ subnet. In that route table, create a route to 0.0.0.0.
Set that route’s Next hop type to Internet if traffic is destined for a public network, or to Virtual Network Gateway if traffic is destined for an on-premises network.
Configure allow and deny rules in the firewall appliance.
If you removed the routes for Blob storage, add those routes to the allow list in the firewall.
If your clusters depend on public repositories, such as operating system repositories or container registries, add those to the allow list.
For information about allow lists, see User-defined route settings for Azure Databricks.
Option: Configure custom DNS
You can use custom DNS with Azure Databricks workspaces deployed in your own virtual network. See the following Microsoft articles for more information about how to configure custom DNS for an Azure virtual network:
.. important: To resolve the IP addresses for Azure artifacts, you must configure your custom DNS to forward these requests to the Azure recursive resolver.
Feedback
Coming soon: Throughout 2024 we will be phasing out GitHub Issues as the feedback mechanism for content and replacing it with a new feedback system. For more information see: https://aka.ms/ContentUserFeedback.
Submit and view feedback for