Replicate data to Azure SQL Database using Data Export Service
Note
Effective November 2021, Data Export Service was deprecated. Data Export Service will continue to work and will be fully supported until it reaches end-of-support and end-of-life in November 2022. More information: https://aka.ms/DESDeprecationBlog
The Data Export Service is an add-on service made available on Microsoft AppSource that adds the ability to replicate data from Microsoft Dataverse database to a Azure SQL Database store in a customer-owned Azure subscription. The supported target destinations are Azure SQL Database and SQL Server on Azure virtual machines. The Data Export Service intelligently synchronizes the entire data initially and thereafter synchronizes on a continuous basis as changes occur (delta changes) in the system. This helps enable several analytics and reporting scenarios on top of data with Azure data and analytics services, and opens up new possibilities for customers and partners to build custom solutions.
Note
It is highly encouraged that you export your Dataverse data to Azure Synapse Analytics and/or Azure Data Lake Gen2 with Azure Synapse Link for Dataverse. More information: Accelerate time to insight with Azure Synapse Link for Dataverse
You can use the Data Export Service with customer engagement apps (Dynamics 365 Sales, Dynamics 365 Customer Service, Dynamics 365 Field Service, Dynamics 365 Marketing, and Dynamics 365 Project Service Automation).
For information about the programmatic interface for managing configuration and administration of the Data Export Service, see Data Export Service in the developer guide.
Prerequisites for using Data Export Service
To start using the Data Export Service, the following prerequisites are required.
Azure SQL Database service
A customer owned Azure SQL Database subscription. This subscription must allow the volume of data that is synchronized.
Firewall settings. We recommend that you turn off Allow access to Azure services and specify the appropriate client IP addresses listed in this topic. More information: Azure SQL database static IP addresses used by the Data Export Service
Alternatively, you can turn on Allow access to Azure services to allow all Azure services access.
For SQL Server on Azure VM, the "Connect to SQL Server over the Internet" option should be enabled. More information: Azure: Connect to a SQL Server Virtual Machine on Azure
Additionally, configure your firewall rules to allow communication between Data Export Service and SQL Server.
The database user must have permissions at the database and schema level according to the following tables. The database user is used in the data export connection string.
Database permissions required.
Permission type code Permission name CRTB CREATE TABLE CRTY CREATE TYPE CRVW CREATE VIEW CRPR CREATE PROCEDURE ALUS ALTER ANY USER VWDS VIEW DATABASE STATE Schema permissions required.
Permission type code Permission name AL ALTER IN INSERT DL DELETE SL SELECT UP UPDATE EX EXECUTE RF REFERENCES
Azure Key Vault service
Customer owned Key Vault subscription, which is used to securely maintain the database connection string.
Grant PermissionsToSecrets permission to the application with the id "b861dbcc-a7ef-4219-a005-0e4de4ea7dcf." This can be completed by running the AzurePowerShell command below and is used to access the Key Vault that contains the connection string secret. More information: How to set up Azure Key Vault
Secrets within the Key Vault should be tagged with the organization (OrgId) and tenant ids (TenantId). This can be completed by running the AzurePowerShell command below. More information: How to set up Azure Key Vault
Configure your firewall rules to allow communication between Data Export Service and Azure Key Vault.
Customer engagement apps
A version 9.0 or later version environment.
The Data Export Service solution must be installed.
- Go to Settings > Microsoft Appsource > search or browse to Microsoft Dynamics 365 - Data Export Service, and then select Get it now.
- Or, find it on Microsoft AppSource.
The entities that will be added to the Export Profile must be enabled with change tracking. To ensure a standard or custom entity can be synchronized go to Customization > Customize the System, and then select the entity. On the General tab make sure the Change Tracking option under the Data Services section is enabled.
You must have the System Administrator security role in the environment.
Web browser
Enable pop-ups for the domain https://discovery.crmreplication.azure.net/ in your web browser. This is required for auto-sign in when you navigate to Settings > Data Export.
Services, credentials, and privileges required
To use the Data Export Service feature, you must have the following services, credentials, and privileges.
A subscription. Only users that are assigned the System Administrator security role can set up or make changes to an Export Profile.
Azure subscription that includes the following services.
Azure SQL Database or AzureSQL Server on Azure virtual machines.
Azure Key Vault.
Important
To use the Data Export Service the customer engagement apps and Azure Key Vault services must operate under the same tenant and within the same Microsoft Entra ID. More information: Azure integration with Microsoft 365
The Azure SQL Database service can be in the same or a different tenant from the service.
What you should know before using the Data Export Service
Export Profiles must be deleted and then re-created whenever you perform any of the following actions on an environment.
- Restore an environment.
- Copy (either full or minimal) an environment.
- Reset an environment.
- Move an environment to a different country or region.
To do this, delete the Export Profile in the EXPORT PROFILES view, then delete the tables and stored procedures, and then create a new profile. More information: How to delete all Data Export Profile tables and stored procedures
The Data Export Service doesn't work for sandbox or production environments that are configured with Enable administration mode turned on. More information: Administration mode
The Data Export Service does not drop (delete) the associated tables, columns, or stored procedure objects in the destination Azure SQL database when the following actions occur.
An entity is deleted.
A field is deleted.
An entity is removed from an Export Profile.
These items must be dropped manually. How to delete Data Export Profile tables and stored procedures for a specific entity Metadata delete notifications are logged in the unprocessablemessages folder. Error handling and monitoring
Export Profile
To export data from customer engagement apps, the administrator creates an Export Profile. Multiple profiles can be created and activated to synchronize data to different destination databases simultaneously.
The Export Profile is the core concept of the Data Export Service. The Export Profile gathers set up and configuration information to synchronize data with the destination database. As part of the Export Profile, the administrator provides a list of entities to be exported to the destination database. Once activated, the Export Profile starts the automatic synchronization of data. Initially, all data that corresponds to each selected entity is exported. Thereafter, only the changes to data as they occur to the entity records or metadata in customer engagement apps are synchronized continuously using a push mechanism in near real time. Therefore, you don't need to set up a schedule to retrieve data from customer engagement apps.
Only entities that have change tracking enabled can be added to the Export Profile. Notice that, most of the standard entities which capture data are change tracking enabled. Custom entities must be explicitly enabled for change tracking before you can add them to an Export Profile. More information: Enable change tracking to control data synchronization
The Data Export Service does both metadata and data synchronization. Each entity translates into one table, and each field translates into a column in the destination database table. Table and column names use the schema name of the metadata.
Once activated, an Export Profile gathers statistics for data synchronization that helps in operational visibility and diagnostics of the data exported.
Data synchronization available with an Export Profile
| Category | Feature | Supported data types |
|---|---|---|
| Initial Sync | Metadata - Basic Data Types | Whole Number, Floating Point Number, Decimal Number, Single Line of Text, Multi Line of Text, Date and Time data types. |
| Initial Sync | Metadata - Advanced Data Types | Currency, PartyList, Option Set, Status, Status Reason, Lookup (including Customer and Regarding type lookup). PartyList is only available for export version 8.1 and above. |
| Initial Sync | Data - Basic Types | All basic data types. |
| Initial Sync | Data - Advanced Types | All advanced data types. |
| Delta Sync | Modify Schema - Basic Types | Add or modify field change, all basic data types. |
| Delta Sync | Modify Schema - Advanced Types | Add or modify field change, all advanced data types. |
| Delta Sync | Modify Data - Basic Types | All basic data types. |
| Delta Sync | Modify Data - Advanced Types | All advanced data types, such as PartyList. |
Create an Export Profile
Ensure that following requirements are met before creating an Export Profile.
The Data Export Service solution is installed in your environment.
Maintain the SQL Database connection string in the Key Vault and copy the Key Vault URL to provide in the Export Profile. More information: Azure: Get started with Azure Key Vault
The entities to be added to the Export Profile are enabled for change tracking. More information: Enable change tracking to control data synchronization
Your SQL Database service has enough storage space to store the data.
You are a System Administrator in the environment.
Go to Settings > Data Export.
Review the notice, and select Continue or Cancel if you don't want to export data.
Select New to create a new Export Profile.
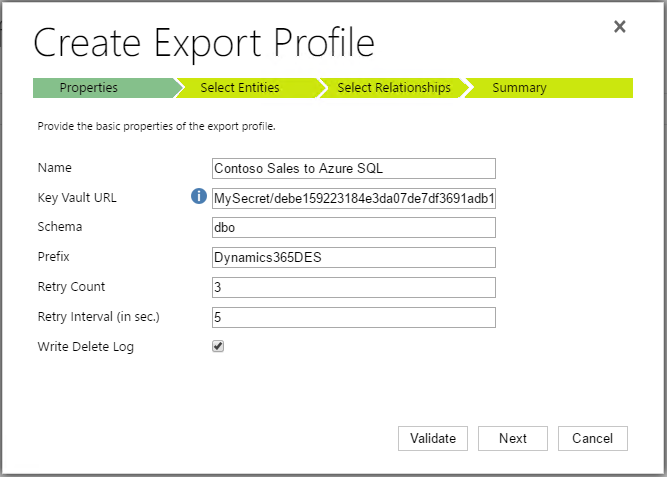
In the Properties step, enter the following information, and then select Next to continue without connecting to the Key Vault. Selecting Validate uses the Key Vault URL you provided to connect to the Key Vault.
Name. Unique name of the profile. This field is mandatory.
Key Vault Connection URL. Key Vault URL pointing to the connection string stored with credentials used to connect to the destination database. This field is mandatory. More information: How to set up Azure Key Vault
Important
The Key Vault Connection URL is case-sensitive. Enter the Key Vault Connection URL exactly as it is displayed after you run the Windows PowerShell commands in this topic.
Schema. Name for an alternative database schema. Only alphanumeric characters are valid. This field is optional. By default, dbo is the schema that is used for the destination SQL Database.
Prefix. Prefix to be used for the table names created in the destination database. This helps you easily identify the tables created for the Export Profile in the destination database. When specified, make sure that the prefix is less than 15 characters. This field is optional and only alphanumeric characters are allowed.
Retry count. The number of times a record is retried in case of a failure to insert or update in the destination table. This field is mandatory. Acceptable values are 0-20 and the default is 12.
Retry interval. The number of seconds to wait before a retry in case of a failure. This field is mandatory. Acceptable values are 0-3600 and the default is 5.
Write Delete Log. Optional setting for logging deleted records.
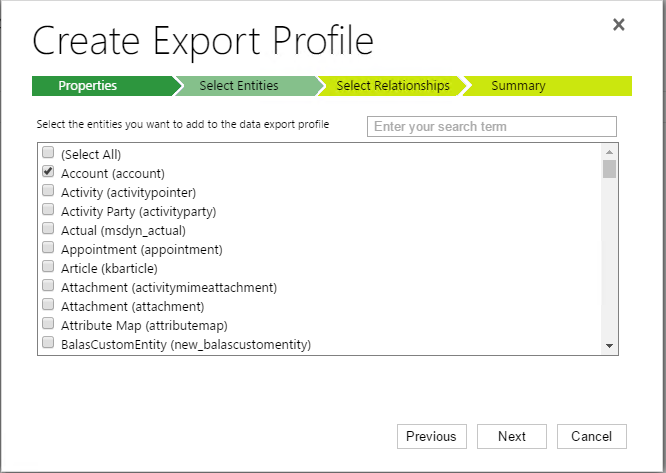
In the Select Entities step, select the entities that you want to export to the destination SQL Database, and then select Next.
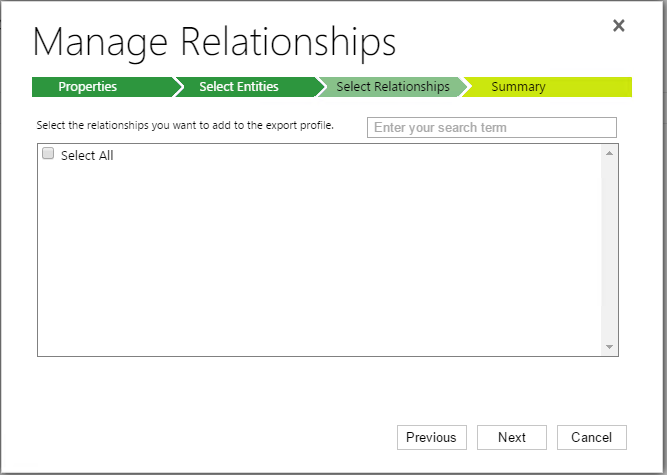
In the Select Relationships step, you can synchronize the M:N (many-to-many) relationships that exist with the entities you selected in the previous step. Select Next.
In the Summary step, select Create and Activate to create the profile record and connect to the Key Vault, which begins the synchronization process. Otherwise, select Create to save the Export Profile and activate later.

Modify an existing Export Profile
You can add or remove the entities and relationships in an existing Export Profile that you want to replicate.
Go to Settings > Data Export.
In the All Data Export Profile view, select the Export Profile that you want to change.

On the Actions toolbar, select MANAGE ENTITIES to add or remove entities for data export. To add or remove entity relationships, select MANAGE RELATIONSHIPS.

Select the entities or entity relationships that you want to add or remove.
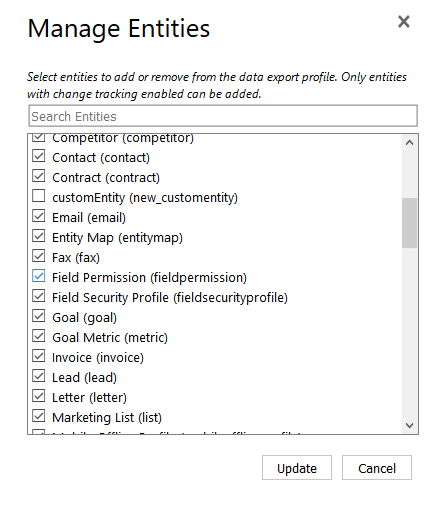
Select Update to submit your changes to the Export Profile.
Important
When you remove an entity or entity relationship from an Export Profile it doesn't drop the corresponding table in the destination database. Before you can re-add an entity that has been removed, you must drop the corresponding table in the destination database. To drop an entity table, see How to delete Data Export Profile tables and stored procedures for a specific entity.
Table details for the destination Azure SQL Database
The Data Export Service creates tables for both data and metadata. A table is created for each entity and M:N relationship that is synchronized.
Once an Export Profile is activated, these tables are created in the destination database. These are system tables and will not have the SinkCreatedTime and SinkModifiedTime fields added.
| Table name | Created |
|---|---|
| <Prefix>_GlobalOptionsetMetadata | Upon Export Profile activation. |
| <Prefix>_OptionsetMetadata | Upon Export Profile activation. |
| <Prefix>_StateMetadata | Upon Export Profile activation. |
| <Prefix>_StatusMetadata | Upon Export Profile activation. |
| <Prefix>_TargetMetadata | Upon Export Profile activation. |
| <Prefix>_AttributeMetadata | Upon Export Profile activation. |
| <Prefix>_DeleteLog | Upon Export Profile activation when the delete log option is enabled. |
Resolving synchronization issues
Even after several retry attempts, record synchronization failures may occur from database storage constraints or table locking due to long running queries. To resolve these failures you can force a resynchronization of only failed records or a resynchronization of all records.
View your export profiles to look for any that have record synchronization failures. You do this by viewing the data profiles in the Synchronization area or by opening a Export Profile , such as this profile that has a contact entity record synchronization failure.

Examine the source of the synchronization failure and resolve it. More information: Error handling and monitoring
After the problem has been resolved, resynchronize the failed records.
Note
Failed records synchronization is a public preview feature.
- Preview features aren’t meant for production use and may have restricted functionality. These features are available before an official release so that customers can get early access and provide feedback.
- We expect changes to this feature, so you shouldn’t use it in production. Use it only in test and development environments.
- Microsoft doesn't provide support for this preview feature. Microsoft Dynamics 365 Technical Support won’t be able to help you with issues or questions. Preview features aren't meant for production use and are subject to a separate supplemental terms of use.
Sign in to your environment and go to Settings > Data Export.
Open the Export Profile that includes record synch failures.
On the Export Profile toolbar, select RESYNC FAILED RECORDS.
Select Ok upon successful resynchronization of the failed records on the confirmation dialog.

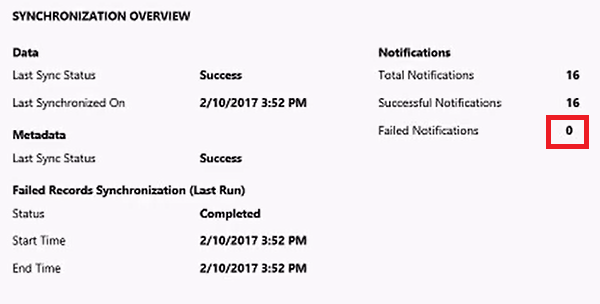
- Verify that the Export Profile doesn't contain failed record notifications by opening the data export profile and viewing the Failed Notifications counter on the PROPERTIES & OVERVIEW tab, which should be 0. Select REFRESH on the Export Profile toolbar to make sure the Failed Notifications value is current.
- Preview features aren’t meant for production use and may have restricted functionality. These features are available before an official release so that customers can get early access and provide feedback.
If the record synchronization failures persist after you've tried resynchronizing by following the previous steps, contact Microsoft Customer Support Services.
Error handling and monitoring
To view the synchronization status of an Export Profile, go to Settings > Data Export and open the Export Profile. On the ENTITIES tab, the synchronization status is displayed including a Failed Records column for records that could not be synchronized. For any failed records, a list of those records including the status reason can be downloaded by selecting FAILED RECORDS on the command bar.

In the Export Profile you can select PROPERTIES & OVERVIEW to display the properties of the profile. Select RELATIONSHIPS to view the relationships synchronization status.
How to view detailed information about the records that failed to sync
Viewing the failed record logs can help you determine the cause of synchronization failures. To view failed records in the destination Azure destination database, use Azure Storage Explorer, a free standalone app that allows you to easily work with Azure Storage data. More information: Azure Storage Explorer.
Go to Settings > Data Export.
In the In the All Data Export Profile view, select the Export Profile that has failed notifications.

On the Actions toolbar, select FAILED RECORDS.

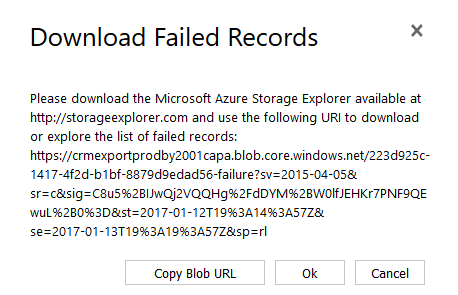
In the Download Failed Records dialog box, select Copy Blob URL, and then select Ok.
Note
The blob URL is valid for up to 24 hours. If the URL exceeds the 24 hour period, repeat the steps described earlier to generate a new blob URL.
Start Azure Storage Explorer.
In Azure Storage Explorer, select Connect to Azure Storage.
Paste the URL from your clipboard in to the Connect to Azure Storage box, and then select Next.
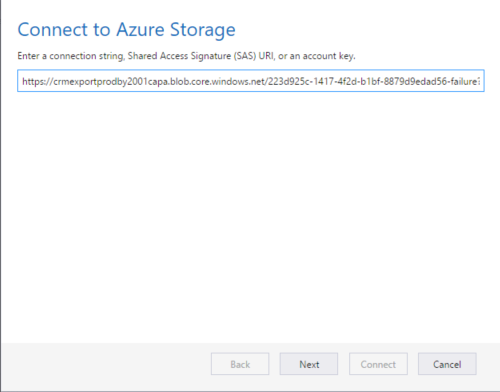
On the Connection Summary page, select Connect.
Azure Storage Explorer connects to the destination database. If failed records exist for the Export Profile, Azure Storage Explorer displays failed record synchronization folders.
How to view detailed information about the records that failed to sync (Preview)
You can download the failed records directly from within the Data Export Service user interface. This feature is currently in Preview and would be great for you to test and provide feedback.
Steps to download failed records:
Identify the profile with failed records.

Select the profile and select Download Failed records (Preview) from the top menu bar.

In the Download Failed records dialog box, you will see a sorted list of last 20 (max) blob files. Select the one you want to download, and then select Ok.

Once downloaded, open the file in a text editor of your choice (for example, Notepad) and view the details for failures.

Failed record synchronization folder structure and log files
The Failed Records Azure Blob storage URL points to a location that has the following folder structure:
data. This folder contains failed data notifications and the associated JSON for record data.
metadata. This folder contains failed metadata notifications and the associated JSON for metadata.
failurelog. This folder contains logs that provides information about the synchronization failure and the reason the failure occurred.
forcerefreshfailurelog. This folder contains errors from the last run of the Data Export Service Failed Records command used to resynchronize failed records.
unprocessablemessages. This folder contains the data notifications that were not processed either due to deletion of data or metadata and the associated JSON.
The failurelog and forcerefreshfailurelog folders are structured Year\Month\Day\Hour so that you can quickly locate the latest failures. All failure records older than 30 days are deleted.
Here's an example log file that indicates a contact entity record synchronization failure.
Entity: contact, RecordId: 459d1d3e-7cc8-e611-80f7-5065f38bf1c1, NotificationTime: 12/28/2016 12:32:39 AM, ChangeType: Update, FailureReason: The database 'tempdb' has reached its size quota. Partition or delete data, drop indexes, or consult the documentation for possible resolutions.
The statement has been terminated.
Common reasons for record synchronization failures
Here are a few reasons why record synchronization failures may occur.
Insufficient storage for the destination database. Before you try to resynchronize the failed records, increase or free Azure SQL Database storage as appropriate. When this problem occurs, a message similar to this is recorded to the failure log.
The database 'databasename' has reached its size quota. Partition or delete data, drop indexes, or consult the documentation for possible resolutions.
Synchronization timeouts with Azure SQL Database. This can occur during the initial synchronization of a data export profile when large amounts of data are processed at one time. When this issue occurs, resynchronize the failed records. Resolving synchronization issues
Best practices when using Azure SQL Database with Data Export
To avoid synchronization errors due to resource throttling, we recommend that you have an Azure SQL Database Premium P1 or better plan when you use the Data Export Service. More information: Azure SQL Database resource limits and SQL Database Pricing
Set the Azure SQL Database to use read committed snapshot isolation (RCSI) for workloads running concurrently on the destination database that execute long running read queries, such as reporting and ETL jobs. This reduces the occurrence of timeout errors that can occur with the Data Export Service due to read\write conflicts.
To help improve query performance we recommend the Data Export Service database max degree of parallelism (MAXDOP) be set to 1. More information: MSDN: Server Memory Options
Frequently assess the amount of fragmentation, and when necessary, rebuild the indexes in the Data Export Service database. More information: Reorganize and Rebuild Indexes
Periodically update database statistics on tables and indexed views in the Data Export Service database. More information: Update Statistics
Monitor the Data Export Service database's utilization. More information: Perf monitoring
About data synchronization latency
The Data Export Service is architected to synchronize data changes to the destination database using a push mechanism by listening to changes as they happen in customer engagement apps. The service strives to push data within a few minutes, but there are number of factors that can influence end-to-end synchronization latency.
Factors that influence the duration of synchronization include the following:
- The current work load on customer engagement apps.
- The data change rate in customer engagement apps.
- The number of entities added to each export profile and their attributes.
- SQL Server performance. For example:
- SQL connection setup time.
- SQL statement execution time.
Based on our monitoring of the service it's been observed that most on-going delta synchronization finishes in 15 minutes when the service operates under the following conditions:
- The synchronization that occurs is a delta synchronization and not the initial synchronization. Delta synchronization is only for data change operations, which include record create, update, and delete transactions. Note that delta synchronization begins once the initial synchronization has finished.
- The maximum data change rate in customer engagement apps for all the entities in the export profile is less than 3000 records per hour. Any sudden increase in the data change rate due to bulk change of records exceeding the maximum change rate will cause additional latency.
- Each entity added to an export profile has less than 150 attributes.
- Database connection or SQL statement execution finishes in less than 10 seconds. If this limit is exceeded it will result in additional latency.
- No destination database connection or SQL execution errors occur during synchronization.
When the above conditions are met, 15 minutes is a typical synchronization latency. Microsoft provides no service level agreement (SLA) for the Data Export Service and makes no guarantees or commitments regarding synchronization latency times.
How to set up Azure Key Vault
Run the Windows PowerShell script described here as an Azure account administrator to give permission to the Data Export Service feature so it may access your Azure Key Vault. This script displays the key vault URL required for creating the Export Profile that is used to access the connection string.
Before running the script, replace the placeholders for the following variables.
$subscriptionId. The Key Vault resource group you want to use. If a resource group doesn't already exist a new one with the name you specify will be created. In this example, ContosoResourceGroup1 is used.
$location. Specify the location where the resource group is, or should be, located, such as West US.
$connectionString. The connection string to the Azure SQL Database. You can use the ADO.NET connection string as it is displayed in your Azure dashboard.
$organizationIdList = Comma separated list of allowed organizations, listed by organization Id (organizationId), to enable for Data Export Service. To find an organization's Id, go to Settings > Customizations > Developer Resources. The organization Id is under environment Reference Information.
$tenantId. Specifies the Azure Active Directory tenant Id to which the Key Vault subscription.
Important
An Azure subscription can have multiple Azure Active Directory tenant Ids. Make sure that you select the correct Azure Active Directory tenant Id that is associated with the environment that you will use for data export.
Note
Ensure that the User ID referenced within the $connectionString has appropriate permission to the target Azure SQL database.
# -------------------------------------------------------------------------------- #
    #  Provide the value for the following parameters before executing the script
$subscriptionId = 'ContosoSubscriptionId'
$keyvaultName = 'ContosoKeyVault'
    $secretName = 'ContosoDataExportSecret'
    $resourceGroupName = 'ContosoResourceGroup1'
    $location = 'West US'
    $connectionString = 'AzureSQLconnectionString'
$organizationIdList = 'ContosoSalesOrg1_id, ContosoSalesOrg2_id'
$tenantId = 'tenantId'
    # -------------------------------------------------------------------------------- #

# Login to Azure account, select subscription and tenant Id
Connect-AzAccount -Tenant $tenantId -Subscription $subscriptionId

# Create new resource group if not exists.
$rgAvail = Get-AzResourceGroup -Name $resourceGroupName -Location $location -ErrorAction SilentlyContinue
if(!$rgAvail){
    New-AzResourceGroup -Name $resourceGroupName -Location $location
}

# Create new key vault if not exists.
$kvAvail = Get-AzKeyVault -VaultName $keyvaultName -ResourceGroupName $resourceGroupName -ErrorAction SilentlyContinue
if(!$kvAvail){
    New-AzKeyVault -VaultName $keyvaultName -ResourceGroupName $resourceGroupName -Location $location
    # Wait few seconds for DNS entry to propagate
    Start-Sleep -Seconds 15
}

# Create tags to store allowed set of Organizations.
$secretTags = @{}
foreach ($orgId in $organizationIdList.Split(',')) {
    $secretTags.Add($orgId.Trim(), $tenantId)
}

# Add or update a secret to key vault.
$secretValue = ConvertTo-SecureString $connectionString -AsPlainText -Force
$secret = Set-AzKeyVaultSecret -VaultName $keyvaultName -Name $secretName -SecretValue $secretValue -Tags $secretTags

# Authorize application to access key vault.
$servicePrincipal = 'b861dbcc-a7ef-4219-a005-0e4de4ea7dcf'
Set-AzKeyVaultAccessPolicy -VaultName $keyvaultName -ServicePrincipalName $servicePrincipal -PermissionsToSecrets get

# Display secret url.
Write-Host "Connection key vault URL is "$secret.id.TrimEnd($secret.Version)""
How to delete all Data Export Profile tables and stored procedures
Important
Before you run this SQL statement make sure that you have correctly defined the @prefix and @schema values in the statement. The Export Profile will need to be re-created after you run this SQL statement.
-----------------------------------------------------------------
-- Provide the value for the following parameters
DECLARE @prefix nvarchar(32) =''
DECLARE @schema nvarchar(32) ='dbo'
-----------------------------------------------------------------

DECLARE @sql nvarchar(max) = '';

SELECT @sql += 'DROP TABLE ' + QUOTENAME([TABLE_SCHEMA]) + '.' + QUOTENAME([TABLE_NAME]) + ';'
FROM [INFORMATION_SCHEMA].[TABLES]
WHERE [TABLE_TYPE] = 'BASE TABLE' AND [TABLE_NAME] like @prefix + '_%' AND [TABLE_SCHEMA]= @schema;

PRINT @sql
EXEC SP_EXECUTESQL @sql;

PRINT 'Finished dropping all tables. Starting to drop all stored procedures now.'

SELECT @sql='';
SELECT @sql += 'DROP PROCEDURE ' + QUOTENAME([ROUTINE_SCHEMA]) + '.' + QUOTENAME([ROUTINE_NAME]) + ';'
FROM [INFORMATION_SCHEMA].[ROUTINES]
WHERE [ROUTINE_TYPE] = 'PROCEDURE' AND [ROUTINE_NAME] like @prefix + '_%' AND [ROUTINE_SCHEMA]= @schema;
PRINT @sql
EXEC SP_EXECUTESQL @sql;

PRINT 'Finished dropping all stored procedures. Starting to drop all types now.'

SELECT @sql='';
SELECT @sql += 'DROP TYPE ' + QUOTENAME(SCHEMA_NAME([SCHEMA_ID])) + '.' +  QUOTENAME([NAME]) + ';'
FROM SYS.TYPES
WHERE is_user_defined = 1 AND [NAME] LIKE @prefix + '_%' AND [SCHEMA_ID]=SCHEMA_ID(@schema);

PRINT @sql
EXEC SP_EXECUTESQL @sql;
How to delete Data Export Profile tables and stored procedures for a specific entity
Important
Before you run this SQL statement make sure that you have correctly defined the @prefix, @schema, and @entityName values in the statement. In this example, the leads entity table, types, and stored procedures are dropped.
-----------------------------------------------------------------
-- Provide the value for the following parameters
DECLARE @prefix nvarchar(32) ='crm'
DECLARE @schema nvarchar(32) ='dbo'
DECLARE @entityName nvarchar(32) ='lead'
-----------------------------------------------------------------
DECLARE @sql nvarchar(max) = '';

IF @prefix != ''
BEGIN
       SET @prefix = @prefix + '_'
END

SELECT @sql += 'DROP TABLE ' + QUOTENAME([TABLE_SCHEMA]) + '.' + QUOTENAME([TABLE_NAME]) + ';'
FROM [INFORMATION_SCHEMA].[TABLES]
WHERE [TABLE_TYPE] = 'BASE TABLE' AND [TABLE_NAME] like @prefix + @entityName  AND [TABLE_SCHEMA]= @schema;
PRINT @sql
EXEC SP_EXECUTESQL @sql;
PRINT 'Finished dropping the entity. Starting to drop the types associated with the entity'

SELECT @sql='';
SELECT @sql += 'DROP TYPE ' + QUOTENAME(SCHEMA_NAME([SCHEMA_ID])) + '.' + QUOTENAME([NAME]) + ';'
FROM SYS.TYPES
WHERE
  is_user_defined = 1
  AND (
    [NAME] LIKE @prefix + @entityName +'Type'
    OR [NAME] LIKE @prefix + @entityName +'IdType'
  )
  AND [SCHEMA_ID] = SCHEMA_ID(@schema);
PRINT @sql
EXEC SP_EXECUTESQL @sql;
How to uninstall Data Export Service from Administer Power Platform
- Navigate to Advanced settings.
- Select Settings > Customizations, and then select Solutions.
- Choose DataExportService published by Microsoft Dynamics 365, and then select Delete.
Find the Microsoft Entra tenant Id for your tenant
- Sign in to the Azure portal.
- Under Azure services select Tenant properties.
- Select the value in the Tenant ID field.
Azure SQL database static IP addresses used by the Data Export Service
In Azure SQL Database, select Set server firewall, turn Allow access to Azure services to OFF, select Add client IP, and then add the IP addresses appropriate for the region of your environment. More information: Azure: Configure an Azure SQL Database server-level firewall rule using the Azure Portal
| Region | New IP address | Old IP address |
|---|---|---|
| West US | 20.245.127.60 | 13.64.148.9 |
| East US | 172.174.41.63 | 20.228.153.81 |
| East Asia | 20.239.192.9 | 104.208.84.217 |
| Southeast Asia | 20.24.15.60 | 20.205.153.14 |
| Central India | 20.219.158.75 | 20.198.113.107 |
| South India | 52.140.54.95 | 104.211.204.18 |
| West Europe | 20.126.43.104 | 40.68.244.253 |
| North Europe | 20.166.94.137 | 20.238.83.32 |
| Japan West | No change | 104.214.144.93 |
| Japan East | 52.253.104.175 | 20.89.138.246 |
| Brazil South | 4.228.211.102 | 20.197.186.17 |
| Australia Southeast | No change | 20.70.112.80 |
| Australia East | 20.5.88.96 | 20.213.58.3 |
| Canada Central | 20.220.227.230 | 20.151.173.107 |
| Canada East | 40.86.216.207 | 52.229.109.91 |
| United Kingdom West | 51.142.173.150 | 20.68.113.18 |
| United Kingdom South | 20.117.159.198 | 20.117.89.184 |
Note
North American customers should add IP addresses to an approved list for both East US and West US.
To prevent any disruptions to data synchronization, customers should keep new IP address and old IP address.
Known issues
Deleted records may get reinserted into entity table after a synchronization failure
When you recover from synchronization failures, records that had been previously deleted may get reinserted back into the originating entity table. To work around this issue when synchronization failures occur, follow these steps.
Create Export Profiles that are Write Delete Log enabled. Re-create existing Export Profiles that don't have Write Delete Log enabled.
Create and execute a SQL query for the Azure SQL destination database that searches for records in the DeleteLog table. If one or more records are found it indicates the presence of deleted records.
If one or more records exist in the DeleteLog table, create and run a SQL query that detects environments where the record Id for a record found in the DeleteLog table matches the record Id for a record in an EntityName table and the versionNumber in the deleteLog is greater than the versionNumber on the record in the EntityName table. When a record Id match occurs, delete the record from the EntityName table. For example, if a record Id in the AccountId column of the DeleteLog table matches a record Id in the AccountId column of the AccountBase entity table and the versionNumber in the DeleteLog is greater than the versionNumber in the Account table, delete the record from the AccountBase entity table.
Important
Depending on your business needs and requirements, we recommend that you execute the SQL queries for record deletion frequently, but during non-operational hours.
Example query for entity record deletion.
DELETE A FROM [dbo].[prefix_account] A
WHERE id IN (SELECT CONVERT(uniqueidentifier, recordid) FROM [dbo].[prefix_DeleteLog] DL WHERE DL.entityname ='account'
AND DL.VersionNumber > A.VersionNumber)
Entities that don't support data export
The entities listed here, although they support change tracking, aren't supported for data export using the Data Export Service.
| Entity | Table Name | Work Around |
|---|---|---|
| Activity | ActivityPointerBase | Select the specific activity entities for export, such as Phone Call, Appointment, Email, and Task. |
Unable to create a row greater than the allowable maximum row size (8K)
If your error logs show "Cannot create a row of size (size) which is greater than the allowable maximum row size of 8060", you are running into an issue where you are exceeding the maximum allowable row size limit. The Data Export Service does not support row size greater than maximum allowable row size of 8k. To mitigate this, you need to ensure that you honor the row size limits.
Length of string in source is longer than destination schema for ColumnName
If your error logs show "String length in source longer than destination schema for [ColumnName, MaxDataLength]" you are running into an issue where the string length of your source data is longer than destination. If the string length of your source data is longer than destination, writes to destination will fail.To mitigate this issue, you would either need to reduce size of data or increase the length of column, greater than MaxLength manually in the DB.
No support for attachments
Exporting attachments such as documentbody on Annotation table is not supported.
Privacy notice
By using the Data Export Service, when you activate a data export profile from within Dynamics 365, the data of the entities added to the profile is sent to Azure. The initial synchronization includes all the data associated with the entities added to the export profile, but thereafter synchronization includes only new changes, which are continuously sent to the Data Export Service. Data sent to the Data Export Service is stored temporarily in Azure Service Bus and Azure Storage, processed in Azure Service Fabric, and finally synchronized (inserted, updated, or deleted) to the destination database specified in your Azure subscription. After the data has been synchronized, it is deleted from Azure Service Bus and Azure Storage. If there is a failure during data synchronization, minimal data corresponding to entity type, record ID, and sync timestamp is stored in Azure Storage to allow for downloading a list of records that were not updated.
An administrator can deactivate the data export profile at any time to stop data synchronization. In addition, an administrator can delete the export profile to remove any failed record logs and can uninstall the Data Export Service solution to stop using the Data Export Service.
Data synchronization happens continuously between Dynamics 365 and the Data Export Service in a secure manner. Data is encrypted as it is continuously exchanged between Dynamics 365 and the Data Export Service.
Azure components and services that are involved with the Data Export Service are detailed in the following sections.
This provides the API and compute Azure VMs to process record synchronize notifications received from Dynamics 365 and then process them to insert, update, or delete record data in the destination database. Micro-services that are deployed on virtual machines managed by the Azure Service Fabric runtime handle all the compute services related to data synchronization.
This provides the message bus into which Dynamics 365 inserts the synchronization notification messages that are processed by compute nodes in Azure Service Fabric. Each message stores information, such as the org id and record, for which for which to sync data. Data in the Azure Service Bus is encrypted at rest and is only accessible by the Data Export Service.
Data is temporarily stored in Azure Blob Storage in case the record sync notification’s data is too large to store in a message or a transient failure is encountered to process the synchronization notification. These blobs are encrypted by leveraging the latest feature in the Azure Storage SDK, which provides symmetric and asymmetric encryption support and integration with Azure Key Vault.
The Azure SQL Database stores data export profile configuration and data synchronization metrics.
See also
Entity relationships overview
Data Export Service
Team Blog: Introduction to Data Export Service
Feedback
Coming soon: Throughout 2024 we will be phasing out GitHub Issues as the feedback mechanism for content and replacing it with a new feedback system. For more information see: https://aka.ms/ContentUserFeedback.
Submit and view feedback for