Calling Power Automate from a site script
Site designs are a powerful extensibility mechanism for customizing - and standardizing - the look and feel of your site collections. One of the script actions - triggerFlow - can be used to call custom solutions to apply configurations we don't support natively. Power Automate flows can also be used for business automation - in this case, used with site designs to track the creation of sites!
This article describes how to build a simple site directory using a site design and Power Automate. Whenever a site is created using this site design, details of the site are captured and written to a SharePoint list.
The steps in this article illustrate the following components:
- A SharePoint list
- A site design and a site script
- Power Automate
You'll first create the SharePoint list and then it will be referenced in your Power Automate flow - which will be triggered by the site design applied after the site is created.
Create your site directory list
You need to first set up the list that will be used to record all the sites created using this site design.
Select a site collection to host your list.
Create a new list named "Site Directory"
Configure the following fields:
- webUrl (Hyperlink or Picture)
- webDescription (Single line of text)
- creatorName (Single line of text)
- creatorEmail (Single line of text)
- createdTimeUTC (Single line of text)
Create the flow
In order to capture the site creation event and create the corresponding list item, you need to create a flow - which can then be referenced in your site design's site script:
Go to the Power Automate site, sign in, and choose *+ Automated—from blank at the top of the page.
Click Skip on the next screen
Choose Search connectors and triggers to select your trigger
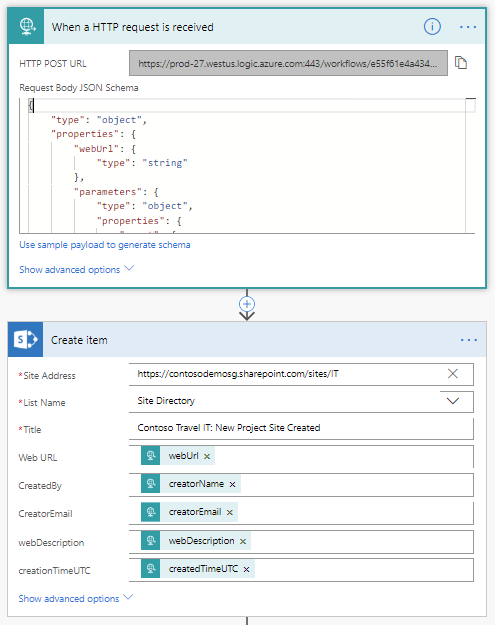
Search for Request, and then choose Request - When a HTTP Request is received [PREMIUM]. NOTE: The Request trigger is now PREMIUM and will therefore require additional licensing.
Enter the following JSON as your request body:
{
    "type": "object",
    "properties": {
      "webUrl": {
        "type": "string"
      },
      "parameters": {
        "type": "object",
        "properties": {
          "event": {
            "type": "string"
          },
          "product": {
            "type": "string"
          }
        }
      },
      "webDescription": {
        "type": "string"
      },
      "creatorName": {
        "type": "string"
      },
      "creatorEmail": {
        "type": "string"
      },
      "createdTimeUTC": {
        "type": "string"
      }
    }
  }
Select + New Step.
Search for Create item, and select SharePoint - Create item.
Enter the site address where the list above was created.
Select the "Site Directory" list you created in the previous step.
Enter a value for the Title field - this will be the same value for each list item. For example: "Contoso Travel: New Project Site Created".
For each field in your list form, add the corresponding element from the Dynamic Content picker. When you are done your action should look something like this:
Choose Save. This generates the HTTP Post URL that you will need to copy for your site script
triggerFlowaction.Choose the first step in your flow ('When an HTTP request is received') and copy the URL.
Save your flow.
Create the site design
Open PowerShell and make sure that you have the latest SharePoint Online Management Shell installed.
Connect to your tenant using Connect-SPOService.
Connect-SPOService -Url https://[yourtenant]-admin.sharepoint.comNow you can get the existing site designs.
Get-SPOSiteDesignTo create a site design, you first need to create a site script. A site design is a container that refers to one or more site scripts.
Copy the following JSON code to your clipboard and modify it. Set the url property to the value that you copied when you created the flow. The URL looks similar to the following:
https://prod-27.westus.logic.azure.com:443/workflows/ef7434cf0d704dd48ef5fb6...oke?api-version=2016-06-01&sp=%2Ftriggers%2Fmanual%2Frun{ "$schema": "schema.json", "actions": [ { "verb": "triggerFlow", "url": "[paste the workflow trigger URL here]", "name": "Record site creation event", "parameters": { "event": "site creation", "product": "SharePoint Online" } } ] }Select the JSON again and copy it again to your clipboard.
Open PowerShell and enter the following to copy the script into a variable and create the site script:
$script = Get-Clipboard -Raw
Add-SPOSiteScript -Title "Site Script to record site creation event" -Content $script
Get-SPOSiteScript
You will see a list of one or more site scripts, including the site script you just created. Select the ID of the site script that you created, and copy it to the clipboard.
Use the following command to create the site design:
Add-SPOSiteDesign -Title "Record site creation" -Description "The creation of this site will be recorded in the site directory list" -SiteScripts [Paste the ID of the Site Script here] -WebTemplate "64"
Note
The Add-SPOSiteDesign cmdlet associates the site design with the Team site. If you want to associate the design with a Communication site, use -WebTemplate "68".
Verify the results
To test the results, create a new site. In your SharePoint tenant, select SharePoint > Create Site > Team Site. (If you have disabled self-service site creation, you'll need to create the site from the SharePoint Admin Center.)
Your new site design should show up as a design option. Notice that the site design is applied after the site is created. If you configured it correctly, your flow will be triggered. You can check the run history of the flow to verify that it ran correctly.
See also
Feedback
Coming soon: Throughout 2024 we will be phasing out GitHub Issues as the feedback mechanism for content and replacing it with a new feedback system. For more information see: https://aka.ms/ContentUserFeedback.
Submit and view feedback for