Deploy your SharePoint client-side web part to Azure CDN
Create a new sample web part and deploy its assets to an Azure Content Delivery Network (CDN) instead of using the default Office 365 CDN as the hosting solution. You'll use an Azure Storage account integrated with a CDN to deploy your assets. SharePoint Framework build tools provide out-of-the-box support for deploying to an Azure Storage account; however, you can also manually upload the files to your favorite CDN provider or to SharePoint.
Note
There are multiple different hosting options for your web part assets. This tutorial concentrates on showing the Azure CDN option, but you could also use the Office 365 CDN or simply host your assets from SharePoint library from your tenant. In the latter case, you would not benefit from the CDN performance improvements, but that would also work from the functionality perspective. Any location that end users can access by using HTTP would be technically suitable for hosting the assets for end users.
Configure an Azure storage account
To configure an Azure storage account and integrate it with the CDN, follow the instructions at Integrate an Azure storage account with Azure CDN, along with the detailed steps in this article.
Note
As Azure UIs are evolving fast, some of the pictures and steps might be out of date, but high level process is still valid.
Storage account name
This is the name you used to create your storage account, as described in Step 1: Create a storage account.
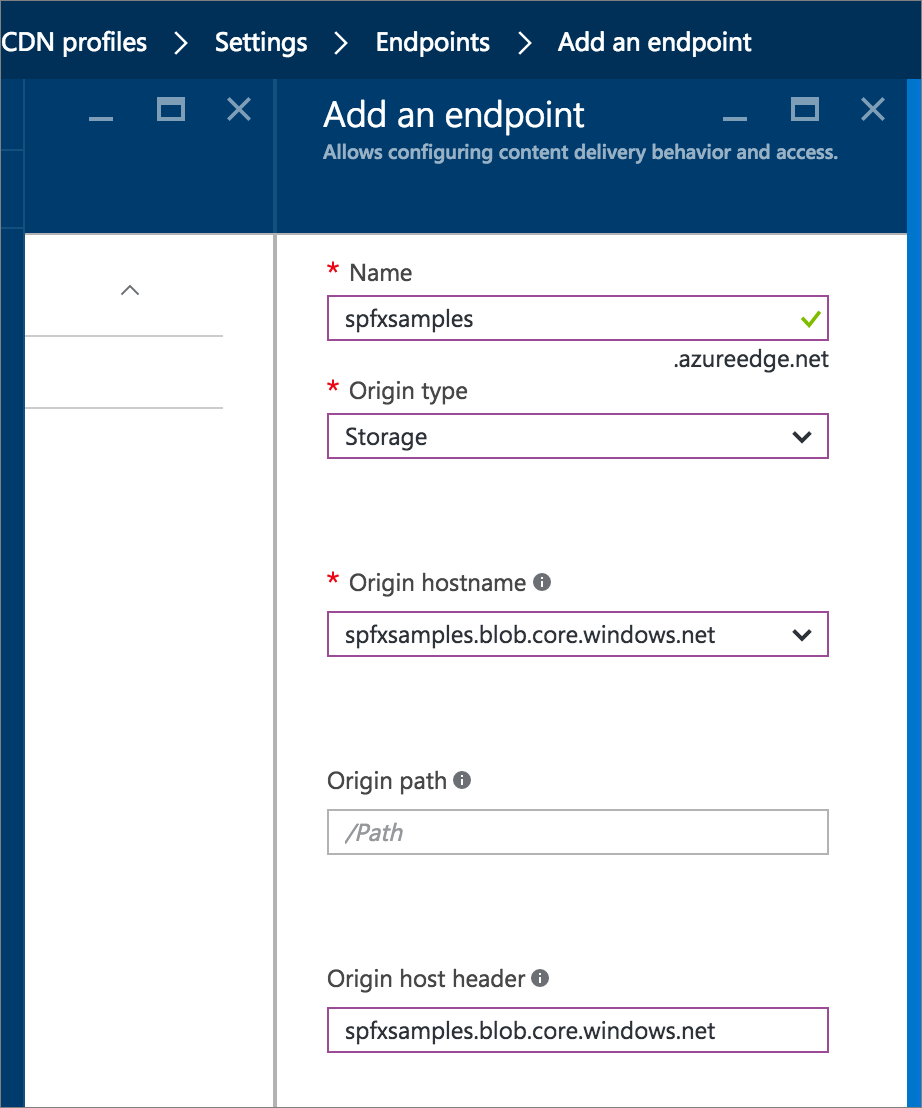
For example, in the following screenshot, spfxsamples is the storage account name.
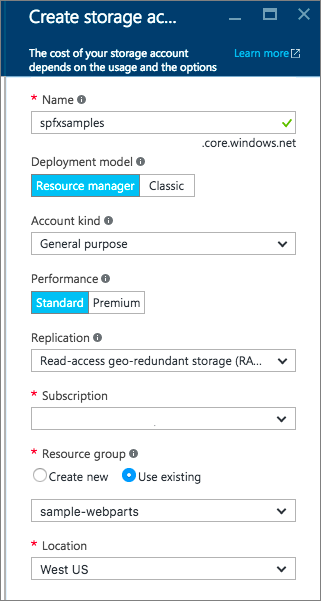
This creates a new storage account endpoint spfxsamples.blob.core.windows.net.
Note
You need to create a unique storage account name for your own SharePoint Framework projects.
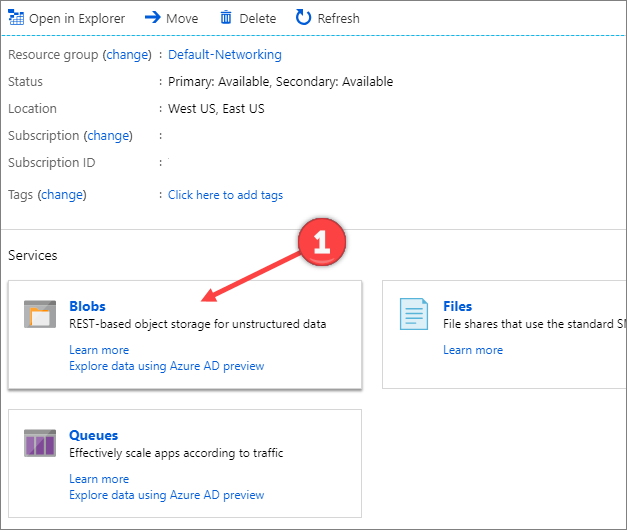
BLOB container name
Create a new Blob service container. This is available in your storage account dashboard.
Select the + Container and create a new container with the following:
- Name: azurehosted-webpart
- Access type: Container
Storage account access key
In the storage account dashboard, select Access Key in the dashboard, and copy one of the access keys.

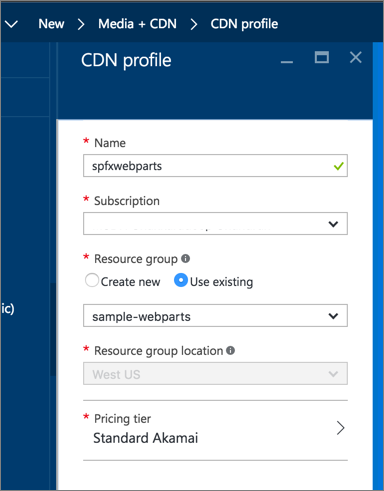
CDN profile and endpoint
Create a new CDN profile and associate the CDN endpoint with this BLOB container.
Create a new CDN profile as described in Step 2: Enable CDN for the storage account (scroll down in Step 2 for To create a new CDN profile).
For example, in the following screenshot, spfxwebparts is the CDN profile name.
Create a CDN endpoint as described in Step 2: Enable CDN for the storage account. The CDN endpoint is created with the following URL:
http://spfxsamples.azureedge.netFor example, in the following screenshot, spfxsamples is the endpoint name, Storage is the origin type, and spfxsamples.blob.core.windows.net is the storage account.
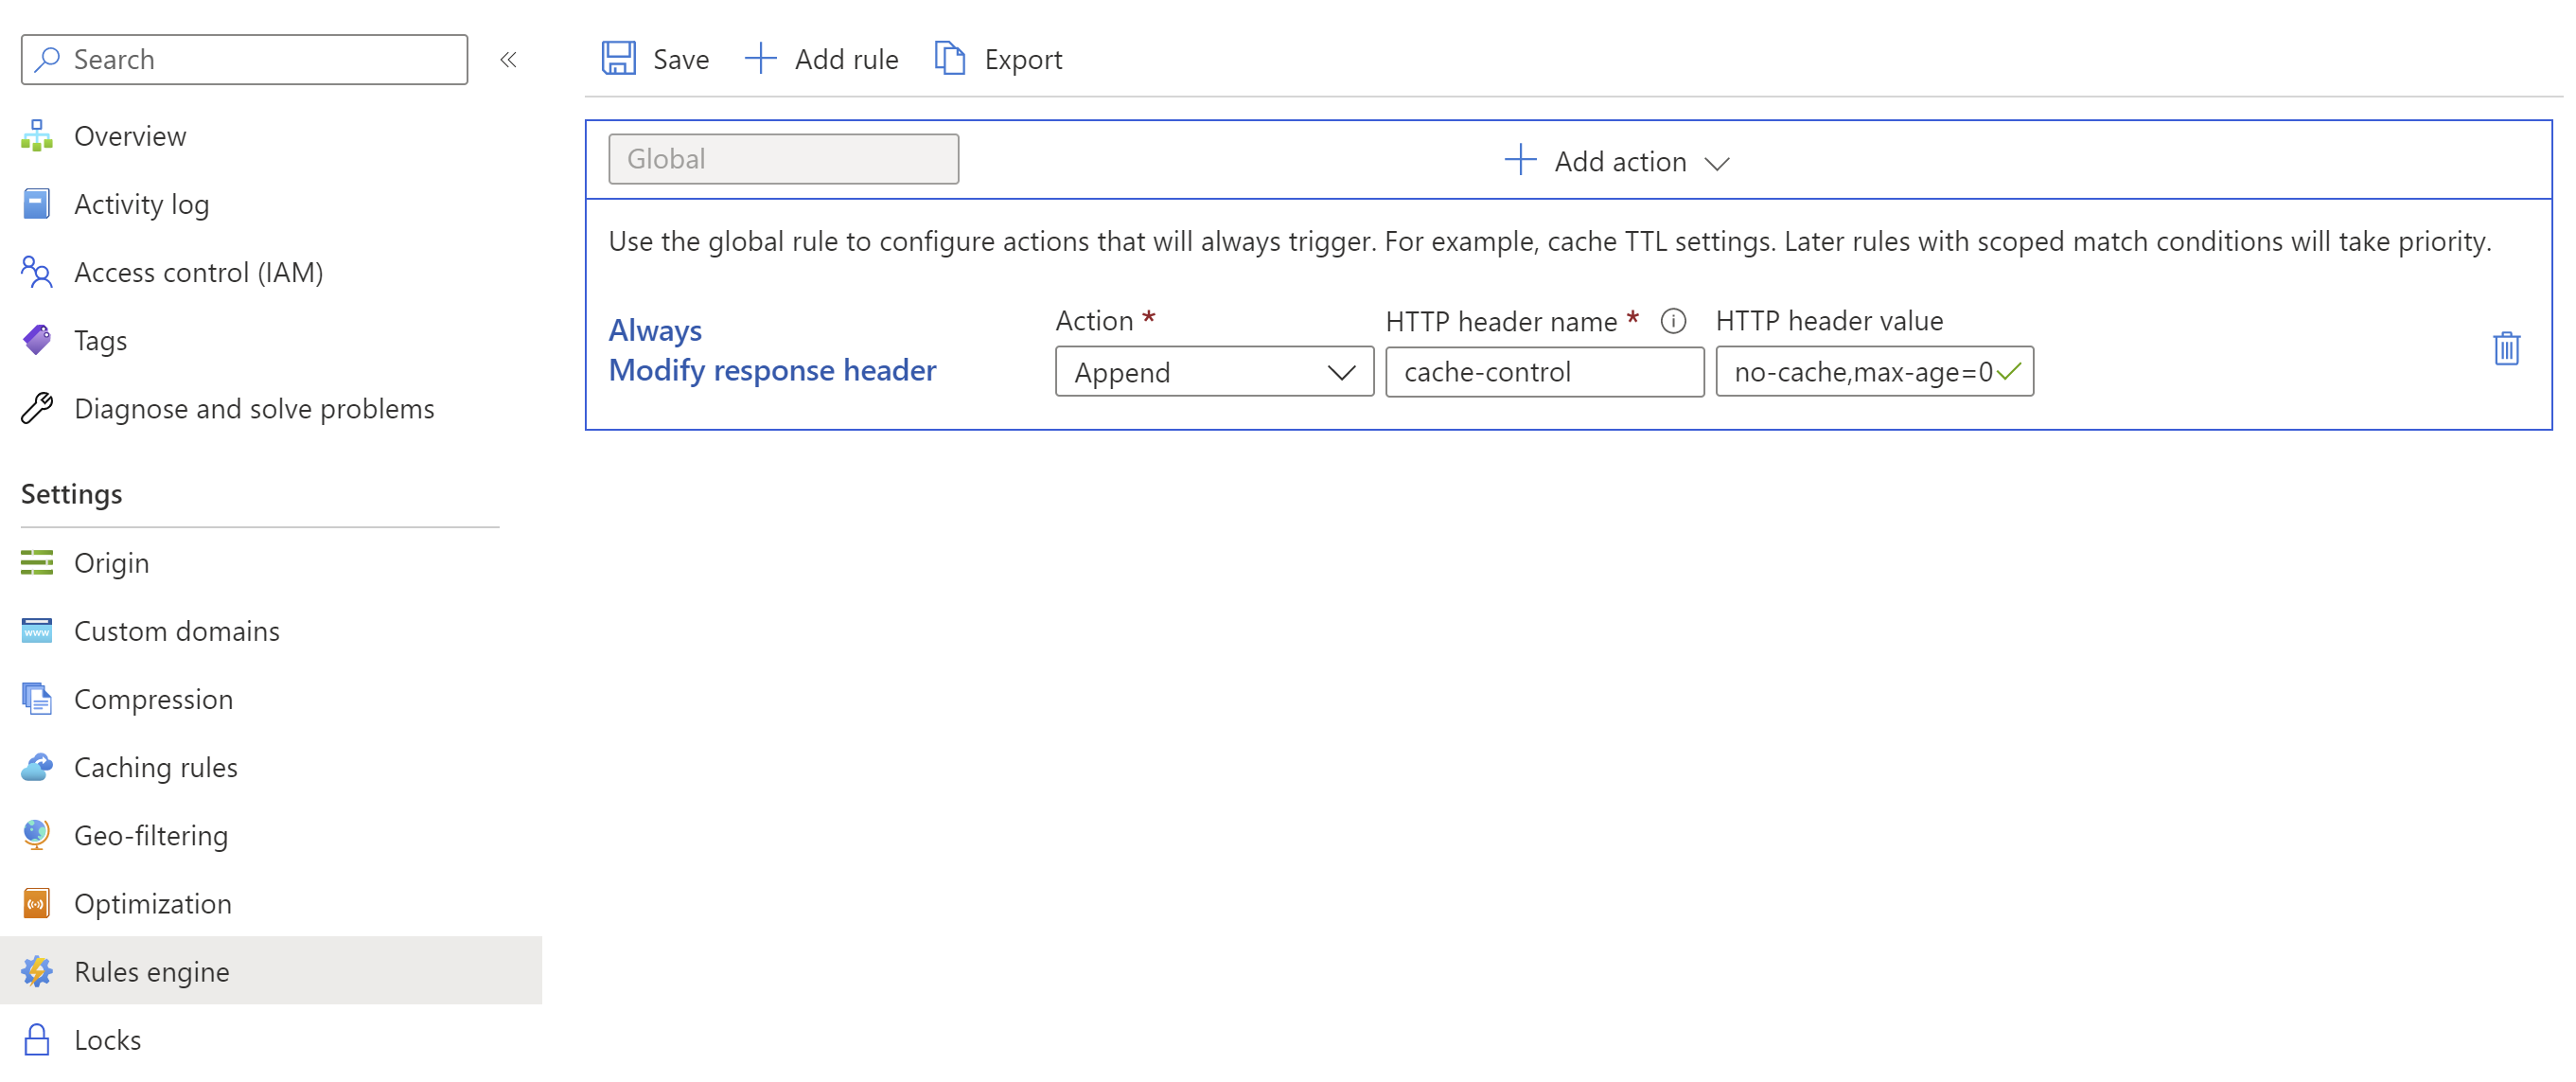
To allow scripts to be cached by the SharePoint service worker, add an appropriate Cache-Control response header to the CDN endpoint.
Because you associated the CDN endpoint with your storage account, you can also access the BLOB container at the following URL: http://spfxsamples.azureedge.net/azurehosted-webpart/
Note, however, that you have not yet deployed the files.
Create a new web part project
Create a new project directory in your preferred location:
md azurehosted-webpartGo to the project directory:
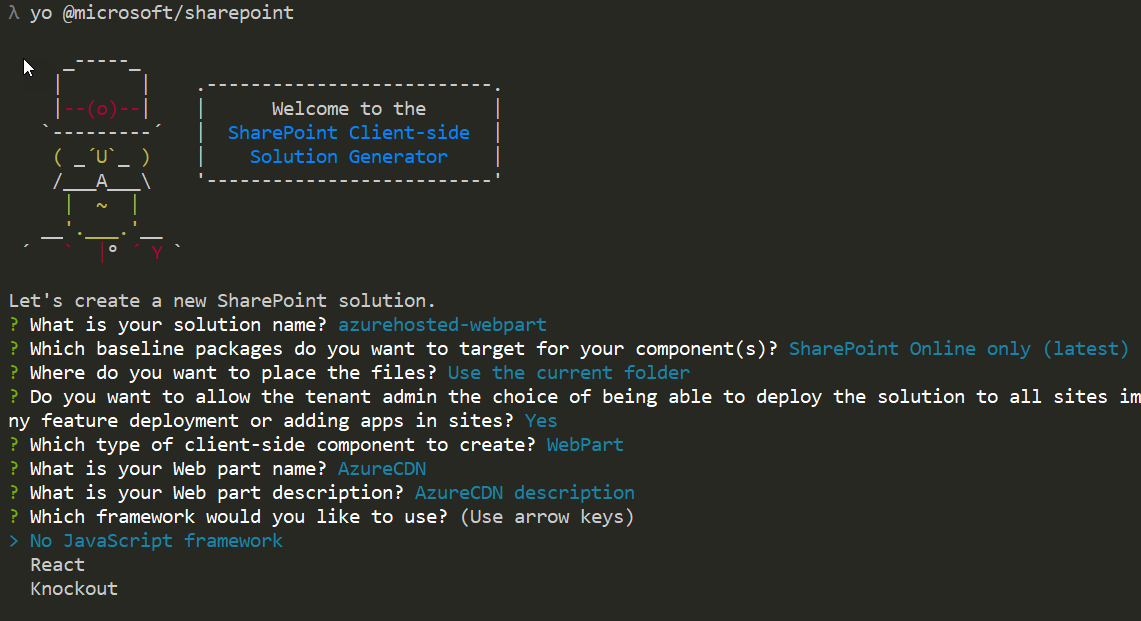
cd azurehosted-webpartCreate a new SharePoint Framework solution by running Yeoman SharePoint Generator:
yo @microsoft/sharepointWhen prompted:
- Accept the default azurehosted-webpart as your solution name, and select Enter.
- Select SharePoint Online only (latest), and select Enter.
- Select Use the current folder for where to place the files.
- Select y to use the tenant-scoped deployment option, which makes the web part available across sites immediately when it's deployed.
- Select N on the question if solution contains unique permissions.
- Select WebPart as the client-side component type to be created.
The next set of prompts asks for specific information about your web part:
- Use AzureCDN for your web part name, and select Enter.
- Accept the default AzureCDN description as your web part description, and select Enter.
- Accept the default No JavaScript web framework as the framework you would like to use, and select Enter.
At this point, Yeoman scaffolds the solution files and installs the required dependencies. This might take a few minutes. Yeoman scaffolds the project to include your custom web part as well.
Enter the following to open the web part project in Visual Studio Code:
code .
Configure the solution not to use default settings
Open ./config/package-solution.json file. This is where we control the solution packaging.
Set the
includeClientSideAssetsvalue tofalseso that client-side assets are NOT packaged inside the .sppkg file, which is the default behavior. As we're hosting assets from an external CDN, we do not want them to be included in the solution package. Your configuration should look somewhat like the following.{ "$schema": "https://developer.microsoft.com/json-schemas/spfx-build/package-solution.schema.json", "solution": { "name": "azurehosted-webpart-client-side-solution", "id": "a4e95ed1-d096-4573-8a57-d0cc3b52da6a", "version": "1.0.0.0", "includeClientSideAssets": false, "skipFeatureDeployment": true, "isDomainIsolated": false }, "paths": { "zippedPackage": "solution/azurehosted-webpart.sppkg" } }Note
The
skipFeatureDeploymentsetting is heretruebecause the answer for the tenant-scope deployment option was said to be 'y' in the Yeoman flow. This means that you do NOT need to explicitly install the solution to the site before the web part is available. Deploying and approving the solution package in the tenant app catalog is sufficient to make the web part available across all the sites in the given tenant.
Configure Azure Storage account details
Open ./config/deploy-azure-storage.json file. This is the file that contains your Azure Storage account details.
{
  "$schema": "https://developer.microsoft.com/json-schemas/spfx-build/deploy-azure-storage.schema.json",
  "workingDir": "./release/assets/",
  "account": "<!-- STORAGE ACCOUNT NAME -->",
  "container": "azurehosted-webpart",
  "accessKey": "<!-- ACCESS KEY -->"
}
Important
The location of resources used in the Azure CDN deployments changed in SPFx v1.12.1. The snippet above reflects the correct location in the
workingDirproperty.For projects created prior to SPFx v1.12.1, the
workingDirproperty was set to./temp/deploy/. If you've upgraded the project to SPFx v1.12.1+, you should update this property to the above setting. For more information, see SharePoint Framework v1.12.1 release notes.Replace the
account,container,accessKeywith your storage account name, BLOB container, and storage account access key respectively.workingDiris the directory where the web part assets are located.In this example, with the storage account created earlier, this file will look like:
{
  "$schema": "https://developer.microsoft.com/json-schemas/spfx-build/deploy-azure-storage.schema.json",
  "workingDir": "./release/assets/",
  "account": "spfxsamples",
  "container": "azurehosted-webpart",
  "accessKey": "q1UsGWocj+CnlLuv9ZpriOCj46ikgBbDBCaQ0FfE8+qKVbDTVSbRGj41avlG73rynbvKizZpIKK9XpnpA=="
}
Save the file.
Configure the web part to load from CDN
For the web part to load from your CDN, you need to tell it your CDN path.
Switch to Visual Studio Code and open the ./config/write-manifests.json file.
Enter your CDN base path for the
cdnBasePathproperty.{ "cdnBasePath": "<!-- PATH TO CDN -->" }In this example, with the CDN profile created earlier, this file will look like:
{
  "cdnBasePath": "https://spfxsamples.azureedge.net/azurehosted-webpart/"
}
Note
The CDN base path is the CDN endpoint with the BLOB container.
Save the file.
Prepare the web part assets to deploy
Before uploading the assets to CDN, you need to build them.
Switch to the console and execute the following gulp task:
gulp bundle --shipThis builds the minified assets required to upload to the CDN provider. The --ship indicates the build tool to build for distribution. You should also notice that the output of the build tool indicates the Build Target is SHIP.
Build target: SHIP
[21:23:01] Using gulpfile ~/apps/azurehosted-webpart/gulpfile.js
[21:23:01] Starting gulp
[21:23:01] Starting 'default'...
The minified assets can be found under the temp\deploy directory.
Deploy assets to Azure Storage
Switch to the console of the azurehosted-webpart project directory.
Enter the gulp task to deploy the assets to your storage account:
gulp deploy-azure-storageThis deploys the web part bundle along with other assets such as JavaScript and CSS files to the CDN.
Deploy the updated package
To package the solution
Because you changed the web part bundle, you need to redeploy the package to the app catalog. You used --ship to generate minified assets for distribution.
Switch to the console of the azurehosted-webpart project directory.
Enter the gulp task to package the client-side solution, this time with the --ship flag set. This forces the task to pick up the CDN base path configured in the previous step:
gulp package-solution --shipThis creates the updated client-side solution package in the sharepoint\solution folder.
To upload to your app catalog
Upload or drag and drop the client-side solution package to the app catalog. Notice how the URL is pointing to the Azure CDN URL configured in the previous steps.
Select the check box to indicate that the solution can be deployed automatically across all sites in the organization.
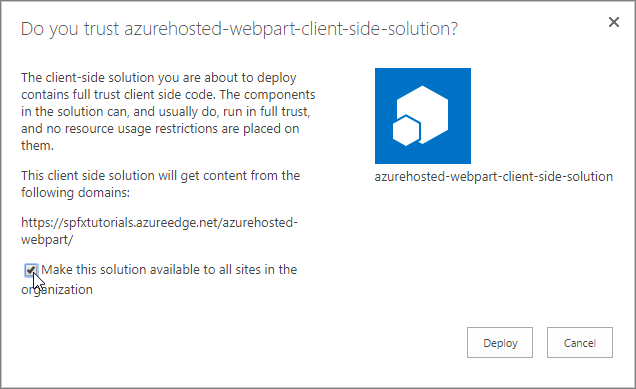
Select Deploy.
The app catalog now has the client-side solution package where the web part bundle is loaded from the CDN.
Test the HelloWorld web part
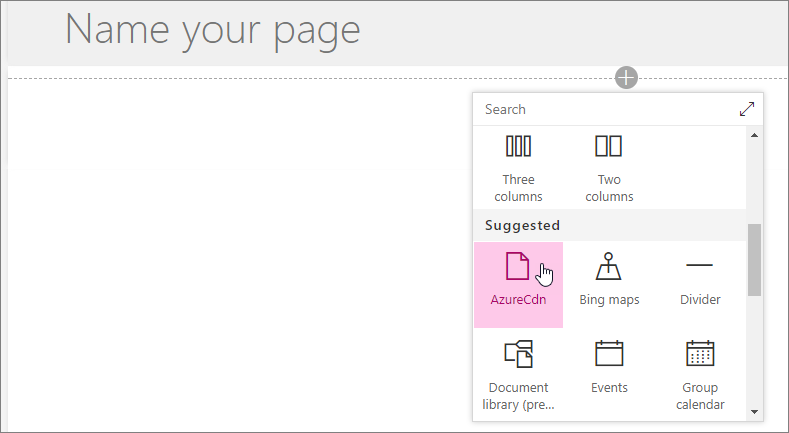
Go to any SharePoint site in your tenant and select Add a page from the gears menu.
Edit the page and select AzureCDN web part from the web part picker to confirm that your deployment has been successful.
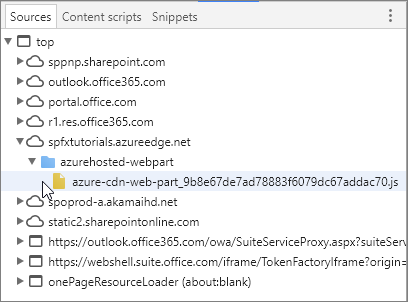
Notice that you aren't running gulp serve, and therefore nothing is served from localhost. Content is served from the Azure CDN. You can also double-check this by selecting F12 in your browser and confirming that you can see the Azure CDN as one of the sources for the page assets.
Deploy to other CDNs
To deploy the assets to your favorite CDN provider, you can copy the files from temp\deploy folder. To generate assets for distribution, run the following gulp command as we did before with the --ship parameter:
gulp bundle --ship
As long as you're updating the cdnBasePath accordingly, your files are being properly loaded.
Note
If you find an issue in the documentation or in the SharePoint Framework, please report that to SharePoint engineering by using the issue list at the sp-dev-docs repository or by adding a comment to this article. Thanks for your input in advance.
See also
Feedback
Coming soon: Throughout 2024 we will be phasing out GitHub Issues as the feedback mechanism for content and replacing it with a new feedback system. For more information see: https://aka.ms/ContentUserFeedback.
Submit and view feedback for