Hi @mc ,
To implement JWT authentication in Asp.net Core application, you could refer the following steps:
- Install the "Microsoft.AspNetCore.Authentication.JwtBearer" package via Nuget.
- In the API application startup.cs file, configure the authentication schema with JWT bearer options.
////reuqired the following reference: //using Microsoft.AspNetCore.Authentication.JwtBearer; //using Microsoft.IdentityModel.Tokens; //using System.Text; // This method gets called by the runtime. Use this method to add services to the container. public void ConfigureServices(IServiceCollection services) { services.AddAuthentication(JwtBearerDefaults.AuthenticationScheme) .AddJwtBearer(options => { options.TokenValidationParameters = new TokenValidationParameters { ValidateIssuer = true, ValidateAudience = true, ValidateLifetime = true, ValidateIssuerSigningKey = true, ValidIssuer = Configuration["Jwt:Issuer"], ValidAudience = Configuration["Jwt:Issuer"], IssuerSigningKey = new SymmetricSecurityKey(Encoding.UTF8.GetBytes(Configuration["Jwt:Key"])) }; }); services.AddControllers(); services.AddSwaggerGen(c => { c.SwaggerDoc("v1", new OpenApiInfo { Title = "APIApplication", Version = "v1" }); }); } // This method gets called by the runtime. Use this method to configure the HTTP request pipeline. public void Configure(IApplicationBuilder app, IWebHostEnvironment env) { if (env.IsDevelopment()) { app.UseDeveloperExceptionPage(); app.UseSwagger(); app.UseSwaggerUI(c => c.SwaggerEndpoint("/swagger/v1/swagger.json", "APIApplication v1")); } app.UseHttpsRedirection(); app.UseRouting(); //keep the middleware order. app.UseAuthentication(); app.UseAuthorization(); app.UseEndpoints(endpoints => { endpoints.MapControllers(); }); } - Store JWT values (Such as: issuer, audience, signing key) in appsettings.json file
"Jwt": { "Key": "ThisismySecretKey", "Issuer": "Test.com" }, - Generate JSON Web Token: Create a Login controller and after valid user, generate the JWT token.
The UserModel model as below://required the following reference: //using Microsoft.Extensions.Configuration; //using Microsoft.AspNetCore.Authorization; //using APIApplication.Models; //using Microsoft.IdentityModel.Tokens; //using System.IdentityModel.Tokens.Jwt; //using System.Text; [Route("api/[controller]")] [ApiController] public class LoginController : ControllerBase { private IConfiguration _config; public LoginController(IConfiguration config) { _config = config; } [AllowAnonymous] [HttpPost] public IActionResult Login([FromBody] UserModel login) { IActionResult response = Unauthorized(); var user = AuthenticateUser(login); if (user != null) { var tokenString = GenerateJSONWebToken(user); response = Ok(new { token = tokenString }); } return response; } private string GenerateJSONWebToken(UserModel userInfo) { var securityKey = new SymmetricSecurityKey(Encoding.UTF8.GetBytes(_config["Jwt:Key"])); var credentials = new SigningCredentials(securityKey, SecurityAlgorithms.HmacSha256); var token = new JwtSecurityToken(_config["Jwt:Issuer"], _config["Jwt:Issuer"], null, expires: DateTime.Now.AddMinutes(120), signingCredentials: credentials); return new JwtSecurityTokenHandler().WriteToken(token); } private UserModel AuthenticateUser(UserModel login) { UserModel user = null; //Validate the User Credentials //Demo Purpose, I have Passed HardCoded User Information if (login.Username == "Jignesh") { user = new UserModel { Username = "Jignesh Trivedi", EmailAddress = "test.btest@gmail.com" }; } return user; } }public class UserModel { public string Username { get; set; } public string EmailAddress { get; set; } } - Apply the JWT authentication, add the [Authorize] attribute at the header of the action method.
[Route("api/[controller]")]
[ApiController]
public class ToDoController : ControllerBase
{
    // GET: api/<ToDoController>
    [HttpGet]
    [Authorize]   //required using Microsoft.AspNetCore.Authorization;
    public IEnumerable<string> Get()
    {
        return new string[] { "value1", "value2" };
    }
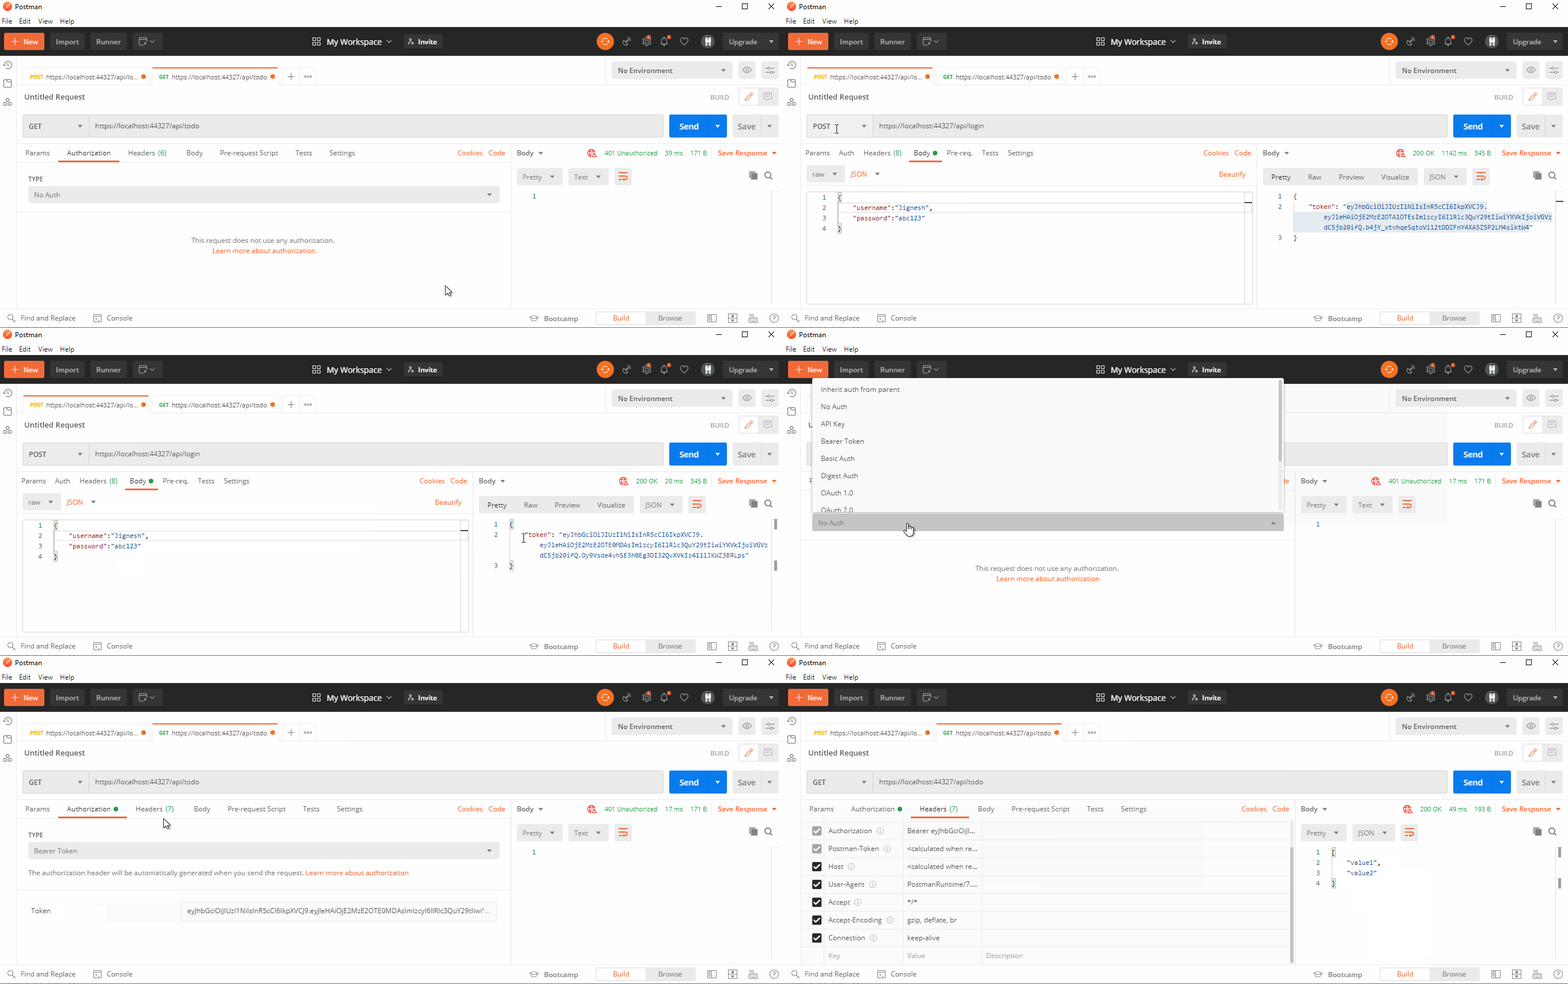
Then, use Postman to check it, the result as below: When we access the ToDoController without a JWT token, we will get 401 (UnAuthorizedAccess) HTTP status code as a response. After calling the LoginController and get the JWT token, we can add it in the HTTP header, then, we can access the action success.

Besides, if you want to access the API with HttpClient, you can refer the following sample code to add the JWT token to the request header.
            HttpClient client = new HttpClient();
            client.BaseAddress = new Uri("https://localhost:44310/api/todo/");
            client.DefaultRequestHeaders
                    .Accept
                    .Add(new MediaTypeWithQualityHeaderValue("application/json"));//ACCEPT header

            var url = "relativeAddress"; //add the `[Route("relativeAddress")]` in the API action method.
            HttpRequestMessage request = new HttpRequestMessage(HttpMethod.Post, url);

            //add jwt token to the header
            var authString = "jwt token";
            request.Headers.Add("Authorization", $"Bearer {authString}");
            request.Content = new StringContent("{\"name\":\"John Doe\",\"age\":33}",
                                                Encoding.UTF8,
                                                "application/json");//CONTENT-TYPE header

            _logger.LogInformation("Create http request");
            await client.SendAsync(request)
                    .ContinueWith(async responseTask =>
                    {
                        Console.WriteLine("Response: {0}", responseTask.Result);
                        var Content = await responseTask.Result.Content.ReadAsStringAsync();
                    });
If the answer is helpful, please click "Accept Answer" and upvote it.
Note: Please follow the steps in our documentation to enable e-mail notifications if you want to receive the related email notification for this thread.
Best regards,
Dillion

