Caching is a common technique that aims to improve the performance and scalability of a system. It caches data by temporarily copying frequently accessed data to fast storage that's located close to the application. If this fast data storage is located closer to the application than the original source, then caching can significantly improve response times for client applications by serving data more quickly.
Caching is most effective when a client instance repeatedly reads the same data, especially if all the following conditions apply to the original data store:
- It remains relatively static.
- It's slow compared to the speed of the cache.
- It's subject to a high level of contention.
- It's far away when network latency can cause access to be slow.
Caching in distributed applications
Distributed applications typically implement either or both of the following strategies when caching data:
- They use a private cache, where data is held locally on the computer that's running an instance of an application or service.
- They use a shared cache, serving as a common source that can be accessed by multiple processes and machines.
In both cases, caching can be performed client-side and server-side. Client-side caching is done by the process that provides the user interface for a system, such as a web browser or desktop application. Server-side caching is done by the process that provides the business services that are running remotely.
Private caching
The most basic type of cache is an in-memory store. It's held in the address space of a single process and accessed directly by the code that runs in that process. This type of cache is quick to access. It can also provide an effective means for storing modest amounts of static data. The size of a cache is typically constrained by the amount of memory available on the machine that hosts the process.
If you need to cache more information than is physically possible in memory, you can write cached data to the local file system. This process will be slower to access than data that's held in memory, but it should still be faster and more reliable than retrieving data across a network.
If you have multiple instances of an application that uses this model running concurrently, each application instance has its own independent cache holding its own copy of the data.
Think of a cache as a snapshot of the original data at some point in the past. If this data isn't static, it's likely that different application instances hold different versions of the data in their caches. Therefore, the same query performed by these instances can return different results, as shown in Figure 1.

Figure 1: Using an in-memory cache in different instances of an application.
Shared caching
If you use a shared cache, it can help alleviate concerns that data might differ in each cache, which can occur with in-memory caching. Shared caching ensures that different application instances see the same view of cached data. It locates the cache in a separate location, which is typically hosted as part of a separate service, as shown in Figure 2.
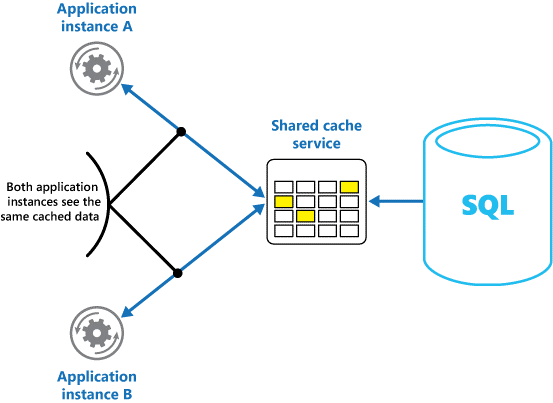
Figure 2: Using a shared cache.
An important benefit of the shared caching approach is the scalability it provides. Many shared cache services are implemented by using a cluster of servers and use software to distribute the data across the cluster transparently. An application instance simply sends a request to the cache service. The underlying infrastructure determines the location of the cached data in the cluster. You can easily scale the cache by adding more servers.
There are two main disadvantages of the shared caching approach:
- The cache is slower to access because it's no longer held locally to each application instance.
- The requirement to implement a separate cache service might add complexity to the solution.
Considerations for using caching
The following sections describe in more detail the considerations for designing and using a cache.
Decide when to cache data
Caching can dramatically improve performance, scalability, and availability. The more data that you have and the larger the number of users that need to access this data, the greater the benefits of caching become. Caching reduces the latency and contention that's associated with handling large volumes of concurrent requests in the original data store.
For example, a database might support a limited number of concurrent connections. Retrieving data from a shared cache, however, rather than the underlying database, makes it possible for a client application to access this data even if the number of available connections is currently exhausted. Additionally, if the database becomes unavailable, client applications might be able to continue by using the data that's held in the cache.
Consider caching data that is read frequently but modified infrequently (for example, data that has a higher proportion of read operations than write operations). However, we don't recommend that you use the cache as the authoritative store of critical information. Instead, ensure that all changes that your application can't afford to lose are always saved to a persistent data store. If the cache is unavailable, your application can still continue to operate by using the data store, and you won't lose important information.
Determine how to cache data effectively
The key to using a cache effectively lies in determining the most appropriate data to cache, and caching it at the appropriate time. The data can be added to the cache on demand the first time it's retrieved by an application. The application needs to fetch the data only once from the data store, and that subsequent access can be satisfied by using the cache.
Alternatively, a cache can be partially or fully populated with data in advance, typically when the application starts (an approach known as seeding). However, it might not be advisable to implement seeding for a large cache because this approach can impose a sudden, high load on the original data store when the application starts running.
Often an analysis of usage patterns can help you decide whether to fully or partially prepopulate a cache, and to choose the data to cache. For example, you can seed the cache with the static user profile data for customers who use the application regularly (perhaps every day), but not for customers who use the application only once a week.
Caching typically works well with data that is immutable or that changes infrequently. Examples include reference information such as product and pricing information in an e-commerce application, or shared static resources that are costly to construct. Some or all of this data can be loaded into the cache at application startup to minimize demand on resources and to improve performance. You might also want to have a background process that periodically updates the reference data in the cache to ensure it's up-to-date. Or, the background process can refresh the cache when the reference data changes.
Caching is less useful for dynamic data, although there are some exceptions to this consideration (see the section Cache highly dynamic data later in this article for more information). When the original data changes regularly, either the cached information becomes stale quickly or the overhead of synchronizing the cache with the original data store reduces the effectiveness of caching.
A cache doesn't have to include the complete data for an entity. For example, if a data item represents a multivalued object, such as a bank customer with a name, address, and account balance, some of these elements might remain static, such as the name and address. Other elements, such as the account balance, might be more dynamic. In these situations, it can be useful to cache the static portions of the data and retrieve (or calculate) only the remaining information when it's required.
We recommend that you carry out performance testing and usage analysis to determine whether prepopulating or on-demand loading of the cache, or a combination of both, is appropriate. The decision should be based on the volatility and usage pattern of the data. Cache utilization and performance analysis are important in applications that encounter heavy loads and must be highly scalable. For example, in highly scalable scenarios you can seed the cache to reduce the load on the data store at peak times.
Caching can also be used to avoid repeating computations while the application is running. If an operation transforms data or performs a complicated calculation, it can save the results of the operation in the cache. If the same calculation is required afterward, the application can simply retrieve the results from the cache.
An application can modify data that's held in a cache. However, we recommend thinking of the cache as a transient data store that could disappear at any time. Don't store valuable data in the cache only; make sure that you maintain the information in the original data store as well. This means that if the cache becomes unavailable, you minimize the chance of losing data.
Cache highly dynamic data
When you store rapidly changing information in a persistent data store, it can impose an overhead on the system. For example, consider a device that continually reports status or some other measurement. If an application chooses not to cache this data on the basis that the cached information will nearly always be outdated, then the same consideration could be true when storing and retrieving this information from the data store. In the time it takes to save and fetch this data, it might have changed.
In a situation such as this, consider the benefits of storing the dynamic information directly in the cache instead of in the persistent data store. If the data is noncritical and doesn't require auditing, then it doesn't matter if the occasional change is lost.
Manage data expiration in a cache
In most cases, data that's held in a cache is a copy of data that's held in the original data store. The data in the original data store might change after it was cached, causing the cached data to become stale. Many caching systems enable you to configure the cache to expire data and reduce the period for which data may be out of date.
When cached data expires, it's removed from the cache, and the application must retrieve the data from the original data store (it can put the newly fetched information back into cache). You can set a default expiration policy when you configure the cache. In many cache services, you can also stipulate the expiration period for individual objects when you store them programmatically in the cache. Some caches enable you to specify the expiration period as an absolute value, or as a sliding value that causes the item to be removed from the cache if it isn't accessed within the specified time. This setting overrides any cache-wide expiration policy, but only for the specified objects.
Note
Consider the expiration period for the cache and the objects that it contains carefully. If you make it too short, objects will expire too quickly and you will reduce the benefits of using the cache. If you make the period too long, you risk the data becoming stale.
It's also possible that the cache might fill up if data is allowed to remain resident for a long time. In this case, any requests to add new items to the cache might cause some items to be forcibly removed in a process known as eviction. Cache services typically evict data on a least-recently-used (LRU) basis, but you can usually override this policy and prevent items from being evicted. However, if you adopt this approach, you risk exceeding the memory that's available in the cache. An application that attempts to add an item to the cache will fail with an exception.
Some caching implementations might provide additional eviction policies. There are several types of eviction policies. These include:
- A most-recently-used policy (in the expectation that the data won't be required again).
- A first-in-first-out policy (oldest data is evicted first).
- An explicit removal policy based on a triggered event (such as the data being modified).
Invalidate data in a client-side cache
Data that's held in a client-side cache is generally considered to be outside the auspices of the service that provides the data to the client. A service can't directly force a client to add or remove information from a client-side cache.
This means that it's possible for a client that uses a poorly configured cache to continue using outdated information. For example, if the expiration policies of the cache aren't properly implemented, a client might use outdated information that's cached locally when the information in the original data source has changed.
If you build a web application that serves data over an HTTP connection, you can implicitly force a web client (such as a browser or web proxy) to fetch the most recent information. You can do this if a resource is updated by a change in the URI of that resource. Web clients typically use the URI of a resource as the key in the client-side cache, so if the URI changes, the web client ignores any previously cached versions of a resource and fetches the new version instead.
Managing concurrency in a cache
Caches are often designed to be shared by multiple instances of an application. Each application instance can read and modify data in the cache. Consequently, the same concurrency issues that arise with any shared data store also apply to a cache. In a situation where an application needs to modify data that's held in the cache, you might need to ensure that updates made by one instance of the application don't overwrite the changes made by another instance.
Depending on the nature of the data and the likelihood of collisions, you can adopt one of two approaches to concurrency:
- Optimistic. Immediately prior to updating the data, the application checks to see whether the data in the cache has changed since it was retrieved. If the data is still the same, the change can be made. Otherwise, the application has to decide whether to update it. (The business logic that drives this decision will be application-specific.) This approach is suitable for situations where updates are infrequent, or where collisions are unlikely to occur.
- Pessimistic. When it retrieves the data, the application locks it in the cache to prevent another instance from changing it. This process ensures that collisions can't occur, but they can also block other instances that need to process the same data. Pessimistic concurrency can affect the scalability of a solution and is recommended only for short-lived operations. This approach might be appropriate for situations where collisions are more likely, especially if an application updates multiple items in the cache and must ensure that these changes are applied consistently.
Implement high availability and scalability, and improve performance
Avoid using a cache as the primary repository of data; this is the role of the original data store from which the cache is populated. The original data store is responsible for ensuring the persistence of the data.
Be careful not to introduce critical dependencies on the availability of a shared cache service into your solutions. An application should be able to continue functioning if the service that provides the shared cache is unavailable. The application shouldn't become unresponsive or fail while waiting for the cache service to resume.
Therefore, the application must be prepared to detect the availability of the cache service and fall back to the original data store if the cache is inaccessible. The Circuit-Breaker pattern is useful for handling this scenario. The service that provides the cache can be recovered, and once it becomes available, the cache can be repopulated as data is read from the original data store, following a strategy such as the Cache-aside pattern.
However, system scalability may be affected if the application falls back to the original data store when the cache is temporarily unavailable. While the data store is being recovered, the original data store could be swamped with requests for data, resulting in timeouts and failed connections.
Consider implementing a local, private cache in each instance of an application, together with the shared cache that all application instances access. When the application retrieves an item, it can check first in its local cache, then in the shared cache, and finally in the original data store. The local cache can be populated using the data in either the shared cache, or in the database if the shared cache is unavailable.
This approach requires careful configuration to prevent the local cache from becoming too stale with respect to the shared cache. However, the local cache acts as a buffer if the shared cache is unreachable. Figure 3 shows this structure.

Figure 3: Using a local private cache with a shared cache.
To support large caches that hold relatively long-lived data, some cache services provide a high-availability option that implements automatic failover if the cache becomes unavailable. This approach typically involves replicating the cached data that's stored on a primary cache server to a secondary cache server, and switching to the secondary server if the primary server fails or connectivity is lost.
To reduce the latency that's associated with writing to multiple destinations, the replication to the secondary server might occur asynchronously when data is written to the cache on the primary server. This approach leads to the possibility that some cached information might be lost if there's a failure, but the proportion of this data should be small, compared to the overall size of the cache.
If a shared cache is large, it might be beneficial to partition the cached data across nodes to reduce the chances of contention and improve scalability. Many shared caches support the ability to dynamically add (and remove) nodes and rebalance the data across partitions. This approach might involve clustering, in which the collection of nodes is presented to client applications as a seamless, single cache. Internally, however, the data is dispersed between nodes following a predefined distribution strategy that balances the load evenly. For more information about possible partitioning strategies, see Data partitioning guidance.
Clustering can also increase the availability of the cache. If a node fails, the remainder of the cache is still accessible. Clustering is frequently used in conjunction with replication and failover. Each node can be replicated, and the replica can be quickly brought online if the node fails.
Many read and write operations are likely to involve single data values or objects. However, at times it might be necessary to store or retrieve large volumes of data quickly. For example, seeding a cache could involve writing hundreds or thousands of items to the cache. An application might also need to retrieve a large number of related items from the cache as part of the same request.
Many large-scale caches provide batch operations for these purposes. This enables a client application to package up a large volume of items into a single request and reduces the overhead that's associated with performing a large number of small requests.
Caching and eventual consistency
For the cache-aside pattern to work, the instance of the application that populates the cache must have access to the most recent and consistent version of the data. In a system that implements eventual consistency (such as a replicated data store) this might not be the case.
One instance of an application could modify a data item and invalidate the cached version of that item. Another instance of the application might attempt to read this item from a cache, which causes a cache-miss, so it reads the data from the data store and adds it to the cache. However, if the data store hasn't been fully synchronized with the other replicas, the application instance could read and populate the cache with the old value.
For more information about handling data consistency, see the Data consistency primer.
Protect cached data
Irrespective of the cache service you use, consider how to protect the data that's held in the cache from unauthorized access. There are two main concerns:
- The privacy of the data in the cache.
- The privacy of data as it flows between the cache and the application that's using the cache.
To protect data in the cache, the cache service might implement an authentication mechanism that requires that applications specify the following:
- Which identities can access data in the cache.
- Which operations (read and write) that these identities are allowed to perform.
To reduce overhead that's associated with reading and writing data, after an identity has been granted write and/or read access to the cache, that identity can use any data in the cache.
If you need to restrict access to subsets of the cached data, you can do one of the following:
- Split the cache into partitions (by using different cache servers) and only grant access to identities for the partitions that they should be allowed to use.
- Encrypt the data in each subset by using different keys, and provide the encryption keys only to identities that should have access to each subset. A client application might still be able to retrieve all of the data in the cache, but it will only be able to decrypt the data for which it has the keys.
You must also protect the data as it flows in and out of the cache. To do this, you depend on the security features provided by the network infrastructure that client applications use to connect to the cache. If the cache is implemented using an on-site server within the same organization that hosts the client applications, then the isolation of the network itself might not require you to take additional steps. If the cache is located remotely and requires a TCP or HTTP connection over a public network (such as the Internet), consider implementing SSL.
Considerations for implementing caching in Azure
Azure Cache for Redis is an implementation of the open source Redis cache that runs as a service in an Azure datacenter. It provides a caching service that can be accessed from any Azure application, whether the application is implemented as a cloud service, a website, or inside an Azure virtual machine. Caches can be shared by client applications that have the appropriate access key.
Azure Cache for Redis is a high-performance caching solution that provides availability, scalability and security. It typically runs as a service spread across one or more dedicated machines. It attempts to store as much information as it can in memory to ensure fast access. This architecture is intended to provide low latency and high throughput by reducing the need to perform slow I/O operations.
Azure Cache for Redis is compatible with many of the various APIs that are used by client applications. If you have existing applications that already use Azure Cache for Redis running on-premises, the Azure Cache for Redis provides a quick migration path to caching in the cloud.
Features of Redis
Redis is more than a simple cache server. It provides a distributed in-memory database with an extensive command set that supports many common scenarios. These are described later in this document, in the section Using Redis caching. This section summarizes some of the key features that Redis provides.
Redis as an in-memory database
Redis supports both read and write operations. In Redis, writes can be protected from system failure either by being stored periodically in a local snapshot file or in an append-only log file. This situation isn't the case in many caches, which should be considered transitory data stores.
All writes are asynchronous and don't block clients from reading and writing data. When Redis starts running, it reads the data from the snapshot or log file and uses it to construct the in-memory cache. For more information, see Redis persistence on the Redis website.
Note
Redis doesn't guarantee that all writes will be saved if there's a catastrophic failure, but at worst you might lose only a few seconds worth of data. Remember that a cache isn't intended to act as an authoritative data source, and it's the responsibility of the applications using the cache to ensure that critical data is saved successfully to an appropriate data store. For more information, see the Cache-aside pattern.
Redis data types
Redis is a key-value store, where values can contain simple types or complex data structures such as hashes, lists, and sets. It supports a set of atomic operations on these data types. Keys can be permanent or tagged with a limited time-to-live, at which point the key and its corresponding value are automatically removed from the cache. For more information about Redis keys and values, visit the page An introduction to Redis data types and abstractions on the Redis website.
Redis replication and clustering
Redis supports primary/subordinate replication to help ensure availability and maintain throughput. Write operations to a Redis primary node are replicated to one or more subordinate nodes. Read operations can be served by the primary or any of the subordinates.
If you have a network partition, subordinates can continue to serve data and then transparently resynchronize with the primary when the connection is reestablished. For further details, visit the Replication page on the Redis website.
Redis also provides clustering, which enables you to transparently partition data into shards across servers and spread the load. This feature improves scalability, because new Redis servers can be added and the data repartitioned as the size of the cache increases.
Furthermore, each server in the cluster can be replicated by using primary/subordinate replication. This ensures availability across each node in the cluster. For more information about clustering and sharding, visit the Redis cluster tutorial page on the Redis website.
Redis memory use
A Redis cache has a finite size that depends on the resources available on the host computer. When you configure a Redis server, you can specify the maximum amount of memory it can use. You can also configure a key in a Redis cache to have an expiration time, after which it's automatically removed from the cache. This feature can help prevent the in-memory cache from filling with old or stale data.
As memory fills up, Redis can automatically evict keys and their values by following a number of policies. The default is LRU (least recently used), but you can also select other policies such as evicting keys at random or turning off eviction altogether (in which, case attempts to add items to the cache fail if it's full). The page Using Redis as an LRU cache provides more information.
Redis transactions and batches
Redis enables a client application to submit a series of operations that read and write data in the cache as an atomic transaction. All the commands in the transaction are guaranteed to run sequentially, and no commands issued by other concurrent clients will be interwoven between them.
However, these aren't true transactions as a relational database would perform them. Transaction processing consists of two stages--the first is when the commands are queued, and the second is when the commands are run. During the command queuing stage, the commands that comprise the transaction are submitted by the client. If some sort of error occurs at this point (such as a syntax error, or the wrong number of parameters) then Redis refuses to process the entire transaction and discards it.
During the run phase, Redis performs each queued command in sequence. If a command fails during this phase, Redis continues with the next queued command and doesn't roll back the effects of any commands that have already been run. This simplified form of transaction helps to maintain performance and avoid performance problems that are caused by contention.
Redis does implement a form of optimistic locking to assist in maintaining consistency. For detailed information about transactions and locking with Redis, visit the Transactions page on the Redis website.
Redis also supports nontransactional batching of requests. The Redis protocol that clients use to send commands to a Redis server enables a client to send a series of operations as part of the same request. This can help to reduce packet fragmentation on the network. When the batch is processed, each command is performed. If any of these commands are malformed, they'll be rejected (which doesn't happen with a transaction), but the remaining commands will be performed. There's also no guarantee about the order in which the commands in the batch will be processed.
Redis security
Redis is focused purely on providing fast access to data, and is designed to run inside a trusted environment that can be accessed only by trusted clients. Redis supports a limited security model based on password authentication. (It's possible to remove authentication completely, although we don't recommend this.)
All authenticated clients share the same global password and have access to the same resources. If you need more comprehensive sign-in security, you must implement your own security layer in front of the Redis server, and all client requests should pass through this additional layer. Redis shouldn't be directly exposed to untrusted or unauthenticated clients.
You can restrict access to commands by disabling them or renaming them (and by providing only privileged clients with the new names).
Redis doesn't directly support any form of data encryption, so all encoding must be performed by client applications. Additionally, Redis doesn't provide any form of transport security. If you need to protect data as it flows across the network, we recommend implementing an SSL proxy.
For more information, visit the Redis security page on the Redis website.
Note
Azure Cache for Redis provides its own security layer through which clients connect. The underlying Redis servers aren't exposed to the public network.
Azure Redis cache
Azure Cache for Redis provides access to Redis servers that are hosted at an Azure datacenter. It acts as a façade that provides access control and security. You can provision a cache by using the Azure portal.
The portal provides a number of predefined configurations. These range from a 53 GB cache running as a dedicated service that supports SSL communications (for privacy) and master/subordinate replication with an SLA of 99.9% availability, down to a 250 MB cache without replication (no availability guarantees) running on shared hardware.
Using the Azure portal, you can also configure the eviction policy of the cache, and control access to the cache by adding users to the roles provided. These roles, which define the operations that members can perform, include Owner, Contributor, and Reader. For example, members of the Owner role have complete control over the cache (including security) and its contents, members of the Contributor role can read and write information in the cache, and members of the Reader role can only retrieve data from the cache.
Most administrative tasks are performed through the Azure portal. For this reason, many of the administrative commands that are available in the standard version of Redis aren't available, including the ability to modify the configuration programmatically, shut down the Redis server, configure additional subordinates, or forcibly save data to disk.
The Azure portal includes a convenient graphical display that enables you to monitor the performance of the cache. For example, you can view the number of connections being made, the number of requests being performed, the volume of reads and writes, and the number of cache hits versus cache misses. Using this information, you can determine the effectiveness of the cache and if necessary, switch to a different configuration or change the eviction policy.
Additionally, you can create alerts that send email messages to an administrator if one or more critical metrics fall outside of an expected range. For example, you might want to alert an administrator if the number of cache misses exceeds a specified value in the last hour, because it means the cache might be too small or data might be being evicted too quickly.
You can also monitor the CPU, memory, and network usage for the cache.
For further information and examples showing how to create and configure an Azure Cache for Redis, visit the page Lap around Azure Cache for Redis on the Azure blog.
Caching session state and HTML output
If you build ASP.NET web applications that run by using Azure web roles, you can save session state information and HTML output in an Azure Cache for Redis. The session state provider for Azure Cache for Redis enables you to share session information between different instances of an ASP.NET web application, and is very useful in web farm situations where client-server affinity isn't available and caching session data in-memory wouldn't be appropriate.
Using the session state provider with Azure Cache for Redis delivers several benefits, including:
- Sharing session state with a large number of instances of ASP.NET web applications.
- Providing improved scalability.
- Supporting controlled, concurrent access to the same session state data for multiple readers and a single writer.
- Using compression to save memory and improve network performance.
For more information, see ASP.NET session state provider for Azure Cache for Redis.
Note
Don't use the session state provider for Azure Cache for Redis with ASP.NET applications that run outside of the Azure environment. The latency of accessing the cache from outside of Azure can eliminate the performance benefits of caching data.
Similarly, the output cache provider for Azure Cache for Redis enables you to save the HTTP responses generated by an ASP.NET web application. Using the output cache provider with Azure Cache for Redis can improve the response times of applications that render complex HTML output. Application instances that generate similar responses can use the shared output fragments in the cache rather than generating this HTML output afresh. For more information, see ASP.NET output cache provider for Azure Cache for Redis.
Building a custom Redis cache
Azure Cache for Redis acts as a façade to the underlying Redis servers. If you require an advanced configuration that isn't covered by the Azure Redis cache (such as a cache bigger than 53 GB) you can build and host your own Redis servers by using Azure virtual machines.
This is a potentially complex process because you might need to create several VMs to act as primary and subordinate nodes if you want to implement replication. Furthermore, if you wish to create a cluster, then you need multiple primaries and subordinate servers. A minimal clustered replication topology that provides a high degree of availability and scalability comprises at least six VMs organized as three pairs of primary/subordinate servers (a cluster must contain at least three primary nodes).
Each primary/subordinate pair should be located close together to minimize latency. However, each set of pairs can be running in different Azure datacenters located in different regions, if you wish to locate cached data close to the applications that are most likely to use it. For an example of building and configuring a Redis node running as an Azure VM, see Running Redis on a CentOS Linux VM in Azure.
Note
If you implement your own Redis cache in this way, you're responsible for monitoring, managing, and securing the service.
Partitioning a Redis cache
Partitioning the cache involves splitting the cache across multiple computers. This structure gives you several advantages over using a single cache server, including:
- Creating a cache that is much bigger than can be stored on a single server.
- Distributing data across servers, improving availability. If one server fails or becomes inaccessible, the data that it holds is unavailable, but the data on the remaining servers can still be accessed. For a cache, this isn't crucial because the cached data is only a transient copy of the data that's held in a database. Cached data on a server that becomes inaccessible can be cached on a different server instead.
- Spreading the load across servers, thereby improving performance and scalability.
- Geolocating data close to the users that access it, thus reducing latency.
For a cache, the most common form of partitioning is sharding. In this strategy, each partition (or shard) is a Redis cache in its own right. Data is directed to a specific partition by using sharding logic, which can use a variety of approaches to distribute the data. The Sharding pattern provides more information about implementing sharding.
To implement partitioning in a Redis cache, you can take one of the following approaches:
- Server-side query routing. In this technique, a client application sends a request to any of the Redis servers that comprise the cache (probably the closest server). Each Redis server stores metadata that describes the partition that it holds, and also contains information about which partitions are located on other servers. The Redis server examines the client request. If it can be resolved locally, it will perform the requested operation. Otherwise it will forward the request on to the appropriate server. This model is implemented by Redis clustering, and is described in more detail on the Redis cluster tutorial page on the Redis website. Redis clustering is transparent to client applications, and additional Redis servers can be added to the cluster (and the data re-partitioned) without requiring that you reconfigure the clients.
- Client-side partitioning. In this model, the client application contains logic (possibly in the form of a library) that routes requests to the appropriate Redis server. This approach can be used with Azure Cache for Redis. Create multiple Azure Cache for Redis (one for each data partition) and implement the client-side logic that routes the requests to the correct cache. If the partitioning scheme changes (if additional Azure Cache for Redis are created, for example), client applications might need to be reconfigured.
- Proxy-assisted partitioning. In this scheme, client applications send requests to an intermediary proxy service which understands how the data is partitioned and then routes the request to the appropriate Redis server. This approach can also be used with Azure Cache for Redis; the proxy service can be implemented as an Azure cloud service. This approach requires an additional level of complexity to implement the service, and requests might take longer to perform than using client-side partitioning.
The page Partitioning: how to split data among multiple Redis instances on the Redis website provides further information about implementing partitioning with Redis.
Implement Redis cache client applications
Redis supports client applications written in numerous programming languages. If you build new applications by using the .NET Framework, we recommended you use the StackExchange.Redis client library. This library provides a .NET Framework object model that abstracts the details for connecting to a Redis server, sending commands, and receiving responses. It's available in Visual Studio as a NuGet package. You can use this same library to connect to an Azure Cache for Redis, or a custom Redis cache hosted on a VM.
To connect to a Redis server you use the static Connect method of the ConnectionMultiplexer class. The connection that this method creates is designed to be used throughout the lifetime of the client application, and the same connection can be used by multiple concurrent threads. Don't reconnect and disconnect each time you perform a Redis operation because this can degrade performance.
You can specify the connection parameters, such as the address of the Redis host and the password. If you use Azure Cache for Redis, the password is either the primary or secondary key that is generated for Azure Cache for Redis by using the Azure portal.
After you have connected to the Redis server, you can obtain a handle on the Redis database that acts as the cache. The Redis connection provides the GetDatabase method to do this. You can then retrieve items from the cache and store data in the cache by using the StringGet and StringSet methods. These methods expect a key as a parameter, and return the item either in the cache that has a matching value (StringGet) or add the item to the cache with this key (StringSet).
Depending on the location of the Redis server, many operations might incur some latency while a request is transmitted to the server and a response is returned to the client. The StackExchange library provides asynchronous versions of many of the methods that it exposes to help client applications remain responsive. These methods support the Task-based Asynchronous pattern in the .NET Framework.
The following code snippet shows a method named RetrieveItem. It illustrates an implementation of the cache-aside pattern based on Redis and the StackExchange library. The method takes a string key value and attempts to retrieve the corresponding item from the Redis cache by calling the StringGetAsync method (the asynchronous version of StringGet).
If the item isn't found, it's fetched from the underlying data source using the GetItemFromDataSourceAsync method (which is a local method and not part of the StackExchange library). It's then added to the cache by using the StringSetAsync method so it can be retrieved more quickly next time.
// Connect to the Azure Redis cache
ConfigurationOptions config = new ConfigurationOptions();
config.EndPoints.Add("<your DNS name>.redis.cache.windows.net");
config.Password = "<Redis cache key from management portal>";
ConnectionMultiplexer redisHostConnection = ConnectionMultiplexer.Connect(config);
IDatabase cache = redisHostConnection.GetDatabase();
...
private async Task<string> RetrieveItem(string itemKey)
{
    // Attempt to retrieve the item from the Redis cache
    string itemValue = await cache.StringGetAsync(itemKey);

    // If the value returned is null, the item was not found in the cache
    // So retrieve the item from the data source and add it to the cache
    if (itemValue == null)
    {
        itemValue = await GetItemFromDataSourceAsync(itemKey);
        await cache.StringSetAsync(itemKey, itemValue);
    }

    // Return the item
    return itemValue;
}
The StringGet and StringSet methods aren't restricted to retrieving or storing string values. They can take any item that is serialized as an array of bytes. If you need to save a .NET object, you can serialize it as a byte stream and use the StringSet method to write it to the cache.
Similarly, you can read an object from the cache by using the StringGet method and deserializing it as a .NET object. The following code shows a set of extension methods for the IDatabase interface (the GetDatabase method of a Redis connection returns an IDatabase object), and some sample code that uses these methods to read and write a BlogPost object to the cache:
public static class RedisCacheExtensions
{
    public static async Task<T> GetAsync<T>(this IDatabase cache, string key)
    {
        return Deserialize<T>(await cache.StringGetAsync(key));
    }

    public static async Task<object> GetAsync(this IDatabase cache, string key)
    {
        return Deserialize<object>(await cache.StringGetAsync(key));
    }

    public static async Task SetAsync(this IDatabase cache, string key, object value)
    {
        await cache.StringSetAsync(key, Serialize(value));
    }

    static byte[] Serialize(object o)
    {
        byte[] objectDataAsStream = null;

        if (o != null)
        {
            var jsonString = JsonSerializer.Serialize(o);
            objectDataAsStream = Encoding.ASCII.GetBytes(jsonString);
        }

        return objectDataAsStream;
    }

    static T Deserialize<T>(byte[] stream)
    {
        T result = default(T);

        if (stream != null)
        {
            var jsonString = Encoding.ASCII.GetString(stream);
            result = JsonSerializer.Deserialize<T>(jsonString);
        }

        return result;
    }
}
The following code illustrates a method named RetrieveBlogPost that uses these extension methods to read and write a serializable BlogPost object to the cache following the cache-aside pattern:
// The BlogPost type
public class BlogPost
{
    private HashSet<string> tags;

    public BlogPost(int id, string title, int score, IEnumerable<string> tags)
    {
        this.Id = id;
        this.Title = title;
        this.Score = score;
        this.tags = new HashSet<string>(tags);
    }

    public int Id { get; set; }
    public string Title { get; set; }
    public int Score { get; set; }
    public ICollection<string> Tags => this.tags;
}
...
private async Task<BlogPost> RetrieveBlogPost(string blogPostKey)
{
    BlogPost blogPost = await cache.GetAsync<BlogPost>(blogPostKey);
    if (blogPost == null)
    {
        blogPost = await GetBlogPostFromDataSourceAsync(blogPostKey);
        await cache.SetAsync(blogPostKey, blogPost);
    }

    return blogPost;
}
Redis supports command pipelining if a client application sends multiple asynchronous requests. Redis can multiplex the requests using the same connection rather than receiving and responding to commands in a strict sequence.
This approach helps to reduce latency by making more efficient use of the network. The following code snippet shows an example that retrieves the details of two customers concurrently. The code submits two requests and then performs some other processing (not shown) before waiting to receive the results. The Wait method of the cache object is similar to the .NET Framework Task.Wait method:
ConnectionMultiplexer redisHostConnection = ...;
IDatabase cache = redisHostConnection.GetDatabase();
...
var task1 = cache.StringGetAsync("customer:1");
var task2 = cache.StringGetAsync("customer:2");
...
var customer1 = cache.Wait(task1);
var customer2 = cache.Wait(task2);
For additional information on writing client applications that can use the Azure Cache for Redis, see the Azure Cache for Redis documentation. More information is also available at StackExchange.Redis.
The page Pipelines and multiplexers on the same website provides more information about asynchronous operations and pipelining with Redis and the StackExchange library.
Using Redis caching
The simplest use of Redis for caching concerns is key-value pairs where the value is an uninterpreted string of arbitrary length that can contain any binary data. (It's essentially an array of bytes that can be treated as a string). This scenario was illustrated in the section Implement Redis Cache client applications earlier in this article.
Note that keys also contain uninterpreted data, so you can use any binary information as the key. The longer the key is, however, the more space it will take to store, and the longer it will take to perform lookup operations. For usability and ease of maintenance, design your keyspace carefully and use meaningful (but not verbose) keys.
For example, use structured keys such as "customer:100" to represent the key for the customer with ID 100 rather than simply "100". This scheme enables you to easily distinguish between values that store different data types. For example, you could also use the key "orders:100" to represent the key for the order with ID 100.
Apart from one-dimensional binary strings, a value in a Redis key-value pair can also hold more structured information, including lists, sets (sorted and unsorted), and hashes. Redis provides a comprehensive command set that can manipulate these types, and many of these commands are available to .NET Framework applications through a client library such as StackExchange. The page An introduction to Redis data types and abstractions on the Redis website provides a more detailed overview of these types and the commands that you can use to manipulate them.
This section summarizes some common use cases for these data types and commands.
Perform atomic and batch operations
Redis supports a series of atomic get-and-set operations on string values. These operations remove the possible race hazards that might occur when using separate GET and SET commands. The operations that are available include:
INCR,INCRBY,DECR, andDECRBY, which perform atomic increment and decrement operations on integer numeric data values. The StackExchange library provides overloaded versions of theIDatabase.StringIncrementAsyncandIDatabase.StringDecrementAsyncmethods to perform these operations and return the resulting value that is stored in the cache. The following code snippet illustrates how to use these methods:ConnectionMultiplexer redisHostConnection = ...; IDatabase cache = redisHostConnection.GetDatabase(); ... await cache.StringSetAsync("data:counter", 99); ... long oldValue = await cache.StringIncrementAsync("data:counter"); // Increment by 1 (the default) // oldValue should be 100 long newValue = await cache.StringDecrementAsync("data:counter", 50); // Decrement by 50 // newValue should be 50GETSET, which retrieves the value that's associated with a key and changes it to a new value. The StackExchange library makes this operation available through theIDatabase.StringGetSetAsyncmethod. The code snippet below shows an example of this method. This code returns the current value that's associated with the key "data:counter" from the previous example. Then it resets the value for this key back to zero, all as part of the same operation:ConnectionMultiplexer redisHostConnection = ...; IDatabase cache = redisHostConnection.GetDatabase(); ... string oldValue = await cache.StringGetSetAsync("data:counter", 0);MGETandMSET, which can return or change a set of string values as a single operation. TheIDatabase.StringGetAsyncandIDatabase.StringSetAsyncmethods are overloaded to support this functionality, as shown in the following example:ConnectionMultiplexer redisHostConnection = ...; IDatabase cache = redisHostConnection.GetDatabase(); ... // Create a list of key-value pairs var keysAndValues = new List<KeyValuePair<RedisKey, RedisValue>>() { new KeyValuePair<RedisKey, RedisValue>("data:key1", "value1"), new KeyValuePair<RedisKey, RedisValue>("data:key99", "value2"), new KeyValuePair<RedisKey, RedisValue>("data:key322", "value3") }; // Store the list of key-value pairs in the cache cache.StringSet(keysAndValues.ToArray()); ... // Find all values that match a list of keys RedisKey[] keys = { "data:key1", "data:key99", "data:key322"}; // values should contain { "value1", "value2", "value3" } RedisValue[] values = cache.StringGet(keys);
You can also combine multiple operations into a single Redis transaction as described in the Redis transactions and batches section earlier in this article. The StackExchange library provides support for transactions through the ITransaction interface.
You create an ITransaction object by using the IDatabase.CreateTransaction method. You invoke commands to the transaction by using the methods provided by the ITransaction object.
The ITransaction interface provides access to a set of methods that's similar to those accessed by the IDatabase interface, except that all the methods are asynchronous. This means that they're only performed when the ITransaction.Execute method is invoked. The value that's returned by the ITransaction.Execute method indicates whether the transaction was created successfully (true) or if it failed (false).
The following code snippet shows an example that increments and decrements two counters as part of the same transaction:
ConnectionMultiplexer redisHostConnection = ...;
IDatabase cache = redisHostConnection.GetDatabase();
...
ITransaction transaction = cache.CreateTransaction();
var tx1 = transaction.StringIncrementAsync("data:counter1");
var tx2 = transaction.StringDecrementAsync("data:counter2");
bool result = transaction.Execute();
Console.WriteLine("Transaction {0}", result ? "succeeded" : "failed");
Console.WriteLine("Result of increment: {0}", tx1.Result);
Console.WriteLine("Result of decrement: {0}", tx2.Result);
Remember that Redis transactions are unlike transactions in relational databases. The Execute method simply queues all the commands that comprise the transaction to be run, and if any of them is malformed then the transaction is stopped. If all the commands have been queued successfully, each command runs asynchronously.
If any command fails, the others still continue processing. If you need to verify that a command has completed successfully, you must fetch the results of the command by using the Result property of the corresponding task, as shown in the example above. Reading the Result property will block the calling thread until the task has completed.
For more information, see Transactions in Redis.
When performing batch operations, you can use the IBatch interface of the StackExchange library. This interface provides access to a set of methods similar to those accessed by the IDatabase interface, except that all the methods are asynchronous.
You create an IBatch object by using the IDatabase.CreateBatch method, and then run the batch by using the IBatch.Execute method, as shown in the following example. This code simply sets a string value, increments and decrements the same counters used in the previous example, and displays the results:
ConnectionMultiplexer redisHostConnection = ...;
IDatabase cache = redisHostConnection.GetDatabase();
...
IBatch batch = cache.CreateBatch();
batch.StringSetAsync("data:key1", 11);
var t1 = batch.StringIncrementAsync("data:counter1");
var t2 = batch.StringDecrementAsync("data:counter2");
batch.Execute();
Console.WriteLine("{0}", t1.Result);
Console.WriteLine("{0}", t2.Result);
It's important to understand that unlike a transaction, if a command in a batch fails because it's malformed, the other commands might still run. The IBatch.Execute method doesn't return any indication of success or failure.
Perform fire and forget cache operations
Redis supports fire and forget operations by using command flags. In this situation, the client simply initiates an operation but has no interest in the result and doesn't wait for the command to be completed. The example below shows how to perform the INCR command as a fire and forget operation:
ConnectionMultiplexer redisHostConnection = ...;
IDatabase cache = redisHostConnection.GetDatabase();
...
await cache.StringSetAsync("data:key1", 99);
...
cache.StringIncrement("data:key1", flags: CommandFlags.FireAndForget);
Specify automatically expiring keys
When you store an item in a Redis cache, you can specify a timeout after which the item will be automatically removed from the cache. You can also query how much more time a key has before it expires by using the TTL command. This command is available to StackExchange applications by using the IDatabase.KeyTimeToLive method.
The following code snippet shows how to set an expiration time of 20 seconds on a key, and query the remaining lifetime of the key:
ConnectionMultiplexer redisHostConnection = ...;
IDatabase cache = redisHostConnection.GetDatabase();
...
// Add a key with an expiration time of 20 seconds
await cache.StringSetAsync("data:key1", 99, TimeSpan.FromSeconds(20));
...
// Query how much time a key has left to live
// If the key has already expired, the KeyTimeToLive function returns a null
TimeSpan? expiry = cache.KeyTimeToLive("data:key1");
You can also set the expiration time to a specific date and time by using the EXPIRE command, which is available in the StackExchange library as the KeyExpireAsync method:
ConnectionMultiplexer redisHostConnection = ...;
IDatabase cache = redisHostConnection.GetDatabase();
...
// Add a key with an expiration date of midnight on 1st January 2015
await cache.StringSetAsync("data:key1", 99);
await cache.KeyExpireAsync("data:key1",
    new DateTime(2015, 1, 1, 0, 0, 0, DateTimeKind.Utc));
...
Tip
You can manually remove an item from the cache by using the DEL command, which is available through the StackExchange library as the IDatabase.KeyDeleteAsync method.
Use tags to cross-correlate cached items
A Redis set is a collection of multiple items that share a single key. You can create a set by using the SADD command. You can retrieve the items in a set by using the SMEMBERS command. The StackExchange library implements the SADD command with the IDatabase.SetAddAsync method, and the SMEMBERS command with the IDatabase.SetMembersAsync method.
You can also combine existing sets to create new sets by using the SDIFF (set difference), SINTER (set intersection), and SUNION (set union) commands. The StackExchange library unifies these operations in the IDatabase.SetCombineAsync method. The first parameter to this method specifies the set operation to perform.
The following code snippets show how sets can be useful for quickly storing and retrieving collections of related items. This code uses the BlogPost type that was described in the section Implement Redis Cache Client Applications earlier in this article.
A BlogPost object contains four fields—an ID, a title, a ranking score, and a collection of tags. The first code snippet below shows the sample data that's used for populating a C# list of BlogPost objects:
List<string[]> tags = new List<string[]>
{
    new[] { "iot","csharp" },
    new[] { "iot","azure","csharp" },
    new[] { "csharp","git","big data" },
    new[] { "iot","git","database" },
    new[] { "database","git" },
    new[] { "csharp","database" },
    new[] { "iot" },
    new[] { "iot","database","git" },
    new[] { "azure","database","big data","git","csharp" },
    new[] { "azure" }
};

List<BlogPost> posts = new List<BlogPost>();
int blogKey = 0;
int numberOfPosts = 20;
Random random = new Random();
for (int i = 0; i < numberOfPosts; i++)
{
    blogKey++;
    posts.Add(new BlogPost(
        blogKey,                  // Blog post ID
        string.Format(CultureInfo.InvariantCulture, "Blog Post #{0}",
            blogKey),             // Blog post title
        random.Next(100, 10000),  // Ranking score
        tags[i % tags.Count]));   // Tags--assigned from a collection
                                  // in the tags list
}
You can store the tags for each BlogPost object as a set in a Redis cache and associate each set with the ID of the BlogPost. This enables an application to quickly find all the tags that belong to a specific blog post. To enable searching in the opposite direction and find all blog posts that share a specific tag, you can create another set that holds the blog posts referencing the tag ID in the key:
ConnectionMultiplexer redisHostConnection = ...;
IDatabase cache = redisHostConnection.GetDatabase();
...
// Tags are easily represented as Redis Sets
foreach (BlogPost post in posts)
{
    string redisKey = string.Format(CultureInfo.InvariantCulture,
        "blog:posts:{0}:tags", post.Id);
    // Add tags to the blog post in Redis
    await cache.SetAddAsync(
        redisKey, post.Tags.Select(s => (RedisValue)s).ToArray());

    // Now do the inverse so we can figure out which blog posts have a given tag
    foreach (var tag in post.Tags)
    {
        await cache.SetAddAsync(string.Format(CultureInfo.InvariantCulture,
            "tag:{0}:blog:posts", tag), post.Id);
    }
}
These structures enable you to perform many common queries very efficiently. For example, you can find and display all of the tags for blog post 1 like this:
// Show the tags for blog post #1
foreach (var value in await cache.SetMembersAsync("blog:posts:1:tags"))
{
    Console.WriteLine(value);
}
You can find all tags that are common to blog post 1 and blog post 2 by performing a set intersection operation, as follows:
// Show the tags in common for blog posts #1 and #2
foreach (var value in await cache.SetCombineAsync(SetOperation.Intersect, new RedisKey[]
    { "blog:posts:1:tags", "blog:posts:2:tags" }))
{
    Console.WriteLine(value);
}
And you can find all blog posts that contain a specific tag:
// Show the ids of the blog posts that have the tag "iot".
foreach (var value in await cache.SetMembersAsync("tag:iot:blog:posts"))
{
    Console.WriteLine(value);
}
Find recently accessed items
A common task required of many applications is to find the most recently accessed items. For example, a blogging site might want to display information about the most recently read blog posts.
You can implement this functionality by using a Redis list. A Redis list contains multiple items that share the same key. The list acts as a double-ended queue. You can push items to either end of the list by using the LPUSH (left push) and RPUSH (right push) commands. You can retrieve items from either end of the list by using the LPOP and RPOP commands. You can also return a set of elements by using the LRANGE and RRANGE commands.
The code snippets below show how you can perform these operations by using the StackExchange library. This code uses the BlogPost type from the previous examples. As a blog post is read by a user, the IDatabase.ListLeftPushAsync method pushes the title of the blog post onto a list that's associated with the key "blog:recent_posts" in the Redis cache.
ConnectionMultiplexer redisHostConnection = ...;
IDatabase cache = redisHostConnection.GetDatabase();
...
string redisKey = "blog:recent_posts";
BlogPost blogPost = ...; // Reference to the blog post that has just been read
await cache.ListLeftPushAsync(
    redisKey, blogPost.Title); // Push the blog post onto the list
As more blog posts are read, their titles are pushed onto the same list. The list is ordered by the sequence in which the titles have been added. The most recently read blog posts are toward the left end of the list. (If the same blog post is read more than once, it will have multiple entries in the list.)
You can display the titles of the most recently read posts by using the IDatabase.ListRange method. This method takes the key that contains the list, a starting point, and an ending point. The following code retrieves the titles of the 10 blog posts (items from 0 to 9) at the left-most end of the list:
// Show latest ten posts
foreach (string postTitle in await cache.ListRangeAsync(redisKey, 0, 9))
{
    Console.WriteLine(postTitle);
}
Note that the ListRangeAsync method doesn't remove items from the list. To do this, you can use the IDatabase.ListLeftPopAsync and IDatabase.ListRightPopAsync methods.
To prevent the list from growing indefinitely, you can periodically cull items by trimming the list. The code snippet below shows you how to remove all but the five left-most items from the list:
await cache.ListTrimAsync(redisKey, 0, 5);
Implement a leader board
By default, the items in a set aren't held in any specific order. You can create an ordered set by using the ZADD command (the IDatabase.SortedSetAdd method in the StackExchange library). The items are ordered by using a numeric value called a score, which is provided as a parameter to the command.
The following code snippet adds the title of a blog post to an ordered list. In this example, each blog post also has a score field that contains the ranking of the blog post.
ConnectionMultiplexer redisHostConnection = ...;
IDatabase cache = redisHostConnection.GetDatabase();
...
string redisKey = "blog:post_rankings";
BlogPost blogPost = ...; // Reference to a blog post that has just been rated
await cache.SortedSetAddAsync(redisKey, blogPost.Title, blogPost.Score);
You can retrieve the blog post titles and scores in ascending score order by using the IDatabase.SortedSetRangeByRankWithScores method:
foreach (var post in await cache.SortedSetRangeByRankWithScoresAsync(redisKey))
{
    Console.WriteLine(post);
}
Note
The StackExchange library also provides the IDatabase.SortedSetRangeByRankAsync method, which returns the data in score order, but it doesn't return the scores.
You can also retrieve items in descending order of scores, and limit the number of items that are returned by providing additional parameters to the IDatabase.SortedSetRangeByRankWithScoresAsync method. The next example displays the titles and scores of the top 10 ranked blog posts:
foreach (var post in await cache.SortedSetRangeByRankWithScoresAsync(
                               redisKey, 0, 9, Order.Descending))
{
    Console.WriteLine(post);
}
The next example uses the IDatabase.SortedSetRangeByScoreWithScoresAsync method, which you can use to limit the items that are returned to those that fall within a given score range:
// Blog posts with scores between 5000 and 100000
foreach (var post in await cache.SortedSetRangeByScoreWithScoresAsync(
                               redisKey, 5000, 100000))
{
    Console.WriteLine(post);
}
Message by using channels
Apart from acting as a data cache, a Redis server provides messaging through a high-performance publisher/subscriber mechanism. Client applications can subscribe to a channel, and other applications or services can publish messages to the channel. Subscribing applications will then receive these messages and can process them.
Redis provides the SUBSCRIBE command for client applications to use to subscribe to channels. This command expects the name of one or more channels on which the application will accept messages. The StackExchange library includes the ISubscription interface, which enables a .NET Framework application to subscribe and publish to channels.
You create an ISubscription object by using the GetSubscriber method of the connection to the Redis server. Then you listen for messages on a channel by using the SubscribeAsync method of this object. The following code example shows how to subscribe to a channel named "messages:blogPosts":
ConnectionMultiplexer redisHostConnection = ...;
ISubscriber subscriber = redisHostConnection.GetSubscriber();
...
await subscriber.SubscribeAsync("messages:blogPosts", (channel, message) => Console.WriteLine("Title is: {0}", message));
The first parameter to the Subscribe method is the name of the channel. This name follows the same conventions that are used by keys in the cache. The name can contain any binary data, but we recommend you use relatively short, meaningful strings to help ensure good performance and maintainability.
Note also that the namespace used by channels is separate from that used by keys. This means you can have channels and keys that have the same name, although this may make your application code more difficult to maintain.
The second parameter is an Action delegate. This delegate runs asynchronously whenever a new message appears on the channel. This example simply displays the message on the console (the message will contain the title of a blog post).
To publish to a channel, an application can use the Redis PUBLISH command. The StackExchange library provides the IServer.PublishAsync method to perform this operation. The next code snippet shows how to publish a message to the "messages:blogPosts" channel:
ConnectionMultiplexer redisHostConnection = ...;
ISubscriber subscriber = redisHostConnection.GetSubscriber();
...
BlogPost blogPost = ...;
subscriber.PublishAsync("messages:blogPosts", blogPost.Title);
There are several points you should understand about the publish/subscribe mechanism:
- Multiple subscribers can subscribe to the same channel, and they'll all receive the messages that are published to that channel.
- Subscribers only receive messages that have been published after they've subscribed. Channels aren't buffered, and once a message is published, the Redis infrastructure pushes the message to each subscriber and then removes it.
- By default, messages are received by subscribers in the order in which they're sent. In a highly active system with a large number of messages and many subscribers and publishers, guaranteed sequential delivery of messages can slow performance of the system. If each message is independent and the order is unimportant, you can enable concurrent processing by the Redis system, which can help to improve responsiveness. You can achieve this in a StackExchange client by setting the PreserveAsyncOrder of the connection used by the subscriber to false:
ConnectionMultiplexer redisHostConnection = ...;
redisHostConnection.PreserveAsyncOrder = false;
ISubscriber subscriber = redisHostConnection.GetSubscriber();
Serialization considerations
When you choose a serialization format, consider tradeoffs between performance, interoperability, versioning, compatibility with existing systems, data compression, and memory overhead. When you evaluate the performance, remember that benchmarks are highly dependent on context. They may not reflect your actual workload, and may not consider newer libraries or versions. There's no single "fastest" serializer for all scenarios.
Some options to consider include:
Protocol Buffers (also called protobuf) is a serialization format developed by Google for serializing structured data efficiently. It uses strongly typed definition files to define message structures. These definition files are then compiled to language-specific code for serializing and deserializing messages. Protobuf can be used over existing RPC mechanisms, or it can generate an RPC service.
Apache Thrift uses a similar approach, with strongly typed definition files and a compilation step to generate the serialization code and RPC services.
Apache Avro provides similar functionality to Protocol Buffers and Thrift, but there's no compilation step. Instead, serialized data always includes a schema that describes the structure.
JSON is an open standard that uses human-readable text fields. It has broad cross-platform support. JSON doesn't use message schemas. Being a text-based format, it isn't very efficient over the wire. In some cases, however, you may be returning cached items directly to a client via HTTP, in which case storing JSON could save the cost of deserializing from another format and then serializing to JSON.
BSON is a binary serialization format that uses a structure similar to JSON. BSON was designed to be lightweight, easy to scan, and fast to serialize and deserialize, relative to JSON. Payloads are comparable in size to JSON. Depending on the data, a BSON payload may be smaller or larger than a JSON payload. BSON has some additional data types that aren't available in JSON, notably BinData (for byte arrays) and Date.
MessagePack is a binary serialization format that is designed to be compact for transmission over the wire. There are no message schemas or message type checking.
Bond is a cross-platform framework for working with schematized data. It supports cross-language serialization and deserialization. Notable differences from other systems listed here are support for inheritance, type aliases, and generics.
gRPC is an open-source RPC system developed by Google. By default, it uses Protocol Buffers as its definition language and underlying message interchange format.
Next steps
- Azure Cache for Redis documentation
- Azure Cache for Redis FAQ
- Task-based Asynchronous pattern
- Redis documentation
- StackExchange.Redis
- Data partitioning guide
Related resources
The following patterns might also be relevant to your scenario when you implement caching in your applications:
Cache-aside pattern: This pattern describes how to load data on demand into a cache from a data store. This pattern also helps to maintain consistency between data that's held in the cache and the data in the original data store.
The Sharding pattern provides information about implementing horizontal partitioning to help improve scalability when storing and accessing large volumes of data.