A GitHub account. If you don't have one, sign up for free.
Set up GitHub Actions deployment when creating the app
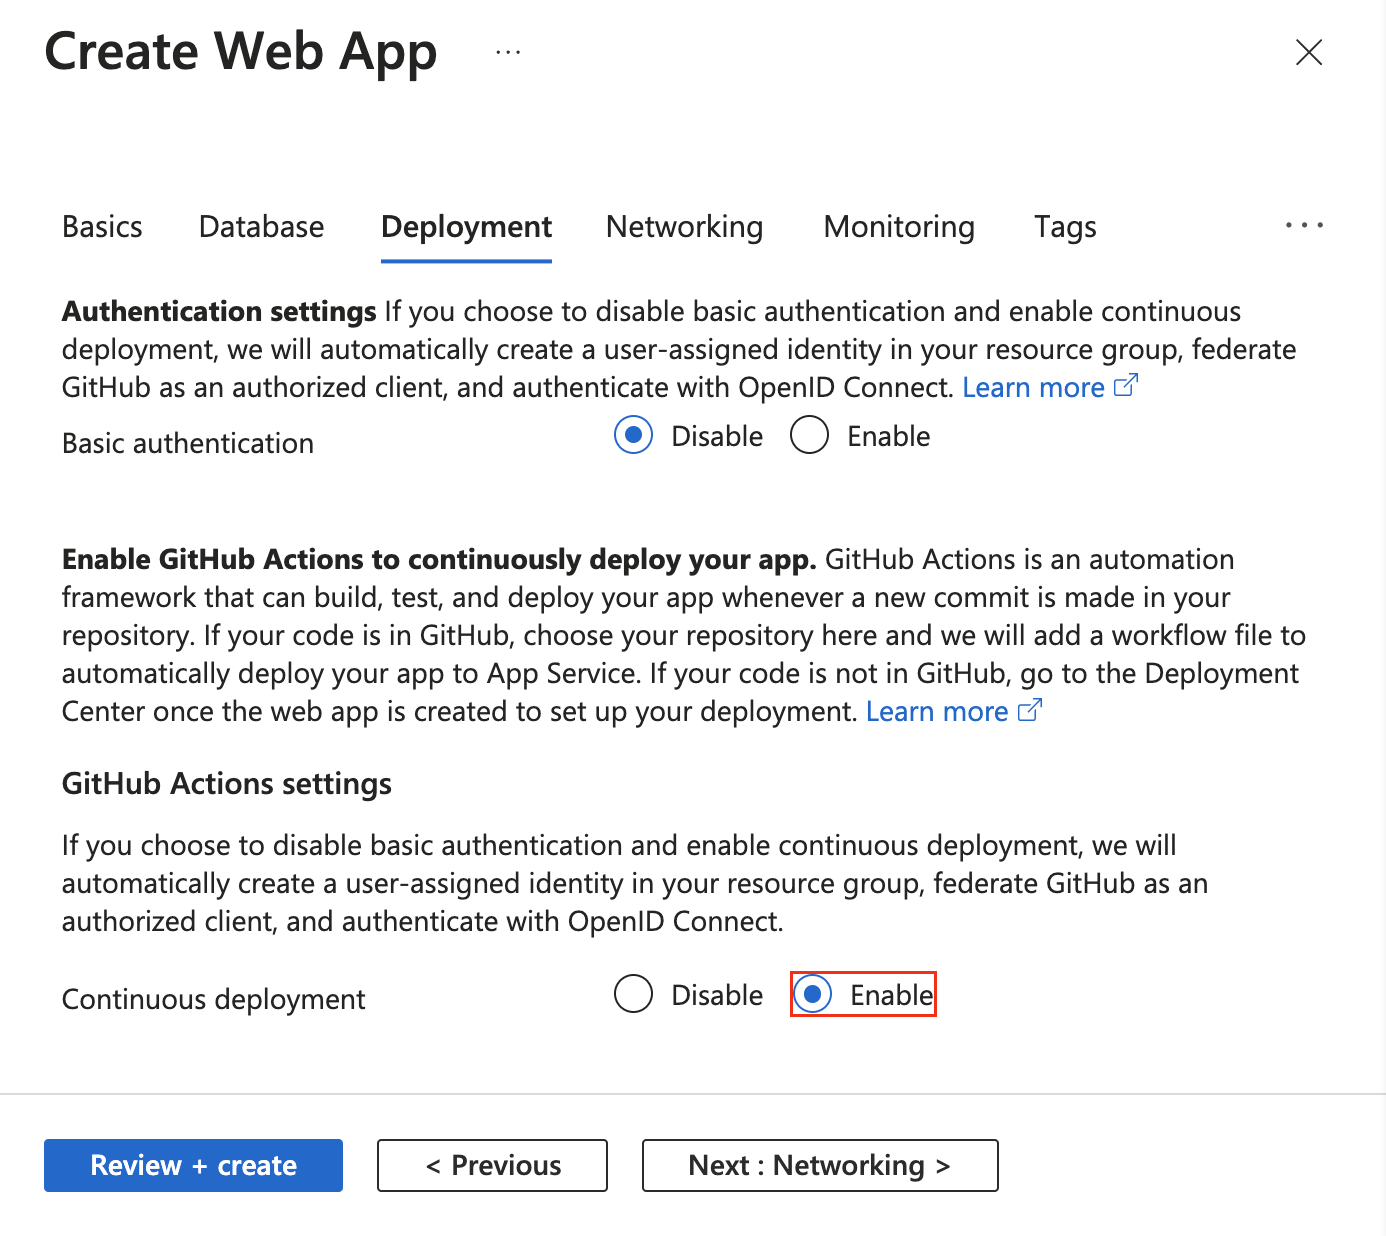
GitHub Actions deployment is integrated into the default app creation wizard. You just need to set Continuous deployment to Enable in the Deployment tab, and configure the organization, repository, and branch you want.
When you enable continuous deployment, the app creation wizard automatically picks the authentication method based on the basic authentication selection and configures your app and your GitHub repository accordingly:
Set up GitHub Actions deployment from the Deployment Center
For an existing app, you can get started quickly with GitHub Actions by using the App Service Deployment Center. This turn-key method automatically generates a GitHub Actions workflow file based on your application stack and commits it to your GitHub repository.
The Deployment Center also lets you easily configure the more secure OpenID Connect authentication with the user-assigned identity option.
If your Azure account has the needed permissions, you can select to create a user-assigned identity. Otherwise, you can select an existing user-assigned managed identity in the Identity dropdown. You can work with your Azure administrator to create a user-assigned managed identity with the Website Contributor role.
The recommended way to authenticate with Azure App Services for GitHub Actions is with a user-defined managed identity, and the easiest way for that is by configuring GitHub Actions deployment directly in the portal instead and selecting User-assigned managed identity.
Note
Authentication using a user-assigned managed identity is currently in preview.
Alternatively, you can authenticate with a service principal, OpenID Connect, or a publish profile.
A publish profile is an app-level credential. Set up your publish profile as a GitHub secret.
Go to your app service in the Azure portal.
On the Overview page, select Get Publish profile.
Save the downloaded file. You'll use the contents of the file to create a GitHub secret.
Note
As of October 2020, Linux web apps needs the app setting WEBSITE_WEBDEPLOY_USE_SCM set to truebefore downloading the publish profile. This requirement will be removed in the future.
az ad sp create-for-rbac --name "myApp" --role contributor \
                            --scopes /subscriptions/<subscription-id>/resourceGroups/<group-name>/providers/Microsoft.Web/sites/<app-name> \
                            --json-auth
In the previous example, replace the placeholders with your subscription ID, resource group name, and app name. The output is a JSON object with the role assignment credentials that provide access to your App Service app similar to the following JSON snippet. Copy this JSON object for later.
It is always a good practice to grant minimum access. The scope in the previous example is limited to the specific App Service app and not the entire resource group.
OpenID Connect is an authentication method that uses short-lived tokens. Setting up OpenID Connect with GitHub Actions is more complex but offers hardened security.
This command outputs a JSON with an appId that is your client-id. Save the value to use as the AZURE_CLIENT_ID GitHub secret later.
You'll use the objectId value when creating federated credentials with Graph API and reference it as the APPLICATION-OBJECT-ID.
Create a service principal. Replace the $appID with the appId from your JSON output.
This command generates JSON output with a different objectId and will be used in the next step. The new objectId is the assignee-object-id.
Copy the appOwnerTenantId to use as a GitHub secret for AZURE_TENANT_ID later.
az ad sp create --id $appId
Create a new role assignment by subscription and object. By default, the role assignment is tied to your default subscription. Replace $subscriptionId with your subscription ID, $resourceGroupName with your resource group name, and $assigneeObjectId with the generated assignee-object-id. Learn how to manage Azure subscriptions with the Azure CLI.
az role assignment create --role contributor --subscription $subscriptionId --assignee-object-id $assigneeObjectId --scope /subscriptions/$subscriptionId/resourceGroups/$resourceGroupName/providers/Microsoft.Web/sites/ --assignee-principal-type ServicePrincipal
Replace APPLICATION-OBJECT-ID with the objectId (generated while creating app) for your Active Directory application.
Set a value for CREDENTIAL-NAME to reference later.
Set the subject. Its value is defined by GitHub depending on your workflow:
Jobs in your GitHub Actions environment: repo:< Organization/Repository >:environment:< Name >
For Jobs not tied to an environment, include the ref path for branch/tag based on the ref path used for triggering the workflow: repo:< Organization/Repository >:ref:< ref path>. For example, repo:n-username/ node_express:ref:refs/heads/my-branch or repo:n-username/ node_express:ref:refs/tags/my-tag.
For workflows triggered by a pull request event: repo:< Organization/Repository >:pull_request.
az ad app federated-credential create --id <APPLICATION-OBJECT-ID> --parameters credential.json
("credential.json" contains the following content)
{
    "name": "<CREDENTIAL-NAME>",
    "issuer": "https://token.actions.githubusercontent.com",
    "subject": "repo:organization/repository:ref:refs/heads/main",
    "description": "Testing",
    "audiences": [
        "api://AzureADTokenExchange"
    ]
}
To learn how to create a Create an active directory application, service principal, and federated credentials in Azure portal, see Connect GitHub and Azure.
In GitHub, browse your repository. Select Settings > Security > Secrets and variables > Actions > New repository secret.
To use app-level credentials, paste the contents of the downloaded publish profile file into the secret's value field. Name the secret AZURE_WEBAPP_PUBLISH_PROFILE.
When you configure the GitHub workflow file later, you use the AZURE_WEBAPP_PUBLISH_PROFILE in the deploy Azure Web App action. For example:
In GitHub, browse your repository. Select Settings > Security > Secrets and variables > Actions > New repository secret.
To use user-level credentials, paste the entire JSON output from the Azure CLI command into the secret's value field. Name the secret AZURE_CREDENTIALS.
When you configure the GitHub workflow file later, you use the secret for the input creds of the Azure/login. For example:
You need to provide your application's Client ID, Tenant ID and Subscription ID to the Azure/login action. These values can either be provided directly in the workflow or can be stored in GitHub secrets and referenced in your workflow. Saving the values as GitHub secrets is the more secure option.
Open your GitHub repository and go to Settings > Security > Secrets and variables > Actions > New repository secret.
Create secrets for AZURE_CLIENT_ID, AZURE_TENANT_ID, and AZURE_SUBSCRIPTION_ID. Use these values from your Active Directory application for your GitHub secrets:
GitHub Secret
Active Directory Application
AZURE_CLIENT_ID
Application (client) ID
AZURE_TENANT_ID
Directory (tenant) ID
AZURE_SUBSCRIPTION_ID
Subscription ID
Save each secret by selecting Add secret.
3. Add the workflow file to your GitHub repository
A workflow is defined by a YAML (.yml) file in the /.github/workflows/ path in your GitHub repository. This definition contains the various steps and parameters that make up the workflow.
At a minimum, the workflow file would have the following distinct steps:
Authenticate with App Service using the GitHub secret you created.
Build the web app.
Deploy the web app.
To deploy your code to an App Service app, you use the azure/webapps-deploy@v3 action. The action requires the name of your web app in app-name and, depending on your language stack, the path of a *.zip, *.war, *.jar, or folder to deploy in package. For a complete list of possible inputs for the azure/webapps-deploy@v3 action, see the action.yml definition.
The following examples show the part of the workflow that builds the web app, in different supported languages.
name: .NET Core CI
on: [push]
env:
AZURE_WEBAPP_NAME: my-app-name # set this to your application's name
AZURE_WEBAPP_PACKAGE_PATH: '.' # set this to the path to your web app project, defaults to the repository root
DOTNET_VERSION: '6.0.x' # set this to the dot net version to use
jobs:
build:
runs-on: ubuntu-latest
steps:
# Checkout the repo
- uses: actions/checkout@main
# Setup .NET Core SDK
- name: Setup .NET Core
uses: actions/setup-dotnet@v3
with:
dotnet-version: ${{ env.DOTNET_VERSION }}
# Run dotnet build and publish
- name: dotnet build and publish
run: |
dotnet restore
dotnet build --configuration Release
dotnet publish -c Release --property:PublishDir='${{ env.AZURE_WEBAPP_PACKAGE_PATH }}/myapp'
# Deploy to Azure Web apps
- name: 'Run Azure webapp deploy action using publish profile credentials'
uses: azure/webapps-deploy@v3
with:
app-name: ${{ env.AZURE_WEBAPP_NAME }} # Replace with your app name
publish-profile: ${{ secrets.AZURE_WEBAPP_PUBLISH_PROFILE }} # Define secret variable in repository settings as per action documentation
package: '${{ env.AZURE_WEBAPP_PACKAGE_PATH }}/myapp'
Build and deploy an ASP.NET MVC app that uses NuGet and publish-profile for authentication.
name: Deploy ASP.NET MVC App deploy to Azure Web App
on: [push]
env:
AZURE_WEBAPP_NAME: my-app # set this to your application's name
AZURE_WEBAPP_PACKAGE_PATH: '.' # set this to the path to your web app project, defaults to the repository root
NUGET_VERSION: '5.3.x' # set this to the dot net version to use
jobs:
build-and-deploy:
runs-on: windows-latest
steps:
- uses: actions/checkout@main
- name: Install Nuget
uses: nuget/setup-nuget@v1
with:
nuget-version: ${{ env.NUGET_VERSION}}
- name: NuGet to restore dependencies as well as project-specific tools that are specified in the project file
run: nuget restore
- name: Add msbuild to PATH
uses: microsoft/setup-msbuild@v1.0.2
- name: Run MSBuild
run: msbuild .\SampleWebApplication.sln
- name: 'Run Azure webapp deploy action using publish profile credentials'
uses: azure/webapps-deploy@v3
with:
app-name: ${{ env.AZURE_WEBAPP_NAME }} # Replace with your app name
publish-profile: ${{ secrets.AZURE_WEBAPP_PUBLISH_PROFILE }} # Define secret variable in repository settings as per action documentation
package: '${{ env.AZURE_WEBAPP_PACKAGE_PATH }}/SampleWebApplication/'
Build and deploy a Java Spring app to Azure using an Azure publish profile. The publish-profile input references the AZURE_WEBAPP_PUBLISH_PROFILE secret that you created earlier.
name: Java CI with Maven
on: [push]
jobs:
build:
runs-on: ubuntu-latest
steps:
- uses: actions/checkout@v4
- name: Set up JDK 1.8
uses: actions/setup-java@v3
with:
java-version: 1.8
- name: Build with Maven
run: mvn -B package --file pom.xml
working-directory: my-app-path
- name: Azure WebApp
uses: Azure/webapps-deploy@v3
with:
app-name: my-app-name
publish-profile: ${{ secrets.AZURE_WEBAPP_PUBLISH_PROFILE }}
package: my/target/*.jar
To deploy a war instead of a jar, change the package value.
Build and deploy a Node.js app to Azure using the app's publish profile. The publish-profile input references the AZURE_WEBAPP_PUBLISH_PROFILE secret that you created earlier.
# File: .github/workflows/workflow.yml
name: JavaScript CI
on: [push]
env:
AZURE_WEBAPP_NAME: my-app-name # set this to your application's name
AZURE_WEBAPP_PACKAGE_PATH: 'my-app-path' # set this to the path to your web app project, defaults to the repository root
NODE_VERSION: '18.x' # set this to the node version to use
jobs:
build-and-deploy:
name: Build and Deploy
runs-on: ubuntu-latest
steps:
- uses: actions/checkout@main
- name: Use Node.js ${{ env.NODE_VERSION }}
uses: actions/setup-node@v4
with:
node-version: ${{ env.NODE_VERSION }}
- name: npm install, build, and test
run: |
# Build and test the project, then
# deploy to Azure Web App.
npm install
npm run build --if-present
npm run test --if-present
working-directory: my-app-path
- name: 'Deploy to Azure WebApp'
uses: azure/webapps-deploy@v3
with:
app-name: ${{ env.AZURE_WEBAPP_NAME }}
publish-profile: ${{ secrets.AZURE_WEBAPP_PUBLISH_PROFILE }}
package: ${{ env.AZURE_WEBAPP_PACKAGE_PATH }}
Build and deploy a Python app to Azure using the app's publish profile. Note how the publish-profile input references the AZURE_WEBAPP_PUBLISH_PROFILE secret that you created earlier.
name: Python CI
on:
[push]
env:
AZURE_WEBAPP_NAME: my-web-app # set this to your application's name
AZURE_WEBAPP_PACKAGE_PATH: '.' # set this to the path to your web app project, defaults to the repository root
jobs:
build:
runs-on: ubuntu-latest
steps:
- uses: actions/checkout@v4
- name: Set up Python 3.x
uses: actions/setup-python@v4
with:
python-version: 3.x
- name: Install dependencies
run: |
python -m pip install --upgrade pip
pip install -r requirements.txt
- name: Building web app
uses: azure/appservice-build@v2
- name: Deploy web App using GH Action azure/webapps-deploy
uses: azure/webapps-deploy@v3
with:
app-name: ${{ env.AZURE_WEBAPP_NAME }}
publish-profile: ${{ secrets.AZURE_WEBAPP_PUBLISH_PROFILE }}
package: ${{ env.AZURE_WEBAPP_PACKAGE_PATH }}
To deploy with the service principal you configured, use the azure/login@v1 action with the creds key and reference the AZURE_CREDENTIALS secret that you created earlier.
name: .NET Core
on: [push]
env:
AZURE_WEBAPP_NAME: my-app # set this to your application's name
AZURE_WEBAPP_PACKAGE_PATH: '.' # set this to the path to your web app project, defaults to the repository root
DOTNET_VERSION: '6.0.x' # set this to the dot net version to use
jobs:
build:
runs-on: ubuntu-latest
steps:
# Checkout the repo
- uses: actions/checkout@main
- uses: azure/login@v1
  with:
    creds: ${{ secrets.AZURE_CREDENTIALS }}
# Setup .NET Core SDK
- name: Setup .NET Core
uses: actions/setup-dotnet@v3
with:
dotnet-version: ${{ env.DOTNET_VERSION }}
# Run dotnet build and publish
- name: dotnet build and publish
run: |
dotnet restore
dotnet build --configuration Release
dotnet publish -c Release --property:PublishDir='${{ env.AZURE_WEBAPP_PACKAGE_PATH }}/myapp'
# Deploy to Azure Web apps
- name: 'Run Azure webapp deploy action using Azure Credentials'
uses: azure/webapps-deploy@v3
with:
app-name: ${{ env.AZURE_WEBAPP_NAME }} # Replace with your app name
package: '${{ env.AZURE_WEBAPP_PACKAGE_PATH }}/myapp'
- name: logout
run: |
az logout
Build and deploy a ASP.NET MVC app to Azure using an Azure service principal. Note how the creds input references the AZURE_CREDENTIALS secret that you created earlier.
name: Deploy ASP.NET MVC App deploy to Azure Web App

on: [push]

env:
  AZURE_WEBAPP_NAME: my-app    # set this to your application's name
  AZURE_WEBAPP_PACKAGE_PATH: '.'      # set this to the path to your web app project, defaults to the repository root
  NUGET_VERSION: '5.3.x'           # set this to the dot net version to use

jobs:
  build-and-deploy:
    runs-on: windows-latest
    steps:

    # checkout the repo
    - uses: actions/checkout@main

    - uses: azure/login@v1
      with:
        creds: ${{ secrets.AZURE_CREDENTIALS }}

    - name: Install Nuget
      uses: nuget/setup-nuget@v1
      with:
        nuget-version: ${{ env.NUGET_VERSION}}
    - name: NuGet to restore dependencies as well as project-specific tools that are specified in the project file
      run: nuget restore

    - name: Add msbuild to PATH
      uses: microsoft/setup-msbuild@v1.0.2

    - name: Run MSBuild
      run: msbuild .\SampleWebApplication.sln

    - name: 'Run Azure webapp deploy action using Azure Credentials'
      uses: azure/webapps-deploy@v3
      with:
        app-name: ${{ env.AZURE_WEBAPP_NAME }} # Replace with your app name
        package: '${{ env.AZURE_WEBAPP_PACKAGE_PATH }}/SampleWebApplication/'

    # Azure logout
    - name: logout
      run: |
        az logout
Build and deploy a Java Spring app to Azure using an Azure service principal. Note how the creds input references the AZURE_CREDENTIALS secret that you created earlier.
name: Java CI with Maven

on: [push]

jobs:
  build:

    runs-on: ubuntu-latest

    steps:
    - uses: actions/checkout@v4
    - uses: azure/login@v1
      with:
        creds: ${{ secrets.AZURE_CREDENTIALS }}
    - name: Set up JDK 1.8
      uses: actions/setup-java@v3
      with:
        java-version: 1.8
    - name: Build with Maven
      run: mvn -B package --file pom.xml
      working-directory: complete
    - name: Azure WebApp
      uses: Azure/webapps-deploy@v3
      with:
        app-name: my-app-name
        package: my/target/*.jar

    # Azure logout
    - name: logout
      run: |
        az logout
Build and deploy a Node.js app to Azure using an Azure service principal. Note how the creds input references the AZURE_CREDENTIALS secret that you created earlier.
name: JavaScript CI

on: [push]

name: Node.js

env:
  AZURE_WEBAPP_NAME: my-app   # set this to your application's name
  AZURE_WEBAPP_PACKAGE_PATH: 'my-app-path'      # set this to the path to your web app project, defaults to the repository root
  NODE_VERSION: '18.x'                # set this to the node version to use

jobs:
  build-and-deploy:
    runs-on: ubuntu-latest
    steps:
    # checkout the repo
    - name: 'Checkout GitHub Action'
      uses: actions/checkout@main

    - uses: azure/login@v1
      with:
        creds: ${{ secrets.AZURE_CREDENTIALS }}

    - name: Setup Node ${{ env.NODE_VERSION }}
      uses: actions/setup-node@v4
      with:
        node-version: ${{ env.NODE_VERSION }}

    - name: 'npm install, build, and test'
      run: |
        npm install
        npm run build --if-present
        npm run test --if-present
      working-directory:  my-app-path

    # deploy web app using Azure credentials
    - uses: azure/webapps-deploy@v3
      with:
        app-name: ${{ env.AZURE_WEBAPP_NAME }}
        package: ${{ env.AZURE_WEBAPP_PACKAGE_PATH }}

    # Azure logout
    - name: logout
      run: |
        az logout
Build and deploy a Python app to Azure using an Azure service principal. Note how the creds input references the AZURE_CREDENTIALS secret that you created earlier.
name: Python application

on:
  [push]

env:
  AZURE_WEBAPP_NAME: my-app # set this to your application's name
  AZURE_WEBAPP_PACKAGE_PATH: '.' # set this to the path to your web app project, defaults to the repository root

jobs:
  build:
    runs-on: ubuntu-latest
    steps:
    - uses: actions/checkout@v4

    - uses: azure/login@v1
      with:
        creds: ${{ secrets.AZURE_CREDENTIALS }}

    - name: Set up Python 3.x
      uses: actions/setup-python@v4
      with:
        python-version: 3.x
    - name: Install dependencies
      run: |
        python -m pip install --upgrade pip
        pip install -r requirements.txt
    - name: Deploy web App using GH Action azure/webapps-deploy
      uses: azure/webapps-deploy@v3
      with:
        app-name: ${{ env.AZURE_WEBAPP_NAME }}
        package: ${{ env.AZURE_WEBAPP_PACKAGE_PATH }}
    - name: logout
      run: |
        az logout
To deploy with OpenID Connect using the managed identity you configured, use the azure/login@v1 action with the client-id, tenant-id, and subscription-id keys and reference the GitHub secrets that you created earlier.
name: .NET Core

on: [push]

permissions:
      id-token: write
      contents: read

env:
  AZURE_WEBAPP_NAME: my-app    # set this to your application's name
  AZURE_WEBAPP_PACKAGE_PATH: '.'      # set this to the path to your web app project, defaults to the repository root
  DOTNET_VERSION: '6.0.x'           # set this to the dot net version to use

jobs:
  build:
    runs-on: ubuntu-latest

    steps:
      # Checkout the repo
      - uses: actions/checkout@main
      - uses: azure/login@v1
        with:
          client-id: ${{ secrets.AZURE_CLIENT_ID }}
          tenant-id: ${{ secrets.AZURE_TENANT_ID }}
          subscription-id: ${{ secrets.AZURE_SUBSCRIPTION_ID }}


      # Setup .NET Core SDK
      - name: Setup .NET Core
        uses: actions/setup-dotnet@v3
        with:
          dotnet-version: ${{ env.DOTNET_VERSION }}

      # Run dotnet build and publish
      - name: dotnet build and publish
        run: |
          dotnet restore
          dotnet build --configuration Release
          dotnet publish -c Release --property:PublishDir='${{ env.AZURE_WEBAPP_PACKAGE_PATH }}/myapp'

      # Deploy to Azure Web apps
      - name: 'Run Azure webapp deploy action using publish profile credentials'
        uses: azure/webapps-deploy@v3
        with:
          app-name: ${{ env.AZURE_WEBAPP_NAME }} # Replace with your app name
          package: '${{ env.AZURE_WEBAPP_PACKAGE_PATH }}/myapp'

      - name: logout
        run: |
          az logout
Build and deploy a ASP.NET MVC app to Azure using an Azure service principal. The example uses GitHub secrets for the client-id, tenant-id, and subscription-id values. You can also pass these values directly in the login action.
name: Deploy ASP.NET MVC App deploy to Azure Web App

on: [push]

permissions:
      id-token: write
      contents: read

env:
  AZURE_WEBAPP_NAME: my-app    # set this to your application's name
  AZURE_WEBAPP_PACKAGE_PATH: '.'      # set this to the path to your web app project, defaults to the repository root
  NUGET_VERSION: '5.3.x'           # set this to the dot net version to use

jobs:
  build-and-deploy:
    runs-on: windows-latest
    steps:

    # checkout the repo
    - uses: actions/checkout@main

    - uses: azure/login@v1
      with:
        client-id: ${{ secrets.AZURE_CLIENT_ID }}
        tenant-id: ${{ secrets.AZURE_TENANT_ID }}
        subscription-id: ${{ secrets.AZURE_SUBSCRIPTION_ID }}

    - name: Install Nuget
      uses: nuget/setup-nuget@v1
      with:
        nuget-version: ${{ env.NUGET_VERSION}}
    - name: NuGet to restore dependencies as well as project-specific tools that are specified in the project file
      run: nuget restore

    - name: Add msbuild to PATH
      uses: microsoft/setup-msbuild@v1.0.2

    - name: Run MSBuild
      run: msbuild .\SampleWebApplication.sln

    - name: 'Run Azure webapp deploy action using publish profile credentials'
      uses: azure/webapps-deploy@v3
      with:
        app-name: ${{ env.AZURE_WEBAPP_NAME }} # Replace with your app name
        package: '${{ env.AZURE_WEBAPP_PACKAGE_PATH }}/SampleWebApplication/'

    # Azure logout
    - name: logout
      run: |
        az logout
Build and deploy a Java Spring app to Azure using an Azure service principal. The example uses GitHub secrets for the client-id, tenant-id, and subscription-id values. You can also pass these values directly in the login action.
name: JavaScript CI

on: [push]

permissions:
      id-token: write
      contents: read

name: Node.js

env:
  AZURE_WEBAPP_NAME: my-app   # set this to your application's name
  AZURE_WEBAPP_PACKAGE_PATH: 'my-app-path'      # set this to the path to your web app project, defaults to the repository root
  NODE_VERSION: '18.x'                # set this to the node version to use

jobs:
  build-and-deploy:
    runs-on: ubuntu-latest
    steps:
    # checkout the repo
    - name: 'Checkout GitHub Action'
      uses: actions/checkout@main

    - uses: azure/login@v1
      with:
        client-id: ${{ secrets.AZURE_CLIENT_ID }}
        tenant-id: ${{ secrets.AZURE_TENANT_ID }}
        subscription-id: ${{ secrets.AZURE_SUBSCRIPTION_ID }}

    - name: Setup Node ${{ env.NODE_VERSION }}
      uses: actions/setup-node@v4
      with:
        node-version: ${{ env.NODE_VERSION }}

    - name: 'npm install, build, and test'
      run: |
        npm install
        npm run build --if-present
        npm run test --if-present
      working-directory:  my-app-path

    # deploy web app using Azure credentials
    - uses: azure/webapps-deploy@v3
      with:
        app-name: ${{ env.AZURE_WEBAPP_NAME }}
        package: ${{ env.AZURE_WEBAPP_PACKAGE_PATH }}

    # Azure logout
    - name: logout
      run: |
        az logout
name: Python application

on:
  [push]

permissions:
      id-token: write
      contents: read

env:
  AZURE_WEBAPP_NAME: my-app # set this to your application's name
  AZURE_WEBAPP_PACKAGE_PATH: '.' # set this to the path to your web app project, defaults to the repository root

jobs:
  build:
    runs-on: ubuntu-latest
    steps:
    - uses: actions/checkout@v4

    - uses: azure/login@v1
      with:
        client-id: ${{ secrets.AZURE_CLIENT_ID }}
        tenant-id: ${{ secrets.AZURE_TENANT_ID }}
        subscription-id: ${{ secrets.AZURE_SUBSCRIPTION_ID }}

    - name: Set up Python 3.x
      uses: actions/setup-python@v4
      with:
        python-version: 3.x
    - name: Install dependencies
      run: |
        python -m pip install --upgrade pip
        pip install -r requirements.txt
    - name: Deploy web App using GH Action azure/webapps-deploy
      uses: azure/webapps-deploy@v3
      with:
        app-name: ${{ env.AZURE_WEBAPP_NAME }}
        package: ${{ env.AZURE_WEBAPP_PACKAGE_PATH }}
    - name: logout
      run: |
        az logout
Next steps
Check out references on Azure GitHub Actions and workflows:
Coming soon: Throughout 2024 we will be phasing out GitHub Issues as the feedback mechanism for content and replacing it with a new feedback system. For more information see: https://aka.ms/ContentUserFeedback.