Upgrade preference for App Service Environment planned maintenance
Azure App Service is regularly updated to provide new features, new runtime versions, performance improvements, and bug fixes. This is also known as planned maintenance. The upgrade happens automatically. The upgrades are applied progressively through the regions following Azure Safe Deployment Practices. An App Service Environment is an Azure App Service feature that provides a fully isolated and dedicated environment for running App Service apps securely at high scale. Because of the isolated nature of App Service Environment, you have an opportunity to influence the upgrade process.
If you don't have an App Service Environment, see How to Create an App Service Environment v3.
Note
This article covers the features, benefits, and use cases of App Service Environment v3, which is used with App Service Isolated v2 plans.
With App Service Environment v3, you can specify your preference for when and how the planned maintenance is applied. The upgrade can be applied automatically or manually. Even with your preference set to automatic, you have some options to influence the timing.
Automatic upgrade preference
When you use an automatic upgrade preference, the platform will upgrade your App Service Environment instance when the upgrade is available in the region in which the instance is deployed. You can choose from one of these options:
- None is the default option. This option will automatically apply the upgrade during the upgrade process for that region.
- Early will apply the upgrade automatically, but will prioritize it as one of the first instances in the region to be upgraded.
- Late will apply the upgrade automatically, but the instance will be one of the last in the region to be upgraded.
In smaller regions, Early and Late upgrade preferences might be very close to each other.
Manual upgrade preference
Manual upgrade preference will give you the option to receive a notification when an upgrade is available. The availability will also be visible in the Azure portal. After the upgrade is available, you'll have 15 days to start the upgrade process. If you don't start the upgrade within the 15 days, the upgrade will be processed with the remaining automatic upgrades in the region.
Note
In rare cases the upgrade availability might be impacted by a security hotfix superseding the planned upgrade, or a regression found in the planned upgrade before it has been applied to your instance. In these rare cases, the available upgrade will be removed and will transition to automatic upgrade.
Configure notifications
When an upgrade is available, Azure will add a planned maintenance event in the Service Health dashboard of Azure Monitor. To see past notifications in the Azure portal, navigate to Home > Monitor > Service Health > Planned maintenance. To make it easy to find the relevant events, select the Service box and check only the App Service type. You can also filter by subscription and region.
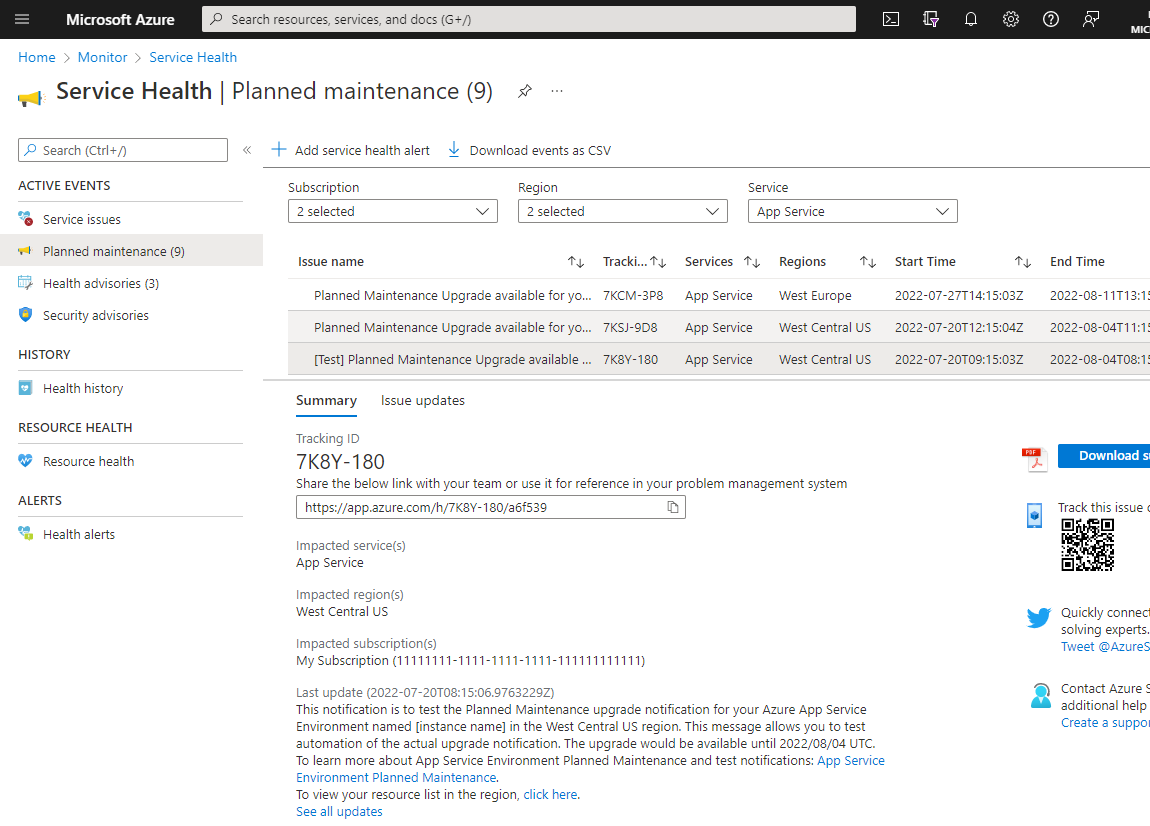
You can configure alerts to send a message to your email address and/or SMS phone number when an event is generated in Azure Monitor. You can also set up a trigger for your custom Azure Function or Logic App, which allows you to automatically take action on your resources. This action could be to automatically divert the traffic from your App Service Environment in one region that will be upgraded to an App Service Environment in another region. Then, you can automatically change the traffic back to normal when an upgrade completes.
To configure alerts for upgrade notifications, select the Add service health alert at the top of the dashboard. Learn more about Azure Monitor Alerts. This how-to article will guide you through configuring alerts for service health events. Finally, you can follow this how-to guide to learn how to create actions groups that will trigger based on the alert.
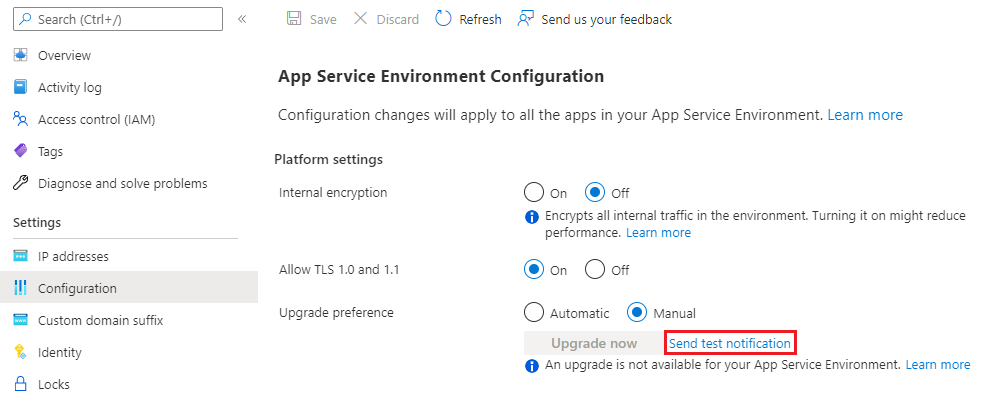
Send test notifications
As you build your automation and notification logic, you may want to test it before the actual upgrade is available as this upgrade could be more than a month out. The Azure portal has the ability to send a special test upgrade available notification, which you can use to verify your automation logic. The message will be similar to the real notification, but the title will be prefixed with "[Test]" and the description will be different. You can send test notifications after you've configured your upgrade preference to Manual.
To send a test notification, navigate to the Configuration page for your App Service Environment and select the Send test notification link. The test notifications are sent in batches every 15 minutes.
Use the Azure portal to configure upgrade preference
- From the Azure portal, navigate to the Configuration page for your App Service Environment.
- Select an upgrade preference.

- Select "Save" at the top of the page.
Use Azure CLI to configure upgrade preference
The recommended experience for the upgrade is to use the Azure portal. If you decide to use the Azure CLI to configure and carry out the upgrade, you should follow the steps described here in order. You can run the commands locally after installing the Azure CLI or use the Azure Cloud Shell.
Replace the placeholders for name and resource group with your values for the App Service Environment you want to configure. To see the current upgrade preference:
ASE_NAME=<Your-App-Service-Environment-name>
ASE_RG=<Your-Resource-Group>
az resource show --name $ASE_NAME -g $ASE_RG --resource-type "Microsoft.Web/hostingEnvironments" --query properties.upgradePreference
To update the upgrade preference to Manual:
ASE_NAME=<Your-App-Service-Environment-name>
ASE_RG=<Your-Resource-Group>
az resource update --name $ASE_NAME -g $ASE_RG --resource-type "Microsoft.Web/hostingEnvironments" --set properties.upgradePreference=Manual
Use the Azure portal to upgrade the App Service Environment
When an upgrade is available, a banner is shown in the Azure portal. Follow these steps to start the upgrade:
- From the Azure portal, navigate to the Configuration page for your App Service Environment.
- Select the Upgrade now button.

- A confirmation banner will appear. Select Start upgrade to start the upgrade process. You'll receive notifications during the upgrade if you've configured them. For more information, see Configure notifications.
Use Azure CLI to upgrade the App Service Environment
Run these commands to get your App Service Environment ID and store it as an environment variable. Replace the placeholders for name and resource group with your values for the App Service Environment you want to migrate.
ASE_NAME=<Your-App-Service-Environment-name>
ASE_RG=<Your-Resource-Group>
ASE_ID=$(az appservice ase show --name $ASE_NAME --resource-group $ASE_RG --query id --output tsv)
Run this command to send a test upgrade notification:
az rest --method POST --uri "${ASE_ID}/testUpgradeAvailableNotification?api-version=2022-03-01"
Run this command to start the upgrade process:
az rest --method POST --uri "${ASE_ID}/upgrade?api-version=2022-03-01"
Next steps
Feedback
Coming soon: Throughout 2024 we will be phasing out GitHub Issues as the feedback mechanism for content and replacing it with a new feedback system. For more information see: https://aka.ms/ContentUserFeedback.
Submit and view feedback for