Manage calls
Learn how to manage calls with the Azure Communication Services SDKS. We'll learn how to place calls, manage their participants and properties.
Prerequisites
- An Azure account with an active subscription. Create an account for free.
- A deployed Communication Services resource. Create a Communication Services resource.
- A
User Access Tokento enable the call client. For more information on how to get aUser Access Token - Optional: Complete the quickstart for getting started with adding calling to your application
Install the SDK
Use the npm install command to install the Azure Communication Services Common and Calling SDKs for JavaScript:
npm install @azure/communication-common --save
npm install @azure/communication-calling --save
Initialize required objects
A CallClient instance is required for most call operations. Here, you create a new CallClient instance. You can configure it with custom options like a Logger instance.
When you have a CallClient instance, you can create a CallAgent instance by calling the createCallAgent method on the CallClient instance. This method asynchronously returns a CallAgent instance object.
The createCallAgent method uses CommunicationTokenCredential as an argument. It accepts a user access token.
You can use the getDeviceManager method on the CallClient instance to access deviceManager.
const { CallClient } = require('@azure/communication-calling');
const { AzureCommunicationTokenCredential} = require('@azure/communication-common');
const { AzureLogger, setLogLevel } = require("@azure/logger");

// Set the logger's log level
setLogLevel('verbose');

// Redirect log output to console, file, buffer, REST API, or whatever location you want
AzureLogger.log = (...args) => {
    console.log(...args); // Redirect log output to console
};

const userToken = '<USER_TOKEN>';
callClient = new CallClient(options);
const tokenCredential = new AzureCommunicationTokenCredential(userToken);
const callAgent = await callClient.createCallAgent(tokenCredential, {displayName: 'optional Azure Communication Services user name'});
const deviceManager = await callClient.getDeviceManager()
Place a call
To create and start a call, use one of the APIs on callAgent and provide a user that you created through the Communication Services identity SDK.
Call creation and start are synchronous. The call instance allows you to subscribe to call events.
Place a 1:n call to a user or PSTN
To call another Communication Services user, use the startCall method on callAgent and pass the recipient's CommunicationUserIdentifier that you created with the Communication Services administration library.
For a 1:1 call to a user, use the following code:
const userCallee = { communicationUserId: '<ACS_USER_ID>' }
const oneToOneCall = callAgent.startCall([userCallee]);
To place a call to a public switched telephone network (PSTN), use the startCall method on callAgent and pass the recipient's PhoneNumberIdentifier. Your Communication Services resource must be configured to allow PSTN calling.
When you call a PSTN number, specify your alternate caller ID. An alternate caller ID is a phone number (based on the E.164 standard) that identifies the caller in a PSTN call. It's the phone number the call recipient sees for an incoming call.
Note
Please check details of PSTN calling offering. For preview program access, apply to the early adopter program.
For a 1:1 call to a PSTN number, use the following code:
const pstnCallee = { phoneNumber: '<ACS_USER_ID>' }
const alternateCallerId = {phoneNumber: '<ALTERNATE_CALLER_ID>'};
const oneToOneCall = callAgent.startCall([pstnCallee], {alternateCallerId});
For a 1:n call to a user and a PSTN number, use the following code:
const userCallee = { communicationUserId: '<ACS_USER_ID>' }
const pstnCallee = { phoneNumber: '<PHONE_NUMBER>'};
const alternateCallerId = {phoneNumber: '<ALTERNATE_CALLER_ID>'};
const groupCall = callAgent.startCall([userCallee, pstnCallee], {alternateCallerId});
Join a room call
To join a room call, you can instantiate a context object with the roomId property as the room identifier. To join the call, use the join method and pass the context instance.
const context = { roomId: '<RoomId>' }
const call = callAgent.join(context);
A room offers application developers better control over who can join a call, when they meet and how they collaborate. To learn more about rooms, you can read the conceptual documentation or follow the quick start guide.
Join a group call
Note
The groupId parameter is considered system metadata and may be used by Microsoft for operations that are required to run the system. Don't include personal data in the groupId value. Microsoft doesn't treat this parameter as personal data and its content may be visible to Microsoft employees or stored long-term.
The groupId parameter requires data to be in GUID format. We recommend using randomly generated GUIDs that aren't considered personal data in your systems.
To start a new group call or join an ongoing group call, use the join method and pass an object with a groupId property. The groupId value has to be a GUID.
const context = { groupId: '<GUID>'};
const call = callAgent.join(context);
Receive an incoming call
The callAgent instance emits an incomingCall event when the logged-in identity receives an incoming call. To listen to this event, subscribe by using one of these options:
const incomingCallHandler = async (args: { incomingCall: IncomingCall }) => {
    const incomingCall = args.incomingCall;

    // Get incoming call ID
    var incomingCallId = incomingCall.id

    // Get information about this Call. This API is provided as a preview for developers
    // and may change based on feedback that we receive. Do not use this API in a production environment.
    // To use this api please use 'beta' release of Azure Communication Services Calling Web SDK
    var callInfo = incomingCall.info;

    // Get information about caller
    var callerInfo = incomingCall.callerInfo

    // Accept the call
    var call = await incomingCall.accept();

    // Reject the call
    incomingCall.reject();

    // Subscribe to callEnded event and get the call end reason
     incomingCall.on('callEnded', args => {
        console.log(args.callEndReason);
    });

    // callEndReason is also a property of IncomingCall
    var callEndReason = incomingCall.callEndReason;
};
callAgentInstance.on('incomingCall', incomingCallHandler);
The incomingCall event includes an incomingCall instance that you can accept or reject.
When starting, joining, or accepting a call with video on, if the camera is being used by another process or if it's disabled in the operating system, the call starts with video off, and a cameraStartFailed: true call diagnostic is raised.
Hold and resume call
Note
At any given moment of time, there should be only 1 active call (in Connected state, with active media). All other calls should be put on hold by a user, or programatically by application. This is common in scenarios like contact centers, where a user may need to handle multiple outbound and inbound calls, all inactive calls should be put on hold, and user should interact with others only in active call
To hold or resume the call, you can use the hold and resume asynchronous APIs:
To hold the call
await call.hold();
When hold API resolves, the call state will be set to LocalHold, if this is a 1:1 call, the other participant will be also put on hold, and state of the call from the perspective of that participant will be set to 'RemoteHold'. The other participant may further put its call on hold, which would result in state change to LocalHold.
If this is a group call - the hold is just a local operation, it won't hold the call for other participants of that call.
To fully resume that call all users who initiated hold must resume it.
To resume call from hold:
await call.resume();
When the resume API resolves, the call state will be set again to Connected.
Mute and unmute a call
To mute or unmute the local endpoint, you can use the mute and unmute asynchronous APIs:
//mute local device (microphone / sent audio)
await call.mute();

//unmute local device (microphone / sent audio)
await call.unmute();
Mute and unmute incoming audio
Mute incoming audio sets the call volume to 0. To mute or unmute the incoming audio, you can use the muteIncomingAudio and unmuteIncomingAudio asynchronous APIs:
//mute local device (speaker)
await call.muteIncomingAudio();

//unmute local device (speaker)
await call.unmuteIncomingAudio();
When incoming audio is muted, the participant client SDK will still receive the call audio (remote participant's audio). The call audio won't be heard in the speaker and the participant won't be able to listen until 'call.unmuteIncomingAudio()' is called. However, we can apply filter on call audio and play the filtered audio.
Mute other participants
Note
This API is provided as a preview for developers and may change based on feedback that we receive. To use this API please use 'beta' release of Azure Communication Services Calling Web SDK version 1.18.1 or higher.
To mute all other participants or mute a specific participant, you can use the asynchronous APIs muteAllRemoteParticipants on the call and mute on the remote participant:
//mute all participants except yourself
await call.muteAllRemoteParticipants();

//mute a specific participant
await call.remoteParticipants[0].mute();
Manage remote participants
All remote participants are detailed in the RemoteParticipant API and available through the remoteParticipants collection on a call instance.
List the participants in a call
The remoteParticipants collection returns a list of remote participants in a call:
call.remoteParticipants; // [remoteParticipant, remoteParticipant....]
Add a participant to a call
To add a participant (either a user or a phone number) to a call, you can use the addParticipant API. Provide one of the Identifier types. It synchronously returns the remoteParticipant instance. The remoteParticipantsUpdated event from Call is raised when a participant is successfully added to the call.
const userIdentifier = { communicationUserId: '<ACS_USER_ID>' };
const pstnIdentifier = { phoneNumber: '<PHONE_NUMBER>' }
const remoteParticipant = call.addParticipant(userIdentifier);
const remoteParticipant = call.addParticipant(pstnIdentifier, {alternateCallerId: '<ALTERNATE_CALLER_ID>'});
Remove a participant from a call
To remove a participant (either a user or a phone number) from a call, you can invoke removeParticipant. You have to pass one of the Identifier types. This method resolves asynchronously after the participant is removed from the call. The participant is also removed from the remoteParticipants collection.
const userIdentifier = { communicationUserId: '<ACS_USER_ID>' };
const pstnIdentifier = { phoneNumber: '<PHONE_NUMBER>' }
await call.removeParticipant(userIdentifier);
await call.removeParticipant(pstnIdentifier);
Access remote participant properties
Remote participants have a set of associated properties and collections:
CommunicationIdentifier: Get the identifier for a remote participant. Identity is one of theCommunicationIdentifiertypes:
const identifier = remoteParticipant.identifier;
It can be one of the following
CommunicationIdentifiertypes:{ communicationUserId: '<ACS_USER_ID'> }: Object representing the Azure Communication Services user.{ phoneNumber: '<E.164>' }: Object representing the phone number in E.164 format.{ microsoftTeamsUserId: '<TEAMS_USER_ID>', isAnonymous?: boolean; cloud?: "public" | "dod" | "gcch" }: Object representing the Teams user.{ id: string }: object representing identifier that doesn't fit any of the other identifier types
state: Get the state of a remote participant.
const state = remoteParticipant.state;
The state can be:
Idle: Initial state.Connecting: Transition state while a participant is connecting to the call.Ringing: Participant is ringing.Connected: Participant is connected to the call.Hold: Participant is on hold.EarlyMedia: Announcement that plays before a participant connects to the call.InLobby: Indicates that remote participant is in lobby.Disconnected: Final state. The participant is disconnected from the call. If the remote participant loses their network connectivity, their state changes toDisconnectedafter two minutes.
callEndReason: To learn why a participant left the call, check thecallEndReasonproperty:const callEndReason = remoteParticipant.callEndReason; const callEndReasonCode = callEndReason.code // (number) code associated with the reason const callEndReasonSubCode = callEndReason.subCode // (number) subCode associated with the reasonNote:
- This property is only set when adding a remote participant via the Call.addParticipant() API, and the remote participant declines for example.
- In the scenario, where for example, UserB kicks UserC, from UserA's perspective, UserA won't see this flag get set for UserC. In other words UserA won't see UserC's callEndReason property get set at all.
isMutedstatus: To find out if a remote participant is muted, check theisMutedproperty. It returnsBoolean.const isMuted = remoteParticipant.isMuted;isSpeakingstatus: To find out if a remote participant is speaking, check theisSpeakingproperty. It returnsBoolean.const isSpeaking = remoteParticipant.isSpeaking;videoStreams: To inspect all video streams that a given participant is sending in this call, check thevideoStreamscollection. It containsRemoteVideoStreamobjects.const videoStreams = remoteParticipant.videoStreams; // [RemoteVideoStream, ...]displayName: To get display name for this remote participant, inspectdisplayNameproperty it return string.const displayName = remoteParticipant.displayName;endpointDetails: Get the details of all the endpoints for this remote participantconst endpointDetails: EndpointDetails[] = remoteParticipant.endpointDetails;Note: A remote participant could be in the call from many endpoints, and each endpoint will have its own unique
participantId.participantIdis different from the RemoteParticipant.identifier's raw Id.
Check call properties
Get the unique ID (string) for a call:
const callId: string = call.id;
Get the local participant Id:
const participantId: string = call.info.participantId;
Note: An Azure Communication Services identity can use the web calling sdk in many endpoints, and each endpoint will have its own unique participantId. participantId is different from the Azure Communication Services identity raw Id.
Retrieve the thread ID if joining a Teams meeting:
const threadId: string | undefined = call.info.threadId;
Get information about the call:
const callInfo = call.info;
Learn about other participants in the call by inspecting the remoteParticipants collection on the 'call' instance:
const remoteParticipants = call.remoteParticipants;
Identify the caller of an incoming call:
const callerIdentity = call.callerInfo.identifier;
identifier is one of the CommunicationIdentifier types.
Get the state of a call:
const callState = call.state;
This returns a string representing the current state of a call:
None: Initial call state.Connecting: Initial transition state when a call is placed or accepted.Ringing: For an outgoing call, indicates that a call is ringing for remote participants. It'sIncomingon their side.EarlyMedia: Indicates a state in which an announcement is played before the call is connected.Connected: Indicates that the call is connected.LocalHold: Indicates that the call is put on hold by a local participant. No media is flowing between the local endpoint and remote participants.RemoteHold: Indicates that the call was put on hold by remote participant. No media is flowing between the local endpoint and remote participants.InLobby: Indicates that user is in lobby.Disconnecting: Transition state before the call goes to aDisconnectedstate.Disconnected: Final call state. If the network connection is lost, the state changes toDisconnectedafter two minutes.
Find out why a call ended by inspecting the callEndReason property:
const callEndReason = call.callEndReason;
const callEndReasonCode = callEndReason.code // (number) code associated with the reason
const callEndReasonSubCode = callEndReason.subCode // (number) subCode associated with the reason
Learn if the current call is incoming or outgoing by inspecting the direction property. It returns CallDirection.
const isIncoming = call.direction == 'Incoming';
const isOutgoing = call.direction == 'Outgoing';
Inspect the active video streams and active screen sharing streams by checking the localVideoStreams collection. The localVideoStreams API returns LocalVideoStream objects or type Video, ScreenSharing or RawMedia.
const localVideoStreams = call.localVideoStreams;
Check if the current microphone is muted. It returns Boolean.
const muted = call.isMuted;
Check if the current incoming audio (speaker) is muted. It returns Boolean.
const incomingAudioMuted = call._isIncomingAudioMuted;
Check if video is on. It returns Boolean.
const isLocalVideoStarted = call.isLocalVideoStarted;
Check is screen sharing is on. It returns Boolean.
const isScreenSharingOn = call.isScreenSharingOn;
Install the SDK
Locate your project-level build.gradle file and add mavenCentral() to the list of repositories under buildscript and allprojects:
buildscript {
    repositories {
    ...
        mavenCentral()
    ...
    }
}
allprojects {
    repositories {
    ...
        mavenCentral()
    ...
    }
}
Then, in your module-level build.gradle file, add the following lines to the dependencies section:
dependencies {
    ...
    implementation 'com.azure.android:azure-communication-calling:1.0.0'
    ...
}
Initialize the required objects
To create a CallAgent instance, you have to call the createCallAgent method on a CallClient instance. This call asynchronously returns a CallAgent instance object.
The createCallAgent method takes CommunicationUserCredential as an argument, which encapsulates an access token.
To access DeviceManager, you must create a callAgent instance first. Then you can use the CallClient.getDeviceManager method to get DeviceManager.
String userToken = '<user token>';
CallClient callClient = new CallClient();
CommunicationTokenCredential tokenCredential = new CommunicationTokenCredential(userToken);
android.content.Context appContext = this.getApplicationContext(); // From within an activity, for instance
CallAgent callAgent = callClient.createCallAgent(appContext, tokenCredential).get();
DeviceManager deviceManager = callClient.getDeviceManager(appContext).get();
To set a display name for the caller, use this alternative method:
String userToken = '<user token>';
CallClient callClient = new CallClient();
CommunicationTokenCredential tokenCredential = new CommunicationTokenCredential(userToken);
android.content.Context appContext = this.getApplicationContext(); // From within an activity, for instance
CallAgentOptions callAgentOptions = new CallAgentOptions();
callAgentOptions.setDisplayName("Alice Bob");
DeviceManager deviceManager = callClient.getDeviceManager(appContext).get();
CallAgent callAgent = callClient.createCallAgent(appContext, tokenCredential, callAgentOptions).get();
Place a call
To create and start a call you need to call the CallAgent.startCall() method and provide the Identifier of the callee(s).
To join a group call you need to call the CallAgent.join() method and provide the groupId. Group Ids must be in GUID or UUID format.
Call creation and start are synchronous. The call instance allows you to subscribe to all events on the call.
Place a 1:1 call to a user
To place a call to another Communication Services user, invoke the call method on callAgent and pass an object with communicationUserId key.
StartCallOptions startCallOptions = new StartCallOptions();
Context appContext = this.getApplicationContext();
CommunicationUserIdentifier acsUserId = new CommunicationUserIdentifier(<USER_ID>);
CommunicationUserIdentifier participants[] = new CommunicationUserIdentifier[]{ acsUserId };
call oneToOneCall = callAgent.startCall(appContext, participants, startCallOptions);
Place a 1:n call with users and PSTN
Note
Please check details of PSTN calling offering. For preview program access, apply to the early adopter program.
To place a 1:n call to a user and a PSTN number you have to specify the phone number of callee. Your Communication Services resource must be configured to allow PSTN calling:
CommunicationUserIdentifier acsUser1 = new CommunicationUserIdentifier(<USER_ID>);
PhoneNumberIdentifier acsUser2 = new PhoneNumberIdentifier("<PHONE_NUMBER>");
CommunicationIdentifier participants[] = new CommunicationIdentifier[]{ acsUser1, acsUser2 };
StartCallOptions startCallOptions = new StartCallOptions();
Context appContext = this.getApplicationContext();
Call groupCall = callAgent.startCall(participants, startCallOptions);
Accept a call
To accept a call, call the 'accept' method on a call object.
Context appContext = this.getApplicationContext();
IncomingCall incomingCall = retrieveIncomingCall();
Call call = incomingCall.accept(context).get();
To accept a call with video camera on:
Context appContext = this.getApplicationContext();
IncomingCall incomingCall = retrieveIncomingCall();
AcceptCallOptions acceptCallOptions = new AcceptCallOptions();
VideoDeviceInfo desiredCamera = callClient.getDeviceManager().get().getCameraList().get(0);
acceptCallOptions.setVideoOptions(new VideoOptions(new LocalVideoStream(desiredCamera, appContext)));
Call call = incomingCall.accept(context, acceptCallOptions).get();
The incoming call can be obtained by subscribing to the onIncomingCall event on the callAgent object:
// Assuming "callAgent" is an instance property obtained by calling the 'createCallAgent' method on CallClient instance
public Call retrieveIncomingCall() {
    IncomingCall incomingCall;
    callAgent.addOnIncomingCallListener(new IncomingCallListener() {
        void onIncomingCall(IncomingCall inboundCall) {
            // Look for incoming call
            incomingCall = inboundCall;
        }
    });
    return incomingCall;
}
Join a room call
Use the CallAgent and RoomCallLocator to join a room call by specifying a roomId. The CallAgent.join method will return a Call object:
val roomCallLocator = RoomCallLocator(roomId)
call = callAgent.join(applicationContext, roomCallLocator, joinCallOptions)
A room offers application developers better control over who can join a call, when they meet and how they collaborate. To learn more about rooms, you can read the conceptual documentation or follow the quick start guide.
Join a group call
To start a new group call or join an ongoing group call you have to call the 'join' method and pass an object with a groupId property. The value has to be a GUID.
Context appContext = this.getApplicationContext();
GroupCallLocator groupCallLocator = new GroupCallLocator("<GUID>");
JoinCallOptions joinCallOptions = new JoinCallOptions();

call = callAgent.join(context, groupCallLocator, joinCallOptions);
Call properties
Get the unique ID for this Call:
String callId = call.getId();
To learn about other participants in the call inspect remoteParticipant collection on the call instance:
List<RemoteParticipant> remoteParticipants = call.getRemoteParticipants();
The identity of caller if the call is incoming:
CommunicationIdentifier callerId = call.getCallerInfo().getIdentifier();
Get the state of the Call:
CallState callState = call.getState();
It returns a string representing the current state of a call:
- 'NONE' - initial call state
- 'EARLY_MEDIA' - indicates a state in which an announcement is played before call is connected
- 'CONNECTING' - initial transition state once call is placed or accepted
- 'RINGING' - for an outgoing call - indicates call is ringing for remote participants
- 'CONNECTED' - call is connected
- 'LOCAL_HOLD' - call is put on hold by local participant, no media is flowing between local endpoint and remote participant(s)
- 'REMOTE_HOLD' - call is put on hold by a remote participant, no media is flowing between local endpoint and remote participant(s)
- 'DISCONNECTING' - transition state before call goes to 'Disconnected' state
- 'DISCONNECTED' - final call state
- 'IN_LOBBY' - in lobby for a Teams meeting interoperability
To learn why a call ended, inspect callEndReason property. It contains code/subcode:
CallEndReason callEndReason = call.getCallEndReason();
int code = callEndReason.getCode();
int subCode = callEndReason.getSubCode();
To see if the current call is an incoming or an outgoing call, inspect callDirection property:
CallDirection callDirection = call.getCallDirection();
// callDirection == CallDirection.INCOMING for incoming call
// callDirection == CallDirection.OUTGOING for outgoing call
To see if the current microphone is muted, inspect the muted property:
boolean muted = call.isMuted();
To inspect active video streams, check the localVideoStreams collection:
List<LocalVideoStream> localVideoStreams = call.getLocalVideoStreams();
Mute and unmute
To mute or unmute the local endpoint you can use the mute and unmute asynchronous APIs:
Context appContext = this.getApplicationContext();
call.mute(appContext).get();
call.unmute(appContext).get();
Mute other participants
Note
This API is provided as a public preview for developers and may change based on feedback that we receive. To use this API please use 'beta' release of Azure Communication Services Calling Android SDK version 2.6.0-beta.5 or higher.
To mute all other participants in a call, use the muteAllRemoteParticipants API on the call.
call.muteAllRemoteParticipants();
To mute a specific remote participant, use the mute API on a given remote participant.
remoteParticipant.mute();
Change the volume of the call
While you are in a call, the hardware volume keys on the phone should allow the user to change the call volume.
This is done by using the method setVolumeControlStream with the stream type AudioManager.STREAM_VOICE_CALL on the Activity where the call is being placed.
This allows the hardware volume keys to change the volume of the call (denoted by a phone icon or something similar on the volume slider), preventing to change the volume for other sound profiles, like alarms, media or system wide volume. For more information, you can check Handling changes in audio output
| Android Developers.
@Override
protected void onCreate(Bundle savedInstanceState) {
    ...
    setVolumeControlStream(AudioManager.STREAM_VOICE_CALL);
}
Remote participants management
All remote participants are represented by RemoteParticipant type and are available through the remoteParticipants collection on a call instance.
List participants in a call
The remoteParticipants collection returns a list of remote participants in given call:
List<RemoteParticipant> remoteParticipants = call.getRemoteParticipants(); // [remoteParticipant, remoteParticipant....]
Add a participant to a call
To add a participant to a call (either a user or a phone number) you can invoke addParticipant.
This will synchronously return the remote participant instance.
const acsUser = new CommunicationUserIdentifier("<acs user id>");
const acsPhone = new PhoneNumberIdentifier("<phone number>");
RemoteParticipant remoteParticipant1 = call.addParticipant(acsUser);
AddPhoneNumberOptions addPhoneNumberOptions = new AddPhoneNumberOptions(new PhoneNumberIdentifier("<alternate phone number>"));
RemoteParticipant remoteParticipant2 = call.addParticipant(acsPhone, addPhoneNumberOptions);
Remove participant from a call
To remove a participant from a call (either a user or a phone number) you can invoke removeParticipant.
This will resolve asynchronously once the participant is removed from the call.
The participant will also be removed from remoteParticipants collection.
RemoteParticipant acsUserRemoteParticipant = call.getParticipants().get(0);
RemoteParticipant acsPhoneRemoteParticipant = call.getParticipants().get(1);
call.removeParticipant(acsUserRemoteParticipant).get();
call.removeParticipant(acsPhoneRemoteParticipant).get();
Remote participant properties
Any given remote participant has a set of properties and collections associated with it:
Get the identifier for this remote participant. Identity is one of the 'Identifier' types
CommunicationIdentifier participantIdentifier = remoteParticipant.getIdentifier();Get state of this remote participant.
ParticipantState state = remoteParticipant.getState();
State can be one of
'IDLE' - initial state
'EARLY_MEDIA' - announcement is played before participant is connected to the call
'RINGING' - participant call is ringing
'CONNECTING' - transition state while participant is connecting to the call
'CONNECTED' - participant is connected to the call
'HOLD' - participant is on hold
'IN_LOBBY' - participant is waiting in the lobby to be admitted. Currently only used in Teams interop scenario
'DISCONNECTED' - final state - participant is disconnected from the call
To learn why a participant left the call, inspect
callEndReasonproperty:CallEndReason callEndReason = remoteParticipant.getCallEndReason();To check whether this remote participant is muted or not, inspect the
isMutedproperty:boolean isParticipantMuted = remoteParticipant.isMuted();To check whether this remote participant is speaking or not, inspect the
isSpeakingproperty:boolean isParticipantSpeaking = remoteParticipant.isSpeaking();To inspect all video streams that a given participant is sending in this call, check the
videoStreamscollection:List<RemoteVideoStream> videoStreams = remoteParticipant.getVideoStreams(); // [RemoteVideoStream, RemoteVideoStream, ...]
Using Foreground Services
In cases when you want to run a user visible task even when your application is in background, you can use Foreground Services.
Using Foreground Services, you can for example, keeps a user visible notification when your application has an active call. This way, even if the user goes to the homescreen or removes the application from the recent's screen, the call will continue to be active.
If you don't use a Foreground Service while in a call, navigating to the homescreen can keep the call active, but removing the application from the recent's screen can stop the call if the Android OS kills your application's process.
You should start the Foreground Service when you start/join a call, for example:
call = callAgent.startCall(context, participants, options);
startService(yourForegroundServiceIntent);
And stop the Foreground Service when you hangup the call or the call's status is Disconnected, for example:
call.hangUp(new HangUpOptions()).get();
stopService(yourForegroundServiceIntent);
Notes on using Foreground Services
Keep in mind that scenarios like stopping an already running Foreground Service when the app is removed from the recent's list, will remove the user visible notification and the Android OS can keep your application process alive for some extra period of time, meaning that the call can still be active during this period.
If your application is stopping the Foreground Service on the service onTaskRemoved method for example, your application can start/stop audio and video according to your Activity Lifecycle like stopping audio and video when your activity is destroyed with the onDestroy method override.
Set up your system
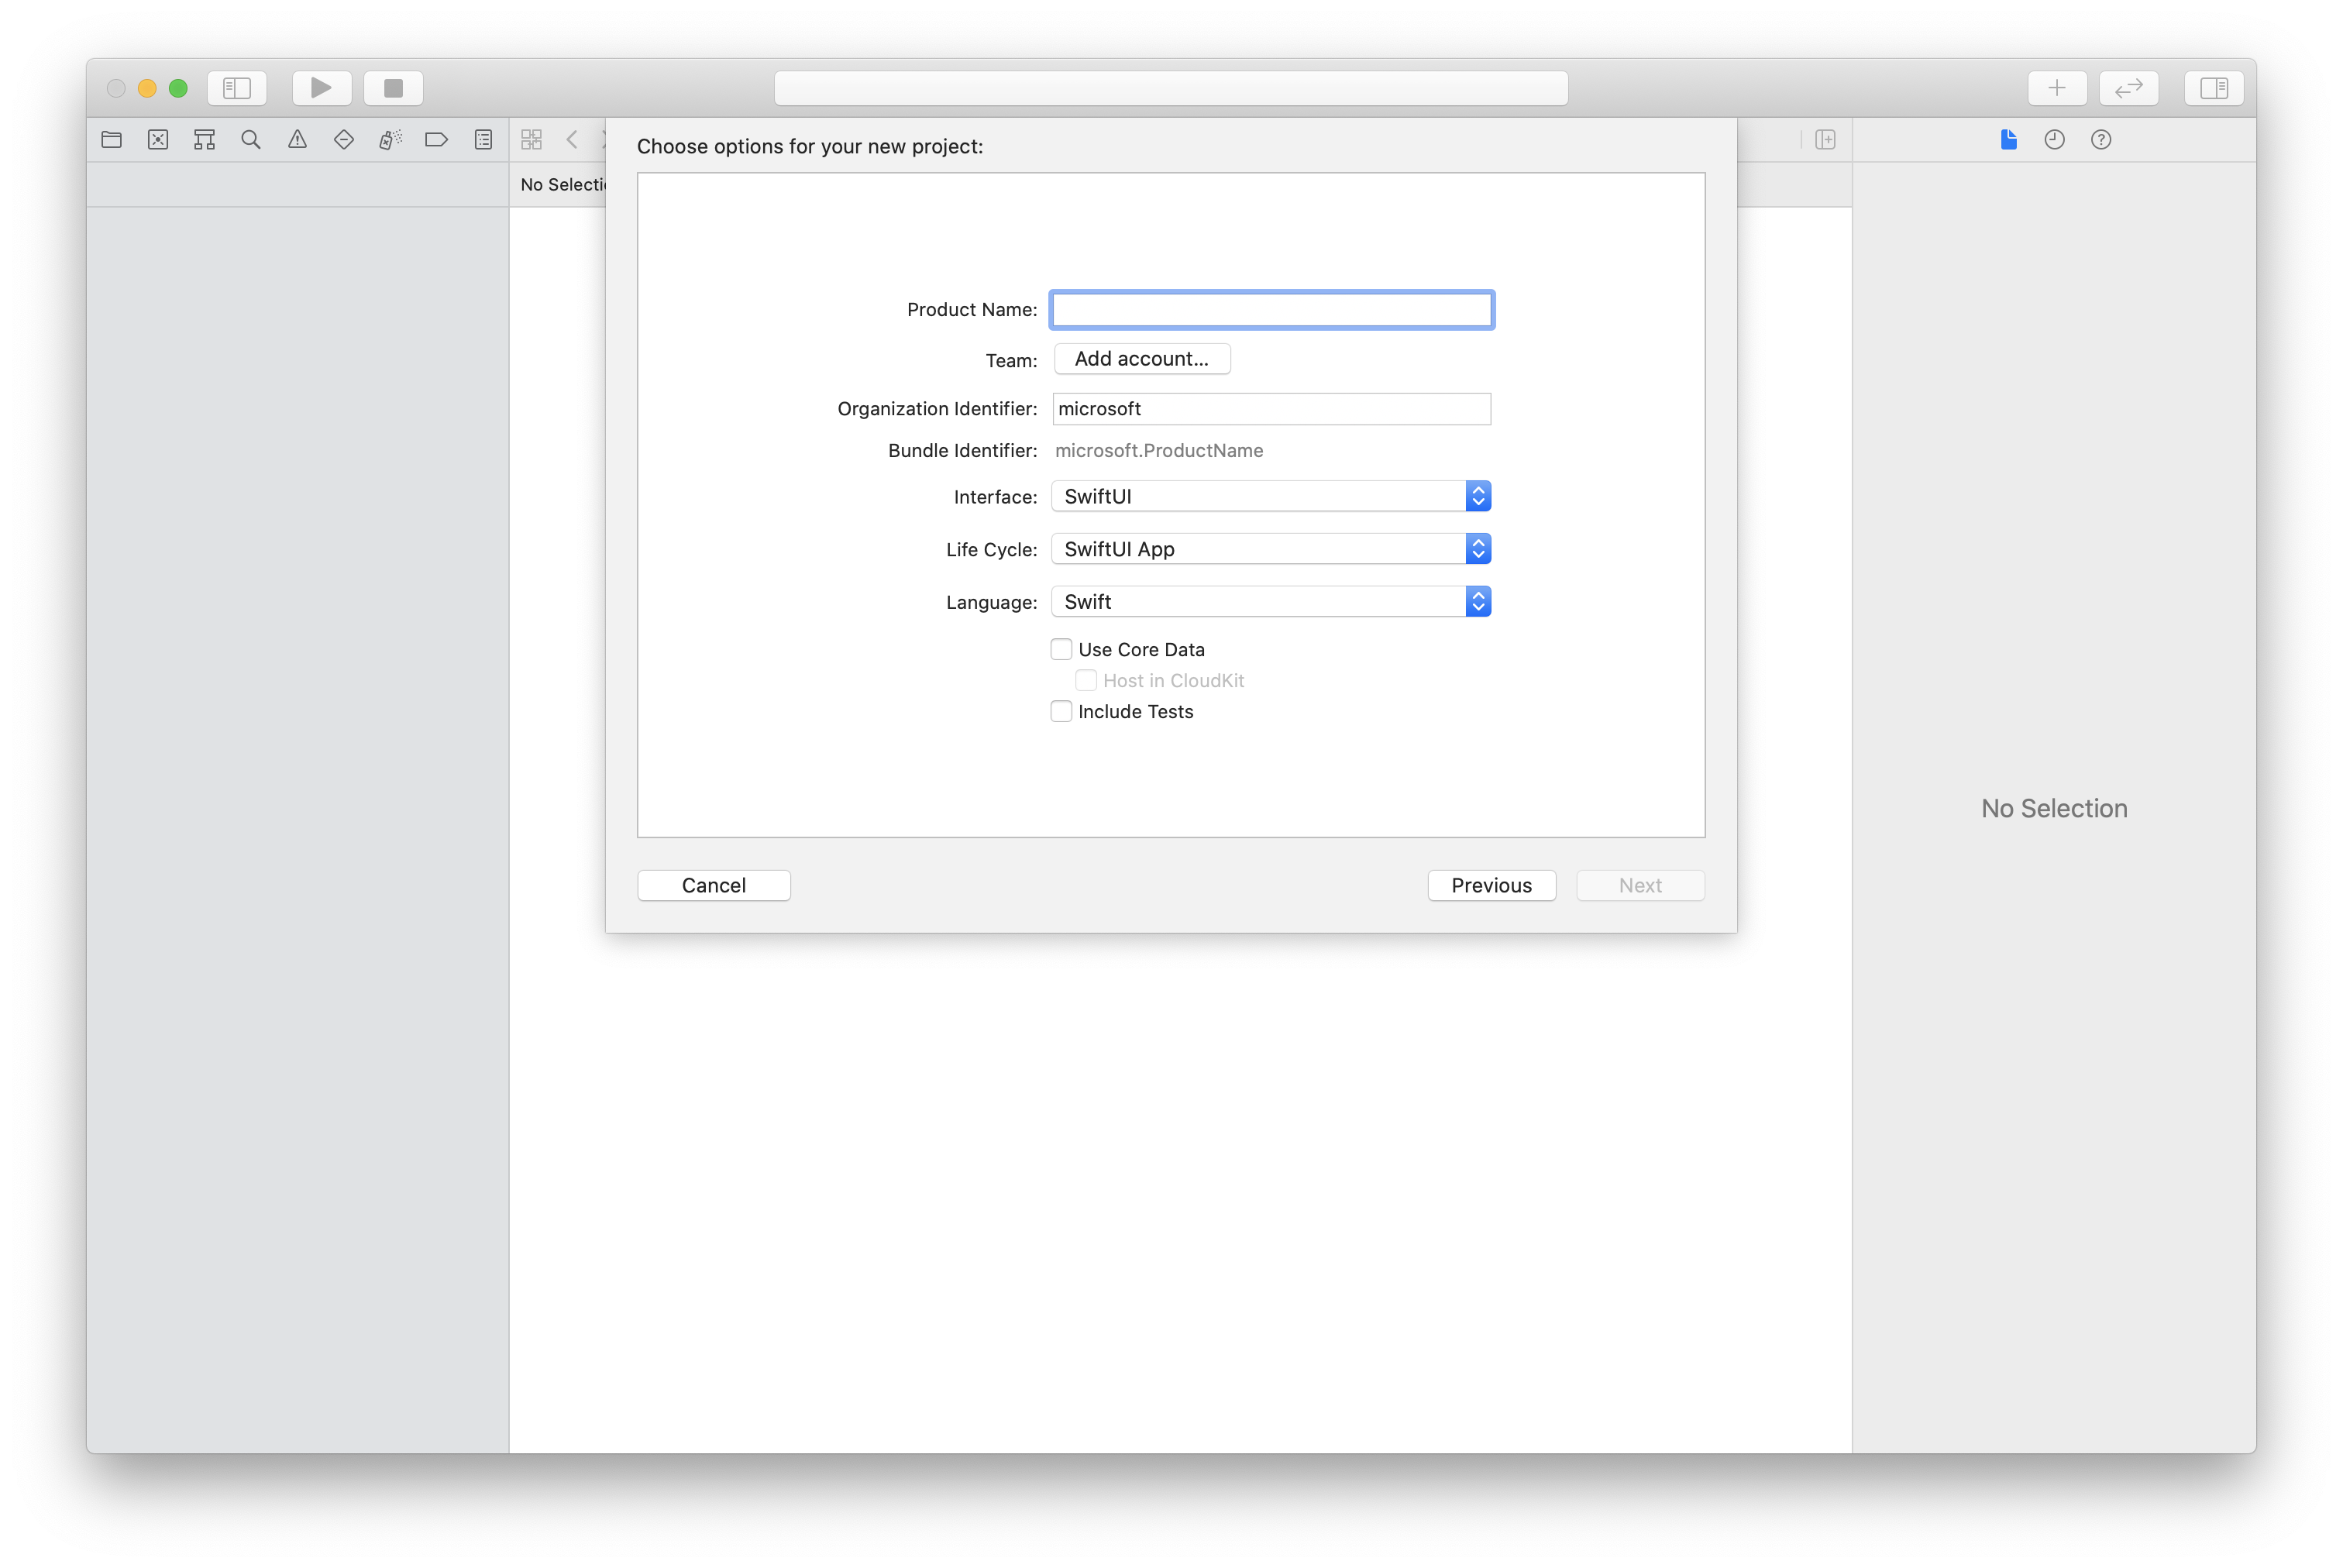
Create the Xcode project
In Xcode, create a new iOS project and select the Single View App template. This quickstart uses the SwiftUI framework, so you should set Language to Swift and set Interface to SwiftUI.
You're not going to create tests during this quickstart. Feel free to clear the Include Tests checkbox.
Install the package and dependencies by using CocoaPods
Create a Podfile for your application, like this example:
platform :ios, '13.0'
use_frameworks!
target 'AzureCommunicationCallingSample' do
    pod 'AzureCommunicationCalling', '~> 1.0.0'
end
Run
pod install.Open
.xcworkspaceby using Xcode.
Request access to the microphone
To access the device's microphone, you need to update your app's information property list by using NSMicrophoneUsageDescription. You set the associated value to a string that will be included in the dialog that the system uses to request access from the user.
Right-click the Info.plist entry of the project tree, and then select Open As > Source Code. Add the following lines in the top-level <dict> section, and then save the file.
<key>NSMicrophoneUsageDescription</key>
<string>Need microphone access for VOIP calling.</string>
Set up the app framework
Open your project's ContentView.swift file. Add an import declaration to the top of the file to import the AzureCommunicationCalling library. In addition, import AVFoundation. You'll need it for audio permission requests in the code.
import AzureCommunicationCalling
import AVFoundation
Initialize CallAgent
To create a CallAgent instance from CallClient, you have to use a callClient.createCallAgent method that asynchronously returns a CallAgent object after it's initialized.
To create a call client, pass a CommunicationTokenCredential object:
import AzureCommunication

let tokenString = "token_string"
var userCredential: CommunicationTokenCredential?
do {
    let options = CommunicationTokenRefreshOptions(initialToken: token, refreshProactively: true, tokenRefresher: self.fetchTokenSync)
    userCredential = try CommunicationTokenCredential(withOptions: options)
} catch {
    updates("Couldn't created Credential object", false)
    initializationDispatchGroup!.leave()
    return
}

// tokenProvider needs to be implemented by Contoso, which fetches a new token
public func fetchTokenSync(then onCompletion: TokenRefreshOnCompletion) {
    let newToken = self.tokenProvider!.fetchNewToken()
    onCompletion(newToken, nil)
}
Pass the CommunicationTokenCredential object that you created to CallClient, and set the display name:
self.callClient = CallClient()
let callAgentOptions = CallAgentOptions()
options.displayName = " iOS Azure Communication Services User"

self.callClient!.createCallAgent(userCredential: userCredential!,
    options: callAgentOptions) { (callAgent, error) in
        if error == nil {
            print("Create agent succeeded")
            self.callAgent = callAgent
        } else {
            print("Create agent failed")
        }
})
Note
When the application implements event delegates, it has to hold a strong reference to the objects that require event subscriptions. For example, when a RemoteParticipant object is returned on invoking the call.addParticipant method and the application sets the delegate to listen on RemoteParticipantDelegate, the application must hold a strong reference to the RemoteParticipant object. Otherwise, if this object gets collected, the delegate will throw a fatal exception when the Calling SDK tries to invoke the object.
Place an outgoing call
To create and start a call, you need to call one of the APIs on CallAgent and provide the Communication Services identity of a user that you've provisioned by using the Communication Services Management SDK.
Call creation and start are synchronous. You'll receive a call instance that allows you to subscribe to all events on the call.
Place a 1:1 call to a user or a 1:n call with users and PSTN
let callees = [CommunicationUser(identifier: 'UserId')]
self.callAgent?.startCall(participants: callees, options: StartCallOptions()) { (call, error) in
     if error == nil {
         print("Successfully started outgoing call")
         self.call = call
     } else {
         print("Failed to start outgoing call")
     }
}
Place a 1:n call with users and PSTN
Note
Please check details of PSTN calling offering. For preview program access, apply to the early adopter program.
To place the call to PSTN, you have to specify a phone number acquired with Communication Services.
let pstnCallee = PhoneNumberIdentifier(phoneNumber: '+1999999999')
let callee = CommunicationUserIdentifier('UserId')
self.callAgent?.startCall(participants: [pstnCallee, callee], options: StartCallOptions()) { (groupCall, error) in
     if error == nil {
         print("Successfully started outgoing call to multiple participants")
         self.call = groupCall
     } else {
         print("Failed to start outgoing call to multiple participants")
     }
}
Join a room call
To join a room call, specify the roomId property as the room identifier. To join the call, use the join method and pass the roomCallLocator.
func joinRoomCall() {
    if self.callAgent == nil {
        print("CallAgent not initialized")
        return
    }

    if (self.roomId.isEmpty) {
        print("Room ID not set")
        return
    }

    // Join a call with a Room ID
    let options = JoinCallOptions()
    let audioOptions = AudioOptions()
    audioOptions.muted = self.muted

    options.audioOptions = audioOptions

    let roomCallLocator = RoomCallLocator(roomId: roomId)
    self.callAgent!.join(with: roomCallLocator, joinCallOptions: options) { (call, error) in
        self.setCallAndObserver(call: call, error: error)
    }
}
A room offers application developers better control over who can join a call, when they meet and how they collaborate. To learn more about rooms, you can read the conceptual documentation or follow the quick start guide.
Join a group call
To join a call, you need to call one of the APIs on CallAgent.
let groupCallLocator = GroupCallLocator(groupId: UUID(uuidString: "uuid_string")!)
self.callAgent?.join(with: groupCallLocator, joinCallOptions: JoinCallOptions()) { (call, error) in
    if error == nil {
        print("Successfully joined group call")
        self.call = call
    } else {
        print("Failed to join group call")
    }
}
Subscribe to an incoming call
Subscribe to an incoming call event.
final class IncomingCallHandler: NSObject, CallAgentDelegate, IncomingCallDelegate
{
    // Event raised when there is an incoming call
    public func callAgent(_ callAgent: CallAgent, didReceiveIncomingCall incomingcall: IncomingCall) {
        self.incomingCall = incomingcall
        // Subscribe to get OnCallEnded event
        self.incomingCall?.delegate = self
    }

    // Event raised when incoming call was not answered
    public func incomingCall(_ incomingCall: IncomingCall, didEnd args: PropertyChangedEventArgs) {
        print("Incoming call was not answered")
        self.incomingCall = nil
    }
}
Accept an incoming call
To accept a call, call the accept method on a IncomingCall object.
self.incomingCall!.accept(options: AcceptCallOptions()) { (call, error) in
   if (error == nil) {
       print("Successfully accepted incoming call")
       self.call = call
   } else {
       print("Failed to accept incoming call")
   }
}

let firstCamera: VideoDeviceInfo? = self.deviceManager!.cameras.first
localVideoStreams = [LocalVideoStream]()
localVideoStreams!.append(LocalVideoStream(camera: firstCamera!))
let acceptCallOptions = AcceptCallOptions()
acceptCallOptions.videoOptions = VideoOptions(localVideoStreams: localVideoStreams!)
if let incomingCall = self.incomingCall {
    incomingCall.accept(options: acceptCallOptions) { (call, error) in
        if error == nil {
            print("Incoming call accepted")
        } else {
            print("Failed to accept incoming call")
        }
    }
} else {
  print("No incoming call found to accept")
}
Perform mid-call operations
You can perform various operations during a call to manage settings related to video and audio.
Mute and unmute
To mute or unmute the local endpoint, you can use the mute and unmute asynchronous APIs.
call!.mute { (error) in
    if error == nil {
        print("Successfully muted")
    } else {
        print("Failed to mute")
    }
}
Use the following code to unmute the local endpoint asynchronously.
call!.unmute { (error) in
    if error == nil {
        print("Successfully un-muted")
    } else {
        print("Failed to unmute")
    }
}
Mute other participants
Note
This API is provided as a public preview for developers and may change based on feedback that we receive. To use this API please use 'beta' release of Azure Communication Services Calling iOS SDK version 2.7.0-beta.3 or higher.
To mute all other participants in a call, use the muteAllRemoteParticipants API on the call.
call!.muteAllRemoteParticipants { (error) in
    if error == nil {
        print("Successfully muted all remote participants.")
    } else {
        print("Failed to mute remote participants.")
    }
}
To mute a specific remote participant, use the mute API on a given remote participant.
remoteParticipant.mute { (error) in
    if error == nil {
        print("Successfully muted participant.")
    } else {
        print("Failed to mute participant.")
    }
}
Manage remote participants
All remote participants are represented by the RemoteParticipant type and are available through the remoteParticipants collection on a call instance.
List participants in a call
call.remoteParticipants
Add a participant to a call
To add a participant to a call (either a user or a phone number), you can invoke addParticipant. This command will synchronously return a remote participant instance.
let remoteParticipantAdded: RemoteParticipant = call.add(participant: CommunicationUserIdentifier(identifier: "userId"))
Remove a participant from a call
To remove a participant from a call (either a user or a phone number), you can invoke the removeParticipant API. This will resolve asynchronously.
call!.remove(participant: remoteParticipantAdded) { (error) in
    if (error == nil) {
        print("Successfully removed participant")
    } else {
        print("Failed to remove participant")
    }
}
Get remote participant properties
// [RemoteParticipantDelegate] delegate - an object you provide to receive events from this RemoteParticipant instance
var remoteParticipantDelegate = remoteParticipant.delegate

// [CommunicationIdentifier] identity - same as the one used to provision a token for another user
var identity = remoteParticipant.identifier

// ParticipantStateIdle = 0, ParticipantStateEarlyMedia = 1, ParticipantStateConnecting = 2, ParticipantStateConnected = 3, ParticipantStateOnHold = 4, ParticipantStateInLobby = 5, ParticipantStateDisconnected = 6
var state = remoteParticipant.state

// [Error] callEndReason - reason why participant left the call, contains code/subcode/message
var callEndReason = remoteParticipant.callEndReason

// [Bool] isMuted - indicating if participant is muted
var isMuted = remoteParticipant.isMuted

// [Bool] isSpeaking - indicating if participant is currently speaking
var isSpeaking = remoteParticipant.isSpeaking

// RemoteVideoStream[] - collection of video streams this participants has
var videoStreams = remoteParticipant.videoStreams // [RemoteVideoStream, RemoteVideoStream, ...]
Set up your system
Create the Visual Studio project
For a UWP app, in Visual Studio 2022, create a new Blank App (Universal Windows) project. After you enter the project name, feel free to choose any Windows SDK later than 10.0.17763.0.
For a WinUI 3 app, create a new project with the Blank App, Packaged (WinUI 3 in Desktop) template to set up a single-page WinUI 3 app. Windows App SDK version 1.3 or later is required.
Install the package and dependencies by using NuGet Package Manager
The Calling SDK APIs and libraries are publicly available via a NuGet package.
The following steps exemplify how to find, download, and install the Calling SDK NuGet package:
- Open NuGet Package Manager by selecting Tools > NuGet Package Manager > Manage NuGet Packages for Solution.
- Select Browse, and then enter
Azure.Communication.Calling.WindowsClientin the search box. - Make sure that the Include prerelease check box is selected.
- Select the
Azure.Communication.Calling.WindowsClientpackage, and then selectAzure.Communication.Calling.WindowsClient1.4.0-beta.1 or a newer version. - Select the checkbox that corresponds to the Communication Services project on the right-side tab.
- Select the Install button.
Request access to the microphone
The app requires access to the microphone to run properly. In UWP apps, the microphone capability should be declared in the app manifest file.
The following steps exemplify how to achieve that.
- In the
Solution Explorerpanel, double click on the file with.appxmanifestextension. - Click on the
Capabilitiestab. - Select the
Microphonecheck box from the capabilities list.
Create UI buttons to place and hang up the call
This simple sample app contains two buttons. One for placing the call and another to hang up a placed call. The following steps exemplify how to add these buttons to the app.
- In the
Solution Explorerpanel, double click on the file namedMainPage.xamlfor UWP, orMainWindows.xamlfor WinUI 3. - In the central panel, look for the XAML code under the UI preview.
- Modify the XAML code by the following excerpt:
<TextBox x:Name="CalleeTextBox" PlaceholderText="Who would you like to call?" />
<StackPanel>
    <Button x:Name="CallButton" Content="Start/Join call" Click="CallButton_Click" />
    <Button x:Name="HangupButton" Content="Hang up" Click="HangupButton_Click" />
</StackPanel>
Setting up the app with Calling SDK APIs
The Calling SDK APIs are in two different namespaces. The following steps inform the C# compiler about these namespaces allowing Visual Studio's Intellisense to assist with code development.
- In the
Solution Explorerpanel, click on the arrow on the left side of the file namedMainPage.xamlfor UWP, orMainWindows.xamlfor WinUI 3. - Double click on file named
MainPage.xaml.csorMainWindows.xaml.cs. - Add the following commands at the bottom of the current
usingstatements.
using Azure.Communication.Calling.WindowsClient;
Keep MainPage.xaml.cs or MainWindows.xaml.cs open. The next steps will add more code to it.
Allow app interactions
The UI buttons previously added need to operate on top of a placed CommunicationCall. It means that a CommunicationCall data member should be added to the MainPage or MainWindow class.
Additionally, to allow the asynchronous operation creating CallAgent to succeed, a CallAgent data member should also be added to the same class.
Add the following data members to the MainPage pr MainWindow class:
CallAgent callAgent;
CommunicationCall call;
Create button handlers
Previously, two UI buttons were added to the XAML code. The following code adds the handlers to be executed when a user selects the button. The following code should be added after the data members from the previous section.
private async void CallButton_Click(object sender, RoutedEventArgs e)
{
    // Start call
}

private async void HangupButton_Click(object sender, RoutedEventArgs e)
{
    // End the current call
}
Object model
The following classes and interfaces handle some of the major features of the Azure Communication Services Calling client library for UWP.
| Name | Description |
|---|---|
CallClient |
The CallClient is the main entry point to the Calling client library. |
CallAgent |
The CallAgent is used to start and join calls. |
CommunicationCall |
The CommunicationCall is used to manage placed or joined calls. |
CommunicationTokenCredential |
The CommunicationTokenCredential is used as the token credential to instantiate the CallAgent. |
CallAgentOptions |
The CallAgentOptions contains information to identify the caller. |
HangupOptions |
The HangupOptions informs if a call should be terminated to all its participants. |
Initialize the CallAgent
To create a CallAgent instance from CallClient, you must use CallClient.CreateCallAgentAsync method that asynchronously returns a CallAgent object once it's initialized.
To create CallAgent, you must pass a CallTokenCredential object and a CallAgentOptions object. Keep in mind that CallTokenCredential throws if a malformed token is passed.
The following code should be added inside and helper function to be called in app initialization.
var callClient = new CallClient();
this.deviceManager = await callClient.GetDeviceManagerAsync();

var tokenCredential = new CallTokenCredential("<AUTHENTICATION_TOKEN>");
var callAgentOptions = new CallAgentOptions()
{
    DisplayName = "<DISPLAY_NAME>"
};

this.callAgent = await callClient.CreateCallAgentAsync(tokenCredential, callAgentOptions);
Change the <AUTHENTICATION_TOKEN> with a valid credential token for your resource. Refer to the user access token documentation if a credential token has to be sourced.
Create CallAgent and place a call
The objects needed for creating a CallAgent are now ready. It's time to asynchronously create CallAgent and place a call.
The following code should be added after handling the exception from the previous step.
var startCallOptions = new StartCallOptions();
var callees = new [] { new UserCallIdentifier(CalleeTextBox.Text.Trim()) };

this.call = await this.callAgent.StartCallAsync(callees, startCallOptions);
this.call.OnStateChanged += Call_OnStateChangedAsync;
Feel free to use 8:echo123 to talk to the Azure Communication Services echo bot.
Mute and unmute
To mute or unmute the outgoing audio you can use the MuteOutgoingAudioAsync and UnmuteOutgoingAudioAsync asynchronous APIs:
// mute outgoing audio
await this.call.MuteOutgoingAudioAsync();

// unmute outgoing audio
await this.call.UnmuteOutgoingAudioAsync();
Mute other participants
Note
This API is provided as a public preview for developers and may change based on feedback that we receive. To use this API please use 'beta' release of Azure Communication Services Calling Windows SDK version 1.4.0-beta.1 or higher.
To mute all other participants or mute a specific participant, you can use the asynchronous APIs MuteAllRemoteParticipantsAsync on the call and MuteAsync on the remote participant:
// mute all participants except yourself
await this.call.MuteAllRemoteParticipantsAsync();

// mute specific participant in the call
await this.call.RemoteParticipants.FirstOrDefault().MuteAsync();
End a call
Once a call is placed, the HangupAsync method of the CommunicationCall object should be used to hang up the call.
An instance of HangupOptions should also be used to inform if the call must be terminated to all its participants.
The following code should be added inside HangupButton_Click.
this.call.OnStateChanged -= Call_OnStateChangedAsync;
await this.call.HangUpAsync(new HangUpOptions() { ForEveryone = false });
Run the code
Make sure Visual Studio builds the app for x64, x86 or ARM64, then hit F5 to start running the app. After that, click on the Call button to place a call to the callee defined.
Keep in mind that the first time the app runs, the system prompts user for granting access to the microphone.
Next steps
Feedback
Coming soon: Throughout 2024 we will be phasing out GitHub Issues as the feedback mechanism for content and replacing it with a new feedback system. For more information see: https://aka.ms/ContentUserFeedback.
Submit and view feedback for