Quickstart: How to send an email using Azure Communication Service
Note
Please share your thoughts and feedback about Azure Communication Services with us by taking this short survey.
In this quick start, you'll learn about how to send email using our Email SDKs.
Get started with Azure Communication Services by using the Communication Services Try Email to send Email messages.
Prerequisites
- An Azure account with an active subscription. Create an account for free.
- The latest version .NET Core client library for your operating system.
- An Azure Email Communication Services Resource created and ready with a provisioned domain Get started with Creating Email Communication Resource
- An active Communication Services resource connected with Email Domain. Get started by Connecting Email Resource with a Communication Resource
Completing this quick start incurs a small cost of a few USD cents or less in your Azure account.
Sending an Email using Try Email
Try Email helps you kick-start sending emails to the desired recipients using Azure Communication Services, as well as verifying the configuration for your application to send email. It also helps to jump-start your email notification development with the code snippet in your preferred choice of language.
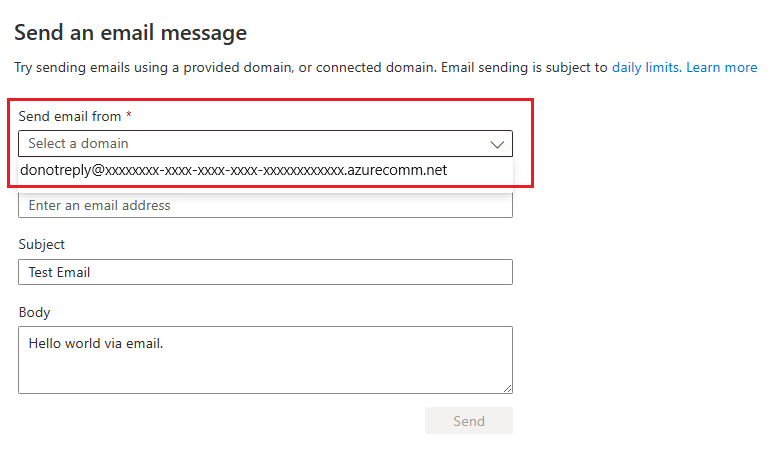
To send a message to a recipient, and to specify the message subject and body,
From the overview page of a provisioned Azure Communication Service resource, click Try Email on the left navigation panel under Email.

Select one of the verified domains from drop-down.
Compose the email to send
- Enter Recipient email address
- Enter Subject
- Write the Email Body
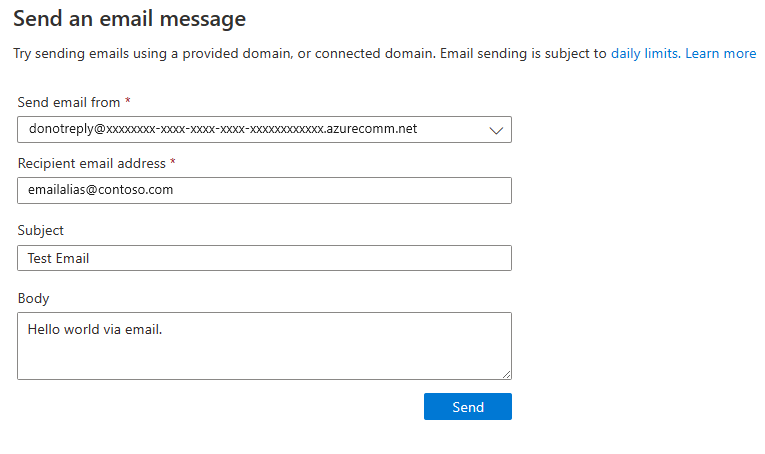
Click Send

Email Sent Successfully.

You can now also copy the sample Code Snippet to send an email to use in your sample project to send notifications.
Select Language of your choice
Click Insert my Connection
Click Copy
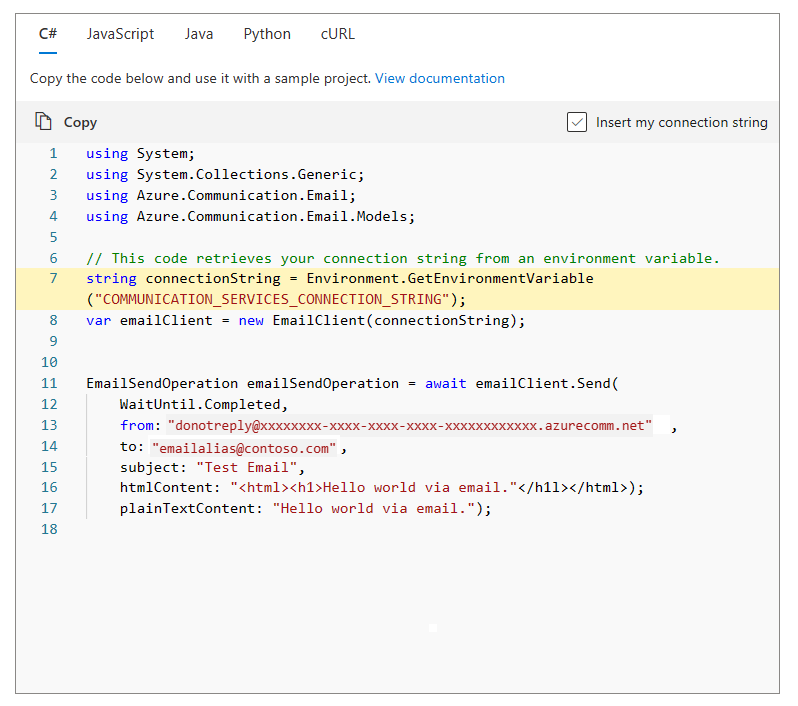
Email Code Snippet is now ready to use in your notification project.


Get started with Azure Communication Services by using the Azure CLI communication extension to send Email messages.
Completing this quick start incurs a small cost of a few USD cents or less in your Azure account.
Prerequisites
- An Azure account with an active subscription. Create an account for free.
- An Azure Email Communication Services resource created and ready with a provisioned domain. Get started with creating an Email Communication Resource.
- An active Azure Communication Services resource connected to an Email Domain and its connection string. Get started by connecting an Email Communication Resource with a Azure Communication Resource.
- The latest Azure CLI.
Prerequisite check
- In a terminal or command window, run the
az --versioncommand to check that Azure CLI and the communication extension are installed. - To view the domains verified with your Email Communication Services resource, sign in to the Azure portal. Locate your Email Communication Services resource and open the Provision domains tab from the left navigation pane.
Setting up
Add the extension
Add the Azure Communication Services extension for Azure CLI by using the az extension command.
az extension add --name communication
Sign in to Azure CLI
You need to sign in to Azure CLI. You can sign in running the az login command from the terminal and providing your credentials.
Store your connection string in an environment variable
You can configure the AZURE_COMMUNICATION_CONNECTION_STRING environment variable to use Azure CLI keys operations without having to use --connection_string to pass in the connection string. To configure an environment variable, open a console window and select your operating system from the below tabs. Replace <connectionString> with your actual connection string.
setx AZURE_COMMUNICATION_STRING "<yourConnectionString>"
After you add the environment variable, you may need to restart any running programs that will need to read the environment variable, including the console window. For example, if you're using Visual Studio as your editor, restart Visual Studio before running the example.
Send an email message
az communication email send
	--connection-string "yourConnectionString"
	--sender "<donotreply@xxxxxxxx-xxxx-xxxx-xxxx-xxxxxxxxxxxx.azurecomm.net>"
	--to "<emailalias@emaildomain.com>"
	--subject "Welcome to Azure Communication Services Email" --text "This email message is sent from Azure Communication Services Email using Azure CLI."
Make these replacements in the code:
- Replace
<yourConnectionString>with your connection string. - Replace
<emailalias@emaildomain.com>with the email address you would like to send a message to. - Replace
<donotreply@xxxxxxxx-xxxx-xxxx-xxxx-xxxxxxxxxxxx.azurecomm.net>with the MailFrom address of your verified domain.
The above command also performs a polling on the messageId and returns the status of the email delivery. The status can be one of the following:
| Status Name | Description |
|---|---|
| NotStarted | We're not sending this status from our service at this time. |
| Running | The email send operation is currently in progress and being processed. |
| Succeeded | The email send operation has completed without error and the email is out for delivery. Any detailed status about the email delivery beyond this stage can be obtained either through Azure Monitor or through Azure Event Grid. Learn how to subscribe to email events |
| Failed | The email send operation wasn't successful and encountered an error. The email wasn't sent. The result contains an error object with more details on the reason for failure. |
Optional parameters
The following optional parameters are available in Azure CLI.
--htmlcan be used instead of--textfor html email body.--importancesets the importance type for the email. Known values are: high, normal, and low. Default is normal.--tosets the list of email recipients.--ccsets carbon copy email addresses.--bccsets blind carbon copy email addresses.--reply-tosets Reply-To email address.--disable-trackingindicates whether user engagement tracking should be disabled for this request.--attachmentssets the list of email attachments.--attachment-typessets the list of email attachment types, in the same order of attachments.
Also, you can use a list of recipients with --cc and --bcc similar to --to. There needs to be at least one recipient in --to or --cc or --bcc.
Get started with Azure Communication Services by using the Communication Services C# Email client library to send Email messages.
Tip
Jump-start your email sending experience with Azure Communication Services by skipping straight to the Basic Email Sending and Advanced Email Sending sample code on GitHub.
Understanding the Email Object model
The following classes and interfaces handle some of the major features of the Azure Communication Services Email Client library for C#.
| Name | Description |
|---|---|
| EmailAddress | This class contains an email address and an option for a display name. |
| EmailAttachment | This class creates an email attachment by accepting a unique ID, email attachment MIME type string, and binary data for content. |
| EmailClient | This class is needed for all email functionality. You instantiate it with your connection string and use it to send email messages. |
| EmailClientOptions | This class can be added to the EmailClient instantiation to target a specific API version. |
| EmailContent | This class contains the subject and the body of the email message. You have to specify at least one of PlainText or Html content |
| EmailCustomHeader | This class allows for the addition of a name and value pair for a custom header. Email importance can also be specified through these headers using the header name 'x-priority' or 'x-msmail-priority' |
| EmailMessage | This class combines the sender, content, and recipients. Custom headers, attachments, and reply-to email addresses can optionally be added, as well. |
| EmailRecipients | This class holds lists of EmailAddress objects for recipients of the email message, including optional lists for CC & BCC recipients. |
| EmailSendOperation | This class represents the asynchronous email send operation and is returned from email send api call. |
| EmailSendResult | This class holds the results of the email send operation. It has an operation ID, operation status and error object (when applicable). |
EmailSendResult returns the following status on the email operation performed.
| Status | Description |
|---|---|
| NotStarted | We're not sending this status from our service at this time. |
| Running | The email send operation is currently in progress and being processed. |
| Succeeded | The email send operation has completed without error and the email is out for delivery. Any detailed status about the email delivery beyond this stage can be obtained either through Azure Monitor or through Azure Event Grid. Learn how to subscribe to email events |
| Failed | The email send operation wasn't successful and encountered an error. The email wasn't sent. The result contains an error object with more details on the reason for failure. |
Prerequisites
- An Azure account with an active subscription. Create an account for free.
- The latest version .NET Core client library for your operating system.
- An Azure Email Communication Services Resource created and ready with a provisioned domain Get started with Creating Email Communication Resource
- An active Communication Services resource connected with Email Domain and a Connection String. Get started by Connecting Email Resource with a Communication Resource
Completing this quick start incurs a small cost of a few USD cents or less in your Azure account.
Note
We can also send an email from our own verified domain. Add custom verified domains to Email Communication Service.
Prerequisite check
- In a terminal or command window, run the
dotnetcommand to check that the .NET client library is installed. - To view the subdomains associated with your Email Communication Services resource, sign in to the Azure portal, locate your Email Communication Services resource and open the Provision domains tab from the left navigation pane.
Create a new C# application
In a console window (such as cmd, PowerShell, or Bash), use the dotnet new command to create a new console app with the name EmailQuickstart. This command creates a simple "Hello World" C# project with a single source file: Program.cs.
dotnet new console -o EmailQuickstart
Change your directory to the newly created app folder and use the dotnet build command to compile your application.
cd EmailQuickstart
dotnet build
Install the package
While still in the application directory, install the Azure Communication Services Email client library for .NET package by using the dotnet add package command.
dotnet add package Azure.Communication.Email
Creating the email client with authentication
Open Program.cs and replace the existing code with the following
to add using directives for including the Azure.Communication.Email namespace and a starting point for execution for your program.
using System;
using System.Collections.Generic;
using System.Threading;
using System.Threading.Tasks;

using Azure;
using Azure.Communication.Email;

namespace SendEmail
{
  internal class Program
  {
    static async Task Main(string[] args)
    {

    }
  }
}
There are a few different options available for authenticating an email client:
Open Program.cs in a text editor and replace the body of the Main method with code to initialize an EmailClient with your connection string. The following code retrieves the connection string for the resource from an environment variable named COMMUNICATION_SERVICES_CONNECTION_STRING. Learn how to manage your resource's connection string.
// This code demonstrates how to fetch your connection string
// from an environment variable.
string connectionString = Environment.GetEnvironmentVariable("COMMUNICATION_SERVICES_CONNECTION_STRING");
EmailClient emailClient = new EmailClient(connectionString);
Basic email sending
Construct your email message
To send an email message, you need to:
- Define the email subject and body.
- Define your Sender Address. Construct your email message with your Sender information you get your MailFrom address from your verified domain.
- Define the Recipient Address.
- Call the SendAsync method. Add this code to the end of
Mainmethod in Program.cs:
Replace with your domain details and modify the content, recipient details as required
//Replace with your domain and modify the content, recipient details as required

var subject = "Welcome to Azure Communication Service Email APIs.";
var htmlContent = "<html><body><h1>Quick send email test</h1><br/><h4>This email message is sent from Azure Communication Service Email.</h4><p>This mail was sent using .NET SDK!!</p></body></html>";
var sender = "donotreply@xxxxxxxx-xxxx-xxxx-xxxx-xxxxxxxxxxxx.azurecomm.net";
var recipient = "emailalias@contoso.com";
Send and get the email send status
To send an email message, you need to:
- Call SendAsync method that sends the email request as an asynchronous operation. Call with Azure.WaitUntil.Completed if your method should wait to return until the long-running operation has completed on the service. Call with Azure.WaitUntil.Started if your method should return after starting the operation.
- SendAsync method returns EmailSendOperation that returns "Succeeded" EmailSendStatus if email is out for delivery and throws an exception otherwise. Add this code to the end of
Mainmethod in Program.cs:
try
{
    Console.WriteLine("Sending email...");
    EmailSendOperation emailSendOperation = await emailClient.SendAsync(
        Azure.WaitUntil.Completed,
        sender,
        recipient,
        subject,
        htmlContent);
    EmailSendResult statusMonitor = emailSendOperation.Value;

    Console.WriteLine($"Email Sent. Status = {emailSendOperation.Value.Status}");

    /// Get the OperationId so that it can be used for tracking the message for troubleshooting
    string operationId = emailSendOperation.Id;
    Console.WriteLine($"Email operation id = {operationId}");
}
catch (RequestFailedException ex)
{
    /// OperationID is contained in the exception message and can be used for troubleshooting purposes
    Console.WriteLine($"Email send operation failed with error code: {ex.ErrorCode}, message: {ex.Message}");
}
Getting email delivery status
EmailSendOperation only returns email operation status. To get the actual email delivery status, you can subscribe to "EmailDeliveryReportReceived" event that is generated when the email delivery is completed. The event returns the following delivery state:
- Delivered.
- Failed.
- Quarantined.
See Handle Email Events for details.
You can also now subscribe to Email Operational logs that provide information related to delivery metrics for messages sent from the Email service.
- Email Send Mail operational logs - provides detailed information related to the Email service send mail requests.
- Email Status Update operational logs - provides message and recipient level delivery status updates related to the Email service send mail requests.
Access logs for Email Communication Service.
Run the code
Run the application from your application directory with the dotnet run command.
dotnet run
Sample code
You can download the sample app from GitHub
Get started with Azure Communication Services by using the Communication Services JS Email client library to send Email messages.
Tip
Jump-start your email sending experience with Azure Communication Services by skipping straight to the Basic Email Sending and Advanced Email Sending sample code on GitHub.
Understanding the email object model
The following classes and interfaces handle some of the major features of the Azure Communication Services Email Client library for JavaScript.
| Name | Description |
|---|---|
| EmailAddress | This class contains an email address and an option for a display name. |
| EmailAttachment | This class creates an email attachment by accepting a unique ID, email attachment MIME type string, and binary data for content. |
| EmailClient | This class is needed for all email functionality. You instantiate it with your connection string and use it to send email messages. |
| EmailClientOptions | This class can be added to the EmailClient instantiation to target a specific API version. |
| EmailContent | This class contains the subject and the body of the email message. You have to specify at least one of PlainText or Html content. |
| EmailCustomHeader | This class allows for the addition of a name and value pair for a custom header. Email importance can also be specified through these headers using the header name 'x-priority' or 'x-msmail-priority'. |
| EmailMessage | This class combines the sender, content, and recipients. Custom headers, attachments, and reply-to email addresses can optionally be added, as well. |
| EmailRecipients | This class holds lists of EmailAddress objects for recipients of the email message, including optional lists for CC & BCC recipients. |
| EmailSendResult | This class holds the results of the email send operation. It has an operation ID, operation status and error object (when applicable). |
| EmailSendStatus | This class represents the set of statuses of an email send operation. |
EmailSendResult returns the following status on the email operation performed.
| Status Name | Description |
|---|---|
| isStarted | Returns true if the email send operation is currently in progress and being processed. |
| isCompleted | Returns true if the email send operation has completed without error and the email is out for delivery. Any detailed status about the email delivery beyond this stage can be obtained either through Azure Monitor or through Azure Event Grid. Learn how to subscribe to email events |
| result | Property that exists if the email send operation has concluded. |
| error | Property that exists if the email send operation wasn't successful and encountered an error. The email wasn't sent. The result contains an error object with more details on the reason for failure. |
Prerequisites
- Node.js (~14).
- An Azure account with an active subscription. Create an account for free.
- An Azure Email Communication Services resource created and ready with a provisioned domain. Get started with creating an Email Communication Resource.
- An active Azure Communication Services resource connected to an Email Domain and its connection string. Get started by connecting an Email Communication Resource with a Azure Communication Resource.
Completing this quick start incurs a small cost of a few USD cents or less in your Azure account.
Note
We can also send an email from our own verified domain. Add custom verified domains to Email Communication Service.
Prerequisite check
- In a terminal or command window, run
node --versionto check that Node.js is installed. - To view the domains verified with your Email Communication Services resource, sign in to the Azure portal, locate your Email Communication Services resource and open the Provision domains tab from the left navigation pane.
Set up the application environment
Create a new Node.js Application
First, open your terminal or command window, create a new directory for your app, and navigate to it.
mkdir email-quickstart && cd email-quickstart
Run npm init -y to create a package.json file with default settings.
npm init -y
Use a text editor to create a file called send-email.js in the project root directory. Change the "main" property in package.json to "send-email.js". The following section demonstrates how to add the source code for this quickstart to the newly created file.
Install the package
Use the npm install command to install the Azure Communication Services Email client library for JavaScript.
npm install @azure/communication-email --save
The --save option lists the library as a dependency in your package.json file.
Creating the email client with authentication
There are a few different options available for authenticating an email client:
Import the EmailClient from the client library and instantiate it with your connection string.
The following code retrieves the connection string for the resource from an environment variable named COMMUNICATION_SERVICES_CONNECTION_STRING using the dotenv package. Use the npm install command to install the dotenv package. Learn how to manage your resource's connection string.
npm install dotenv
Add the following code to send-email.js:
const { EmailClient } = require("@azure/communication-email");
require("dotenv").config();

// This code demonstrates how to fetch your connection string
// from an environment variable.
const connectionString = process.env['COMMUNICATION_SERVICES_CONNECTION_STRING'];
const emailClient = new EmailClient(connectionString);
For simplicity, this quickstart uses connection strings, but in production environments, we recommend using service principals.
Basic email sending
Send an email message
To send an email message, call the beginSend function from the EmailClient. This method returns a poller that checks on the status of the operation and retrieves the result once it's finished.
async function main() {
  const POLLER_WAIT_TIME = 10
  try {
    const message = {
      senderAddress: "<donotreply@xxxxxxxx-xxxx-xxxx-xxxx-xxxxxxxxxxxx.azurecomm.net>",
      content: {
        subject: "Welcome to Azure Communication Services Email",
        plainText: "This email message is sent from Azure Communication Services Email using the JavaScript SDK.",
      },
      recipients: {
        to: [
          {
            address: "<emailalias@emaildomain.com>",
            displayName: "Customer Name",
          },
        ],
      },
    };

    const poller = await emailClient.beginSend(message);

    if (!poller.getOperationState().isStarted) {
      throw "Poller was not started."
    }

    let timeElapsed = 0;
    while(!poller.isDone()) {
      poller.poll();
      console.log("Email send polling in progress");

      await new Promise(resolve => setTimeout(resolve, POLLER_WAIT_TIME * 1000));
      timeElapsed += 10;

      if(timeElapsed > 18 * POLLER_WAIT_TIME) {
        throw "Polling timed out.";
      }
    }

    if(poller.getResult().status === KnownEmailSendStatus.Succeeded) {
      console.log(`Successfully sent the email (operation id: ${poller.getResult().id})`);
    }
    else {
      throw poller.getResult().error;
    }
  } catch (e) {
    console.log(e);
  }
}

main();
Make these replacements in the code:
- Replace
<emailalias@emaildomain.com>with the email address you would like to send a message to. - Replace
<donotreply@xxxxxxxx-xxxx-xxxx-xxxx-xxxxxxxxxxxx.azurecomm.net>with the MailFrom address of your verified domain.
Run the code
use the node command to run the code you added to the send-email.js file.
node ./send-email.js
Sample code
You can download the sample app from GitHub
Get started with Azure Communication Services by using the Communication Services Java Email SDK to send Email messages.
Tip
Jump-start your email sending experience with Azure Communication Services by skipping straight to the Basic Email Sending and Advanced Email Sending sample code on GitHub.
Understanding the email object model
The following classes and interfaces handle some of the major features of the Azure Communication Services Email SDK for Python.
| Name | Description |
|---|---|
| EmailAddress | This class contains an email address and an option for a display name. |
| EmailAttachment | This interface creates an email attachment by accepting a unique ID, email attachment MIME type string, and a string of content bytes. |
| EmailClient | This class is needed for all email functionality. You instantiate it with your connection string and use it to send email messages. |
| EmailMessage | This class combines the sender, content, and recipients. Custom headers, attachments, and reply-to email addresses can optionally be added, as well. |
| EmailSendResult | This class holds the results of the email send operation. It has an operation ID, operation status and error object (when applicable). |
| EmailSendStatus | This class represents the set of statuses of an email send operation. |
EmailSendResult returns the following status on the email operation performed.
| Status Name | Description |
|---|---|
| NOT_STARTED | We're not sending this status from our service at this time. |
| IN_PROGRESS | The email send operation is currently in progress and being processed. |
| SUCCESSFULLY_COMPLETED | The email send operation has completed without error and the email is out for delivery. Any detailed status about the email delivery beyond this stage can be obtained either through Azure Monitor or through Azure Event Grid. Learn how to subscribe to email events |
| FAILED | The email send operation wasn't successful and encountered an error. The email wasn't sent. The result contains an error object with more details on the reason for failure. |
Prerequisites
- An Azure account with an active subscription. Create an account for free.
- Java Development Kit (JDK) version 8 or above.
- Apache Maven.
- A deployed Communication Services resource and connection string. For details, see Create a Communication Services resource.
- Create an Azure Email Communication Services resource to start sending emails.
- A setup managed identity for a development environment, see Authorize access with managed identity.
Completing this quickstart incurs a small cost of a few USD cents or less in your Azure account.
Note
We can also send an email from our own verified domain Add custom verified domains to Email Communication Service.
Prerequisite check
- In a terminal or command window, run
mvn -vto check that Maven is installed. - To view the domains verified with your Email Communication Services resource, sign in to the Azure portal. Locate your Email Communication Services resource and open the Provision domains tab from the left navigation pane.
Set up the application environment
To set up an environment for sending emails, take the steps in the following sections.
Create a new Java application
Open your terminal or command window and navigate to the directory where you would like to create your Java application. Run the following command to generate the Java project from the maven-archetype-quickstart template.
mvn archetype:generate -DarchetypeArtifactId="maven-archetype-quickstart" -DarchetypeGroupId="org.apache.maven.archetypes" -DarchetypeVersion="1.4" -DgroupId="com.communication.quickstart" -DartifactId="communication-quickstart"
The generate goal creates a directory with the same name as the artifactId value. Under this directory, the src/main/java directory contains the project source code, the src/test/java directory contains the test source, and the pom.xml file is the project's Project Object Model (POM).
Install the package
Open the pom.xml file in your text editor. Add the following dependency element to the group of dependencies.
<dependency>
    <groupId>com.azure</groupId>
    <artifactId>azure-communication-email</artifactId>
    <version>1.0.0-beta.2</version>
</dependency>
Set up the app framework
Open /src/main/java/com/communication/quickstart/App.java in a text editor, add import directives, and remove the System.out.println("Hello world!"); statement:
package com.communication.quickstart;

import com.azure.communication.email.models.*;
import com.azure.communication.email.*;
import com.azure.core.util.polling.PollResponse;
import com.azure.core.util.polling.SyncPoller;

public class App
{
    public static void main( String[] args )
    {
        // Quickstart code goes here.
    }
}
Creating the email client with authentication
There are a few different options available for authenticating an email client:
To authenticate a client, you instantiate an EmailClient with your connection string. Learn how to manage your resource's connection string. You can also initialize the client with any custom HTTP client that implements the com.azure.core.http.HttpClient interface.
To instantiate a client, add the following code to the main method:
// You can get your connection string from your resource in the Azure portal.
String connectionString = "endpoint=https://<resource-name>.communication.azure.com/;accesskey=<access-key>";

EmailClient emailClient = new EmailClientBuilder()
    .connectionString(connectionString)
    .buildClient();
For simplicity, this quickstart uses connection strings, but in production environments, we recommend using service principals.
Basic email sending
To send an email message, call the beginSend function from the EmailClient. This method returns a poller, which can be used to check on the status of the operation and retrieve the result once it's finished. Note that the initial request to send an email will not be sent until either the poll method is called or we wait for completion of the poller.
EmailMessage message = new EmailMessage()
    .setSenderAddress("<donotreply@xxxxxxxx-xxxx-xxxx-xxxx-xxxxxxxxxxxx.azurecomm.net>")
    .setToRecipients("<emailalias@emaildomain.com>")
    .setSubject("Welcome to Azure Communication Services Email")
    .setBodyPlainText("This email message is sent from Azure Communication Services Email using the Java SDK.");

try
{
    SyncPoller<EmailSendResult, EmailSendResult> poller = emailClient.beginSend(message, null);

    PollResponse<EmailSendResult> pollResponse = null;

    Duration timeElapsed = Duration.ofSeconds(0);
    Duration POLLER_WAIT_TIME = Duration.ofSeconds(10);

    while (pollResponse == null
            || pollResponse.getStatus() == LongRunningOperationStatus.NOT_STARTED
            || pollResponse.getStatus() == LongRunningOperationStatus.IN_PROGRESS)
    {
        pollResponse = poller.poll();
        System.out.println("Email send poller status: " + pollResponse.getStatus());

        Thread.sleep(POLLER_WAIT_TIME.toMillis());
        timeElapsed = timeElapsed.plus(POLLER_WAIT_TIME);

        if (timeElapsed.compareTo(POLLER_WAIT_TIME.multipliedBy(18)) >= 0)
        {
            throw new RuntimeException("Polling timed out.");
        }
    }

    if (poller.getFinalResult().getStatus() == EmailSendStatus.SUCCEEDED)
    {
        System.out.printf("Successfully sent the email (operation id: %s)", poller.getFinalResult().getId());
    }
    else
    {
        throw new RuntimeException(poller.getFinalResult().getError().getMessage());
    }
}
catch (Exception exception)
{
    System.out.println(exception.getMessage());
}
Make these replacements in the code:
- Replace
<emailalias@emaildomain.com>with the email address you would like to send a message to. - Replace
<donotreply@xxxxxxxx-xxxx-xxxx-xxxx-xxxxxxxxxxxx.azurecomm.net>with the MailFrom address of your verified domain.
Run the code
Navigate to the directory that contains the pom.xml file and compile the project by using the
mvncommand.mvn compileBuild the package.
mvn packageRun the following
mvncommand to execute the app.mvn exec:java -D"exec.mainClass"="com.communication.quickstart.App" -D"exec.cleanupDaemonThreads"="false"
Sample code
You can download the sample app from GitHub
Get started with Azure Communication Services by using the Communication Services Python Email SDK to send Email messages.
Tip
Jump-start your email sending experience with Azure Communication Services by skipping straight to the Basic Email Sending and Advanced Email Sending sample code on GitHub.
Understanding the email object model
The following JSON message template & response object demonstrate some of the major features of the Azure Communication Services Email SDK for Python.
message = {
    "content": {
        "subject": "str",  # Subject of the email message. Required.
        "html": "str",  # Optional. Html version of the email message.
        "plainText": "str"  # Optional. Plain text version of the email
            message.
    },
    "recipients": {
        "to": [
            {
                "address": "str",  # Email address. Required.
                "displayName": "str"  # Optional. Email display name.
            }
        ],
        "bcc": [
            {
                "address": "str",  # Email address. Required.
                "displayName": "str"  # Optional. Email display name.
            }
        ],
        "cc": [
            {
                "address": "str",  # Email address. Required.
                "displayName": "str"  # Optional. Email display name.
            }
        ]
    },
    "senderAddress": "str",  # Sender email address from a verified domain. Required.
    "attachments": [
        {
            "contentInBase64": "str",  # Base64 encoded contents of the attachment. Required.
            "contentType": "str",  # MIME type of the content being attached. Required.
            "name": "str"  # Name of the attachment. Required.
        }
    ],
    "userEngagementTrackingDisabled": bool,  # Optional. Indicates whether user engagement tracking should be disabled for this request if the resource-level user engagement tracking setting was already enabled in the control plane.
    "headers": {
        "str": "str"  # Optional. Custom email headers to be passed.
    },
    "replyTo": [
        {
            "address": "str",  # Email address. Required.
            "displayName": "str"  # Optional. Email display name.
        }
    ]
}

response = {
    "id": "str",  # The unique id of the operation. Uses a UUID. Required.
    "status": "str",  # Status of operation. Required. Known values are:
        "NotStarted", "Running", "Succeeded", and "Failed".
    "error": {
        "additionalInfo": [
            {
                "info": {},  # Optional. The additional info.
                "type": "str"  # Optional. The additional info type.
            }
        ],
        "code": "str",  # Optional. The error code.
        "details": [
            ...
        ],
        "message": "str",  # Optional. The error message.
        "target": "str"  # Optional. The error target.
    }
}
The response.status values are explained further in the following table.
| Status Name | Description |
|---|---|
| InProgress | The email send operation is currently in progress and being processed. |
| Succeeded | The email send operation has completed without error and the email is out for delivery. Any detailed status about the email delivery beyond this stage can be obtained either through Azure Monitor or through Azure Event Grid. Learn how to subscribe to email events |
| Failed | The email send operation wasn't successful and encountered an error. The email wasn't sent. The result contains an error object with more details on the reason for failure. |
Prerequisites
- An Azure account with an active subscription. Create an account for free.
- Python 3.7+.
- An Azure Email Communication Services resource created and ready with a provisioned domain. Get started with creating an Email Communication Resource.
- An active Azure Communication Services resource connected to an Email Domain and its connection string. Get started by connecting an Email Communication Resource with a Azure Communication Resource.
Completing this quick start incurs a small cost of a few USD cents or less in your Azure account.
Note
We can also send an email from our own verified domain. Add custom verified domains to Email Communication Service.
Prerequisite check
- In a terminal or command window, run the
python --versioncommand to check that Python is installed. - To view the domains verified with your Email Communication Services resource, sign in to the Azure portal. Locate your Email Communication Services resource and open the Provision domains tab from the left navigation pane.
Set up the application environment
To set up an environment for sending emails, take the steps in the following sections.
Create a new Python application
Open your terminal or command window. Then use the following command to create a virtual environment and activate it. This command creates a new directory for your app.
python -m venv email-quickstartNavigate to the root directory of the virtual environment and activate it using the following commands.
cd email-quickstart
.\Scripts\activate
Use a text editor to create a file called send-email.py in the project root directory and add the structure for the program, including basic exception handling.
import os
from azure.communication.email import EmailClient

try:
    # Quickstart code goes here.
except Exception as ex:
    print('Exception:')
    print(ex)
In the following sections, you add all the source code for this quickstart to the send-email.py file that you created.
Install the package
While still in the application directory, install the Azure Communication Services Email SDK for Python package by using the following command.
pip install azure-communication-email
Creating the email client with authentication
There are a few different options available for authenticating an email client:
Instantiate an EmailClient with your connection string. Learn how to manage your resource's connection string.
# Create the EmailClient object that you use to send Email messages.
email_client = EmailClient.from_connection_string(<connection_string>)
For simplicity, this quickstart uses connection strings, but in production environments, we recommend using service principals.
Basic email sending
Send an email message
To send an email message, you need to:
- Construct the message with the following values:
senderAddress: A valid sender email address, found in the MailFrom field in the overview pane of the domain linked to your Email Communication Services Resource.recipients: An object with a list of email recipients, and optionally, lists of CC & BCC email recipients.content: An object containing the subject, and optionally the plaintext or HTML content, of an email message.
- Call the begin_send method, which returns the result of the operation.
message = {
    "content": {
        "subject": "This is the subject",
        "plainText": "This is the body",
        "html": "<html><h1>This is the body</h1></html>"
    },
    "recipients": {
        "to": [
            {
                "address": "<emailalias@emaildomain.com>",
                "displayName": "Customer Name"
            }
        ]
    },
    "senderAddress": "<donotreply@xxxxxxxx-xxxx-xxxx-xxxx-xxxxxxxxxxxx.azurecomm.net>"
}

poller = email_client.begin_send(message)
print("Result: " + poller.result())
Make these replacements in the code:
- Replace
<emailalias@emaildomain.com>with the email address you would like to send a message to. - Replace
<donotreply@xxxxxxxx-xxxx-xxxx-xxxx-xxxxxxxxxxxx.azurecomm.net>with the MailFrom address of your verified domain.
Get the status of the email delivery
We can poll for the status of the email delivery by setting a loop on the operation status object returned from the EmailClient's begin_send method:
POLLER_WAIT_TIME = 10

try:
    email_client = EmailClient.from_connection_string(connection_string)

    poller = email_client.begin_send(message);

    time_elapsed = 0
    while not poller.done():
        print("Email send poller status: " + poller.status())

        poller.wait(POLLER_WAIT_TIME)
        time_elapsed += POLLER_WAIT_TIME

        if time_elapsed > 18 * POLLER_WAIT_TIME:
            raise RuntimeError("Polling timed out.")

    if poller.result()["status"] == "Succeeded":
        print(f"Successfully sent the email (operation id: {poller.result()['id']})")
    else:
        raise RuntimeError(str(poller.result()["error"]))

except Exception as ex:
    print(ex)
Run the code
Run the application from your application directory with the python command.
python send-email.py
Sample code
You can download the sample app from GitHub
Prerequisites
An Azure account with an active subscription, or create an Azure account for free.
An active Azure Communication Services resource, or create a Communication Services resource.
An active Azure Logic Apps resource (logic app) and workflow, or create a new logic app resource and workflow with the trigger that you want to use. Currently, the Azure Communication Services Email connector provides only actions, so your logic app workflow requires a trigger, at minimum. You can create either a Consumption or Standard logic app resource.
An Azure Communication Services Email resource with a configured domain or custom domain.
An Azure Communication Services resource connected with an Azure Email domain.
Send email
To add a new step to your workflow by using the Azure Communication Services Email connector, follow these steps:
In the designer, open your logic app workflow.
Consumption
Under the step where you want to add the new action, select New step. Alternatively, to add the new action between steps, move your pointer over the arrow between those steps, select the plus sign (+), and select Add an action.
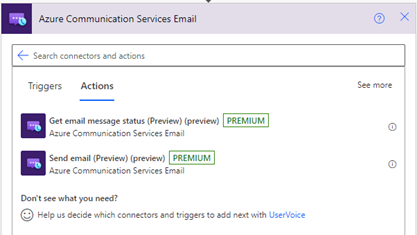
Under the Choose an operation search box, select Standard. In the search box, enter Communication Services Email.
From the actions list, select Send email.
Standard
Under the step where you want to add the new action, select the plus sign (+). Alternatively, to add the new action between steps, move your pointer over the arrow between those steps, select the plus sign (+), and select Add an action.
Under the Choose an operation search box, select Azure. In the search box, enter Communication Services Email.
From the actions list, select Send email.
Provide a name for the connection.
Enter the connection string for your Azure Communications Service resource. To find this string, follow these steps:
In the Azure portal, open your Azure Communication Service resource.
On the resource menu, under Settings, select Keys, and copy the connection string.
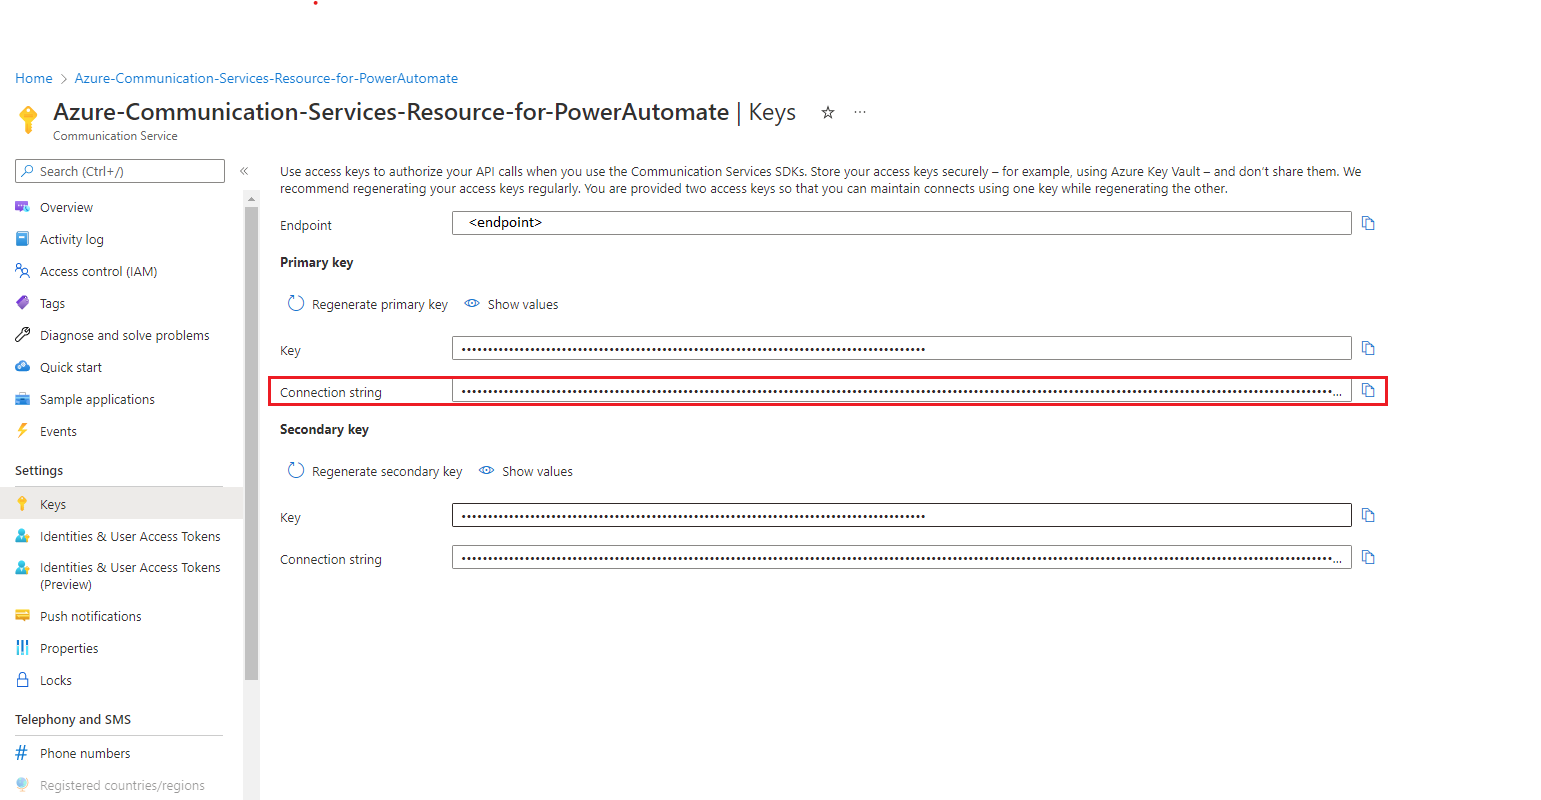
When you're done, select Create.
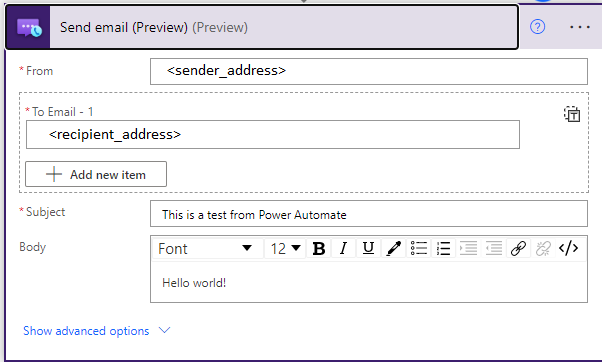
In the From field, use the email address that you configured in the prerequisites. Enter the values for the To, Subject, and Body fields, for example:
Save your workflow. On the designer toolbar, select Save.

Test your workflow
Based on whether you have a Consumption or Standard workflow, manually start your workflow:
- Consumption: On the designer toolbar, select Run Trigger > Run.
- Standard: On the workflow menu, select Overview. On the toolbar, select Run Trigger > Run.
The workflow creates a user, issues an access token for that user, then removes and deletes the user. You can check the outputs of these actions after the workflow runs successfully.
You should get an email at the specified address. Also, you can use the Get email message status action to check the status of emails send through the Send email action. For more actions, review the Azure Communication Services Email connector reference documentation.
Clean up workflow resources
To clean up your logic app resource, workflow, and related resources, review how to clean up Consumption logic app resources or how to clean up Standard logic app resources.
Troubleshooting
Email Delivery
To troubleshoot issues related to email delivery, you can get status of the email delivery to capture delivery details.
Important
The success result returned by polling for the status of the send operation only validates the fact that the email has successfully been sent out for delivery. To get additional information about the status of the delivery on the recipient end, you will need to reference how to handle email events.
Email Throttling
If you see that your application is hanging it could be due to email sending being throttled. You can handle this through logging or by implementing a custom policy.
Note
This sandbox setup is to help developers start building the application. You can gradually request to increase the sending volume once the application is ready to go live. Submit a support request to raise your desired sending limit if you require sending a volume of messages exceeding the rate limits.
Clean up Azure Communication Service resources
To clean up and remove a Communication Services subscription, you can delete the resource or resource group. Deleting the resource group also deletes any other associated resources. Learn more about cleaning up resources.
Next steps
In this quickstart, you learned how to send emails using Azure Communication Services. You might also want to:
- Learn about Email concepts.
- Familiarize yourself with email client library.
- Learn more about how to send a chat message from Power Automate using Azure Communication Services.
- Learn more about access tokens check in Create and Manage Azure Communication Services users and access tokens.
Feedback
Coming soon: Throughout 2024 we will be phasing out GitHub Issues as the feedback mechanism for content and replacing it with a new feedback system. For more information see: https://aka.ms/ContentUserFeedback.
Submit and view feedback for