Events
Mar 17, 9 PM - Mar 21, 10 AM
Join the meetup series to build scalable AI solutions based on real-world use cases with fellow developers and experts.
Register nowThis browser is no longer supported.
Upgrade to Microsoft Edge to take advantage of the latest features, security updates, and technical support.
APPLIES TO:
![]() Cassandra
Cassandra
In this quickstart, you create an Azure Cosmos DB for Apache Cassandra account, and use a Cassandra Python app cloned from GitHub to create a Cassandra database and container. Azure Cosmos DB is a multi-model database service that lets you quickly create and query document, table, key-value, and graph databases with global distribution and horizontal scale capabilities.
Before you can create a document database, you need to create a Cassandra account with Azure Cosmos DB.
From the Azure portal menu or the Home page, select Create a resource.
On the New page, search for and select Azure Cosmos DB.
On the Azure Cosmos DB page, select Create.
On the API page, select Create under the Cassandra section.
The API determines the type of account to create. Azure Cosmos DB provides five APIs: NoSQL for document databases, Gremlin for graph databases, MongoDB for document databases, Azure Table, and Cassandra. You must create a separate account for each API.
Select Cassandra, because in this quickstart you are creating a table that works with the API for Cassandra.
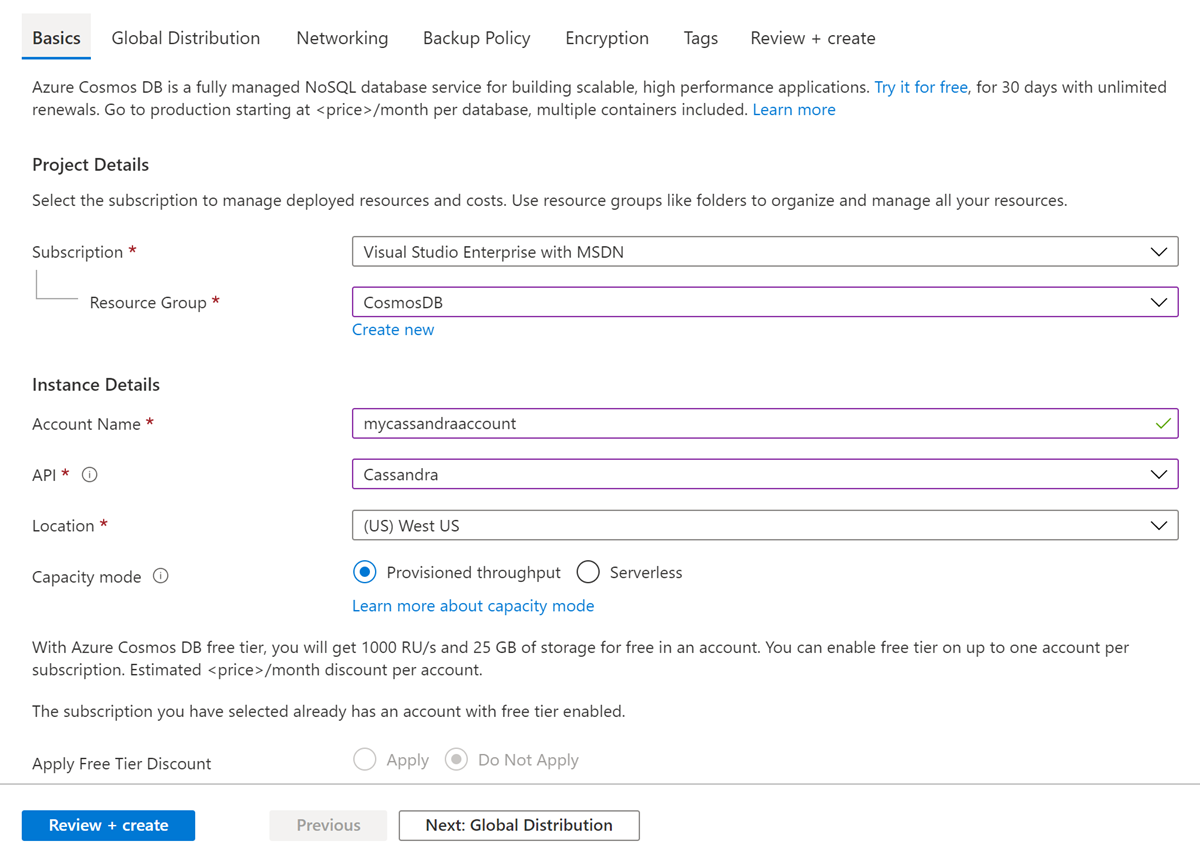
In the Create Azure Cosmos DB Account page, enter the basic settings for the new Azure Cosmos DB account.
| Setting | Value | Description |
|---|---|---|
| Subscription | Your subscription | Select the Azure subscription that you want to use for this Azure Cosmos DB account. |
| Resource Group | Create new Then enter the same name as Account Name |
Select Create new. Then enter a new resource group name for your account. For simplicity, use the same name as your Azure Cosmos DB account name. |
| Account Name | Enter a unique name | Enter a unique name to identify your Azure Cosmos DB account. Your account URI will be cassandra.cosmos.azure.com appended to your unique account name. The account name can use only lowercase letters, numbers, and hyphens (-), and must be between 3 and 31 characters long. |
| Location | The region closest to your users | Select a geographic location to host your Azure Cosmos DB account. Use the location that is closest to your users to give them the fastest access to the data. |
| Capacity mode | Provisioned throughput or Serverless | Select Provisioned throughput to create an account in provisioned throughput mode. Select Serverless to create an account in serverless mode. |
| Apply Azure Cosmos DB free tier discount | Apply or Do not apply | With Azure Cosmos DB free tier, you will get the first 1000 RU/s and 25 GB of storage for free in an account. Learn more about free tier. |
| Limit total account throughput | Select to limit throughput of the account | This is useful if you want to limit the total throughput of the account to a specific value. |
Note
You can have up to one free tier Azure Cosmos DB account per Azure subscription and must opt-in when creating the account. If you do not see the option to apply the free tier discount, this means another account in the subscription has already been enabled with free tier.
In the Global Distribution tab, configure the following details. You can leave the default values for the purpose of this quickstart:
| Setting | Value | Description |
|---|---|---|
| Geo-Redundancy | Disable | Enable or disable global distribution on your account by pairing your region with a pair region. You can add more regions to your account later. |
| Multi-region Writes | Disable | Multi-region writes capability allows you to take advantage of the provisioned throughput for your databases and containers across the globe. |
| Availability Zones | Disable | Availability Zones are isolated locations within an Azure region. Each zone is made up of one or more datacenters equipped with independent power, cooling, and networking. |
Note
The following options are not available if you select Serverless as the Capacity mode:
Optionally you can configure additional details in the following tabs:
Select Review + create.
Review the account settings, and then select Create. It takes a few minutes to create the account. Wait for the portal page to display Your deployment is complete.

Select Go to resource to go to the Azure Cosmos DB account page.
Now let's clone an API for Cassandra app from GitHub, set the connection string, and run it. You see how easy it's to work with data programmatically.
Open a command prompt. Create a new folder named git-samples. Then, close the command prompt.
md "C:\git-samples"
Open a git terminal window, such as git bash, and use the cd command to change to the new folder to install the sample app.
cd "C:\git-samples"
Run the following command to clone the sample repository. This command creates a copy of the sample app on your computer.
git clone https://github.com/Azure-Samples/azure-cosmos-db-cassandra-python-getting-started.git
This step is optional. If you're interested to learn how the code creates the database resources, you can review the following snippets. The snippets are all taken from the pyquickstart.py file. Otherwise, you can skip ahead to Update your connection string.
The cluster is initialized with contactPoint and port information that is retrieved from the Azure portal. The cluster then connects to the Azure Cosmos DB for Apache Cassandra by using the connect() method. An authorized connection is established by using the username, password, and the default certificate or an explicit certificate if you provide one within the config file.
ssl_context = SSLContext(PROTOCOL_TLSv1_2)
ssl_context.verify_mode = CERT_NONE
auth_provider = PlainTextAuthProvider(username=cfg.config['username'], password=cfg.config['password'])
cluster = Cluster([cfg.config['contactPoint']], port = cfg.config['port'], auth_provider=auth_provider,ssl_context=ssl_context)
session = cluster.connect()
A new keyspace is created.
print ("\nCreating Keyspace")
execute_command('CREATE KEYSPACE IF NOT EXISTS uprofile WITH replication = {\'class\': \'NetworkTopologyStrategy\', \'datacenter\' : \'1\' }');
A new table is created.
print ("\nCreating Table")
execute_command('CREATE TABLE IF NOT EXISTS uprofile.user (user_id int PRIMARY KEY, user_name text, user_bcity text)');
Key/value entities are inserted.
execute_command("INSERT INTO  uprofile.user  (user_id, user_name , user_bcity) VALUES (%s,%s,%s)", [1,'Lybkov','Seattle'])
execute_command("INSERT INTO  uprofile.user  (user_id, user_name , user_bcity) VALUES (%s,%s,%s)", [2,'Doniv','Dubai'])
execute_command("INSERT INTO  uprofile.user  (user_id, user_name , user_bcity) VALUES (%s,%s,%s)", [3,'Keviv','Chennai'])
execute_command("INSERT INTO  uprofile.user  (user_id, user_name , user_bcity) VALUES (%s,%s,%s)", [4,'Ehtevs','Pune'])
execute_command("INSERT INTO  uprofile.user  (user_id, user_name , user_bcity) VALUES (%s,%s,%s)", [5,'Dnivog','Belgaum'])
execute_command("INSERT INTO  uprofile.user  (user_id, user_name , user_bcity) VALUES (%s,%s,%s)", [6,'Ateegk','Narewadi'])
execute_command("INSERT INTO  uprofile.user  (user_id, user_name , user_bcity) VALUES (%s,%s,%s)", [7,'KannabbuS','Yamkanmardi'])
execute_command("INSERT INTO  uprofile.user  (user_id, user_name , user_bcity) VALUES (%s,%s,%s)", [8,'Jonas','Atlanta'])
Query to get all key values.
print ("\nSelecting All")
rows = session.execute('SELECT * FROM uprofile.user')
PrintTable(rows)
Query to get a key-value.
print ("\nSelecting Id=1")
rows = session.execute('SELECT * FROM uprofile.user where user_id=1')
PrintTable(rows)
Now go back to the Azure portal to get your connection string information and copy it into the app. The connection string enables your app to communicate with your hosted database.
In your Azure Cosmos DB account in the Azure portal, select Connection String.
Use the  button on the right side of the screen to copy the top value, the CONTACT POINT.

Open the config.py file.
Paste the CONTACT POINT value from the portal over <FILLME> on line 10.
Line 10 should now look similar to
'contactPoint': 'cosmos-db-quickstarts.cassandra.cosmosdb.azure.com'
Paste the PORT value from the portal over <FILLME> on line 12.
Line 12 should now look similar to
'port': 10350,
Copy the USERNAME value from the portal and paste it over <FILLME> on line 6.
Line 6 should now look similar to
'username': 'cosmos-db-quickstart',
Copy the PASSWORD value from the portal and paste it over <FILLME> on line 8.
Line 8 should now look similar to
'password' = '2Ggkr662ifxz2Mg==';`
Save the config.py file.
Use the cd command in the git terminal to change into the azure-cosmos-db-cassandra-python-getting-started folder.
Run the following commands to install the required modules:
python -m pip install cassandra-driver==3.20.2
python -m pip install prettytable
python -m pip install requests
python -m pip install pyopenssl
Note
We recommend Python driver version 3.20.2 for use with API for Cassandra. Higher versions may cause errors.
Run the following command to start your Python application:
python pyquickstart.py
Verify the results as expected from the command line.
Press CTRL+C to stop execution of the program and close the console window.

In the Azure portal, open Data Explorer to query, modify, and work with this new data.

The Azure portal monitors your Azure Cosmos DB account throughput, storage, availability, latency, and consistency. Charts for metrics associated with an Azure Cosmos DB Service Level Agreement (SLA) show the SLA value compared to actual performance. This suite of metrics makes monitoring your SLAs transparent.
To review metrics and SLAs:
Select Metrics in your Azure Cosmos DB account's navigation menu.
Select a tab such as Latency, and select a timeframe on the right. Compare the Actual and SLA lines on the charts.

Review the metrics on the other tabs.
When you're done with your app and Azure Cosmos DB account, you can delete the Azure resources you created so you don't incur more charges. To delete the resources:
In the Azure portal Search bar, search for and select Resource groups.
From the list, select the resource group you created for this quickstart.
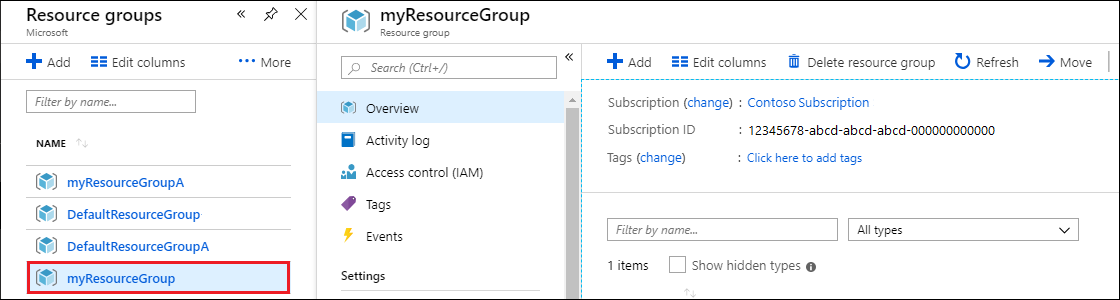
On the resource group Overview page, select Delete resource group.
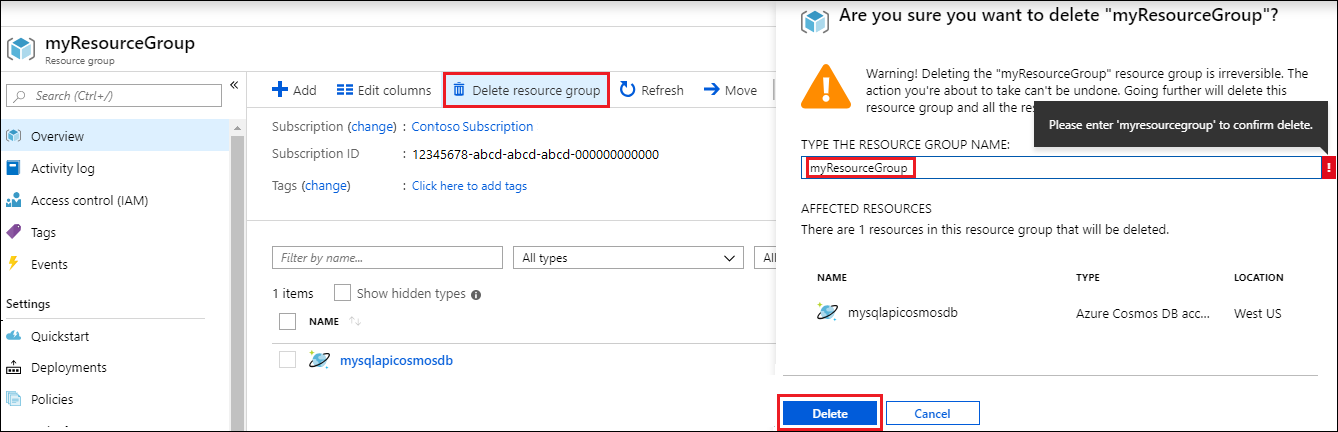
In the next window, enter the name of the resource group to delete, and then select Delete.
In this quickstart, you learned how to create an Azure Cosmos DB account with API for Cassandra, and run a Cassandra Python app that creates a Cassandra database and container. You can now import other data into your Azure Cosmos DB account.
Events
Mar 17, 9 PM - Mar 21, 10 AM
Join the meetup series to build scalable AI solutions based on real-world use cases with fellow developers and experts.
Register nowTraining
Certification
Microsoft Certified: Azure Cosmos DB Developer Specialty - Certifications
Write efficient queries, create indexing policies, manage, and provision resources in the SQL API and SDK with Microsoft Azure Cosmos DB.