Pay your Microsoft Customer Agreement Azure or Microsoft Online Subscription Program Azure bill
This article applies to customers with a Microsoft Customer Agreement (MCA) and to customers who signed up for Azure through the Azure website, Azure.com (for a Microsoft Online Services Program (MOSP) account also called pay-as-you-go account).
Check your access to a Microsoft Customer Agreement.
There are two ways to pay for your bill for Azure. You can pay with the default payment method of your billing profile or you can make a one-time payment with Pay now.
If you signed up for Azure through a Microsoft representative, then your default payment method is always set to wire transfer. Automatic credit card payment isn't an option if you signed up for Azure through a Microsoft representative. Instead, you can pay with a credit card for individual invoices.
If you have a Microsoft Online Services Program account, your default payment method is credit card. Payments are normally automatically deducted from your credit card, but you can also make one-time payments manually by credit card.
If you have Azure credits, they automatically apply to your invoice each billing period.
Note
Regardless of the payment method selected to complete your payment, you must specify the invoice number in the payment details.
Here's a table summarizing payment methods for different agreement types
| Agreement type | Credit card | Wire transfer¹ |
|---|---|---|
| Microsoft Customer Agreement purchased through a Microsoft representative |
✔ (with a $50,000.00 USD limit) | ✔ |
| Enterprise Agreement | ✘ | ✔ |
| MOSP | ✔ | ✔ if approved to pay by invoice |
¹ If supported by your bank, an ACH credit transaction can be made automatically.
Reserve Bank of India
The Reserve Bank of India has issued new directives.
As of October 2021, automatic payments in India may block some credit card transactions, especially transactions exceeding 5,000 INR. Because of this situation, you may need to make payments manually in the Azure portal. This directive doesn't affect the total amount you're charged for your Azure usage.
As of June 2022, The Reserve Bank of India (RBI) increased the limit of e-mandates on cards for recurring payments from INR 5,000 to INR 15,000.
As of September 2022, Microsoft and other online merchants no longer stores credit card information. To comply with this regulation, Microsoft removed all stored card details from Microsoft Azure. To avoid service interruption, you need to add and verify your payment method to make a payment in the Azure portal for all invoices.
Learn about the Reserve Bank of India directive; Restriction on storage of actual card data
UPI and NetBanking payment options
Azure supports two alternate payment options for customers in India:
- UPI (Unified Payments Interface) payment is a real-time payment method.
- NetBanking (Internet Banking) facilitates customers with access to banking services on an online platform.
How do I make a payment with UPI or NetBanking?
UPI and NetBanking are only supported for one-time transactions.
To make a payment with UPI or NetBanking:
- Select Add a new payment method when you’re making a payment.
- Select UPI / NetBanking.
- You're redirected to a payment partner, like Billdesk, where you can choose your payment method.
- You’re redirected to your bank's website where you can process the payment.
After you submit the payment, allow time for the payment to appear in the Azure portal.
How am I refunded if I made a payment with UPI or NetBanking?
Refunds are treated as a regular charge. They’re refunded to your bank account.
Partial payment for Azure global in China
Partial payment is available for Azure global pay-as-you-go customers in China only. If you accrue usage higher than your credit card limit, you can use the following self-serve process to split the invoice amount across multiple credit cards using partial payment.
Note
To avoid service interruption, pay the full invoice amount by the due date found on the invoice.
To make a partial payment, use the following steps.
- Sign into the Azure portal.
- Search for Cost Management + Billing.
- In the left menu, select Invoices under Billing.
- If any of your eligible invoices are due or past due, a blue Pay now link for the invoice is available. Select Pay now.
- In the Pay now window, select or tap Select a payment method to choose an existing credit card or add a new one.
- After you select a payment method, select Pay now.
- If the payment fails, the partial payment feature appears in the Pay now experience. The minimum partial payment amount is 10,000 CNY. Enter an amount greater than 10,000 CNY.
- After you enter the amount, select the Select a payment method option to choose an existing credit card or add a new one. It's the card the first partial payment is applied to.
- After you select a payment method, select Pay now.
- Repeat steps 8 – 9 until you fully pay the invoice amount.
Pay by default payment method
The default payment method of your billing profile can either be a credit card, debit card, or wire transfer.
Credit or debit card
If the default payment method for your billing profile is a credit or debit card, it's automatically charged each billing period.
If your automatic credit or debit card charge gets declined for any reason, you can make a one-time payment with a credit or debit card in the Azure portal using Pay now.
If you have a Microsoft Online Services Program (pay-as-you-go) account and you have a bill due, the Pay now banner appears on your subscription property page.
If you want to learn how to change your default payment method to wire transfer, see How to pay by invoice.
There are a few countries/regions that don't allow the use of debit cards, however in general, you can use them to pay your Azure bill. Virtual and prepaid debit cards can't be used to pay your Azure bill.
- Hong Kong Special Administrative Region and Brazil only support credit cards.
- India supports debit and credit cards through Visa and Mastercard.
Wire transfer
If the default payment method of your billing profile is wire transfer, follow the payment instructions shown on your invoice PDF file.
Alternatively, if your invoice is under the threshold amount for your currency, you can make a one-time payment in the Azure portal with a credit or debit card using Pay now. If your invoice amount exceeds the threshold, you can't pay your invoice with a credit or debit card. You'll find the threshold amount for your currency in the Azure portal after selecting Pay now.
Note
When multiple invoices are remitted in a single wire transfer, you must specify the invoice numbers for all of the invoices.
Bank details used to send wire transfer payments
If your default payment method is wire transfer, check your invoice for payment instructions. Find payment instructions for your country or region in the following list.
- Choose your country or region
- Afghanistan
- Albania
- Algeria
- Angola
- Argentina
- Armenia
- Australia
- Austria
- Azerbaijan
- Bahamas
- Bahrain
- Bangladesh
- Barbados
- Belarus
- Belgium
- Belize
- Bermuda
- Bolivia
- Bosnia and Herzegovina
- Botswana
- Brazil
- Brunei
- Bulgaria
- Cameroon
- Canada
- Cabo Verde
- Cayman Islands
- Chile
- China (PRC)
- Colombia
- Costa Rica
- Côte d'Ivoire
- Croatia
- Curacao
- Cyprus
- Czech Republic
- Democratic Republic of Congo
- Denmark
- Dominican Republic
- Ecuador
- Egypt
- El Salvador
- Estonia
- Ethiopia
- Faroe Islands
- Fiji
- Finland
- France
- French Guiana
- Georgia
- Germany
- Ghana
- Greece
- Grenada
- Guadeloupe
- Guam
- Guatemala
- Guyana
- Haiti
- Honduras
- Hong Kong SAR
- Hungary
- Iceland
- India
- Indonesia
- Iraq
- Ireland
- Israel
- Italy
- Jamaica
- Japan
- Jordan
- Kazakhstan
- Kenya
- Korea
- Kuwait
- Kyrgyzstan
- Latvia
- Lebanon
- Libya
- Liechtenstein
- Lithuania
- Luxembourg
- Macao Special Administrative Region
- Malaysia
- Malta
- Mauritius
- Mexico
- Moldova
- Monaco
- Mongolia
- Montenegro
- Morocco
- Namibia
- Nepal
- Netherlands
- New Zealand
- Nicaragua
- Nigeria
- North Macedonia, Republic of
- Norway
- Oman
- Pakistan
- Palestinian Authority
- Panama
- Paraguay
- Peru
- Philippines
- Poland
- Portugal
- Puerto Rico
- Qatar
- Romania
- Russia
- Rwanda
- Saint Kitts and Nevis
- Saint Lucia
- Saint Vincent and the Grenadines
- Saudi Arabia
- Senegal
- Serbia
- Singapore
- Slovakia
- Slovenia
- South Africa
- Spain
- Sri Lanka
- Suriname
- Sweden
- Switzerland
- Taiwan
- Tajikistan
- Tanzania
- Thailand
- Trinidad and Tobago
- Turkmenistan
- Tunisia
- Türkiye
- Uganda
- Ukraine
- United Arab Emirates
- United Kingdom
- United States
- Uruguay
- Uzbekistan
- Venezuela
- Vietnam
- Virgin Islands, US
- Yemen
- Zambia
- Zimbabwe
Pay now in the Azure portal
To pay invoices in the Azure portal, you must have the correct MCA permissions or be the Billing Account admin. The Billing Account admin is the user who originally signed up for the MCA account.
- Sign in to the Azure portal.
- Search on Cost Management + Billing.
- In the left menu, select Invoices under Billing.
- If any of your eligible invoices are due or past due, a blue Pay now link appears for the invoice. Select Pay now.
- In the Pay now window, select or tap Select a payment method to choose an existing credit card or add a new one.
- After you select a payment method, select Pay now.
The invoice status shows paid within 24 hours.
Pay now might be unavailable
If you have a Microsoft Online Services Program account (pay-as-you-go account), the Pay now option might be unavailable. Instead, you might see a Settle balance banner. If so, see Resolve past due balance.
Based on the default payment method and invoice amount, the Pay now option might be unavailable. Check your invoice for payment instructions.
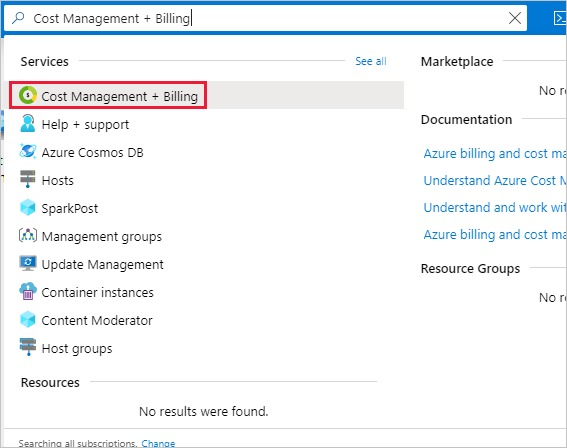
Check access to a Microsoft Customer Agreement
Check the agreement type to determine whether you have access to a billing account for a Microsoft Customer Agreement.
Go to the Azure portal to check for billing account access. Search for and select Cost Management + Billing.
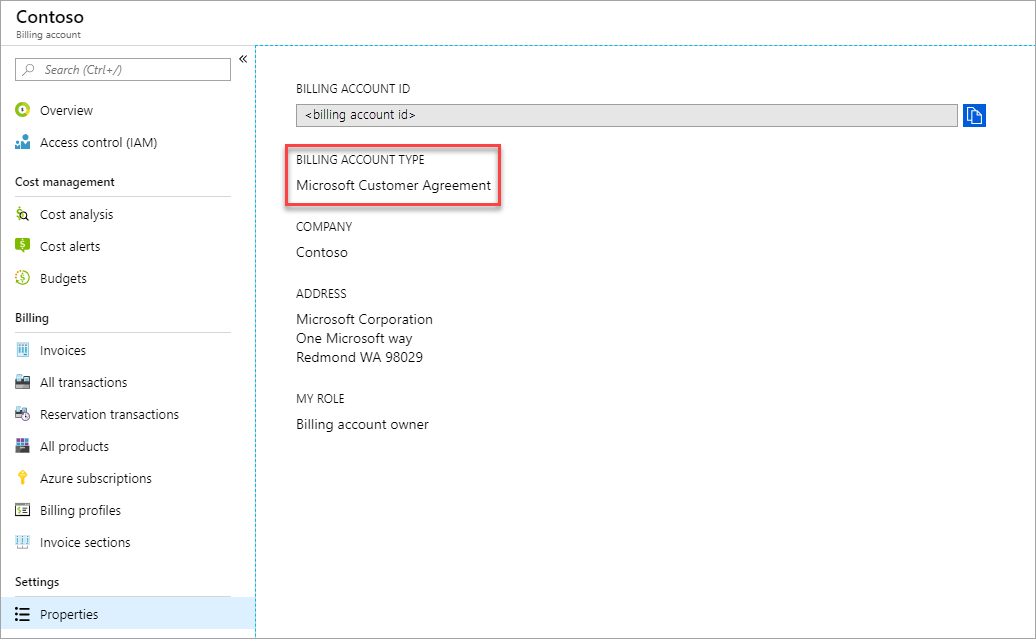
If you have access to just one billing scope, select Properties from the menu. You have access to a billing account for a Microsoft Customer Agreement if the billing account type is Microsoft Customer Agreement.
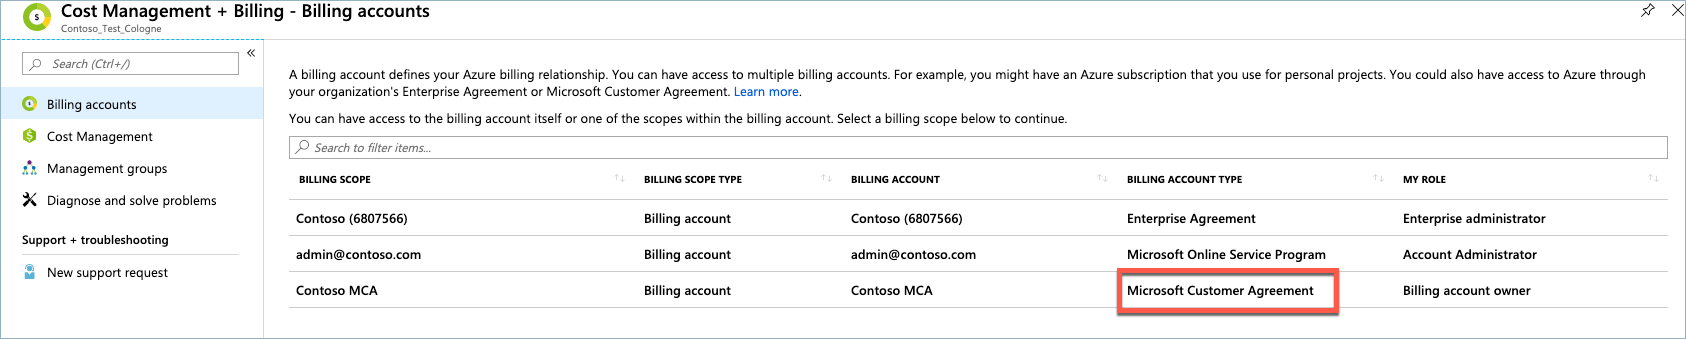
If you have access to multiple billing scopes, check the type in the billing account column. You have access to a billing account for a Microsoft Customer Agreement if the billing account type for any of the scopes is Microsoft Customer Agreement.

Next steps
- To become eligible to pay by wire transfer, see how to pay by invoice
Feedback
Coming soon: Throughout 2024 we will be phasing out GitHub Issues as the feedback mechanism for content and replacing it with a new feedback system. For more information see: https://aka.ms/ContentUserFeedback.
Submit and view feedback for