Tutorial: How to access on-premises SQL Server from Data Factory Managed VNet using Private Endpoint
This tutorial provides steps for using the Azure portal to setup Private Link Service and access on-premises SQL Server from a managed virtual network using a private endpoint. Using a managed virtual network ensures that traffic to and from your on-premises SQL source will all pass through your own private endpoint, thereby securing exposure to the public cloud with an extra layer of security and isolation. The required resources mentioned below are necessary to support the scenario.
Note
The solution presented in this article describes SQL Server connectivity, but you can use a similar approach to connect and query other available on-premises connectors that are supported in Azure Data Factory.

Prerequisites
- Azure subscription. If you don't have an Azure subscription, create a free account before you begin.
- Virtual Network. If you don’t have a Virtual Network, create one following Create Virtual Network.
- Virtual network to on-premises network. Create a connection between virtual network and on-premises network either using ExpressRoute or VPN. If you prefer to use a cloud virtual machine in a private network, you can do this as well. Just create a virtual network for your cloud virtual machines and a private link to the virtual network and you can access them as if they were on-premises machines in your private network even though they are hosted in the cloud.
- Data Factory with Managed VNet enabled. If you don’t have a Data Factory or Managed VNet is not enabled, create one following Create Data Factory with Managed VNet.
Create subnets for resources
Use the portal to create subnets in your virtual network.
| Subnet | Description |
|---|---|
| be-subnet | subnet for backend servers |
| fe-subnet | subnet for standard internal load balancer |
| pls-subnet | subnet for Private Link Service |

Create a standard load balancer
Use the portal to create a standard internal load balancer.
On the top left-hand side of the screen, select Create a resource > Networking > Load Balancer.
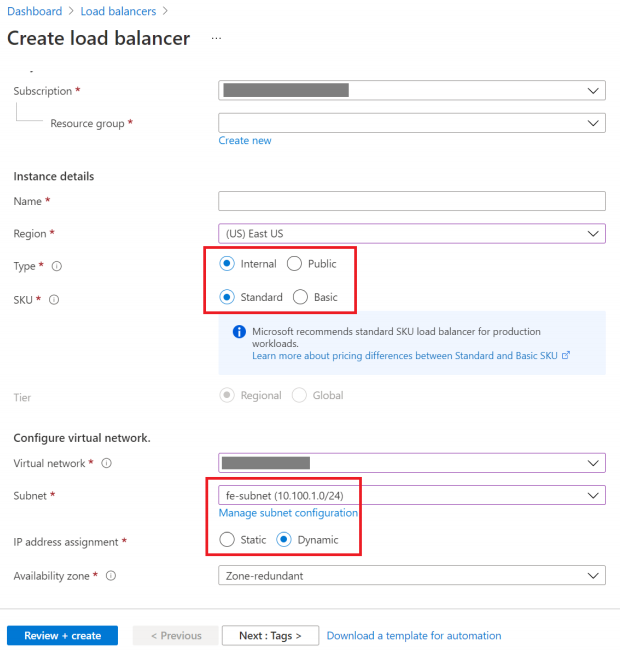
In the Basics tab of the Create load balancer page, enter, or select the following information:
Setting Value Subscription Select your subscription. Resource group Select your resource group. Name Enter myLoadBalancer. Region Select East US. Type Select Internal. SKU Select Standard. Virtual network Select your virtual network. Subnet Select fe-subnet created in the previous step. IP address assignment Select Dynamic. Availability zone Select Zone-redundant. Accept the defaults for the remaining settings, and then select Review + create.
In the Review + create tab, select Create.
Create load balancer resources
Create a backend pool
A backend address pool contains the IP addresses of the virtual (NICs) connected to the load balancer.
Create the backend address pool myBackendPool to include virtual machines for load-balancing internet traffic.
- Select All services in the left-hand menu, select All resources, and then select myLoadBalancer from the resources list.
- Under Settings, select Backend pools, then select Add.
- On the Add a backend pool page, for name, type myBackendPool, as the name for your backend pool, and then select Add.
Create a health probe
The load balancer monitors the status of your app with a health probe.
The health probe adds or removes VMs from the load balancer based on their response to health checks.
Create a health probe named myHealthProbe to monitor the health of the VMs.
Select All services in the left-hand menu, select All resources, and then select myLoadBalancer from the resources list.
Under Settings, select Health probes, then select Add.
Setting Value Name Enter myHealthProbe. Protocol Select TCP. Port Enter 22. Interval Enter 15 for number of Interval in seconds between probe attempts. Unhealthy threshold Select 2 for number of Unhealthy threshold or consecutive probe failures that must occur before a VM is considered unhealthy. Leave the rest the defaults and select OK.
Create a load balancer rule
A load balancer rule is used to define how traffic is distributed to the VMs. You define the frontend IP configuration for the incoming traffic and the backend IP pool to receive the traffic. The source and destination port are defined in the rule.
In this section, you'll create a load balancer rule:
Select All services in the left-hand menu, select All resources, and then select myLoadBalancer from the resources list.
Under Settings, select Load-balancing rules, then select Add.
Use these values to configure the load-balancing rule:
Setting Value Name Enter myRule. IP Version Select IPv4. Frontend IP address Select LoadBalancerFrontEnd. Protocol Select TCP. Port Enter 1433. Backend port Enter 1433. Backend pool Select myBackendPool. Health probe Select myHealthProbe. Idle timeout (minutes) Move the slider to 15 minutes. TCP reset Select Disabled. Leave the rest of the defaults and then select OK.
Create a private link service
In this section, you'll create a Private Link service behind a standard load balancer.
On the upper-left part of the page in the Azure portal, select Create a resource.
Search for Private Link in the Search the Marketplace box.
Select Create.
In Overview under Private Link Center, select the blue Create private link service button.
In the Basics tab under Create private link service, enter, or select the following information:
Setting Value Project details Subscription Select your subscription. Resource Group Select your resource group. Instance details Name Enter myPrivateLinkService. Region Select East US. Select the Outbound settings tab or select Next: Outbound settings at the bottom of the page.
In the Outbound settings tab, enter or select the following information:
Setting Value Load balancer Select myLoadBalancer. Load balancer frontend IP address Select LoadBalancerFrontEnd. Source NAT subnet Select pls-subnet. Enable TCP proxy V2 Leave the default of No. Private IP address settings Leave the default settings. Select the Access security tab or select Next: Access security at the bottom of the page.
Leave the default of Role-based access control only in the Access security tab.
Select the Tags tab or select Next: Tags at the bottom of the page.
Select the Review + create tab or select Next: Review + create at the bottom of the page.
Select Create in the Review + create tab.
Create backend servers
On the upper-left side of the portal, select Create a resource > Compute > Virtual machine.
In Create a virtual machine, type or select the values in the Basics tab:
Setting Value Project details Subscription Select your Azure subscription. Resource Group Select your resource group. Instance details Virtual machine name Enter myVM1. Region Select East US. Availability Options Select Availability zones. Availability zone Select 1. Image Select Ubuntu Server 22.04 LTS. Azure Spot instance Select No. Size Choose VM size or take default setting. Administrator account Username Enter a username. SSH public key source Generate new key pair. Key pair name mySSHKey. Inbound port rules Public inbound ports None Select the Networking tab, or select Next: Disks, then Next: Networking.
In the Networking tab, select or enter:
Setting Value Network interface Virtual network Select your virtual network. Subnet be-subnet. Public IP Select None. NIC network security group Select None. Load balancing Place this virtual machine behind an existing load balancing solution? Select Yes. Load balancing settings Load balancing options Select Azure load balancing. Select a load balancer Select myLoadBalancer. Select a backend pool Select myBackendPool. Select Review + create.
Review the settings, and then select Create.
You can repeat step 1 to 6 to have more than 1 backend server VM for HA.
Creating Forwarding Rule to Endpoint
Login and copy script ip_fwd.sh to your backend server VMs.
Run the script with the following options:
sudo ./ip_fwd.sh -i eth0 -f 1433 -a <FQDN/IP> -b 1433Set the placeholder
<FQDN/IP>is your target SQL Server IP.Note
FQDN doesn't work for on-premises SQL Server unless you add a record in Azure DNS zone.
Run the following command and check the iptables in your backend server VMs. You can see one record in your iptables with your target IP.
sudo iptables -t nat -v -L PREROUTING -n --line-number**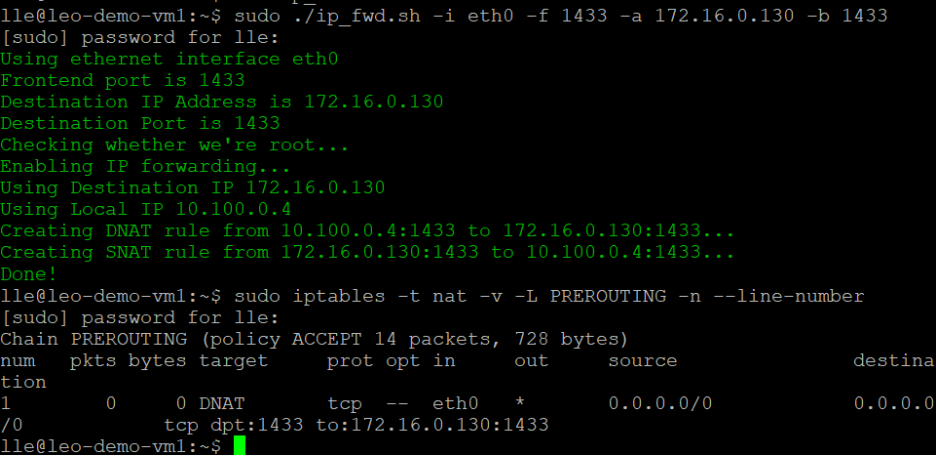
Note
If you have more than one SQL Server or data sources, you need to define multiple load balancer rules and IP table records with different ports. Otherwise, there will be some conflict. For example,
Port in load balancer rule Backend port in load balance rule Command run in backend server VM SQL Server 1 1433 1433 sudo ./ip_fwd.sh -i eth0 -f 1433 -a <FQDN/IP> -b 1433 SQL Server 2 1434 1434 sudo ./ip_fwd.sh -i eth0 -f 1434 -a <FQDN/IP> -b 1433 Note
It's important to be aware that the configuration within the virtual machine (VM) is not permanent. This means that each time the VM restarts, it will require reconfiguration.
Create a Private Endpoint to Private Link Service
Select All services in the left-hand menu, select All resources, and then select your data factory from the resources list.
Select Author & Monitor to launch the Data Factory UI in a separate tab.
Go to the Manage tab and then go to the Managed private endpoints section.
Select + New under Managed private endpoints.
Select the Private Link Service tile from the list and select Continue.
Enter the name of private endpoint and select myPrivateLinkService in private link service list.
Add the
<FQDN>of your target on-premises SQL Server.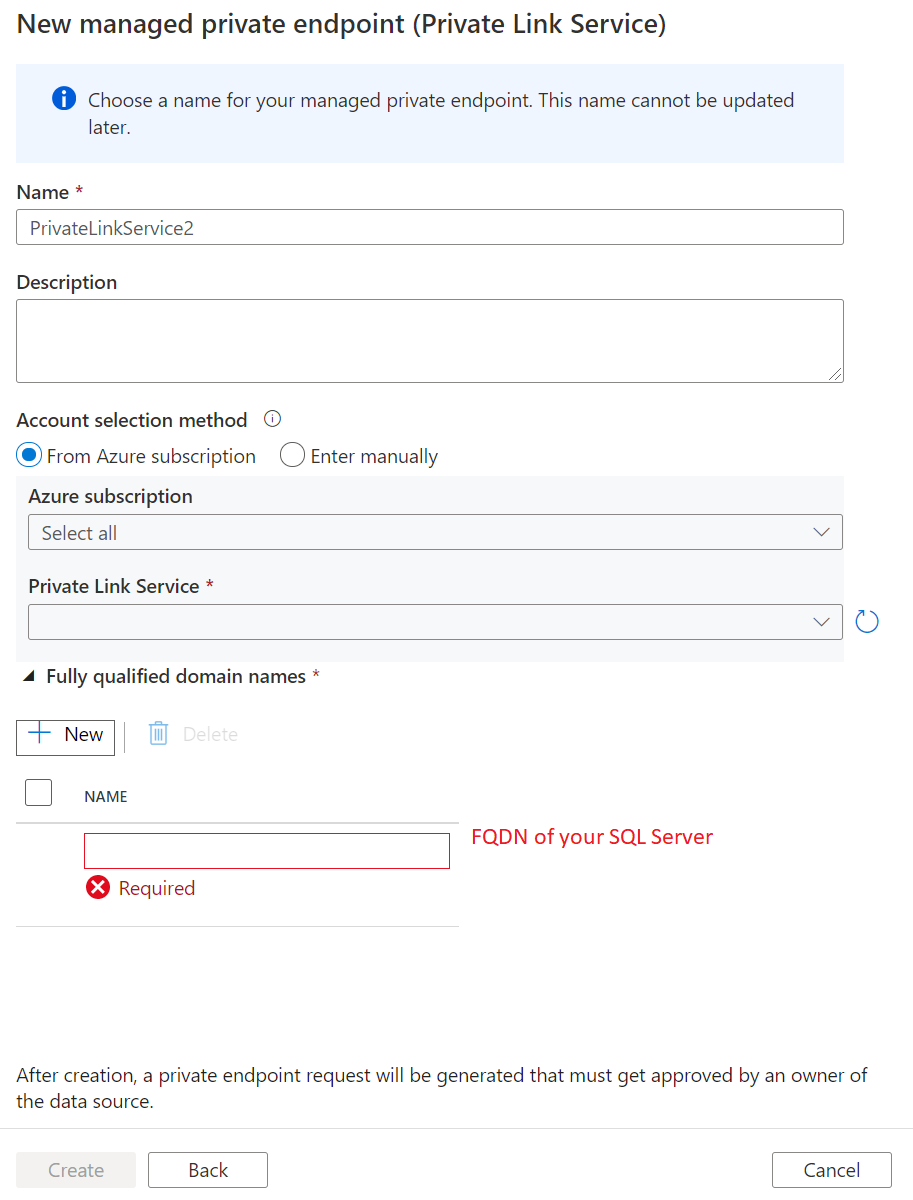
Note
When deploying your SQL Server on a virtual machine within a virtual network, it is essential to enhance your FQDN by appending privatelink. Otherwise, it will be conflicted with other records in the DNS setting. For example, you can simply modify the SQL Server's FQDN from sqlserver.westus.cloudapp.azure.net to sqlserver.privatelink.westus.cloudapp.azure.net.
Create private endpoint.
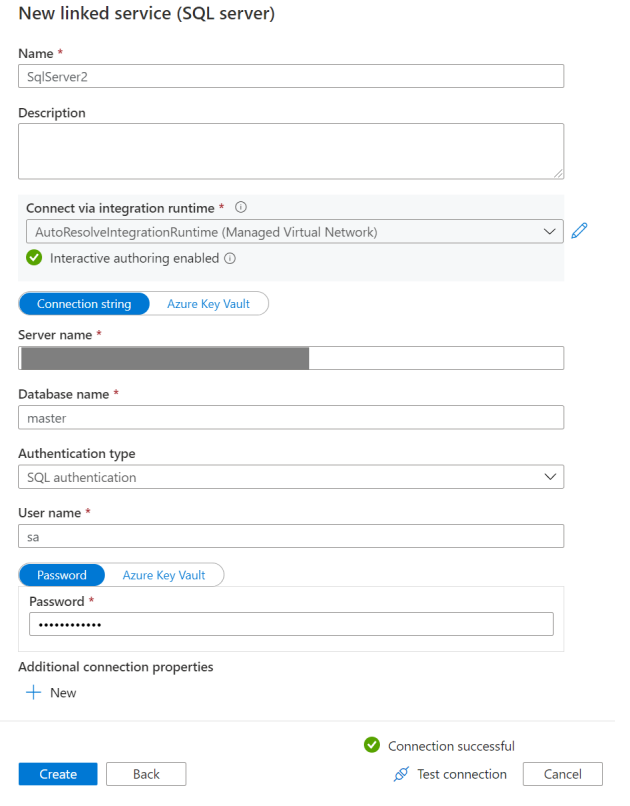
Create a linked service and test the connection
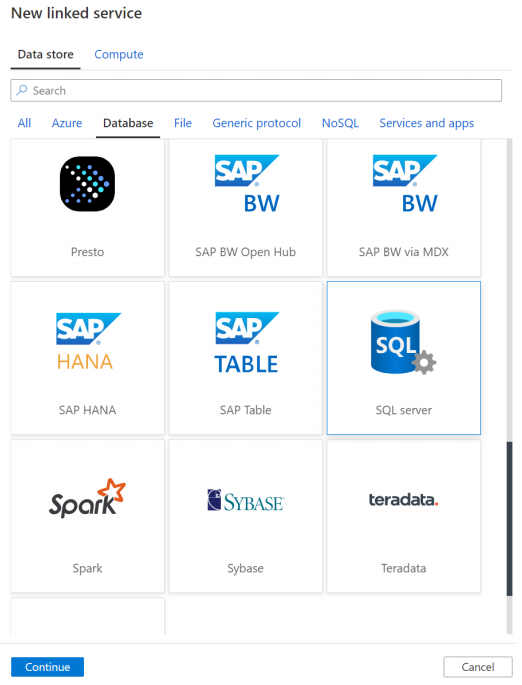
Go to the Manage tab and then go to the Linked services section.
Select + New under Linked Service.
Select the SQL Server tile from the list and select Continue.
Enable Interactive Authoring.
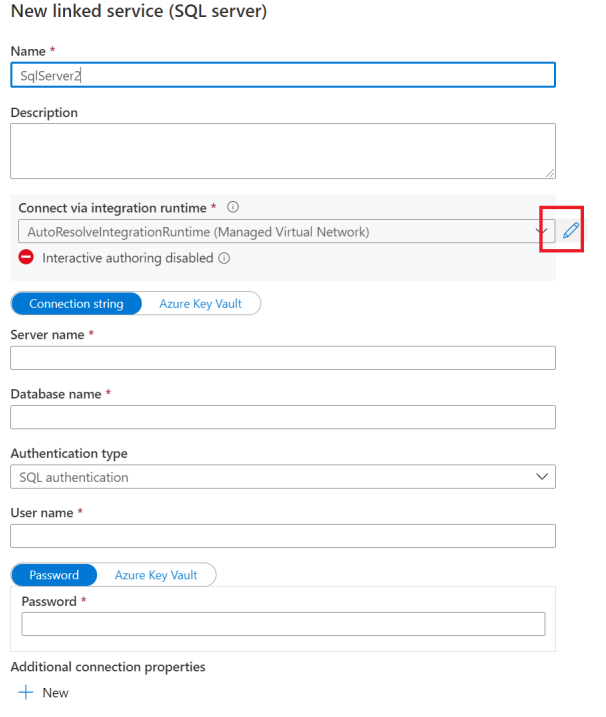
Input the FQDN of your on-premises SQL Server, user name and password.
Then click Test connection.
Note
If you have more than one SQL Server and need to define multiple load balancer rules and IP table records with different ports, make sure you explicitly add the port name after the FQDN when you edit Linked Service. The NAT VM will handle the port translation. If it's not explicitly specified, the connection will always time-out.
Troubleshooting
Go to the backend server VM, confirm telnet the SQL Server works: telnet <FQDN> 1433.
Related content
Advance to the following tutorial to learn about accessing Microsoft Azure SQL Managed Instance from Data Factory Managed VNet using Private Endpoint:
Feedback
Coming soon: Throughout 2024 we will be phasing out GitHub Issues as the feedback mechanism for content and replacing it with a new feedback system. For more information see: https://aka.ms/ContentUserFeedback.
Submit and view feedback for