Tutorial: Copy data to Azure Data Box via SMB
Copy data to Azure Data Box
Important
Azure Data Box now supports access tier assignment at the blob level. The steps contained within this tutorial reflect the updated data copy process and are specific to block blobs.
For help with determining the appropriate access tier for your block blob data, refer to the Determine appropriate access tiers for block blobs section. Follow the steps containined within the Copy data to Azure Data Box section to copy your data to the appropriate access tier.
The information contained within this section applies to orders placed after April 1, 2024.
This tutorial describes how to connect to and copy data from your host computer using the local web UI.
In this tutorial, you learn how to:
- Prerequisites
- Connect to Data Box
- Determine appropriate access tiers for block blobs
- Copy data to Data Box
Prerequisites
Before you begin, make sure that:
- You've completed the Tutorial: Set up Azure Data Box.
- You've received your Data Box and the order status in the portal is Delivered.
- You have a host computer that has the data that you want to copy over to Data Box. Your host computer must:
- Run a Supported operating system.
- Be connected to a high-speed network. We strongly recommend that you have at least one 10-GbE connection. If a 10-GbE connection isn't available, use a 1-GbE data link but the copy speeds are impacted.
Connect to Data Box
Based on the storage account selected, Data Box creates up to:
- Three shares for each associated storage account for GPv1 and GPv2.
- One share for premium storage.
- One share for a blob storage account, containing one folder for each of the four access tiers.
The following table identifies the names of the Data Box shares to which you can connect, and the type of data uploaded to your target storage account. It also identifies the hierarchy of shares and directories into which you copy your source data.
| Storage type | Share name | First-level entity | Second-level entity | Third-level entity |
|---|---|---|---|---|
| Block blob | <storageAccountName>_BlockBlob | <\accessTier> | <\containerName> | <\blockBlob> |
| Page blob | <\storageAccountName>_PageBlob | <\containerName> | <\pageBlob> | |
| File storage | <\storageAccountName>_AzFile | <\fileShareName> | <\file> |
You can't copy files directly to the root folder of any Data Box share. Instead, create folders within the Data Box share depending on your use case.
Block blobs support the assignment of access tiers at the file level. When copying files to the block blob share, the recommended best-practice is to add new subfolders within the appropriate access tier. After creating new subfolders, continue adding files to each subfolder as appropriate.
A new container is created for any folder residing at the root of the block blob share. Any file within that folder is copied to the storage account's default access tier as a block blob.
For more information about blob access tiers, see Access tiers for blob data. For more detailed information about access tier best practices, see Best practices for using blob access tiers.
The following table shows the UNC path to the shares on your Data Box and the corresponding Azure Storage path URL to which data is uploaded. The final Azure Storage path URL can be derived from the UNC share path.
| Azure Storage types | Data Box shares |
|---|---|
| Azure Block blobs | \\<DeviceIPAddress>\<storageaccountname_BlockBlob>\<accessTier>\<ContainerName>\myBlob.txthttps://<storageaccountname>.blob.core.windows.net/<ContainerName>/myBlob.txt |
| Azure Page blobs | \\<DeviceIPAddress>\<storageaccountname_PageBlob>\<ContainerName>\myBlob.vhdhttps://<storageaccountname>.blob.core.windows.net/<ContainerName>/myBlob.vhd |
| Azure Files | \\<DeviceIPAddress>\<storageaccountname_AzFile>\<ShareName>\myFile.txthttps://<storageaccountname>.file.core.windows.net/<ShareName>/myFile.txt |
If using a Windows Server host computer, follow these steps to connect to the Data Box.
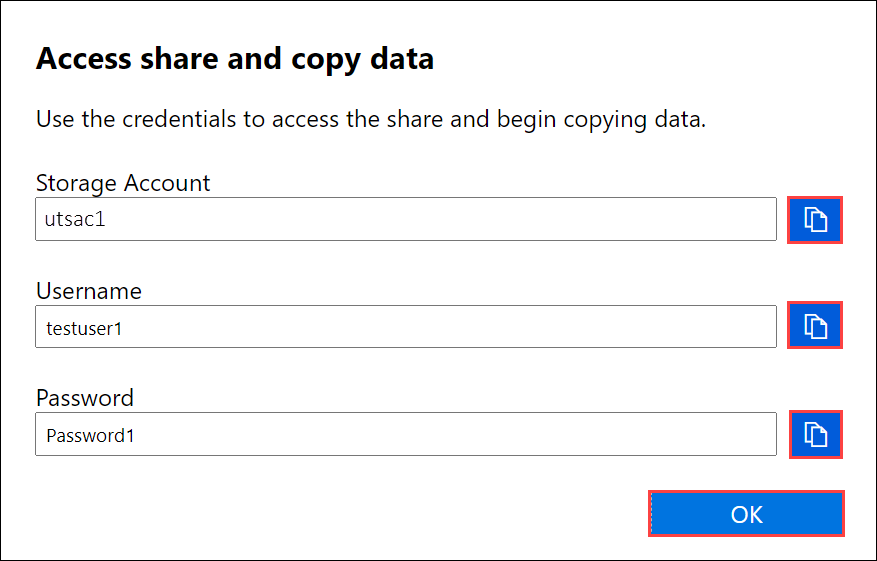
The first step is to authenticate and start a session. Go to Connect and copy. Select SMB to get the access credentials for the shares associated with your storage account.
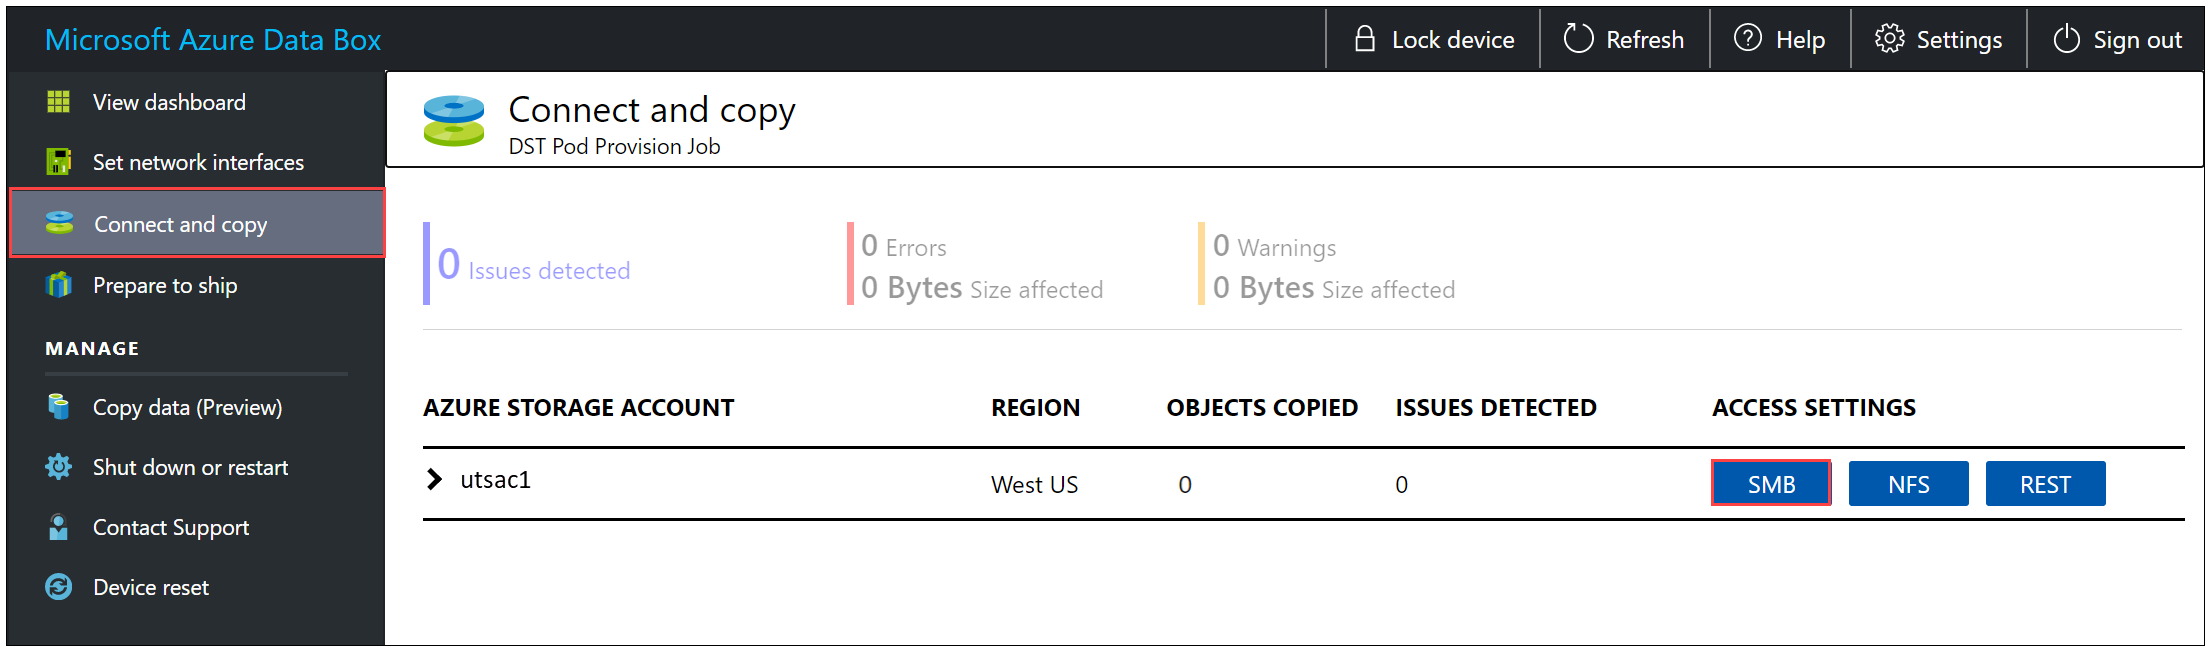
In the Access share and copy data dialog box, copy the Username and the Password corresponding to the share. Then select OK.
The following example uses a sample storage account named utsac1. To access the shares associated with your storage account from your host computer, open a command window. At the command prompt, type:
net use \\<DeviceIPAddress>\<share name> /u:<IP address of the device>\<user name for the share>Depending upon your data format, the share paths are as follows:
- Azure Block blob -
\\<DeviceIPAddress>\utsac1_BlockBlob - Azure Page blob -
\\<DeviceIPAddress>\utsac1_PageBlob - Azure Files -
\\<DeviceIPAddress>\utsac1_AzFile
- Azure Block blob -
Enter the password for the share when prompted. If the password has special characters, add double quotation marks before and after it. The following sample shows connecting to a share via the preceding command.
C:\Users\Databoxuser>net use \\<DeviceIPAddress>\utSAC1_202006051000_BlockBlob /u:<DeviceIPAddress>\testuser1
Enter the password for 'testuser1' to connect to '<DeviceIPAddress>': "ab1c2def$3g45%6h7i&j8kl9012345"
The command completed successfully.
Press Windows + R. In the Run window, specify the
\\<DeviceIPAddress>. Select OK to open File Explorer.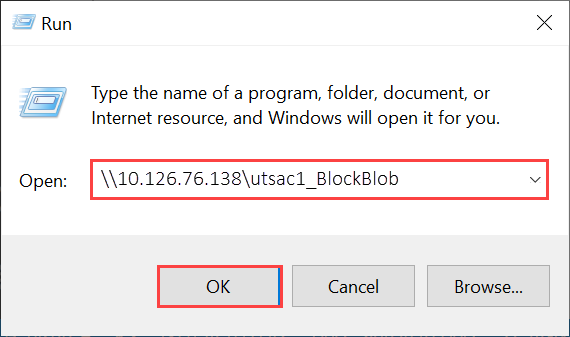
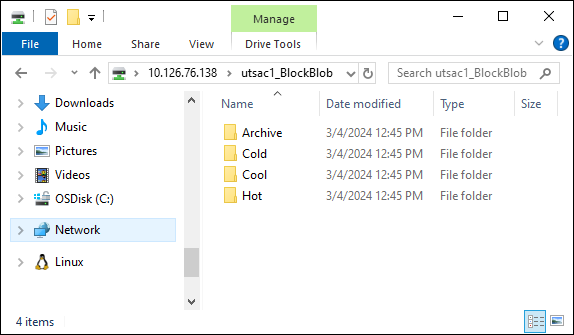
You should now see the shares as folders.
Important
You can't copy files directly to the storage account's root folder. Within a block blob storage account's root folder, you'll find a folder corresponding to each of the available access tiers.
To copy your data to Azure Data Box, you must first select the folder corresponding to one of the access tiers. Next, create a sub-folder within that tier's folder to store your data. Finally, copy your data to the newly created sub-folder. Your new sub-folder represents the container created within the storage account during ingestion. Your data is uploaded to this container as blobs.
If using a Linux client, use the following command to mount the SMB share. The vers parameter value identifies the version of SMB that your Linux host supports. Insert the appropriate version into the sample command provided. To see a list of SMB versions supported by Data Box, see Supported file systems for Linux clients.
sudo mount -t cifs -o vers=2.1 10.126.76.138:/utsac1_BlockBlob /home/databoxubuntuhost/databox
Determine appropriate access tiers for block blobs
Important
The information contained within this section applies to orders placed after April 1st, 2024.
Azure Storage allows you to store block blob data in multiple access tiers within the same storage account. This ability allows data to be organized and stored more efficiently based on how often it's accessed. The following table contains information and recommendations about Azure Storage access tiers.
| Tier | Recommendation | Best practice |
|---|---|---|
| Hot | Useful for online data accessed or modified frequently. This tier has the highest storage costs, but the lowest access costs. | Data in this tier should be in regular and active use. |
| Cool | Useful for online data accessed or modified infrequently. This tier has lower storage costs and higher access costs than the hot tier. | Data in this tier should be stored for at least 30 days. |
| Cold | Useful for online data accessed or modified rarely but still requiring fast retrieval. This tier has lower storage costs and higher access costs than the cool tier. | Data in this tier should be stored for a minimum of 90 days. |
| Archive | Useful for offline data rarely accessed and having lower latency requirements. | Data in this tier should be stored for a minimum of 180 days. Data removed from the archive tier within 180 days is subject to an early deletion charge. |
For more information about blob access tiers, see Access tiers for blob data. For more detailed best practices, see Best practices for using blob access tiers.
You can transfer your block blob data to the appropriate access tier by copying it to the corresponding folder within Data Box. This process is discussed in greater detail within the Copy data to Azure Data Box section.
Copy data to Data Box
After connecting to one or more Data Box shares, the next step is to copy data. Before you begin the data copy, consider the following limitations:
- Make sure that you copy your data to the share that corresponds to the required data format. For instance, copy block blob data to the share for block blobs. Copy VHDs to the page blob share. If the data format doesn't match the appropriate share type, the data upload to Azure fails during a later step.
- When copying data to the AzFile or PageBlob shares, first create a folder at the share's root, then copy files to that folder.
- When copying data to the BlockBlob share, create a subfolder within the desired access tier, then copy data to the newly created subfolder. The subfolder represents a container into which data is uploaded as blobs. You can't copy files directly to a share's root folder.
- While copying data, make sure that the data size conforms to the size limits described in the Azure storage account size limits.
- If you want to preserve metadata (ACLs, timestamps, and file attributes) when transferring data to Azure Files, follow the guidance in Preserving file ACLs, attributes, and timestamps with Azure Data Box
- Simultaneous uploads by Data Box and another non-Data Box application could potentially result in upload job failures and data corruption.
- If you use both the SMB and NFS protocols for data copies, we recommend that you:
- Use different storage accounts for SMB and NFS.
- Don't copy the same data to the same end destination in Azure using both SMB and NFS. In these cases, the final outcome can't be determined.
- Although copying via both SMB and NFS in parallel can work, we don't recommend doing that as it's prone to human error. Wait until your SMB data copy is complete before you start an NFS data copy.
Important
Make sure that you maintain a copy of the source data until you can confirm that your data has been copied into Azure Storage.
After you connect to the SMB share, begin the data copy. You can use any SMB-compatible file copy tool, such as Robocopy, to copy your data. Multiple copy jobs can be initiated using Robocopy. Use the following command:
robocopy <Source> <Target> * /e /r:3 /w:60 /is /nfl /ndl /np /MT:32 or 64 /fft /B /Log+:<LogFile>
The attributes are described in the following table.
| Attribute | Description |
|---|---|
| /e | Copies subdirectories including empty directories. |
| /r: | Specifies the number of retries on failed copies. |
| /w: | Specifies the wait time between retries, in seconds. |
| /is | Includes the same files. |
| /nfl | Specifies that file names aren't logged. |
| /ndl | Specifies that directory names aren't logged. |
| /np | Specifies that the progress of the copying operation (the number of files or directories copied so far) won't be displayed. Displaying the progress significantly lowers the performance. |
| /MT | Use multithreading, recommended 32 or 64 threads. This option not used with encrypted files. You might need to separate encrypted and unencrypted files. However, single threaded copy significantly lowers the performance. |
| /fft | Use to reduce the time stamp granularity for any file system. |
| /B | Copies files in Backup mode. |
| /z | Copies files in Restart mode; use this switch if the environment is unstable. This option reduces throughput due to additional logging. |
| /zb | Uses Restart mode. If access is denied, this option uses Backup mode. This option reduces throughput due to checkpointing. |
| /efsraw | Copies all encrypted files in EFS raw mode. Use only with encrypted files. |
| log+:<LogFile> | Appends the output to the existing log file. |
The following sample shows the output of the robocopy command to copy files to the Data Box.
C:\Users>robocopy

    -------------------------------------------------------------------------------
    ROBOCOPY     ::     Robust File Copy for Windows
    -------------------------------------------------------------------------------

        Started : Thursday, March 8, 2018 2:34:53 PM
        Simple Usage :: ROBOCOPY source destination /MIR

        source :: Source Directory (drive:\path or \\server\share\path).
        destination :: Destination Dir  (drive:\path or \\server\share\path).
                /MIR :: Mirror a complete directory tree.

    For more usage information run ROBOCOPY /?

    ****  /MIR can DELETE files as well as copy them !

C:\Users>Robocopy C:\Git\azure-docs-pr\contributor-guide \\10.126.76.172\devicemanagertest1_AzFile\templates /MT:32

    -------------------------------------------------------------------------------
    ROBOCOPY     ::     Robust File Copy for Windows
    -------------------------------------------------------------------------------

        Started : Thursday, March 8, 2018 2:34:58 PM
        Source : C:\Git\azure-docs-pr\contributor-guide\
            Dest : \\10.126.76.172\devicemanagertest1_AzFile\templates\

        Files : *.*

        Options : *.* /DCOPY:DA /COPY:DAT /MT:32 /R:5 /W:60

    ------------------------------------------------------------------------------

    100%        New File                 206        C:\Git\azure-docs-pr\contributor-guide\article-metadata.md
    100%        New File                 209        C:\Git\azure-docs-pr\contributor-guide\content-channel-guidance.md
    100%        New File                 732        C:\Git\azure-docs-pr\contributor-guide\contributor-guide-index.md
    100%        New File                 199        C:\Git\azure-docs-pr\contributor-guide\contributor-guide-pr-criteria.md
                New File                 178        C:\Git\azure-docs-pr\contributor-guide\contributor-guide-pull-request-co100%  .md
                New File                 250        C:\Git\azure-docs-pr\contributor-guide\contributor-guide-pull-request-et100%  e.md
    100%        New File                 174        C:\Git\azure-docs-pr\contributor-guide\create-images-markdown.md
    100%        New File                 197        C:\Git\azure-docs-pr\contributor-guide\create-links-markdown.md
    100%        New File                 184        C:\Git\azure-docs-pr\contributor-guide\create-tables-markdown.md
    100%        New File                 208        C:\Git\azure-docs-pr\contributor-guide\custom-markdown-extensions.md
    100%        New File                 210        C:\Git\azure-docs-pr\contributor-guide\file-names-and-locations.md
    100%        New File                 234        C:\Git\azure-docs-pr\contributor-guide\git-commands-for-master.md
    100%        New File                 186        C:\Git\azure-docs-pr\contributor-guide\release-branches.md
    100%        New File                 240        C:\Git\azure-docs-pr\contributor-guide\retire-or-rename-an-article.md
    100%        New File                 215        C:\Git\azure-docs-pr\contributor-guide\style-and-voice.md
    100%        New File                 212        C:\Git\azure-docs-pr\contributor-guide\syntax-highlighting-markdown.md
    100%        New File                 207        C:\Git\azure-docs-pr\contributor-guide\tools-and-setup.md
    ------------------------------------------------------------------------------

                Total    Copied   Skipped  Mismatch    FAILED    Extras
    Dirs :         1         1         1         0         0         0
    Files :        17        17         0         0         0         0
    Bytes :     3.9 k     3.9 k         0         0         0         0
C:\Users>
For more specific scenarios such as using robocopy to list, copy, or delete files on Data Box, see Use robocopy to list, copy, modify files on Data Box.
To optimize the performance, use the following robocopy parameters when copying the data.
| Platform | Mostly small files < 512 KB | Mostly medium files 512 KB - 1 MB | Mostly large files > 1 MB |
|---|---|---|---|
| Data Box | 2 Robocopy sessions 16 threads per session |
3 Robocopy sessions 16 threads per session |
2 Robocopy sessions 24 threads per session |
For more information on Robocopy command, go to Robocopy and a few examples.
Notifications are displayed during the copy process to identify errors.
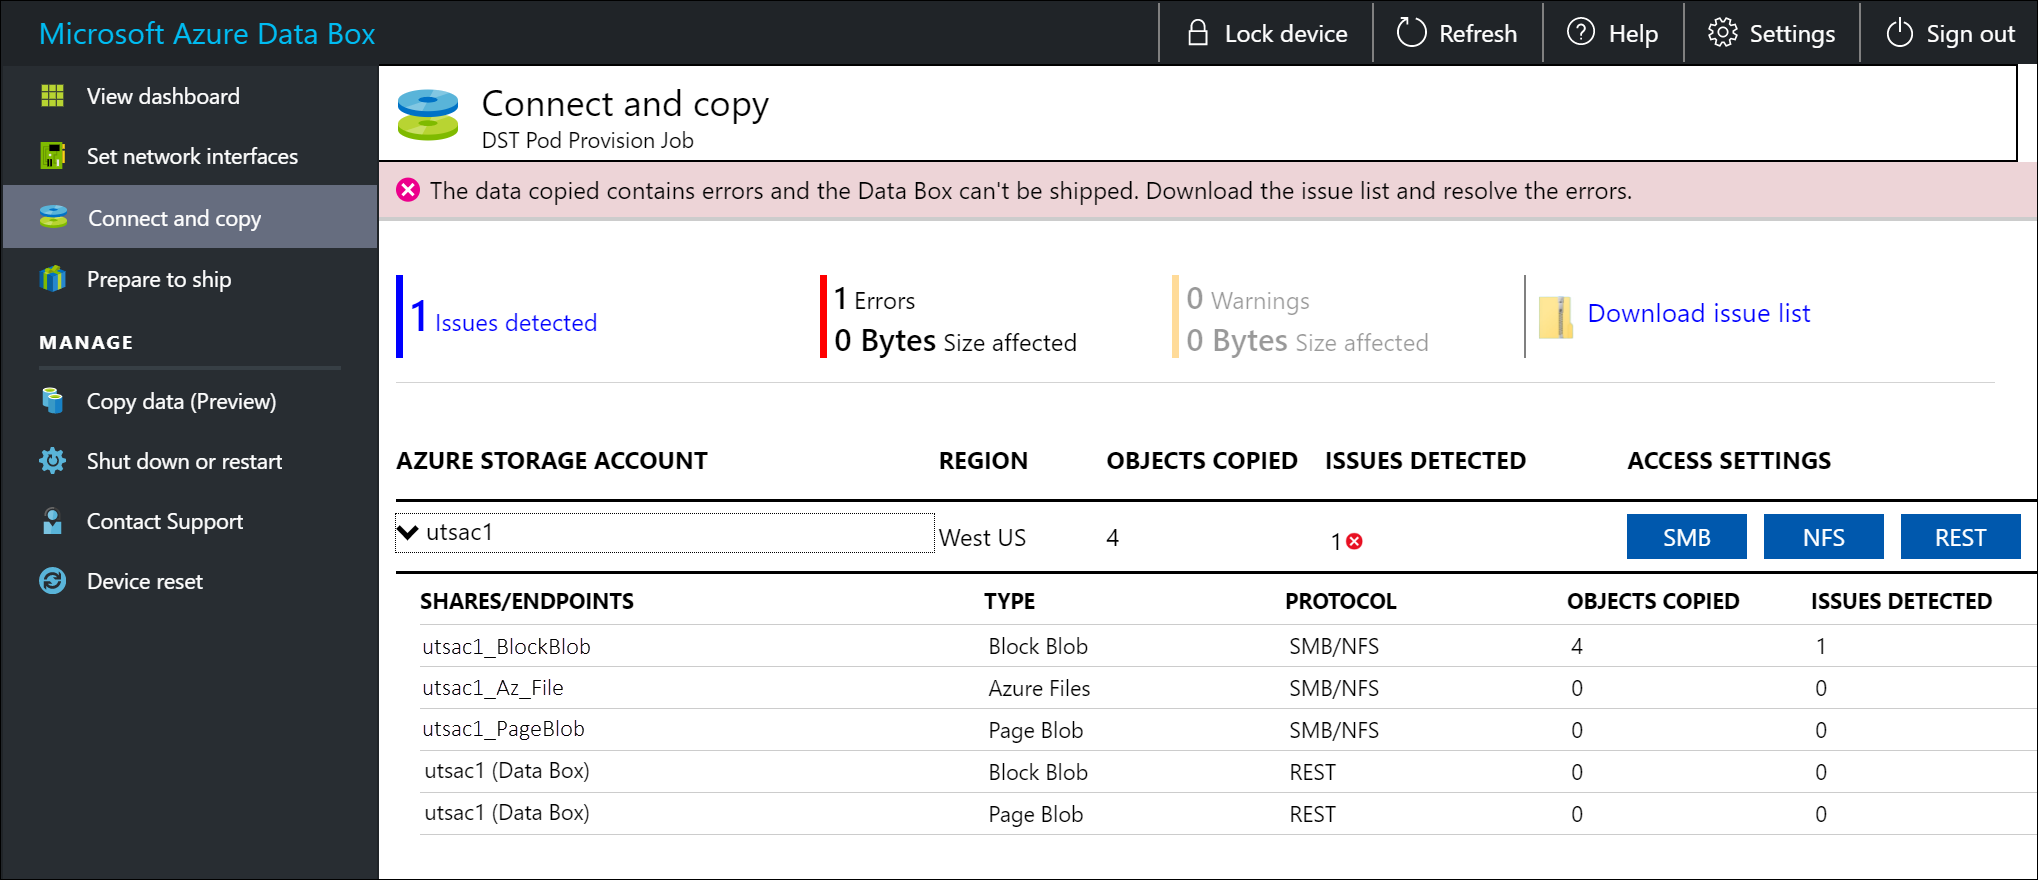
Select Download issue list.
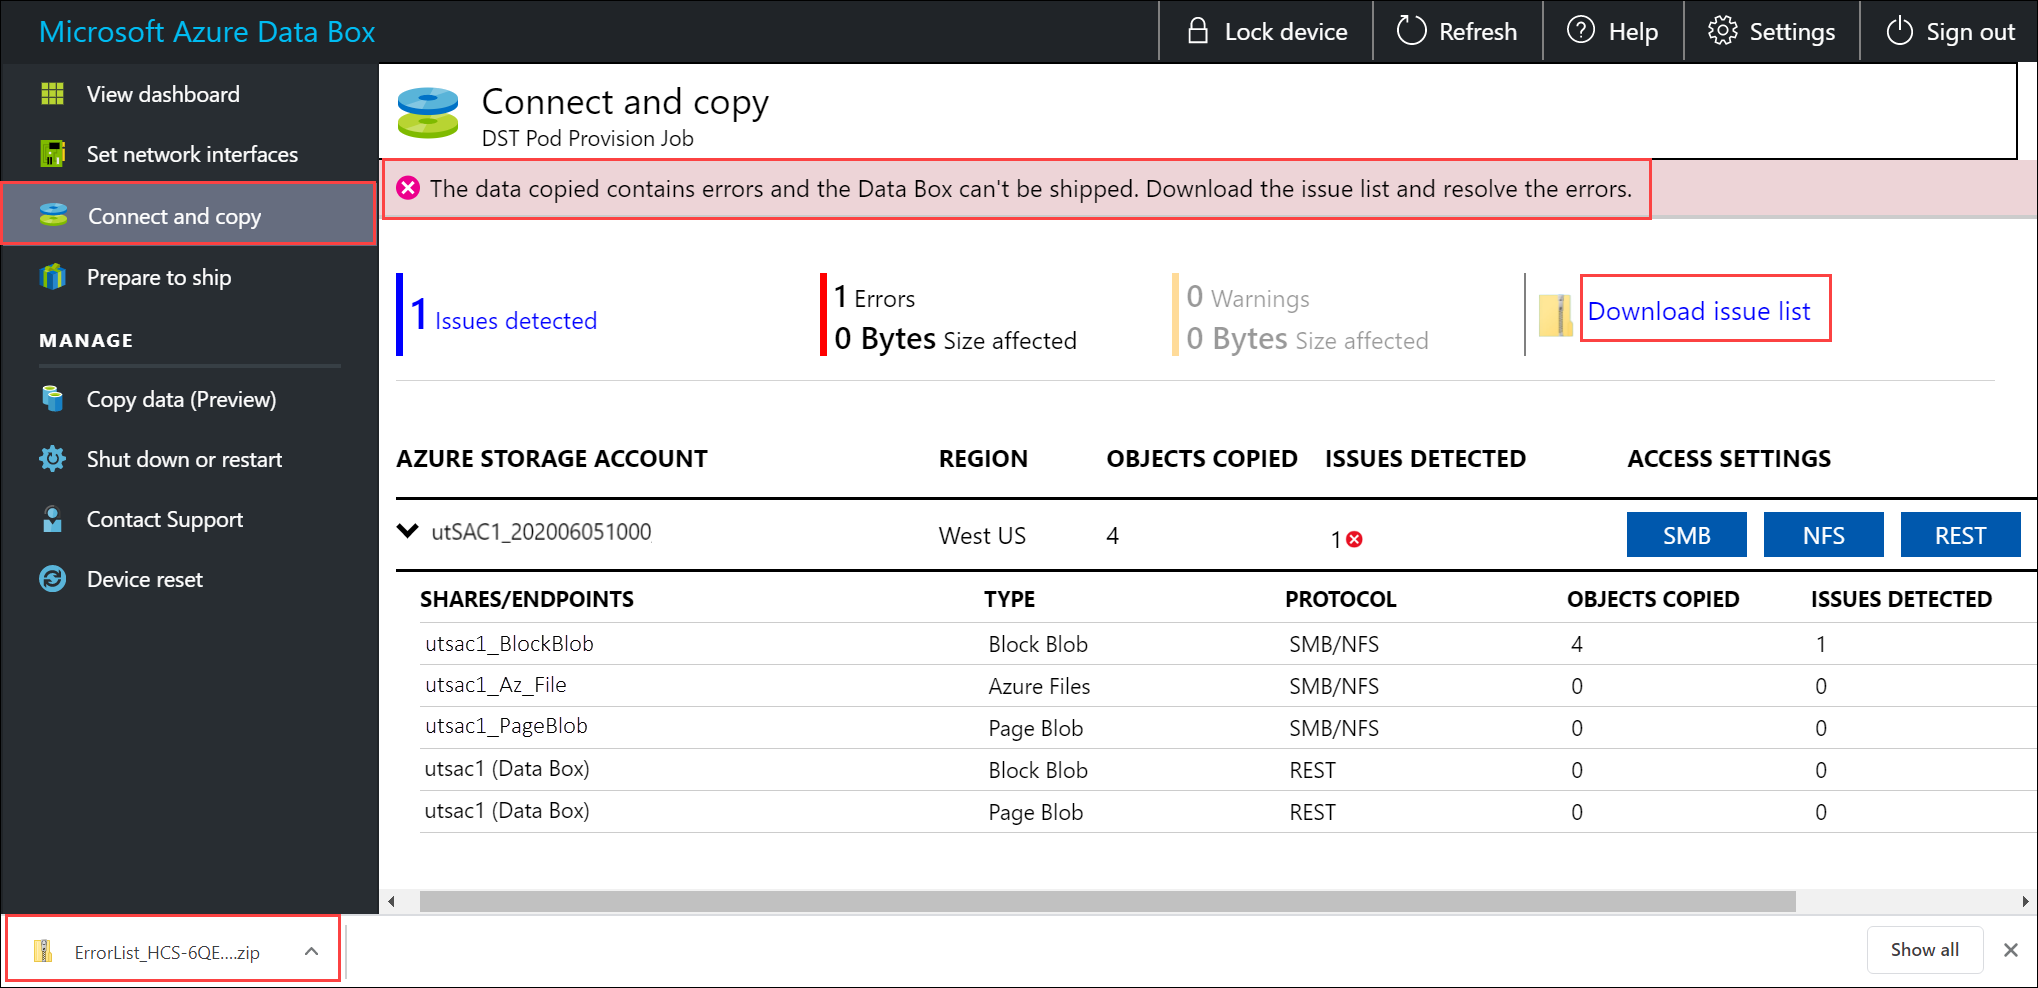
Open the list to view the details of the error and select the resolution URL to view the recommended resolution.
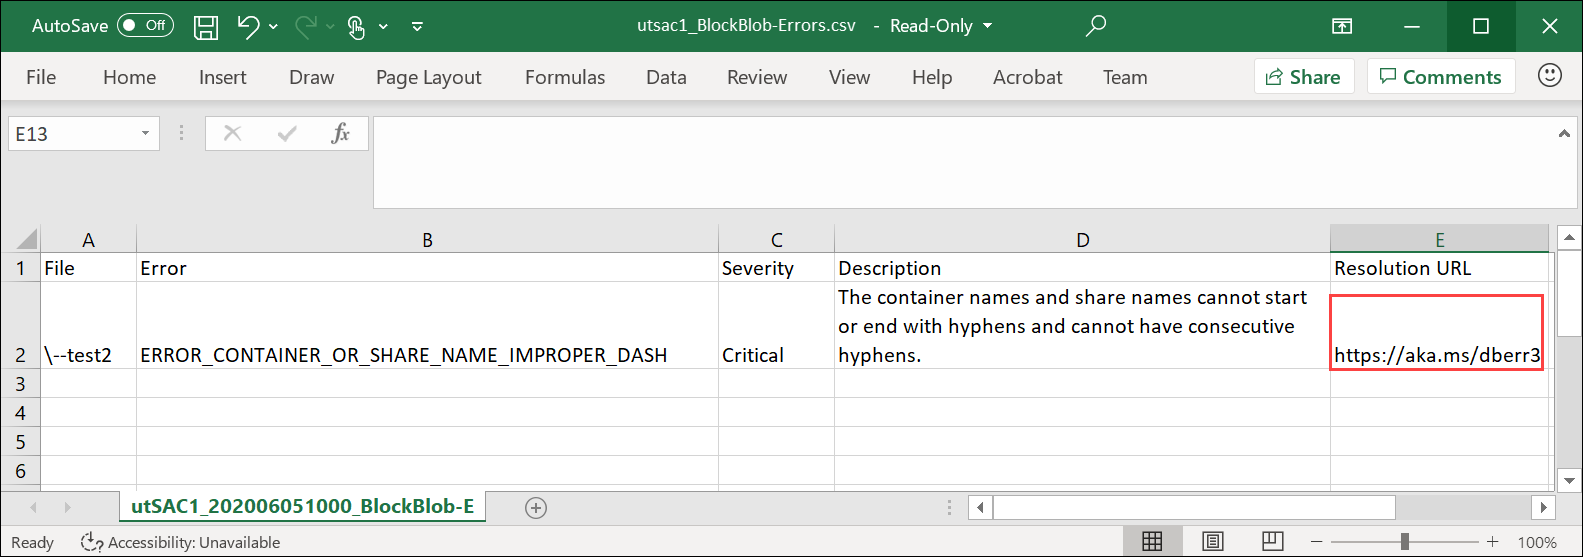
For more information, see View error logs during data copy to Data Box. For a detailed list of errors during data copy, see Troubleshoot Data Box issues.
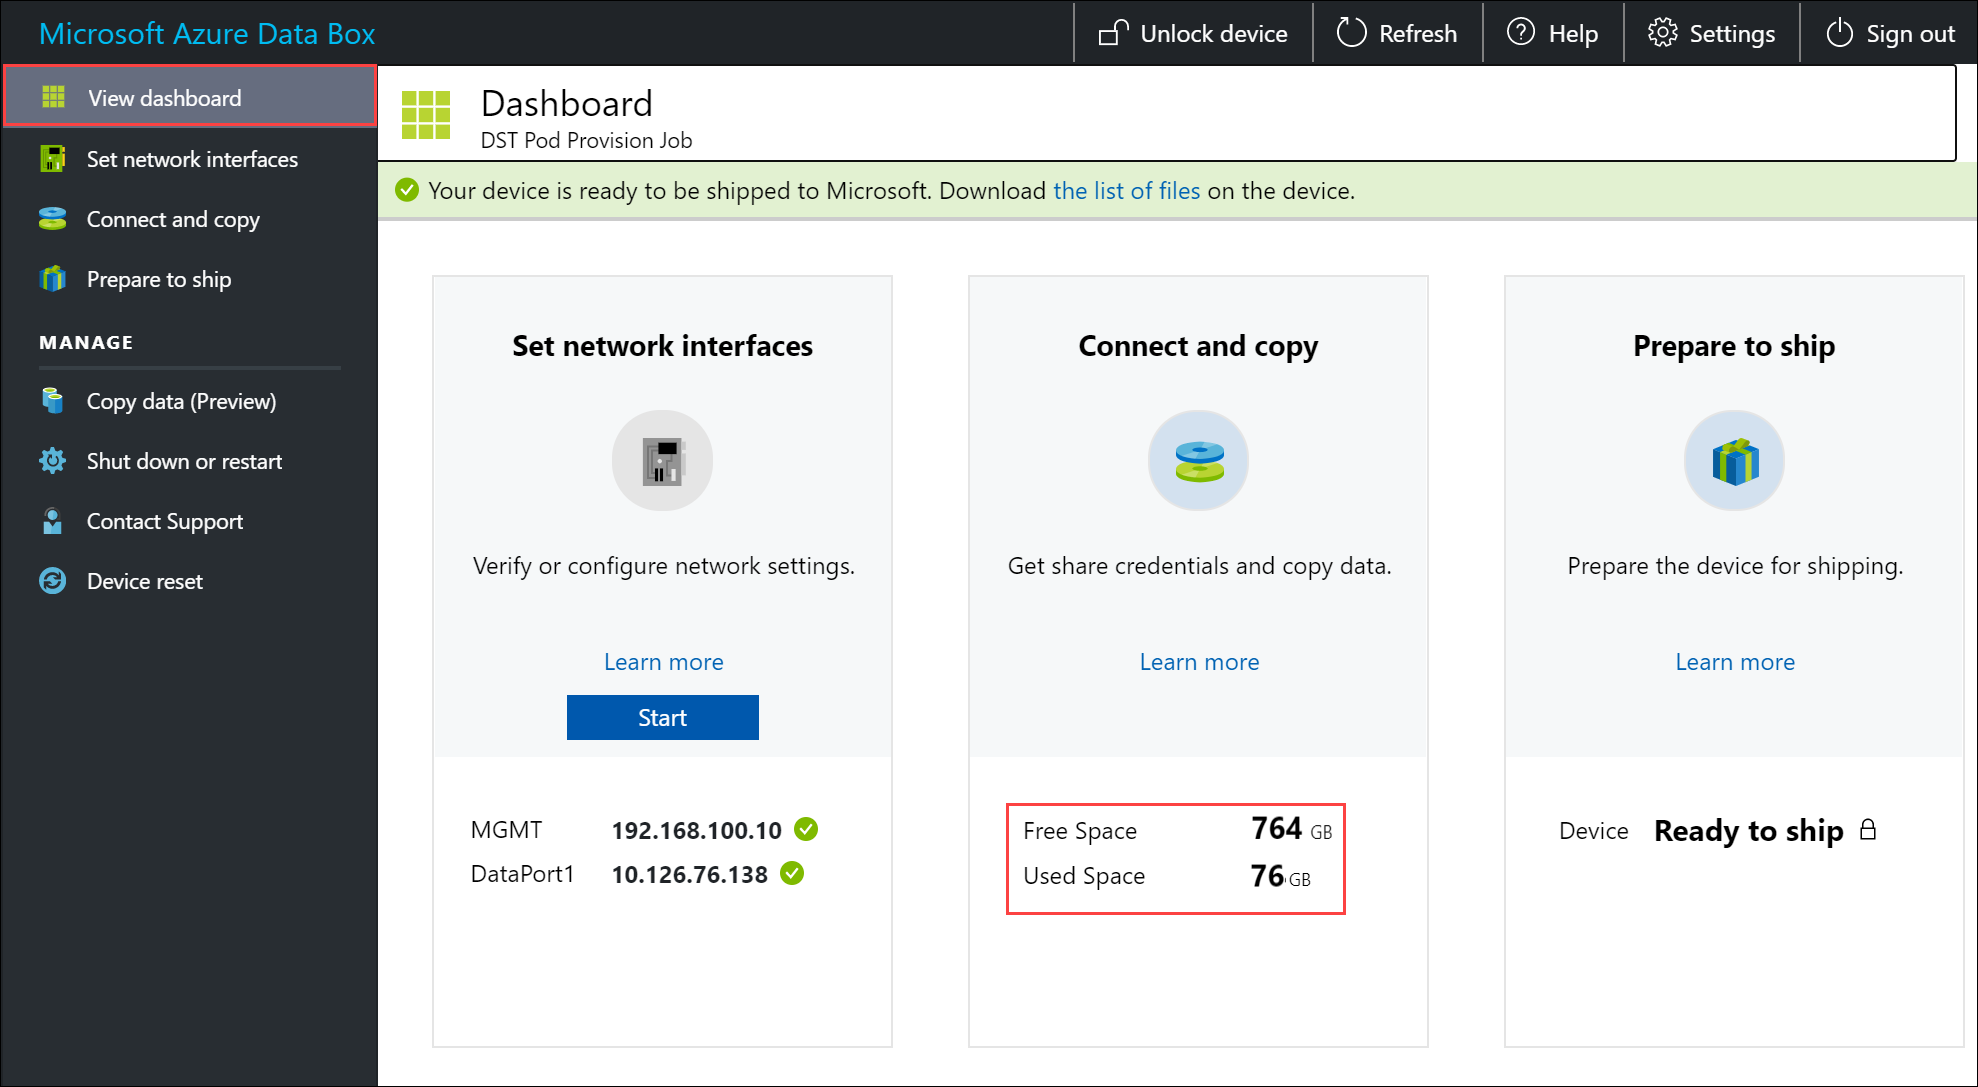
To ensure data integrity, checksum is computed inline as the data is copied. Once the copy is complete, verify the used space and the free space on your device.
You can copy data from your source server to your Data Box via SMB, NFS, REST, data copy service or to managed disks.
In each case, make sure that the share and folder names, and the data size follow guidelines described in the Azure Storage and Data Box service limits.
Copy data via SMB
To copy data via SMB:
If using a Windows host, use the following command to connect to the SMB shares:
\\<Device IP address>\ShareNameTo retrieve the share access credentials, go to the Connect & copy page within the local web UI of the Data Box.
Use an SMB compatible file copy tool such as Robocopy to copy data to shares.
For step-by-step instructions, go to Tutorial: Copy data to Azure Data Box via SMB.
Copy data via NFS
To copy data via NFS:
When using an NFS host, use the following command to mount the NFS shares on your Data Box:
sudo mount <Data Box device IP>:/<NFS share on Data Box device> <Path to the folder on local Linux computer>To get the share access credentials, go to the Connect & copy page in the local web UI of the Data Box.
Use
cporrsynccommand to copy your data.
For step-by-step instructions, go to Tutorial: Copy data to Azure Data Box via NFS.
Copy data via REST
To copy data via REST:
- To copy data using Data Box Blob storage via REST APIs, you can connect over http or https.
- To copy data to Data Box Blob storage, you can use AzCopy.
For step-by-step instructions, go to Tutorial: Copy data to Azure Data Box Blob storage via REST APIs.
Copy data via data copy service
To copy data via data copy service:
- To copy data by using the data copy service, you need to create a job. In the local web UI of your Data Box, go to Manage > Copy data > Create.
- Fill out the parameters and create a job.
For step-by-step instructions, go to Tutorial: Use the data copy service to copy data into Azure Data Box.
Copy data to managed disks
To copy data managed disks:
- When ordering the Data Box device, select managed disks as your storage destination.
- Connect to Data Box via SMB or NFS shares.
- Copy data via SMB or NFS tools.
For step-by-step instructions, go to Tutorial: Use Data Box to import data as managed disks in Azure.
Next steps
In this tutorial, you learned about Azure Data Box topics such as:
- Prerequisites
- Connect to Data Box
- Copy data to Data Box
Advance to the next tutorial to learn how to ship your Data Box back to Microsoft.
Feedback
Coming soon: Throughout 2024 we will be phasing out GitHub Issues as the feedback mechanism for content and replacing it with a new feedback system. For more information see: https://aka.ms/ContentUserFeedback.
Submit and view feedback for