Tutorial: Copy data to Azure Data Box Disk and verify
Copy data to Azure Data Box Disk and validate
After the disks are connected and unlocked, you can copy data from your source data server to your disks. After the data copy is complete, you should validate the data to ensure that it will successfully upload to Azure.
Important
Azure Data Box now supports access tier assignment at the blob level. The steps contained within this tutorial reflect the updated data copy process and are specific to block blobs.
For help with determining the appropriate access tier for your block blob data, refer to the Determine appropriate access tiers for block blobs section. Follow the steps containined within the Copy data to disks section to copy your data to the appropriate access tier.
The information contained within this section applies to orders placed after April 1, 2024.
Caution
This article references CentOS, a Linux distribution that is nearing End Of Life (EOL) status. Please consider your use and planning accordingly.
This tutorial describes how to copy data from your host computer and generate checksums to verify data integrity.
In this tutorial, you learn how to:
- Determine appropriate access tiers for block blobs
- Copy data to Data Box Disk
- Verify data
Prerequisites
Before you begin, make sure that:
- You have completed the Tutorial: Install and configure your Azure Data Box Disk.
- Your disks are unlocked and connected to a client computer.
- The client computer used to copy data to the disks is running a Supported operating system.
- The intended storage type for your data matches the Supported storage types.
- You've reviewed Managed disk limits in Azure object size limits.
Determine appropriate access tiers for block blobs
Important
The information contained within this section applies to orders placed after April 1st, 2024.
Azure Storage allows you to store block blob data in multiple access tiers within the same storage account. This ability allows data to be organized and stored more efficiently based on how often it's accessed. The following table contains information and recommendations about Azure Storage access tiers.
| Tier | Recommendation | Best practice |
|---|---|---|
| Hot | Useful for online data accessed or modified frequently. This tier has the highest storage costs, but the lowest access costs. | Data in this tier should be in regular and active use. |
| Cool | Useful for online data accessed or modified infrequently. This tier has lower storage costs and higher access costs than the hot tier. | Data in this tier should be stored for at least 30 days. |
| Cold | Useful for online data accessed or modified rarely but still requiring fast retrieval. This tier has lower storage costs and higher access costs than the cool tier. | Data in this tier should be stored for a minimum of 90 days. |
| Archive | Useful for offline data rarely accessed and having lower latency requirements. | Data in this tier should be stored for a minimum of 180 days. Data removed from the archive tier within 180 days is subject to an early deletion charge. |
For more information about blob access tiers, see Access tiers for blob data. For more detailed best practices, see Best practices for using blob access tiers.
You can transfer your block blob data to the appropriate access tier by copying it to the corresponding folder within Data Box Disk. This process is discussed in greater detail within the Copy data to disks section.
Copy data to disks
Review the following considerations before you copy the data to the disks:
It is your responsibility to copy local data to the share which corresponds to the appropriate data format. For instance, copy block blob data to the BlockBlob share. Copy VHDs to the PageBlob share. If the local data format doesn't match the appropriate folder for the chosen storage type, the data upload to Azure fails in a later step.
You can't copy data directly to a share's root folder. Instead, create a folder within the appropriate share and copy your data into it.
Folders located at the PageBlob share's root correspond to containers within your storage account. A new container will be created for any folder whose name does not match an existing container within your storage account.
Folders located at the AzFile share's root correspond to Azure file shares. A new file share will be created for any folder whose name does not match an existing file share within your storage account.
The BlockBlob share's root level contains one folder corresponding to each access tier. When copying data to the BlockBlob share, create a subfolder within the top-level folder corresponding to the desired access tier. As with the PageBlob share, a new containers will be created for any folder whose name doesn't match an existing container. Data within the container will be copied to the tier corresponding to the subfolder's top-level parent.
A container will also be created for any folder residing at the BlockBlob share's root, though the data it will be copied to the container's default access tier. To ensure that your data is copied to the desired access tier, don't create folders at the root level.
Important
Data uploaded to the archive tier remains offline and needs to be rehydrated before reading or modifying. Data copied to the archive tier must remain for at least 180 days or be subject to an early deletion charge. Archive tier is not supported for ZRS, GZRS, or RA-GZRS accounts.
While copying data, ensure that the data size conforms to the size limits described within in the Azure storage and Data Box Disk limits article.
To preserve metadata such as ACLs, timestamps, and file attributes when transferring data to Azure Files, follow the guidance within the Preserving file ACLs, attributes, and timestamps with Azure Data Box Disk article.
If you use both Data Box Disk and other applications to upload data simultaneously, you may experience upload job failures and data corruption.
Important
If you specified managed disks as one of the storage destinations during order creation, the following section is applicable.
Important
If you specified managed disks as one of the storage destinations during order creation, the following section is applicable.
Ensure that virtual hard disks (VHDs) uploaded to the precreated folders have unique names within resource groups. Managed disks must have unique names within a resource group across all the precreated folders on the Data Box Disk. If you're using multiple Data Box Disks, managed disk names must be unique across all folder and disks. When VHDs with duplicate names are found, only one is converted to a managed disk with that name. The remaining VHDs are uploaded as page blobs into the staging storage account.
Always copy the VHDs to one of the precreated folders. VHDs placed outside of these folders or in a folder that you created are uploaded to Azure Storage accounts as page blobs instead of managed disks.
Only fixed VHDs can be uploaded to create managed disks. Dynamic VHDs, differencing VHDs and VHDX files aren't supported.
The Data Box Disk Split Copy and Validation tools,
DataBoxDiskSplitCopy.exeandDataBoxDiskValidation.cmd, report failures when long paths are processed. These failures are common when long paths aren't enabled on the client, and your data copy's paths and file names exceed 256 characters. To avoid these failures, follow the guidance within the enable long paths on your Windows client article.
Perform the following steps to connect and copy data from your computer to the Data Box Disk.
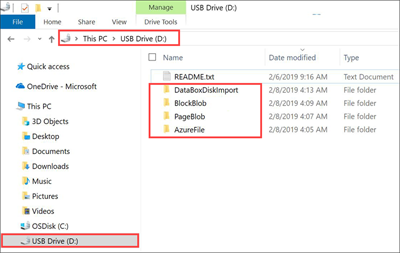
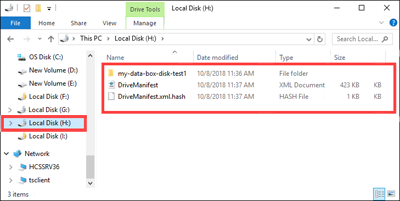
View the contents of the unlocked drive. The list of the precreated folders and subfolders in the drive varies according to the options you select when placing the Data Box Disk order. The creation of extra folders isn't permitted, as copying data to a user-created folder causes upload failures.
Selected storage destination Storage account type Staging storage account type Folders and subfolders Storage account GPv1 or GPv2 NA BlockBlob - Archive
- Cold
- Cool
- Hot
AzureFileStorage account Blob storage account NA BlockBlob - Archive
- Cold
- Cool
- Hot
Managed disks NA GPv1 or GPv2 ManagedDisk - PremiumSSD
- StandardSSD
- StandardHDD
Storage account
Managed disksGPv1 or GPv2 GPv1 or GPv2 BlockBlob - Archive
- Cold
- Cool
- Hot
AzureFile
ManagedDisk- PremiumSSD
- StandardSSD
- StandardHDD
Storage account
Managed disksBlob storage account GPv1 or GPv2 BlockBlob - Archive
- Cold
- Cool
- Hot
- PremiumSSD
- StandardSSD
- StandardHDD
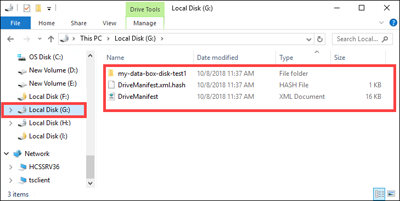
The following screenshot shows an order where a GPv2 storage account and archive tier were specified:
Copy VHD or VHDX data to the PageBlob folder. All files copied to the PageBlob folder are copied into a default
$rootcontainer within the Azure Storage account. A container is created in the Azure storage account for each subfolder within the PageBlob folder.Copy data to be placed in Azure file shares to a subfolder within the AzureFile folder. All files copied to the AzureFile folder are copied as files to a default container of type
databox-format-[GUID], for example,databox-azurefile-7ee19cfb3304122d940461783e97bf7b4290a1d7.You can't copy files directly to the BlockBlob's root folder. Within the root folder, you'll find a sub-folder corresponding to each of the available access tiers. To copy your blob data, you must first select the folder corresponding to one of the access tiers. Next, create a sub-folder within that tier's folder to store your data. Finally, copy your data to the newly created sub-folder. Your new sub-folder represents the container created within the storage account during ingestion. Your data is uploaded to this container as blobs. As with the AzureFile share, a new blob storage container will be created for each sub-folder located at the BlockBlob's root folder. The data within these folders will be saved according to the storage account's default access tier.
Before you begin to copy data, you need to move any files and folders that exist in the root directory to a different folder.
Important
All the containers, blobs, and filenames should conform to Azure naming conventions. If these rules are not followed, the data upload to Azure will fail.
When copying files, ensure that files don't exceed 4.7 TiB for block blobs, 8 TiB for page blobs, and 1 TiB for Azure Files.
You can use File Explorer's drag and drop functionality to copy the data. You can also use any SMB compatible file copy tool such as Robocopy to copy your data.
One benefit of using a file copy tool is the ability to initiate multiple copy jobs, as in the following example using the Robocopy tool:
Robocopy <source> <destination> * /MT:64 /E /R:1 /W:1 /NFL /NDL /FFT /Log:c:\RobocopyLog.txtNote
The parameters used in this example are based on the environment used during in-house testing. Your paramters and values are likely different.
The parameters and options for the command are used as follows:
Parameters/Options Description Source Specifies the path to the source directory. Destination Specifies the path to the destination directory. /E Copies subdirectories including empty directories. /MT[:n] Creates multi-threaded copies with n threads where n is an integer between 1 and 128.
The default value for n is 8./R: <n> Specifies the number of retries on failed copies.
The default value of n is 1,000,000 retries./W: <n> Specifies the wait time between retries, in seconds.
The default value of n is 30 and is equivalent to a wait time 30 seconds./NFL Specifies that file names aren't logged. /NDL Specifies that directory names aren't to be logged. /FFT Assumes FAT file times with a resolution precision of two seconds. /Log:<Log File> Writes the status output to the log file.
Any existing log file is overwritten.Multiple disks can be used in parallel with multiple jobs running on each disk. Keep in mind that duplicate filenames are either overwritten or result in a copy error.
Check the copy status when the job is in progress. The following sample shows the output of the robocopy command to copy files to the Data Box Disk.
C:\Users>robocopy
-------------------------------------------------------------------------------
   ROBOCOPY     ::     Robust File Copy for Windows
-------------------------------------------------------------------------------

   Started : Thursday, March 8, 2018 2:34:53 PM
      Simple Usage :: ROBOCOPY source destination /MIR

            source :: Source Directory (drive:\path or \\server\share\path).
       destination :: Destination Dir  (drive:\path or \\server\share\path).
              /MIR :: Mirror a complete directory tree.

  For more usage information run ROBOCOPY /?

  ****  /MIR can DELETE files as well as copy them !

C:\Users>Robocopy C:\Repository\guides \\10.126.76.172\AzFileUL\templates /MT:64 /E /R:1 /W:1 /FFT
-------------------------------------------------------------------------------
   ROBOCOPY     ::     Robust File Copy for Windows
-------------------------------------------------------------------------------

   Started : Thursday, March 8, 2018 2:34:58 PM
    Source : C:\Repository\guides\
      Dest : \\10.126.76.172\devicemanagertest1_AzFile\templates\

     Files : *.*

   Options : *.* /DCOPY:DA /COPY:DAT /MT:8 /R:1000000 /W:30

 ------------------------------------------------------------------------------

 100%    New File    206    C:\Repository\guides\article-metadata.md
 100%    New File    209    C:\Repository\guides\content-channel-guidance.md
 100%    New File    732    C:\Repository\guides\index.md
 100%    New File    199    C:\Repository\guides\pr-criteria.md
 100%    New File    178    C:\Repository\guides\pull-request-co.md
 100%    New File    250    C:\Repository\guides\pull-request-ete.md
 100%    New File    174    C:\Repository\guides\create-images-markdown.md
 100%    New File    197    C:\Repository\guides\create-links-markdown.md
 100%    New File    184    C:\Repository\guides\create-tables-markdown.md
 100%    New File    208    C:\Repository\guides\custom-markdown-extensions.md
 100%    New File    210    C:\Repository\guides\file-names-and-locations.md
 100%    New File    234    C:\Repository\guides\git-commands-for-master.md
 100%    New File    186    C:\Repository\guides\release-branches.md
 100%    New File    240    C:\Repository\guides\retire-or-rename-an-article.md
 100%    New File    215    C:\Repository\guides\style-and-voice.md
 100%    New File    212    C:\Repository\guides\syntax-highlighting-markdown.md
 100%    New File    207    C:\Repository\guides\tools-and-setup.md
 ------------------------------------------------------------------------------

                Total    Copied   Skipped  Mismatch    FAILED    Extras
     Dirs :         1         1         1         0         0         0
    Files :        17        17         0         0         0         0
    Bytes :     3.9 k     3.9 k         0         0         0         0
    Times :   0:00:05   0:00:00                       0:00:00   0:00:00

    Speed :                5620 Bytes/sec.
    Speed :               0.321 MegaBytes/min.
    Ended : Thursday, August 31, 2023 2:34:59 PM
To optimize the performance, use the following robocopy parameters when copying the data.
Platform Mostly small files < 512 KB Mostly medium files 512 KB-1 MB Mostly large files > 1 MB Data Box Disk 4 Robocopy sessions*
16 threads per session2 Robocopy session*
16 threads per session2 Robocopy session*
16 threads per session*Each Robocopy session can have a maximum of 7,000 directories and 150 million files.
For more information on the Robocopy command, read the Robocopy and a few examples article.
Open the target folder, then view and verify the copied files. If you have any errors during the copy process, download the log files for troubleshooting. The robocopy command's output specifies the location of the log files.

Split and copy data to disks
The Data Box Split Copy tool helps split and copy data across two or more Azure Data Box Disks. The tool is only available for use on a Windows computer. This optional procedure is helpful when you have a large dataset that needs to be split and copied across several disks.
Important
The Data Box Split Copy tool can also validate your data. If you use Data Box Split Copy tool to copy data, you can skip the validation step. The Split Copy tool is not supported with managed disks.
On your Windows computer, ensure that you have the Data Box Split Copy tool downloaded and extracted in a local folder. This tool is included within the Data Box Disk toolset for Windows.
Open File Explorer. Make a note of the data source drive and drive letters assigned to Data Box Disk.
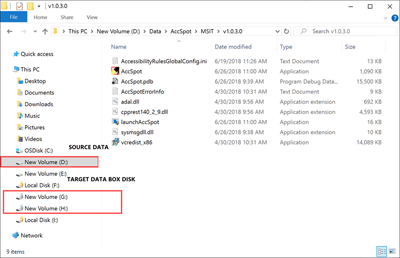
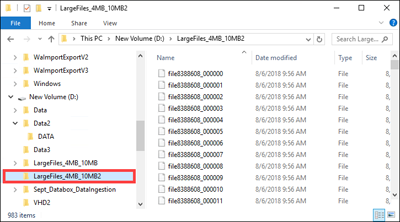
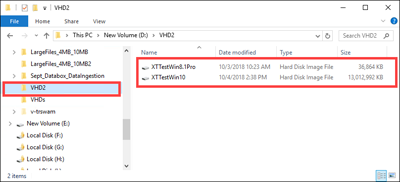
Identify the source data to copy. For instance, in this case:
The following block blob data was identified.
The following page blob data was identified.
Navigate to the folder where the software is extracted and locate the
SampleConfig.jsonfile. This file is a read-only file that you can modify and save.
Modify the
SampleConfig.jsonfile.Provide a job name. A folder with this name is created on the Data Box Disk. It's also used to create a container in the Azure storage account associated with these disks. The job name must follow the Azure container naming conventions.
Supply a source path, making note of the path format in the
SampleConfigFile.json.Enter the drive letters corresponding to the target disks. Data is taken from the source path and copied across multiple disks.
Provide a path for the log files. By default, log files are sent to the directory where the
.exefile is located.To validate the file format, go to
JSONlint.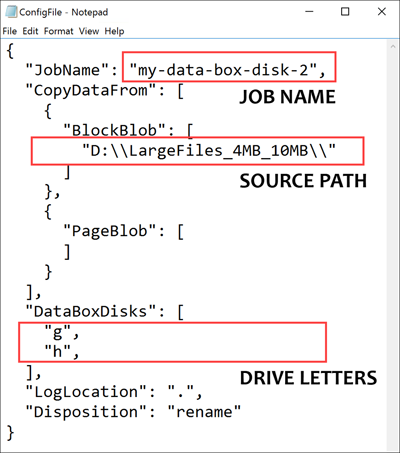
Save the file as
ConfigFile.json.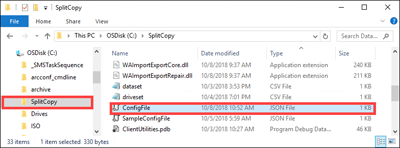
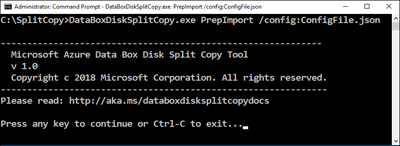
Open a Command Prompt window with elevated privileges and run the
DataBoxDiskSplitCopy.exeusing the following command.DataBoxDiskSplitCopy.exe PrepImport /config:ConfigFile.jsonWhen prompted, press any key to continue running the tool.
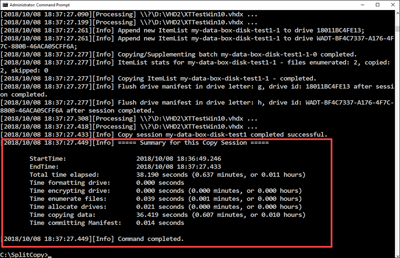
After the dataset is split and copied, the summary of the Split Copy tool for the copy session is presented as shown in the following sample output.
Verify that the data is split properly across the target disks.
Examine the
H:drive contents and ensure that two subfolders are created that correspond to block blob and page blob format data.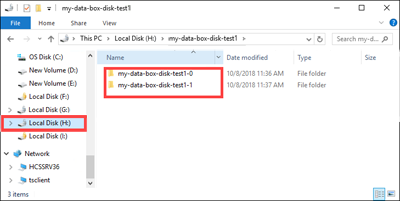
If the copy session fails, use the following command to recover and resume:
DataBoxDiskSplitCopy.exe PrepImport /config:ConfigFile.json /ResumeSession


If you encounter errors while using the Split Copy tool, follow the steps within the troubleshoot Split Copy tool errors article.
Important
The Data Box Split Copy tool also validates your data. If you use Data Box Split Copy tool to copy data, you can skip the validation step. The Split Copy tool is not supported with managed disks.
Validate data
If you didn't use the Data Box Split Copy tool to copy data, you need to validate your data. Perform the following steps on each of your Data Box Disks to verify the data. If you encounter errors during validation, follow the steps within the troubleshoot validation errors article.
Run
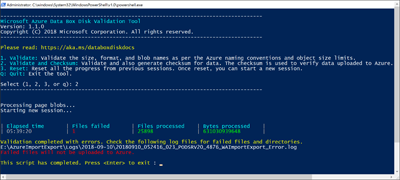
DataBoxDiskValidation.cmdfor checksum validation in the DataBoxDiskImport folder of your drive. This tool is only available for the Windows environment. Linux users need to validate that the source data copied to the disk meets Azure Data Box prerequisites.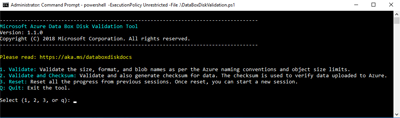
Choose the appropriate validation option when prompted. We recommend that you always validate the files and generate checksums by selecting option 2. After the script has completed, exit out of the command window. The time required for validation to complete depends upon the size of your data. The tool notifies you of any errors encountered during validation and checksum generation, and provides you with a link to the error logs.
Tip
- Reset the tool between two runs.
- The checksum process may take more time if you have a large data set containing many files that take up relatively little storage capacity. If you validate files and skip checksum creation, you should independently verify data integrity on the Data Box Disk prior to deleting any copies. This verification ideally includes generating checksums.


Next steps
In this tutorial, you learned how to complete the following tasks with Azure Data Box Disk:
- Copy data to Data Box Disk
- Verify data integrity
Advance to the next tutorial to learn how to return the Data Box Disk and verify the data upload to Azure.
Copy data to disks
Take the following steps to connect and copy data from your computer to the Data Box Disk.
View the contents of the unlocked drive. The list of the precreated folders and subfolders in the drive is different depending upon the options selected when placing the Data Box Disk order.
Copy the data to folders that correspond to the appropriate data format. For instance, copy the unstructured data to the folder for BlockBlob folder, VHD or VHDX data to PageBlob folder and files to AzureFile. If the data format does not match the appropriate folder (storage type), then at a later step, the data upload to Azure fails.
- Make sure that all the containers, blobs, and files conform to Azure naming conventions and Azure object size limits. If these rules or limits are not followed, the data upload to Azure will fail.
- If your order has Managed Disks as one of the storage destinations, see the naming conventions for managed disks.
- A container is created in the Azure storage account for each subfolder under BlockBlob and PageBlob folders. All files under BlockBlob and PageBlob folders are copied into a default container $root under the Azure Storage account. Any files in the $root container are always uploaded as block blobs.
- Create a sub-folder within AzureFile folder. This sub-folder maps to a fileshare in the cloud. Copy files to the sub-folder. Files copied directly to AzureFile folder fail and are uploaded as block blobs.
- If files and folders exist in the root directory, then you must move those to a different folder before you begin data copy.
Use drag and drop with File Explorer or any SMB compatible file copy tool such as Robocopy to copy your data. Multiple copy jobs can be initiated using the following command:
Robocopy <source> <destination> * /MT:64 /E /R:1 /W:1 /NFL /NDL /FFT /Log:c:\RobocopyLog.txtOpen the target folder to view and verify the copied files. If you have any errors during the copy process, download the log files for troubleshooting. The log files are located as specified in the robocopy command.
Use the optional procedure of split and copy when you are using multiple disks and have a large dataset that needs to be split and copied across all the disks.
Validate data
Take the following steps to verify your data.
Run the
DataBoxDiskValidation.cmdfor checksum validation in the DataBoxDiskImport folder of your drive.Use option 2 to validate your files and generate checksums. Depending upon your data size, this step may take a while. If there are any errors during validation and checksum generation, you are notified and a link to the error logs is also provided.
For more information on data validation, see Validate data. If you experience errors during validation, see troubleshoot validation errors.
Feedback
Coming soon: Throughout 2024 we will be phasing out GitHub Issues as the feedback mechanism for content and replacing it with a new feedback system. For more information see: https://aka.ms/ContentUserFeedback.
Submit and view feedback for