Configure customer-managed keys for encrypting Azure Service Bus data at rest
Azure Service Bus Premium provides encryption of data at rest with Azure Storage Service Encryption (Azure SSE). Service Bus Premium uses Azure Storage to store the data. All the data that's stored with Azure Storage is encrypted using Microsoft-managed keys. If you use your own key (also referred to as Bring Your Own Key (BYOK) or customer-managed key), the data is still encrypted using the Microsoft-managed key, but in addition the Microsoft-managed key is encrypted using the customer-managed key. This feature enables you to create, rotate, disable, and revoke access to customer-managed keys that are used for encrypting Microsoft-managed keys. Enabling the BYOK feature is a one time setup process on your namespace.
There are some caveats to the customer managed key for service side encryption.
- This feature is supported by Azure Service Bus Premium tier. It can't be enabled for standard tier Service Bus namespaces.
- The encryption can only be enabled for new or empty namespaces. If the namespace contains any queues or topics, then the encryption operation fails.
You can use Azure Key Vault to manage your keys and audit your key usage. You can either create your own keys and store them in a key vault, or you can use the Azure Key Vault APIs to generate keys. For more information about Azure Key Vault, see What is Azure Key Vault?
Enable customer-managed keys (Azure portal)
To enable customer-managed keys in the Azure portal, follow these steps:
Navigate to your Service Bus Premium namespace.
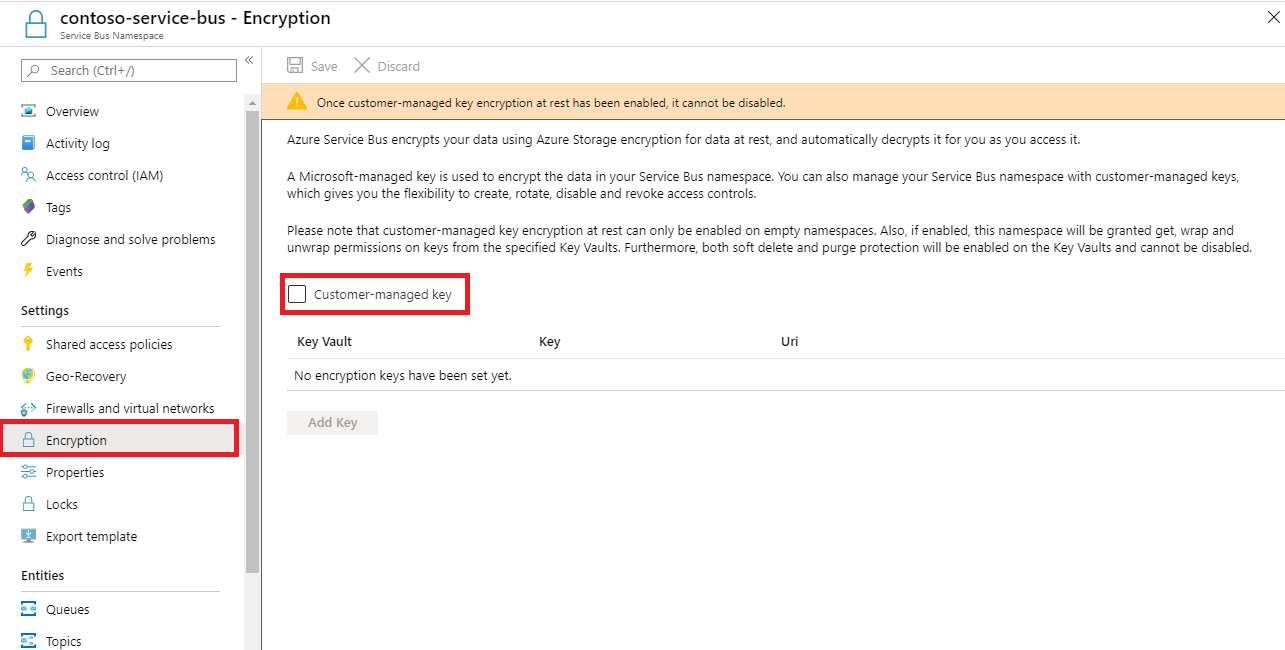
On the Settings page of your Service Bus namespace, select Encryption.
Select the Customer-managed key encryption at rest as shown in the following image.
Set up a key vault with keys
After you enable customer-managed keys, you need to associate the customer managed key with your Azure Service Bus namespace. Service Bus supports only Azure Key Vault. If you enable the Encryption with customer-managed key option in the previous section, you need to have the key imported into Azure Key Vault. Also, the keys must have Soft Delete and Do Not Purge configured for the key. These settings can be configured using PowerShell or CLI.
To create a new key vault, follow the Azure Key Vault Quickstart. For more information about importing existing keys, see About keys, secrets, and certificates.
Important
Using customer-managed keys with Azure Service Bus requires that the key vault have two required properties configured. They are: Soft Delete and Do Not Purge. The Soft Delete property is enabled by default when you create a new key vault in the Azure portal whereas the Purge Protection is optional so make sure to select it when creating the Key Vault. Also, if you need to enable these properties on an existing key vault, you must use either PowerShell or Azure CLI.
To turn on both soft delete and purge protection when creating a vault, use the az keyvault create command.
az keyvault create --name contoso-SB-BYOK-keyvault --resource-group ContosoRG --location westus --enable-soft-delete true --enable-purge-protection trueTo add purge protection to an existing vault (that already has soft delete enabled), use the az keyvault update command.
az keyvault update --name contoso-SB-BYOK-keyvault --resource-group ContosoRG --enable-purge-protection trueCreate keys by following these steps:
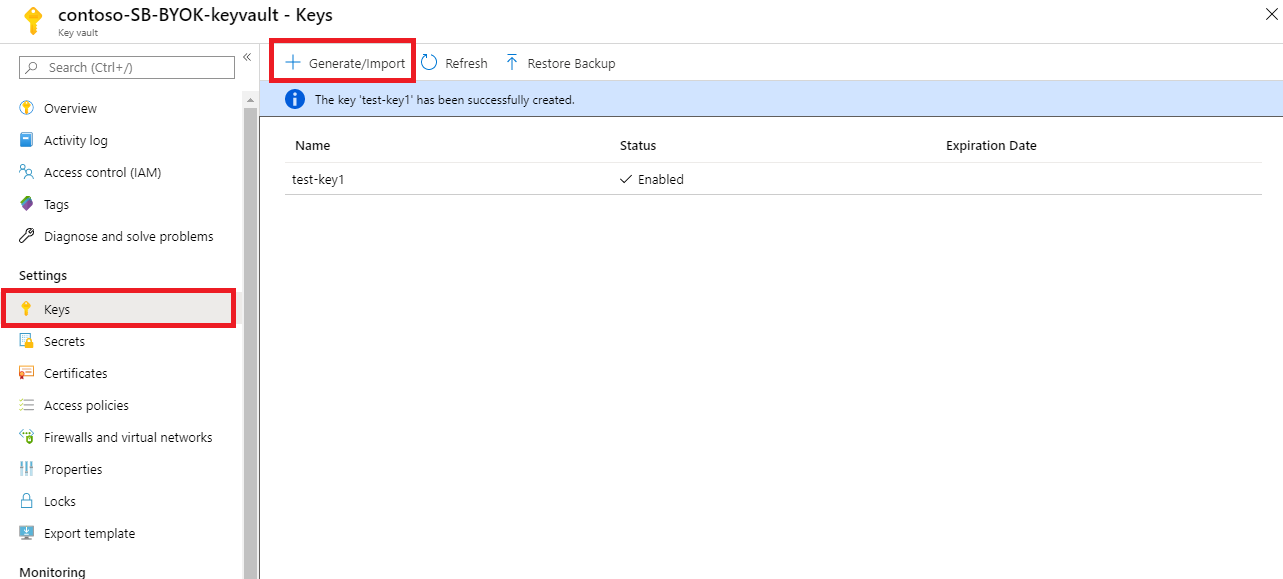
To create a new key, select Generate/Import from the Keys menu under Settings.
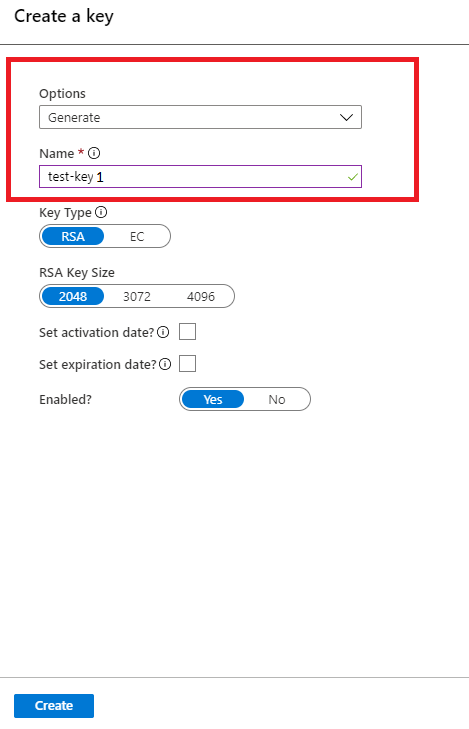
Set Options to Generate and give the key a name.
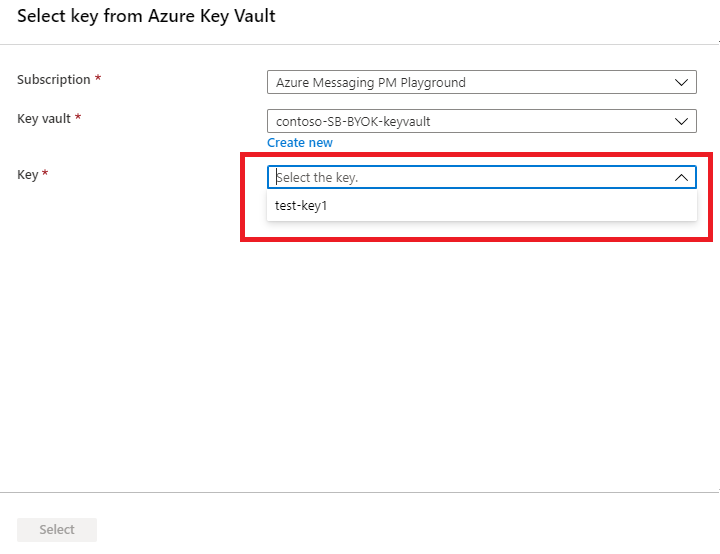
You can now select this key to associate with the Service Bus namespace for encrypting from the drop-down list.
Note
For redundancy, you can add up to 3 keys. In the event that one of the keys has expired, or is not accessible, the other keys will be used for encryption.
Fill in the details for the key and click Select. This enables the encryption of the Microsoft-managed key with your key (customer-managed key).
Important
If you are looking to use Customer managed key along with Geo disaster recovery, please review this section.
To enable encryption of Microsoft-managed key with a customer managed key, an access policy is set up for the Service Bus' managed identity on the specified Azure KeyVault. This ensures controlled access to the Azure KeyVault from the Azure Service Bus namespace.
Due to this:
If Geo disaster recovery is already enabled for the Service Bus namespace and you are looking to enable customer managed key, then
- Break the pairing
- Set up the access policy for the managed identity for both the primary and secondary namespaces to the key vault.
- Set up encryption on the primary namespace.
- Re-pair the primary and secondary namespaces.
If you are looking to enable Geo-DR on a Service Bus namespace where customer managed key is already set up, then -
- Set up the access policy for the managed identity for the secondary namespace to the key vault.
- Pair the primary and secondary namespaces.
Once paired, the secondary namespace will use the key vault configured for the primary namespace. If the key vault for both namespaces is different before Geo-DR pairing, the user must delegate an access policy or RBAC role for the managed identity of the secondary namespace in the key vault associated with primary namespace.
Managed identities
There are two types of managed identities that you can assign to a Service Bus namespace.
System-assigned: You can enable a managed identity directly on a Service Bus namespace. When you enable a system-assigned managed identity, an identity is created in Microsoft Entra that's tied to the lifecycle of that Service Bus namespace. So when the namespace is deleted, Azure automatically deletes the identity for you. By design, only that Azure resource (namespace) can use this identity to request tokens from Microsoft Entra ID.
User-assigned: You may also create a managed identity as a standalone Azure resource, which is called user-assigned identity. You can create a user-assigned managed identity and assign it to one or more Service Bus namespaces. When you use user-assigned managed identities, the identity is managed separately from the resources that use it. They aren't tied to the lifecycle of the namespace. You can explicitly delete a user-assigned identity when you no longer need it.
For more information, see What are managed identities for Azure resources?.
Encrypt using system-assigned identities (template)
This section shows how to do the following tasks:
- Create a premium Service Bus namespace with a managed service identity.
- Create a key vault and grant the service identity access to the key vault.
- Update the Service Bus namespace with the key vault information (key/value).
Create a premium Service Bus namespace with managed service identity
This section shows you how to create an Azure Service Bus namespace with managed service identity by using an Azure Resource Manager template and PowerShell.
Create an Azure Resource Manager template to create a Service Bus premium tier namespace with a managed service identity. Name the file: CreateServiceBusPremiumNamespace.json:
{
   "$schema":"https://schema.management.azure.com/schemas/2015-01-01/deploymentTemplate.json#",
   "contentVersion":"1.0.0.0",
   "parameters":{
      "namespaceName":{
         "type":"string",
         "metadata":{
            "description":"Name for the Namespace."
         }
      },
      "location":{
         "type":"string",
         "defaultValue":"[resourceGroup().location]",
         "metadata":{
            "description":"Specifies the Azure location for all resources."
         }
      }
   },
   "resources":[
      {
         "type":"Microsoft.ServiceBus/namespaces",
         "apiVersion":"2018-01-01-preview",
         "name":"[parameters('namespaceName')]",
         "location":"[parameters('location')]",
         "identity":{
            "type":"SystemAssigned"
         },
         "sku":{
            "name":"Premium",
            "tier":"Premium",
            "capacity":1
         },
         "properties":{

         }
      }
   ],
   "outputs":{
      "ServiceBusNamespaceId":{
         "type":"string",
         "value":"[resourceId('Microsoft.ServiceBus/namespaces',parameters('namespaceName'))]"
      }
   }
}
Create a template parameter file named: CreateServiceBusPremiumNamespaceParams.json.
Note
Replace the following values:
<ServiceBusNamespaceName>- Name of your Service Bus namespace<Location>- Location of your Service Bus namespace
{
   "$schema":"https://schema.management.azure.com/schemas/2015-01-01/deploymentParameters.json#",
   "contentVersion":"1.0.0.0",
   "parameters":{
      "namespaceName":{
         "value":"<ServiceBusNamespaceName>"
      },
      "location":{
         "value":"<Location>"
      }
   }
}
Run the following PowerShell command to deploy the template to create a premium Service Bus namespace. Then, retrieve the ID of the Service Bus namespace to use it later. Replace
{MyRG}with the name of the resource group before running the command.$outputs = New-AzResourceGroupDeployment -Name CreateServiceBusPremiumNamespace -ResourceGroupName {MyRG} -TemplateFile ./CreateServiceBusPremiumNamespace.json -TemplateParameterFile ./CreateServiceBusPremiumNamespaceParams.json $ServiceBusNamespaceId = $outputs.Outputs["serviceBusNamespaceId"].value
Grant Service Bus namespace identity access to key vault
Run the following command to create a key vault with purge protection and soft-delete enabled.
New-AzureRmKeyVault -Name "{keyVaultName}" -ResourceGroupName {RGName} -Location "{location}" -EnableSoftDelete -EnablePurgeProtection(OR)
Run the following command to update an existing key vault. Specify values for resource group and key vault names before running the command.
($updatedKeyVault = Get-AzureRmResource -ResourceId (Get-AzureRmKeyVault -ResourceGroupName {RGName} -VaultName {keyVaultName}).ResourceId).Properties| Add-Member -MemberType "NoteProperty" -Name "enableSoftDelete" -Value "true"-Force | Add-Member -MemberType "NoteProperty" -Name "enablePurgeProtection" -Value "true" -ForceSet the key vault access policy so that the managed identity of the Service Bus namespace can access key value in the key vault. Use the ID of the Service Bus namespace from the previous section.
$identity = (Get-AzureRmResource -ResourceId $ServiceBusNamespaceId -ExpandProperties).Identity

Set-AzureRmKeyVaultAccessPolicy -VaultName {keyVaultName} -ResourceGroupName {RGName} -ObjectId $identity.PrincipalId -PermissionsToKeys get,wrapKey,unwrapKey,list
Encrypt data in Service Bus namespace with customer-managed key from key vault
You have done the following steps so far:
- Created a premium namespace with a managed identity.
- Create a key vault and granted the managed identity access to the key vault.
In this step, you update the Service Bus namespace with key vault information.
Create a JSON file named UpdateServiceBusNamespaceWithEncryption.json with the following content:
{
   "$schema":"https://schema.management.azure.com/schemas/2015-01-01/deploymentTemplate.json#",
   "contentVersion":"1.0.0.0",
   "parameters":{
      "namespaceName":{
         "type":"string",
         "metadata":{
            "description":"Name for the Namespace to be created in cluster."
         }
      },
      "location":{
         "type":"string",
         "defaultValue":"[resourceGroup().location]",
         "metadata":{
            "description":"Specifies the Azure location for all resources."
         }
      },
      "keyVaultUri":{
         "type":"string",
         "metadata":{
            "description":"URI of the KeyVault."
         }
      },
      "keyName":{
         "type":"string",
         "metadata":{
            "description":"KeyName."
         }
      }
   },
   "resources":[
      {
         "type":"Microsoft.ServiceBus/namespaces",
         "apiVersion":"2018-01-01-preview",
         "name":"[parameters('namespaceName')]",
         "location":"[parameters('location')]",
         "identity":{
            "type":"SystemAssigned"
         },
         "sku":{
            "name":"Premium",
            "tier":"Premium",
            "capacity":1
         },
         "properties":{
            "encryption":{
               "keySource":"Microsoft.KeyVault",
               "keyVaultProperties":[
                  {
                     "keyName":"[parameters('keyName')]",
                     "keyVaultUri":"[parameters('keyVaultUri')]"
                  }
               ]
            }
         }
      }
   ]
}
Create a template parameter file: UpdateServiceBusNamespaceWithEncryptionParams.json.
Note
Replace the following values:
<ServiceBusNamespaceName>- Name of your Service Bus namespace<Location>- Location of your Service Bus namespace<KeyVaultName>- Name of your key vault<KeyName>- Name of the key in the key vault
{
   "$schema":"https://schema.management.azure.com/schemas/2015-01-01/deploymentParameters.json#",
   "contentVersion":"1.0.0.0",
   "parameters":{
      "namespaceName":{
         "value":"<ServiceBusNamespaceName>"
      },
      "location":{
         "value":"<Location>"
      },
      "keyName":{
         "value":"<KeyName>"
      },
      "keyVaultUri":{
         "value":"https://<KeyVaultName>.vault.azure.net"
      }
   }
}
Run the following PowerShell command to deploy the Resource Manager template. Replace
{MyRG}with the name of your resource group before running the command.New-AzResourceGroupDeployment -Name UpdateServiceBusNamespaceWithEncryption -ResourceGroupName {MyRG} -TemplateFile ./UpdateServiceBusNamespaceWithEncryption.json -TemplateParameterFile ./UpdateServiceBusNamespaceWithEncryptionParams.json
Encrypt using user-assigned identities (template)
- Create a user-assigned identity.
- Create a key vault and grant access to the user-assigned identity via access policies.
- Create a premium Service Bus namespace with the managed user-identity and the key vault information.
Create a user-assigned identity
Follow instructions from the Create a user-assigned managed identity article to create a user-assigned identity. You can also create a user-assigned identity using CLI, PowerShell, Azure Resource Manager template, and REST.
Note
You can assign up to 4 user identities to a namespace. These associations are deleted when the namespace is deleted or when you pass the identity -> type in the template to None.
Create a key vault and grant access to user-assigned identity
Run the following command to create a key vault with purge protection and soft-delete enabled.
New-AzureRmKeyVault -Name "{keyVaultName}" -ResourceGroupName {RGName} -Location "{location}" -EnableSoftDelete -EnablePurgeProtection(OR)
Run the following command to update an existing key vault. Specify values for resource group and key vault names before running the command.
($updatedKeyVault = Get-AzureRmResource -ResourceId (Get-AzureRmKeyVault -ResourceGroupName {RGName} -VaultName {keyVaultName}).ResourceId).Properties| Add-Member -MemberType "NoteProperty" -Name "enableSoftDelete" -Value "true"-Force | Add-Member -MemberType "NoteProperty" -Name "enablePurgeProtection" -Value "true" -ForceGet the Service principal ID for the user identity using the following PowerShell command. In the example,
ud1is the user-assigned identity to be used for encryption.$servicePrincipal=Get-AzADServicePrincipal -SearchString "ud1"Grant the user-assigned identity access to the key vault by assigning an access policy.
Set-AzureRmKeyVaultAccessPolicy -VaultName {keyVaultName} -ResourceGroupName {RGName} -ObjectId $servicePrincipal.Id -PermissionsToKeys get,wrapKey,unwrapKey,listNote
You can add up to 3 keys but the user identity used for encryption should be the same for all keys. Currently, only single encryption identity is supported.
Create a premium Service Bus namespace with user identity and key vault information
This section gives you an example that shows you how to do the following tasks using an Azure Resource Manager template.
Assign a user-managed identity to a Service Bus namespace.
            "identity": {
                "type": "UserAssigned",
                "userAssignedIdentities": {
                    "[parameters('identity').userAssignedIdentity]": {}
                }
            },
Enable encryption on the namespace by specifying a key from your key vault and the user-managed identity to access the key.
                "encryption":{
                   "keySource":"Microsoft.KeyVault",
                   "keyVaultProperties":[
                        {
                            "keyName": "[parameters('keyName')]",
                            "keyVaultUri": "[parameters('keyVaultUri')]",
                            "identity": {
                                "userAssignedIdentity": "[parameters('identity').userAssignedIdentity]"
                            }
                        }
                   ]
                }
Create a JSON file named CreateServiceBusNamespaceWithUserIdentityAndEncryption.json with the following content:
{
   "$schema":"https://schema.management.azure.com/schemas/2015-01-01/deploymentTemplate.json#",
   "contentVersion":"1.0.0.0",
   "parameters":{
      "namespaceName":{
         "type":"string",
         "metadata":{
            "description":"Name for the Namespace to be created in cluster."
         }
      },
      "location":{
         "type":"string",
         "defaultValue":"[resourceGroup().location]",
         "metadata":{
            "description":"Specifies the Azure location for all resources."
         }
      },
      "keyVaultUri":{
         "type":"string",
         "metadata":{
            "description":"URI of the KeyVault."
         }
      },
      "keyName":{
         "type":"string",
         "metadata":{
            "description":"KeyName."
         },
     "identity": {
        "type": "Object",
        "defaultValue": {
            "userAssignedIdentity": ""
        },
        "metadata": {
            "description": "user-assigned identity."
        }
     }
   },
   "resources":[
      {
         "type":"Microsoft.ServiceBus/namespaces",
         "apiVersion":"2021-01-01-preview",
         "name":"[parameters('namespaceName')]",
         "location":"[parameters('location')]",
         "sku":{
            "name":"Premium",
            "tier":"Premium",
            "capacity":1
         },
        "identity": {
            "type": "UserAssigned",
            "userAssignedIdentities": {
                "[parameters('identity').userAssignedIdentity]": {}
            }
        },
         "properties":{
            "encryption":{
               "keySource":"Microsoft.KeyVault",
               "keyVaultProperties":[
                    {
                        "keyName": "[parameters('keyName')]",
                        "keyVaultUri": "[parameters('keyVaultUri')]",
                        "identity": {
                            "userAssignedIdentity": "[parameters('identity').userAssignedIdentity]"
                        }
                    }
               ]
            }
         }
      }
   ]
}
Create a template parameter file: CreateServiceBusNamespaceWithUserIdentityAndEncryptionParams.json.
{
   "$schema":"https://schema.management.azure.com/schemas/2015-01-01/deploymentParameters.json#",
   "contentVersion":"1.0.0.0",
   "parameters":{
      "namespaceName":{
         "value":"<ServiceBusNamespaceName>"
      },
      "location":{
         "value":"<Location>"
      },
      "keyVaultUri":{
         "value":"https://<KeyVaultName>.vault.azure.net"
      },
      "keyName":{
         "value":"<KeyName>"
      },
      "identity": {
        "value": {
            "userAssignedIdentity": "/subscriptions/<AZURE SUBSCRIPTION ID>/resourceGroups/<RESOURCE GROUP NAME>/providers/Microsoft.ManagedIdentity/userAssignedIdentities/<USER MANAGED IDENTITY NAME>"
        }
     }
   }
}
In the parameter file, replace placeholders with appropriate values.
Placeholder value <ServiceBusNamespaceName>Name of the Service Bus namespace. <Location>Location where you want the namespace to be created. <KeyVaultName>Name of the key vault. <KeyName>Name of the key in the key vault. <AZURE SUBSCRIPTION ID>Your Azure subscription ID. <RESOURCE GROUP NAME>Resource group of the user-managed identity. <USER MANAGED IDENTITY NAME>Name of the user-managed identity. Run the following PowerShell command to deploy the Resource Manager template. Replace
{MyRG}with the name of your resource group before running the command.New-AzResourceGroupDeployment -Name CreateServiceBusNamespaceWithEncryption -ResourceGroupName {MyRG} -TemplateFile ./ CreateServiceBusNamespaceWithUserIdentityAndEncryption.json -TemplateParameterFile ./ CreateServiceBusNamespaceWithUserIdentityAndEncryptionParams.json
Use both user-assigned and system-assigned identities
A namespace can have both system-assigned and user-assigned identities at the same time. In this case, the type property would be SystemAssigned, UserAssigned as shown in the following example.
"identity": {
    "type": "SystemAssigned, UserAssigned",
    "userAssignedIdentities": {
        "/subscriptions/<SUBSCRIPTION ID>/resourceGroups/<RESOURCE GROUP>/providers/Microsoft.ManagedIdentity/userAssignedIdentities/<userIdentity1>" : {}
    }
}
In this scenario, you can choose either the system-assigned identity or the user-assigned identity for encrypting the data at rest.
In the Resource Manager template, if you don't specify an identity attribute, the system-managed identity is used. Here's an example snippet.
"properties":{
   "encryption":{
      "keySource":"Microsoft.KeyVault",
      "keyVaultProperties":[
         {
            "keyName":"[parameters('keyName')]",
            "keyVaultUri":"[parameters('keyVaultUri')]"
         }
      ]
   }
}
See the following example for using the user-managed identity for the encryption. Notice the identity attribute is set to the user-managed identity.
"properties":{
   "encryption":{
      "keySource":"Microsoft.KeyVault",
      "keyVaultProperties":[
         {
            "keyName":"[parameters('keyName')]",
            "keyVaultUri":"[parameters('keyVaultUri')]",
            "identity": {
                "userAssignedIdentity": "[parameters('identity').userAssignedIdentity]"
            }
         }
      ]
   }
}
Enable infrastructure (double) encryption of data
If you require a higher level of assurance that your data is secure, you can enable infrastructure level encryption, which is also known as Double Encryption.
When infrastructure encryption is enabled, data in the Azure Service Bus is encrypted twice, once at the service level and once at the infrastructure level, using two different encryption algorithms and two different keys. Hence, infrastructure encryption of Azure Service Bus data protects against a scenario where one of the encryption algorithms or keys may be compromised.
You can enable infrastructure encryption by updating the Azure Resource Manager template with requireInfrastructureEncryption property in the above UpdateServiceBusNamespaceWithEncryption.json as shown below.
"properties":{
   "encryption":{
      "keySource":"Microsoft.KeyVault",
      "requireInfrastructureEncryption":true,
      "keyVaultProperties":[
         {
            "keyName":"[parameters('keyName')]",
            "keyVaultUri":"[parameters('keyVaultUri')]"
         }
      ]
   }
}
Rotate, revoke, and cache keys
Rotate your encryption keys
You can rotate your key in the key vault by using the Azure Key Vaults rotation mechanism. Activation and expiration dates can also be set to automate key rotation. The Service Bus service detects new key versions and starts using them automatically.
Revoke access to keys
Revoking access to the encryption keys won't purge the data from Service Bus. However, the data can't be accessed from the Service Bus namespace. You can revoke the encryption key through access policy or by deleting the key. Learn more about access policies and securing your key vault from Secure access to a key vault.
Once the encryption key is revoked, the Service Bus service on the encrypted namespace becomes inoperable. If the access to the key is enabled or the deleted key is restored, Service Bus service picks the key so you can access the data from the encrypted Service Bus namespace.
Caching of keys
The Service Bus instance polls its listed encryption keys every 5 minutes. It caches and uses them until the next poll, which is after 5 minutes. As long as at least one key is available, queues and topics are accessible. If all listed keys are inaccessible when it polls, all queues and topics become unavailable.
Here are more details:
- Every 5 minutes, the Service Bus service polls all customer-managed keys listed in the namespace’s record:
- If a key has been rotated, the record is updated with the new key.
- If a key has been revoked, the key is removed from the record.
- If all keys have been revoked, the namespace’s encryption status is set to Revoked. The data can't be accessed from the Service Bus namespace.
Considerations when using geo-disaster recovery
Geo-disaster recovery - encryption with system-assigned identities
To enable encryption of Microsoft-managed key with a customer managed key, an access policy is set up for a system-assigned managed identity on the specified Azure KeyVault. This step ensures controlled access to the Azure KeyVault from the Azure Service Bus namespace. Therefore, you need to follow these steps:
- If Geo disaster recovery is already enabled for the Service Bus namespace and you're looking to enable customer managed key, then
- Break the pairing.
- Set up the access policy for the system-assigned managed identity for both the primary and secondary namespaces to the key vault.
- Set up encryption on the primary namespace.
- Re-pair the primary and secondary namespaces.
- If you're looking to enable Geo-DR on a Service Bus namespace where customer-managed key is already set up, then follow these steps:
- Set up the access policy for the managed identity for the secondary namespace to the key vault.
- Pair the primary and secondary namespaces.
Geo-disaster recovery - encryption with user-assigned identities
Here are a few recommendations:
- Create managed identity and assign Key Vault permissions to your managed identity.
- Add the identity as a user assigned identity, and enable encryption with the identity on both namespaces.
- Pair namespaces together
Conditions for enabling Geo-DR and Encryption with User-Assigned Identities:
- Secondary namespace must already have Encryption enabled with a User-Assigned identity if it's to be paired with a primary namespace that has Encryption enabled.
- It isn't possible to enable Encryption on an already paired primary, even if the secondary has a User-Assigned identity associated with the namespace.
Troubleshoot
Symptom
You get an error stating that the Service Bus namespace is disabled because the encryption key is no longer valid.
Cause
You may be using the resource_id or version, which links to a specific version of the key, which may have expired. If a specific version is provided, Service Bus uses that version of the key, even if the key is rotated.
Resolution
Use the resource__versionless_id or versionless_id instead of using resource_id or version.
Next steps
See the following articles:
Feedback
Coming soon: Throughout 2024 we will be phasing out GitHub Issues as the feedback mechanism for content and replacing it with a new feedback system. For more information see: https://aka.ms/ContentUserFeedback.
Submit and view feedback for