Scale up a Service Fabric cluster primary node type
This article describes how to scale up a Service Fabric cluster primary node type with minimal downtime. In-place SKU upgrades aren't supported on Service Fabric cluster nodes, as such operations potentially involve data and availability loss. The safest, most reliable, and recommended method for scaling up a Service Fabric node type is to:
Add a new node type to your Service Fabric cluster, backed by your upgraded (or modified) virtual machine scale set SKU and configuration. This step also involves setting up a new load balancer, subnet, and public IP for the scale set.
Once both the original and upgraded scale sets are running side by side, disable the original node instances one at a time so that the system services (or replicas of stateful services) migrate to the new scale set.
Verify the cluster and new nodes are healthy, then remove the original scale set (and related resources) and node state for the deleted nodes.
The following will walk you through the process for updating the VM size and operating system of primary node type VMs of a sample cluster with Silver durability, backed by a single scale set with five nodes. We'll be upgrading the primary node type:
- From VM size Standard_D2_V2 to Standard D4_V2, and
- From VM operating system Windows Server 2019 Datacenter to Windows Server 2022 Datacenter.
Warning
Before attempting this procedure on a production cluster, we recommend that you study the sample templates and verify the process against a test cluster. The cluster may also be unavailable for a short period of time.
Do not attempt a primary node type scale up procedure if the cluster status is unhealthy, as this will only destabilize the cluster further.
The step-by-step Azure deployment templates that we'll use to complete this sample upgrade scenario are available on GitHub.
Set up the test cluster
Let's set up the initial Service Fabric test cluster. First, download the Azure Resource Manager sample templates that we'll use to complete this scenario.
Next, sign in to your Azure account.
# Sign in to your Azure account
Login-AzAccount -SubscriptionId "<subscription ID>"
Next open the parameters.json file and update the value for clusterName to something unique (within Azure).
The following commands will guide you through generating a new self-signed certificate and deploying the test cluster. If you already have a certificate you'd like to use, skip to Use an existing certificate to deploy the cluster.
Generate a self-signed certificate and deploy the cluster
First, assign the variables you need for Service Fabric cluster deployment. Adjust the values for resourceGroupName, certSubjectName, parameterFilePath, and templateFilePath for your specific account and environment:
# Assign deployment variables
$resourceGroupName = "sftestupgradegroup"
$certOutputFolder = "c:\certificates"
$certPassword = "Password!1" | ConvertTo-SecureString -AsPlainText -Force
$certSubjectName = "sftestupgrade.southcentralus.cloudapp.azure.com"
$parameterFilePath = "C:\parameters.json"
$templateFilePath = "C:\Initial-TestClusterSetup.json"
Note
Ensure that the certOutputFolder location exists on your local machine before running the command to deploy a new Service Fabric cluster.
Then deploy the Service Fabric test cluster:
# Deploy the initial test cluster
New-AzServiceFabricCluster `
    -ResourceGroupName $resourceGroupName `
    -CertificateOutputFolder $certOutputFolder `
    -CertificatePassword $certPassword `
    -CertificateSubjectName $certSubjectName `
    -TemplateFile $templateFilePath `
    -ParameterFile $parameterFilePath
Once the deployment is complete, locate the .pfx file ($certPfx) on your local machine and import it to your certificate store:
cd c:\certificates
$certPfx = ".\sftestupgradegroup20200312121003.pfx"

Import-PfxCertificate `
     -FilePath $certPfx `
     -CertStoreLocation Cert:\CurrentUser\My `
     -Password (ConvertTo-SecureString Password!1 -AsPlainText -Force)
The operation returns the certificate thumbprint, which you can now use to connect to the new cluster and check its health status. (Skip the following section, which is an alternate approach to cluster deployment.)
Use an existing certificate to deploy the cluster
Alternately, you can use an existing Azure Key Vault certificate to deploy the test cluster. To do this, you need to obtain references to your Key Vault and certificate thumbprint.
# Key Vault variables
$certUrlValue = "https://sftestupgradegroup.vault.azure.net/secrets/sftestupgradegroup20200309235308/dac0e7b7f9d4414984ccaa72bfb2ea39"
$sourceVaultValue = "/subscriptions/########-####-####-####-############/resourceGroups/sftestupgradegroup/providers/Microsoft.KeyVault/vaults/sftestupgradegroup"
$thumb = "BB796AA33BD9767E7DA27FE5182CF8FDEE714A70"
Next, designate a resource group name for the cluster and set the templateFilePath and parameterFilePath locations:
Note
The designated resource group must already exist and be located in the same region as your Key Vault.
$resourceGroupName = "sftestupgradegroup"
$templateFilePath = "C:\Initial-TestClusterSetup.json"
$parameterFilePath = "C:\parameters.json"
Finally, run the following command to deploy the initial test cluster:
# Deploy the initial test cluster
New-AzResourceGroupDeployment `
    -ResourceGroupName $resourceGroupName `
    -TemplateFile $templateFilePath `
    -TemplateParameterFile $parameterFilePath `
    -CertificateThumbprint $thumb `
    -CertificateUrlValue $certUrlValue `
    -SourceVaultValue $sourceVaultValue `
    -Verbose
Connect to the new cluster and check health status
Connect to the cluster and ensure that all five of its nodes are healthy (substitute the clusterName and thumb variables with your own values):
# Connect to the cluster
$clusterName = "sftestupgrade.southcentralus.cloudapp.azure.com:19000"
$thumb = "BB796AA33BD9767E7DA27FE5182CF8FDEE714A70"

Connect-ServiceFabricCluster `
    -ConnectionEndpoint $clusterName `
    -KeepAliveIntervalInSec 10 `
    -X509Credential `
    -ServerCertThumbprint $thumb  `
    -FindType FindByThumbprint `
    -FindValue $thumb `
    -StoreLocation CurrentUser `
    -StoreName My

# Check cluster health
Get-ServiceFabricClusterHealth
Now, we're ready to begin the upgrade procedure.
Deploy a new primary node type with upgraded scale set
In order to upgrade (vertically scale) a node type, we'll first need to deploy a new node type backed by a new scale set and supporting resources. The new scale set will be marked as primary (isPrimary: true), just like the original scale set. If you want to scale up a non-primary node type, see Scale up a Service Fabric cluster non-primary node type. The resources created in the following section will ultimately become the new primary node type in your cluster, and the original primary node type resources are deleted.
Update the cluster template with the upgraded scale set
Here are the section-by-section modifications of the original cluster deployment template for adding a new primary node type and supporting resources.
The required changes for this step have already been made for you in the Step1-AddPrimaryNodeType.json template file, and the following will explain these changes in detail. If you prefer, you can skip the explanation and continue to obtain your Key Vault references and deploy the updated template that adds a new primary node type to your cluster.
Note
Ensure that you use names that are unique from the original node type, scale set, load balancer, public IP, and subnet of the original primary node type, as these resources are deleted at a later step in the process.
Create a new subnet in the existing virtual network
{
    "name": "[variables('subnet1Name')]",
    "properties": {
        "addressPrefix": "[variables('subnet1Prefix')]"
    }
}
Create a new public IP with a unique domainNameLabel
{
    "apiVersion": "[variables('publicIPApiVersion')]",
    "type": "Microsoft.Network/publicIPAddresses",
    "name": "[concat(variables('lbIPName'),'-',variables('vmNodeType1Name'))]",
    "location": "[variables('computeLocation')]",
    "properties": {
        "dnsSettings": {
            "domainNameLabel": "[concat(variables('dnsName'),'-','nt1')]"
        },
        "publicIPAllocationMethod": "Dynamic"
    },
    "tags": {
        "resourceType": "Service Fabric",
        "clusterName": "[parameters('clusterName')]"
    }
}
Create a new load balancer for the public IP
"dependsOn": [
    "[concat('Microsoft.Network/publicIPAddresses/',concat(variables('lbIPName'),'-',variables('vmNodeType1Name')))]"
]
Create a new virtual machine scale set (with upgraded VM and OS SKUs)
Node Type Ref
"nodeTypeRef": "[variables('vmNodeType1Name')]"
VM SKU
"sku": {
    "name": "[parameters('vmNodeType1Size')]",
    "capacity": "[parameters('nt1InstanceCount')]",
    "tier": "Standard"
}
OS SKU
"imageReference": {
    "publisher": "[parameters('vmImagePublisher1')]",
    "offer": "[parameters('vmImageOffer1')]",
    "sku": "[parameters('vmImageSku1')]",
    "version": "[parameters('vmImageVersion1')]"
}
If you're changing OS SKU in a Linux Cluster
In Windows cluster, the value for property vmImage is ‘Windows’ while the value of the same property for Linux cluster is name of the OS image used. For e.g. - Ubuntu20_04(use the latest vm image name).
So, if you're changing the VM image (OS SKU) in a Linux cluster, then update the vmImage setting on the Service Fabric cluster resource as well.
#Update the property vmImage with the required OS name in your ARM template
{
    "vmImage": "[parameter(newVmImageName]”
}
Note: Example of newVmImageName: Ubuntu20_04
You can also update the cluster resource by using the following PowerShell command:
# Update cluster vmImage to target OS. This registers the SF runtime package type that is supplied for upgrades.
Update-AzServiceFabricVmImage -ResourceGroupName $resourceGroup -ClusterName $clusterName -VmImage Ubuntu20_04
Also, ensure you include any additional extensions that are required for your workload.
Add a new primary node type to the cluster
Now that the new node type (vmNodeType1Name) has its own name, subnet, IP, load balancer, and scale set, it can reuse all other variables from the original node type (such as nt0applicationEndPort, nt0applicationStartPort, and nt0fabricTcpGatewayPort):
"name": "[variables('vmNodeType1Name')]",
"applicationPorts": {
    "endPort": "[variables('nt0applicationEndPort')]",
    "startPort": "[variables('nt0applicationStartPort')]"
},
"clientConnectionEndpointPort": "[variables('nt0fabricTcpGatewayPort')]",
"durabilityLevel": "Bronze",
"ephemeralPorts": {
    "endPort": "[variables('nt0ephemeralEndPort')]",
    "startPort": "[variables('nt0ephemeralStartPort')]"
},
"httpGatewayEndpointPort": "[variables('nt0fabricHttpGatewayPort')]",
"isPrimary": true,
"reverseProxyEndpointPort": "[variables('nt0reverseProxyEndpointPort')]",
"vmInstanceCount": "[parameters('nt1InstanceCount')]"
Once you've implemented all the changes in your template and parameters files, proceed to the next section to acquire your Key Vault references and deploy the updates to your cluster.
Obtain your Key Vault references
To deploy the updated configuration, you need several references to the cluster certificate stored in your Key Vault. The easiest way to find these values is through Azure portal. You need:
The Key Vault URL of your cluster certificate. From your Key Vault in Azure portal, select Certificates > Your desired certificate > Secret Identifier:
$certUrlValue="https://sftestupgradegroup.vault.azure.net/secrets/sftestupgradegroup20200309235308/dac0e7b7f9d4414984ccaa72bfb2ea39"The thumbprint of your cluster certificate. (You probably already have the certificate if you connected to the initial cluster to check its health status.) From the same certificate blade (Certificates > Your desired certificate) in Azure portal, copy X.509 SHA-1 Thumbprint (in hex):
$thumb = "BB796AA33BD9767E7DA27FE5182CF8FDEE714A70"The Resource ID of your Key Vault. From your Key Vault in Azure portal, select Properties > Resource ID:
$sourceVaultValue = "/subscriptions/########-####-####-####-############/resourceGroups/sftestupgradegroup/providers/Microsoft.KeyVault/vaults/sftestupgradegroup"
Deploy the updated template
Adjust the templateFilePath as needed and run the following command:
# Deploy the new node type and its resources
$templateFilePath = "C:\Step1-AddPrimaryNodeType.json"

New-AzResourceGroupDeployment `
    -ResourceGroupName $resourceGroupName `
    -TemplateFile $templateFilePath `
    -TemplateParameterFile $parameterFilePath `
    -CertificateThumbprint $thumb `
    -CertificateUrlValue $certUrlValue `
    -SourceVaultValue $sourceVaultValue `
    -Verbose
When the deployment completes, check the cluster health again and ensure all nodes on both node types are healthy.
Get-ServiceFabricClusterHealth
Migrate seed nodes to the new node type
We're now ready to update the original node type as non-primary and start disabling its nodes. As the nodes disable, the cluster's system services and seed nodes migrate to the new scale set.
Unmark the original node type as primary
First remove the isPrimary designation in the template from the original node type.
{
    "isPrimary": false,
}
Then deploy the template with the update. This deployment initiates the migration of seed nodes to the new scale set.
$templateFilePath = "C:\Step2-UnmarkOriginalPrimaryNodeType.json"

New-AzResourceGroupDeployment `
    -ResourceGroupName $resourceGroupName `
    -TemplateFile $templateFilePath `
    -TemplateParameterFile $parameterFilePath `
    -CertificateThumbprint $thumb `
    -CertificateUrlValue $certUrlValue `
    -SourceVaultValue $sourceVaultValue `
    -Verbose
Note
It will take some time to complete the seed node migration to the new scale set. To guarantee data consistency, only one seed node can change at a time. Each seed node change requires a cluster update; thus replacing a seed node requires two cluster upgrades (one each for node addition and removal). Upgrading the five seed nodes in this sample scenario will result in ten cluster upgrades.
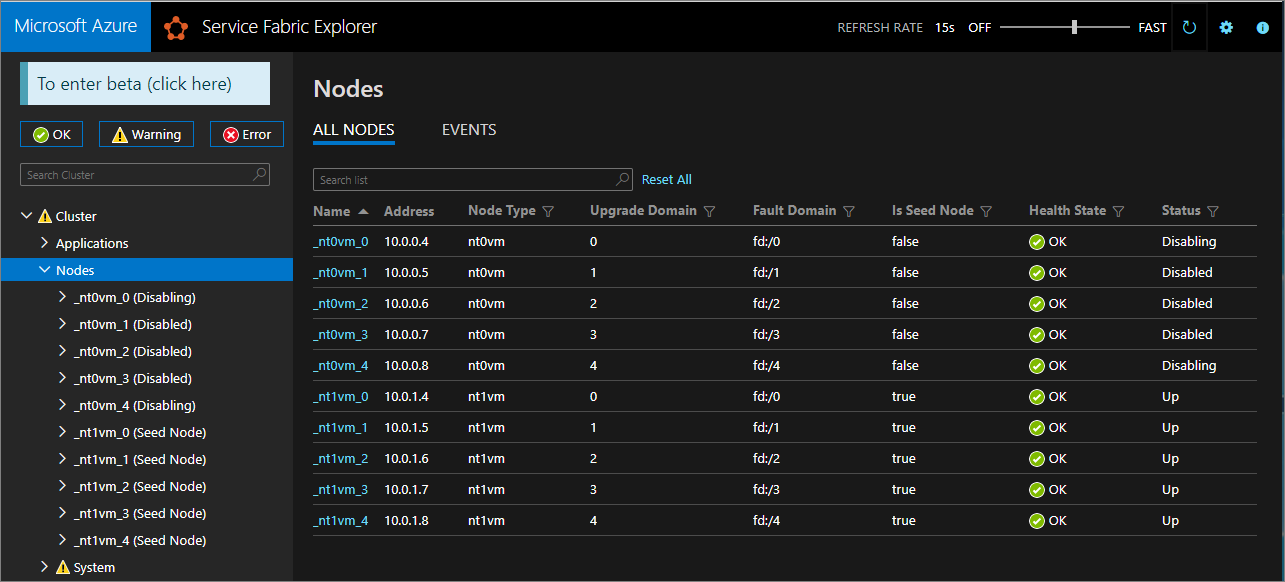
Use Service Fabric Explorer to monitor the migration of seed nodes to the new scale set. The nodes of the original node type (nt0vm) should all be false in the Is Seed Node column, and those of the new node type (nt1vm) should be true.
Disable the nodes in the original node type scale set
Once all seed nodes have migrated to the new scale set, you can disable the nodes of the original scale set.
# Disable the nodes in the original scale set.
$nodeType = "nt0vm"
$nodes = Get-ServiceFabricNode

Write-Host "Disabling nodes..."
foreach($node in $nodes)
{
  if ($node.NodeType -eq $nodeType)
  {
    $node.NodeName

    Disable-ServiceFabricNode -Intent RemoveNode -NodeName $node.NodeName -Force
  }
}
Use Service Fabric Explorer to monitor the progression of nodes in the original scale set from Disabling to Disabled status.
For Silver and Gold durability, some nodes will go into Disabled state, while others might remain in a Disabling state. In Service Fabric Explorer, check the Details tab of nodes in Disabling state. If they show a Pending Safety Check of Kind EnsurePartitionQuorem (ensuring quorum for infrastructure service partitions), then it's safe to continue.

If your cluster is Bronze durability, wait for all nodes to reach Disabled state.
Stop data on the disabled nodes
Now you can stop data on the disabled nodes.
# Stop data on the disabled nodes.
foreach($node in $nodes)
{
  if ($node.NodeType -eq $nodeType)
  {
    $node.NodeName

    Start-ServiceFabricNodeTransition -Stop -OperationId (New-Guid) -NodeInstanceId $node.NodeInstanceId -NodeName $node.NodeName -StopDurationInSeconds 10000
  }
}
Remove the original node type and cleanup its resources
We're ready to remove the original node type and its associated resources to conclude the vertical scaling procedure.
Remove the original scale set
First remove the node type's backing scale set.
$scaleSetName = "nt0vm"
$scaleSetResourceType = "Microsoft.Compute/virtualMachineScaleSets"

Remove-AzResource -ResourceName $scaleSetName -ResourceType $scaleSetResourceType -ResourceGroupName $resourceGroupName -Force
Delete the original IP and load balancer resources
You can now delete the original IP, and load balancer resources. In this step you'll also update the DNS name.
Note
This step is optional if you're already using a Standard SKU public IP and load balancer. In this case you could have multiple scale sets / node types under the same load balancer.
Run the following commands, modifying the $lbname value as needed.
# Delete the original IP and load balancer resources
$lbName = "LB-sftestupgrade-nt0vm"
$lbResourceType = "Microsoft.Network/loadBalancers"
$ipResourceType = "Microsoft.Network/publicIPAddresses"
$oldPublicIpName = "PublicIP-LB-FE-nt0vm"
$newPublicIpName = "PublicIP-LB-FE-nt1vm"

$oldPrimaryPublicIP = Get-AzPublicIpAddress -Name $oldPublicIpName  -ResourceGroupName $resourceGroupName
$primaryDNSName = $oldPrimaryPublicIP.DnsSettings.DomainNameLabel
$primaryDNSFqdn = $oldPrimaryPublicIP.DnsSettings.Fqdn

Remove-AzResource -ResourceName $lbName -ResourceType $lbResourceType -ResourceGroupName $resourceGroupName -Force
Remove-AzResource -ResourceName $oldPublicIpName -ResourceType $ipResourceType -ResourceGroupName $resourceGroupName -Force

$PublicIP = Get-AzPublicIpAddress -Name $newPublicIpName  -ResourceGroupName $resourceGroupName
$PublicIP.DnsSettings.DomainNameLabel = $primaryDNSName
$PublicIP.DnsSettings.Fqdn = $primaryDNSFqdn
Set-AzPublicIpAddress -PublicIpAddress $PublicIP
Remove node state from the original node type
The original node type nodes will now show Error for their Health State. Remove their node state from the cluster.
# Remove state of the obsolete nodes from the cluster
$nodeType = "nt0vm"
$nodes = Get-ServiceFabricNode

Write-Host "Removing node state..."
foreach($node in $nodes)
{
  if ($node.NodeType -eq $nodeType)
  {
    $node.NodeName

    Remove-ServiceFabricNodeState -NodeName $node.NodeName -Force
  }
}
Service Fabric Explorer should now reflect only the five nodes of the new node type (nt1vm), all with Health State values of OK. Your Cluster Health State will still show Error. We'll remediate that next by updating the template to reflect the latest changes and redeploying.
Update the deployment template to reflect the newly scaled-up primary node type
The required changes for this step have already been made for you in the Step3-CleanupOriginalPrimaryNodeType.json template file, and the following sections will explain these template changes in detail. If you prefer, you can skip the explanation and continue to deploy the updated template and complete the tutorial.
Update the cluster management endpoint
Update the cluster managementEndpoint on the deployment template to reference the new IP (by updating vmNodeType0Name with vmNodeType1Name).
"managementEndpoint": "[concat('https://',reference(concat(variables('lbIPName'),'-',variables('vmNodeType1Name'))).dnsSettings.fqdn,':',variables('nt0fabricHttpGatewayPort'))]",
Remove the original node type reference
Remove the original node type reference from the Service Fabric resource in the deployment template:
"name": "[variables('vmNodeType0Name')]",
"applicationPorts": {
    "endPort": "[variables('nt0applicationEndPort')]",
    "startPort": "[variables('nt0applicationStartPort')]"
},
"clientConnectionEndpointPort": "[variables('nt0fabricTcpGatewayPort')]",
"durabilityLevel": "Bronze",
"ephemeralPorts": {
    "endPort": "[variables('nt0ephemeralEndPort')]",
    "startPort": "[variables('nt0ephemeralStartPort')]"
},
"httpGatewayEndpointPort": "[variables('nt0fabricHttpGatewayPort')]",
"isPrimary": true,
"reverseProxyEndpointPort": "[variables('nt0reverseProxyEndpointPort')]",
"vmInstanceCount": "[parameters('nt0InstanceCount')]"
Configure health policies to ignore existing errors
Only for Silver and higher durability clusters, update the cluster resource in the template and configure health policies to ignore fabric:/System application health by adding applicationDeltaHealthPolicies under cluster resource properties as given below. The below policy will ignore existing errors but not allow new health errors.
"upgradeDescription":
{
 "forceRestart": false,
 "upgradeReplicaSetCheckTimeout": "10675199.02:48:05.4775807",
 "healthCheckWaitDuration": "00:05:00",
 "healthCheckStableDuration": "00:05:00",
 "healthCheckRetryTimeout": "00:45:00",
 "upgradeTimeout": "12:00:00",
 "upgradeDomainTimeout": "02:00:00",
 "healthPolicy": {
   "maxPercentUnhealthyNodes": 100,
   "maxPercentUnhealthyApplications": 100
 },
 "deltaHealthPolicy":
 {
   "maxPercentDeltaUnhealthyNodes": 0,
   "maxPercentUpgradeDomainDeltaUnhealthyNodes": 0,
   "maxPercentDeltaUnhealthyApplications": 0,
   "applicationDeltaHealthPolicies":
   {
       "fabric:/System":
       {
           "defaultServiceTypeDeltaHealthPolicy":
           {
                   "maxPercentDeltaUnhealthyServices": 0
           }
       }
   }
 }
}
Remove supporting resources for the original node type
Remove all other resources related to the original node type from the ARM template and the parameters file. Delete the following:
    "vmImagePublisher": {
      "value": "MicrosoftWindowsServer"
    },
    "vmImageOffer": {
      "value": "WindowsServer"
    },
    "vmImageSku": {
      "value": "2019-Datacenter"
    },
    "vmImageVersion": {
      "value": "latest"
    },
Deploy the finalized template
Finally, deploy the modified Azure Resource Manager template.
# Deploy the updated template file
$templateFilePath = "C:\Step3-CleanupOriginalPrimaryNodeType"

New-AzResourceGroupDeployment `
    -ResourceGroupName $resourceGroupName `
    -TemplateFile $templateFilePath `
    -TemplateParameterFile $parameterFilePath `
    -CertificateThumbprint $thumb `
    -CertificateUrlValue $certUrlValue `
    -SourceVaultValue $sourceVaultValue `
    -Verbose
Note
This step will take a while, usually up to two hours.
The upgrade will change settings to the InfrastructureService; therefore, a node restart is needed. In this case, forceRestart is ignored. The parameter upgradeReplicaSetCheckTimeout specifies the maximum time that Service Fabric waits for a partition to be in a safe state, if not already in a safe state. Once safety checks pass for all partitions on a node, Service Fabric proceeds with the upgrade on that node. The value for the parameter upgradeTimeout can be reduced to 6 hours, but for maximal safety 12 hours should be used.
Once the deployment has completed, verify in Azure portal that the Service Fabric resource Status is Ready. Verify you can reach the new Service Fabric Explorer endpoint, the Cluster Health State is OK, and any deployed applications function properly.
Now, you've vertically scaled a cluster primary node type!
Next steps
- Learn how to add a node type to a cluster
- Learn about application scalability.
- Scale an Azure cluster in or out.
- Scale an Azure cluster programmatically using the fluent Azure compute SDK.
- Scale a standalone cluster in or out.
Feedback
Coming soon: Throughout 2024 we will be phasing out GitHub Issues as the feedback mechanism for content and replacing it with a new feedback system. For more information see: https://aka.ms/ContentUserFeedback.
Submit and view feedback for