Connect to Azure VMs after failover from on-premises
This article describes how to set up connectivity so that you can successfully connect to Azure VMs after failover.
When you set up disaster recovery of on-premises virtual machines (VMs) and physical servers to Azure, Azure Site Recovery starts replicating machines to Azure. Then, when outages occur, you can fail over to Azure from your on-premises site. When failover occurs, Site Recovery creates Azure VMs, using replicated on-premises data. As part of disaster recovery planning, you need to figure out how to connect to apps running on these Azure VMs after failover.
In this article you learn how to:
- Prepare on-premises machines before failover.
- Prepare Azure VMs after failover.
- Retain IP addresses on Azure VMs after failover.
- Assign new IP addresses to Azure VMs after failover.
Prepare on-premises machines
To ensure connectivity to Azure VMs, prepare your on-premises machines before failover.
Prepare Windows machines
On on-premises Windows machines, do the following:
Configure Windows settings. These include removing any static persistent routes or WinHTTP proxy, and setting the disk SAN policy to OnlineAll. Follow these instructions.
Make sure these services are running.
Enable remote desktop (RDP) to allow remote connections to the on-premises machine. Learn how to enable RDP with PowerShell.
To access an Azure VM over the internet after failover, in Windows Firewall on the on-premises machine, allow TCP and UDP in the Public profile, and set RDP as an allowed app for all profiles.
If you want to access an Azure VM over a site-to-site VPN after failover, in Windows Firewall on the on-premises machine, allow RDP for the Domain and Private profiles. Learn how to allow RDP traffic.
Make sure that there are no Windows updates pending on the on-premises VM when you trigger a failover. If there are, updates might start installing on the Azure VM after failover, and you won't be able to sign into the VM until updates finish.
Prepare Linux machines
On on-premises Linux machines, do the following:
- Check that the Secure Shell service is set to start automatically on system boot.
- Check that firewall rules allow an SSH connection.
Configure Azure VMs after failover
After failover, do the following on the Azure VMs that are created.
- To connect to the VM over the internet, assign a public IP address to the VM. You can't use the same public IP address for the Azure VM that you used for your on-premises machine. Learn more
- Check that network security group (NSG) rules on the VM allow incoming connections to the RDP or SSH port.
- Check Boot diagnostics to view the VM.
Note
The Azure Bastion service offers private RDP and SSH access to Azure VMs. Learn more about this service.
Set a public IP address
As an alternative to assigning a public IP address manually to an Azure VM, you can assign the address during failover using a script or Azure automation runbook in a Site Recovery recovery plan, or you can set up DNS-level routing using Azure Traffic Manager. Learn more about setting up a public address.
Assign an internal address
To set the internal IP address of an Azure VM after failover, you have a couple of options:
- Retain same IP address: You can use the same IP address on the Azure VM as the one allocated to the on-premises machine.
- Use different IP address: You can use a different IP address for the Azure VM.
Retain IP addresses
Site Recovery lets you retain the same IP addresses when failing over to Azure. Retaining the same IP address avoids potential network issues after failover, but does introduce some complexity.
- If the target Azure VM uses the same IP address/subnet as your on-premises site, you can't connect between them using a site-to-site VPN connection or ExpressRoute, because of the address overlap. Subnets must be unique.
- You need a connection from on-premises to Azure after failover, so that apps are available on Azure VMs. Azure doesn't support stretched VLANs, so if you want to retain IP addresses you need to take the IP space over to Azure by failing over the entire subnet, in addition to the on-premises machine.
- Subnet failover ensures that a specific subnet isn't available simultaneously on-premises and in Azure.
Retaining IP addresses requires the following steps:
- In the Compute & Network properties of the replicated item, set network and IP addressing for the target Azure VM to mirror the on-premises setting.
- Subnets must be managed as part of the disaster recovery process. You need an Azure VNet to match the on-premises network, and after failover network routes must be modified to reflect that the subnet has moved to Azure, and new IP address locations.
Failover example
Let's look at an example.
- The fictitious company Woodgrove Bank hosts their business apps on-premises They host their mobile apps in Azure.
- They connect from on-premises to Azure over site-to-site VPN.
- Woodgrove is using Site Recovery to replicate on-premises machines to Azure.
- Their on-premises apps use hard-coded IP addresses, so they want to retain the same IP addresses in Azure.
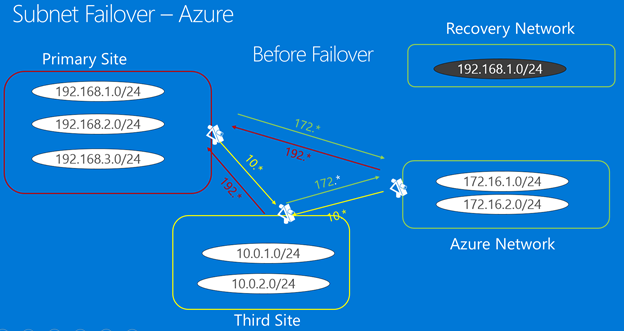
- On-premises the machines running the apps are running in three subnets:
- 192.168.1.0/24
- 192.168.2.0/24
- 192.168.3.0/24
- Their apps running in Azure are located in the Azure VNet Azure Network in two subnets:
- 172.16.1.0/24
- 172.16.2.0/24
In order to retain the addresses, here's what they do.
When they enable replication, they specify that machines should replicate to the Azure Network.
They create Recovery Network in Azure. This VNet mirrors the 192.168.1.0/24 subnet in their on-premises network.
Woodgrove sets up a VNet-to-VNet connection between the two networks.
Note
Depending on application requirements, a VNet-to-VNet connection could be set up before failover, as a manual step/scripted step/Azure automation runbook in a Site Recovery recovery plan, or after failover is complete.
Before failover, on the machine properties in Site Recovery, they set the target IP address to the address of the on-premises machine, as described in the next procedure.
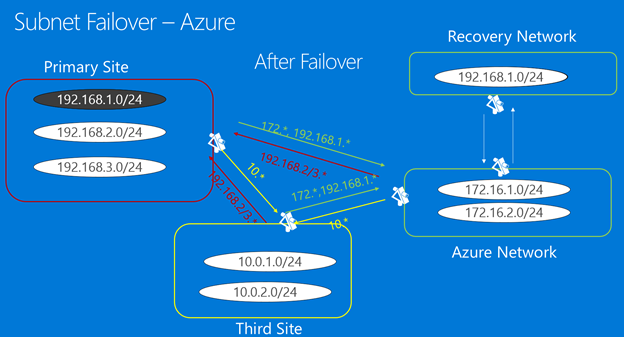
After failover, the Azure VMs are created with the same IP address. Woodgrove connects from Azure Network to Recovery Network VNet using VNet peering (with transit connectivity enabled).
On-premises, Woodgrove needs to make network changes, including modifying routes to reflect that 192.168.1.0/24 has moved to Azure.
Infrastructure before failover
Infrastructure after failover
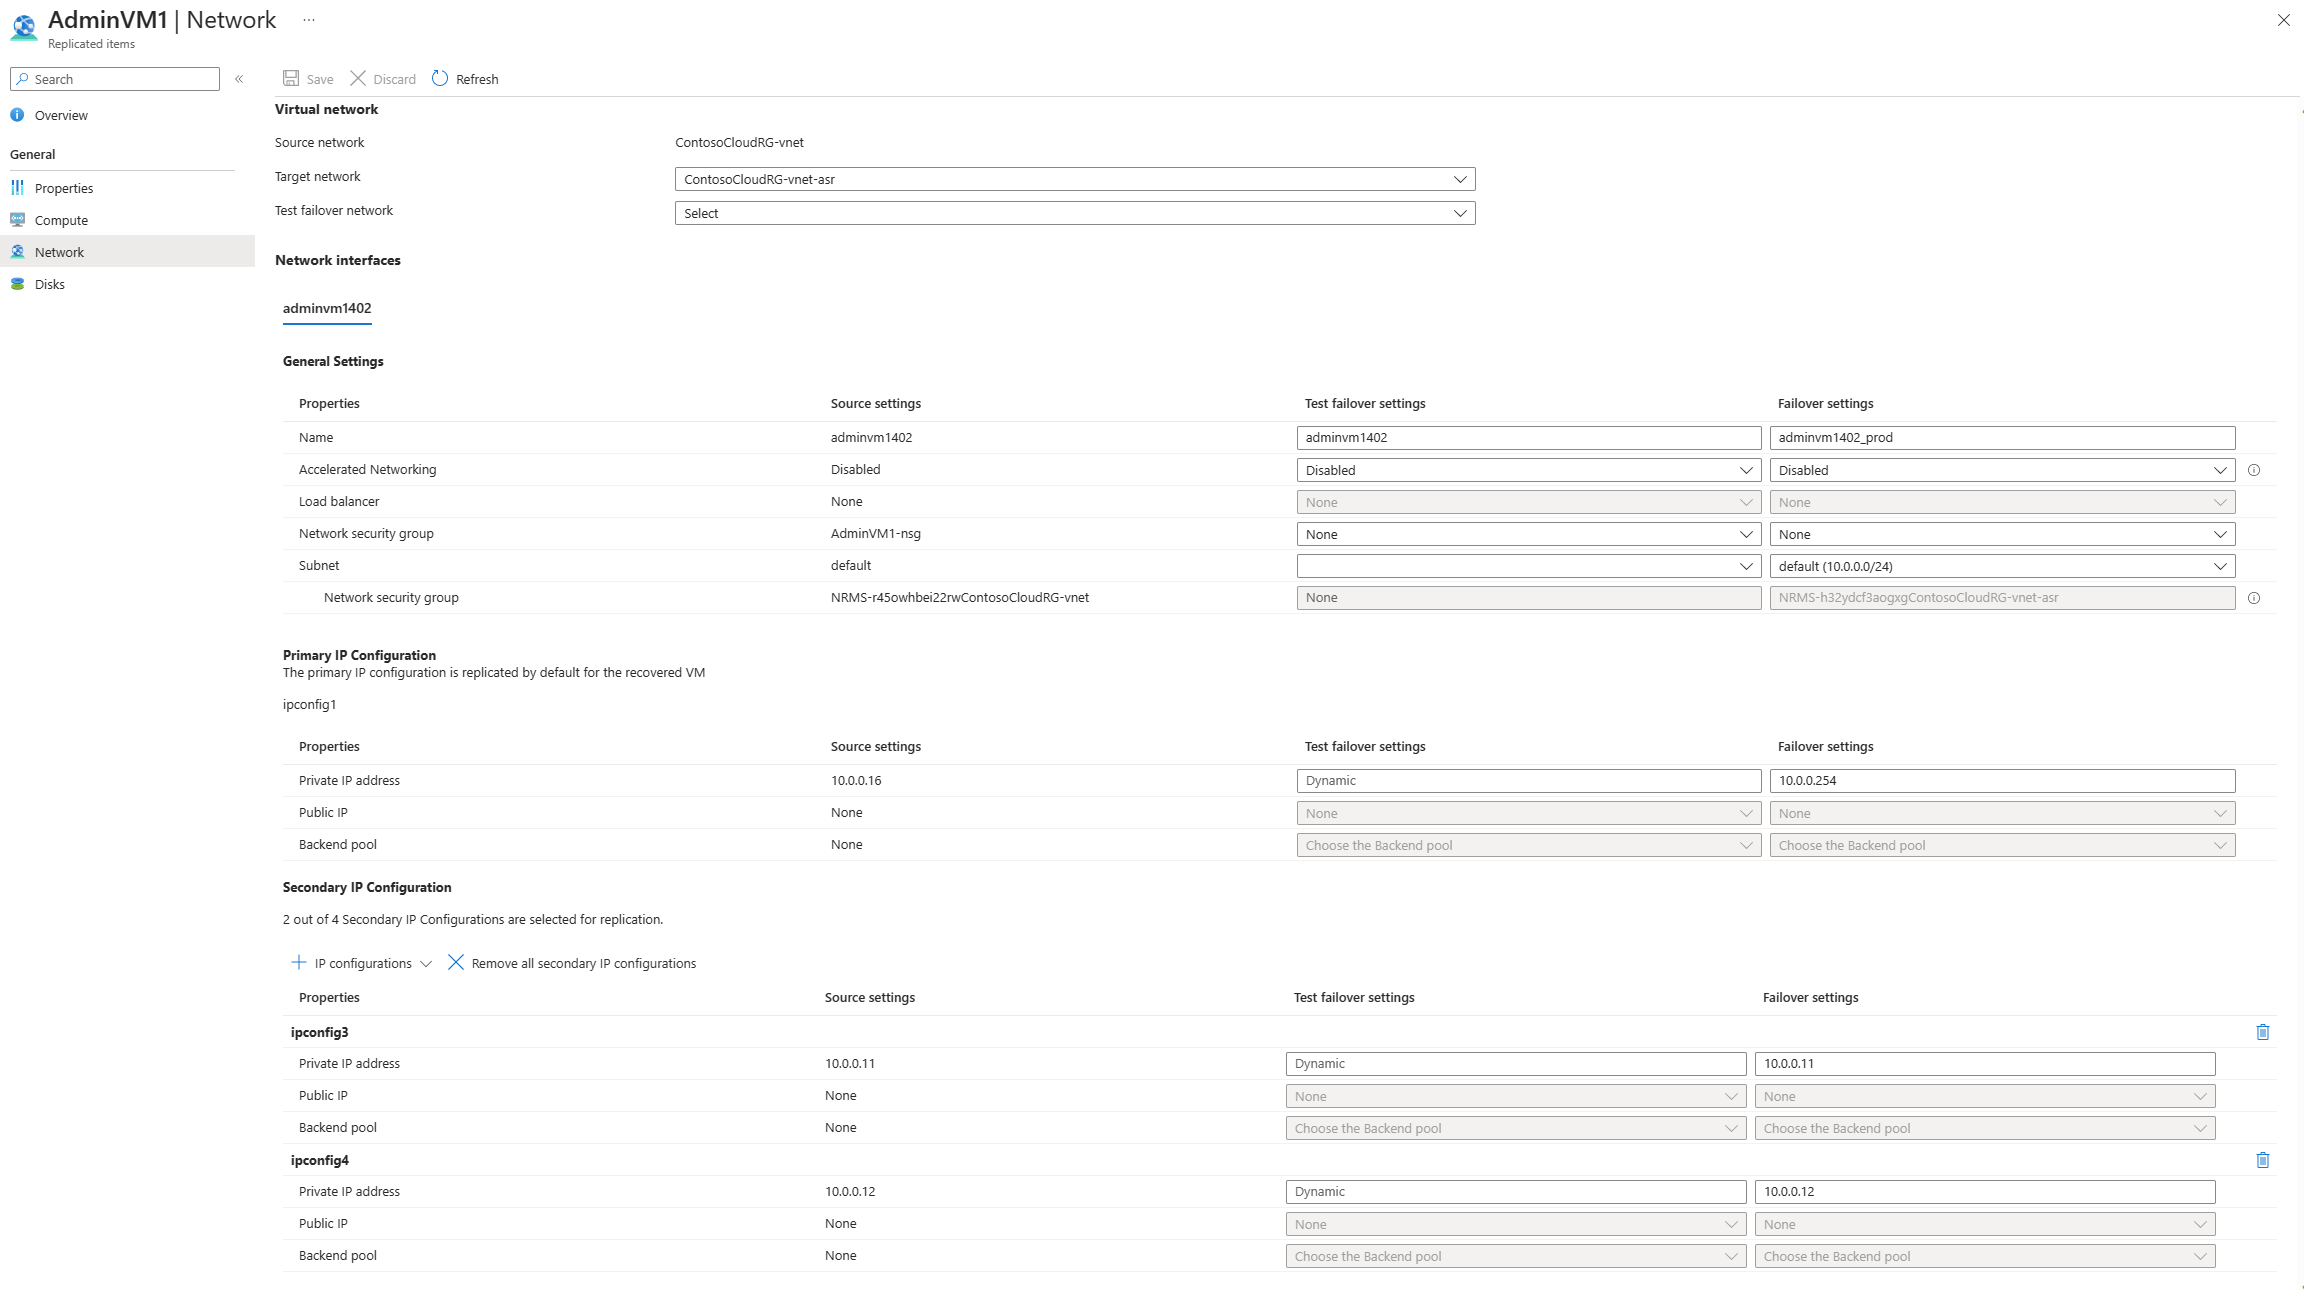
Set target network settings
Before failover, specify the network settings and IP address for the target Azure VM.
- In the Recovery Services vault -> Replicated items, select the on-premises machine.
- In the Compute and Network page for the machine, click Edit, to configure network and adapter settings for the target Azure VM.
- In Network properties, select the target network in which the Azure VM will be located when it's created after failover.
- In Network interfaces, configure the network adapters in the target network. By default Site Recovery shows all detected NICs on the on-premises machine.
- In Target network interface type you can set each NIC as Primary, Secondary, or Do not create if you don't need that specific NIC in the target network. One network adapter must be set as primary for failover. Note that modifying the target network affects all NICs for the Azure VM.
- Click the NIC name to specify the subnet in which the Azure VM will be deployed.
- Overwrite Dynamic with the private IP address you want to assign to target Azure VM. If an IP address isn't specified Site Recovery will assign the next available IP address in the subnet to the NIC at failover.
- Learn more about managing NICs for on-premises failover to Azure.
Get new IP addresses
In this scenario, the Azure VM gets a new IP address after failover. To setup a new IP Address for the virtual machine created after failover, the following steps can be referred -
Go to Replicated Items.
Select the desired Azure virtual machine.
Select Compute and Network and select Edit.
To update Failover network settings, Select Edit for the NIC you want to configure. In the next page that opens, provide the corresponding pre-created IP Address in the test failover and failover location.
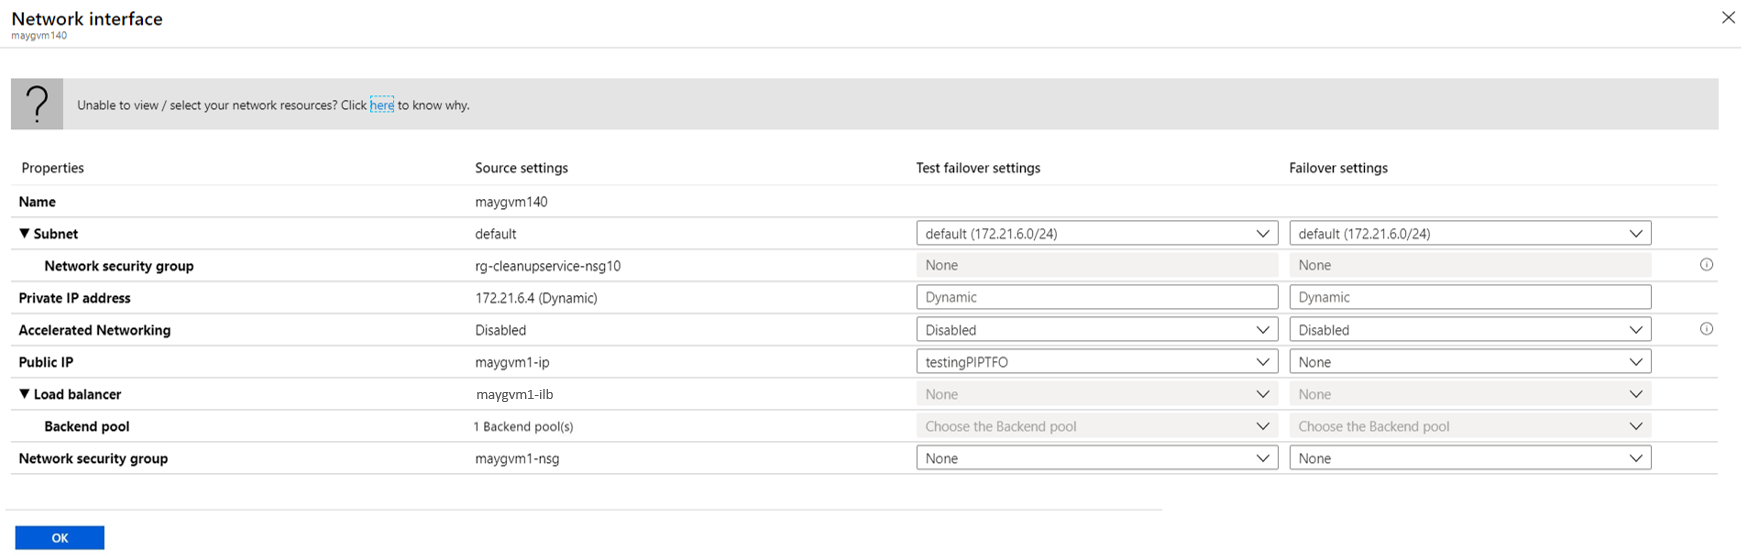
Select OK.
Site Recovery will now honor these settings and ensure that the virtual machine on failover is connected to the selected resource via the corresponding IP Address, if it is available in the target IP range. In this scenario, there's no need to failover the entire subnet. A DNS update will be required to update records for failed over machine to point to the new IP address of the virtual machine.
Next steps
Learn about replicating on-premises Active Directory and DNS to Azure.
Feedback
Coming soon: Throughout 2024 we will be phasing out GitHub Issues as the feedback mechanism for content and replacing it with a new feedback system. For more information see: https://aka.ms/ContentUserFeedback.
Submit and view feedback for