Quickstart: Create an Azure Stream Analytics job using the Azure CLI
In this quickstart, you will use Azure CLI to define a Stream Analytics job that filters real-time sensor messages with a temperature reading greater than 27. The Stream Analytics job reads data from IoT Hub, transforms the data, and writes the output data to a container in a blob storage. The input data used in this quickstart is generated by a Raspberry Pi online simulator.
Before you begin
If you don't have an Azure subscription, create an Azure free account before you begin.
Prerequisites
Use the Bash environment in Azure Cloud Shell. For more information, see Quickstart for Bash in Azure Cloud Shell.

If you prefer to run CLI reference commands locally, install the Azure CLI. If you're running on Windows or macOS, consider running Azure CLI in a Docker container. For more information, see How to run the Azure CLI in a Docker container.
If you're using a local installation, sign in to the Azure CLI by using the az login command. To finish the authentication process, follow the steps displayed in your terminal. For other sign-in options, see Sign in with the Azure CLI.
When you're prompted, install the Azure CLI extension on first use. For more information about extensions, see Use extensions with the Azure CLI.
Run az version to find the version and dependent libraries that are installed. To upgrade to the latest version, run az upgrade.
Create a resource group. All Azure resources must be deployed into a resource group. Resource groups allow you to organize and manage related Azure resources.
For this quickstart, create a resource group named streamanalyticsrg in the eastus location with the following az group create command:
az group create --name streamanalyticsrg --location eastus
Prepare the input data
Before you define the Stream Analytics job, prepare the data that's used for the job's input. The following Azure CLI commands prepare the input data required by the job.
Create an IoT Hub using the az iot hub create command. This example creates an IoT Hub called MyASAIoTHub. As IoT Hub names must be globally unique, you may have to change the name if it's already taken. Set the SKU to F1 to use the free tier if it's available with your subscription. If not, choose the next lowest tier.
iotHubName=MyASAIoTHub
az iot hub create --name $iotHubName --resource-group streamanalyticsrg --sku S1
Once the IoT hub has been created, get the IoT Hub connection string using the az iot hub connection-string show command. Copy the entire connection string and save it. You use it while adding the IoT Hub as an input to your Stream Analytics job.
az iot hub connection-string show --hub-name $iotHubNameAdd a device to IoT Hub using the az iothub device-identity create command. This example creates a device called MyASAIoTDevice.
az iot hub device-identity create --hub-name $iotHubName --device-id "MyASAIoTDevice"Get the device connection string using the az iot hub device-identity connection-string show command. Copy the entire connection string and save it for when you create the Raspberry Pi simulator.
az iot hub device-identity connection-string show --hub-name $iotHubName --device-id "MyASAIoTDevice" --output tableOutput example:
HostName=MyASAIoTHub.azure-devices.net;DeviceId=MyASAIoTDevice;SharedAccessKey=a2mnUsg52+NIgYudxYYUNXI67r0JmNubmfVafojG8=
Create a blob storage account
The following Azure CLI commands create a blob storage account that's used for job output.
Create a general-purpose storage account with the az storage account create command. The general-purpose storage account can be used for all four services: blobs, files, tables, and queues.
storageAccountName="asatutorialstorage$RANDOM"
az storage account create \
    --name $storageAccountName \
    --resource-group streamanalyticsrg \
    --location eastus \
    --sku Standard_ZRS \
    --encryption-services blob
Get the key for your storage account by running the az storage account keys list command.
key=$(az storage account keys list -g streamanalyticsrg -n $storageAccountName --query "[0].value" -o tsv)
echo $key
Important
Note down the access key for the Azure storage account. You will use this key later in this quickstart.
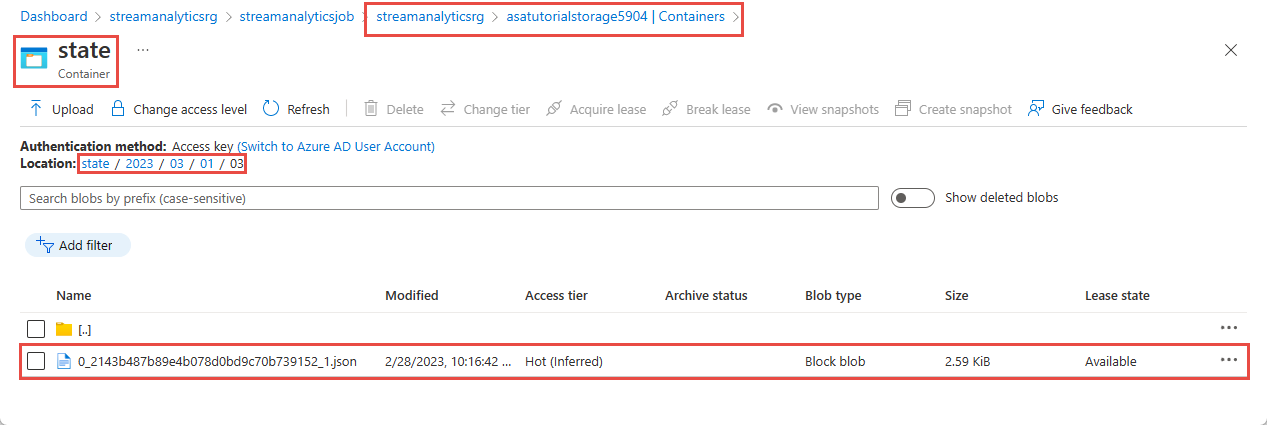
Create a container named
statefor storing blobs with the az storage container create command. You use the storage account key to authorize the operation to create the container. For more information about authorizing data operations with Azure CLI, see Authorize access to blob or queue data with Azure CLI.az storage container create \ --account-name $storageAccountName \ --name state \ --account-key $key \ --auth-mode key
Create a Stream Analytics job
Create a Stream Analytics job with the az stream-analytics job create command.
az stream-analytics job create \
    --job-name "streamanalyticsjob" \
    --resource-group "streamanalyticsrg" \
    --location "eastus" \
    --output-error-policy "Drop" \
    --out-of-order-policy "Drop" \
    --order-max-delay 5 \
    --arrival-max-delay 16 \
    --data-locale "en-US"
Configure input to the job
Add an input to your job by using the az stream-analytics input cmdlet. This cmdlet takes the job name, job input name, resource group name, and the input properties in JSON format as parameters. In this example, you'll create an IoT Hub as an input.
Important
- Replace
IOT HUB ACCESS KEYwith the value of Shared Access Key in the IOT Hub connection string you saved. For example, if the IOT Hub connection string is:HostName=MyASAIoTHub.azure-devices.net;SharedAccessKeyName=iothubowner;SharedAccessKey=xxxxxxxxxxxxxx=, the Shared Access Key value isxxxxxxxxxxxxxx=. While replacing the value, make sure that you don't delete\(escape) character for"(double quotes). - Update the value of
iotHubNamespacein the following command if you used a name other thanMyASAIoTHub. Runecho $iotHubNameto see the name of your IoT Hub.
az stream-analytics input create \
    --properties "{\"type\":\"Stream\",\"datasource\":{\"type\":\"Microsoft.Devices/IotHubs\",\"properties\":{\"consumerGroupName\":\"\$Default\",\"endpoint\":\"messages/events\",\"iotHubNamespace\":\"MyASAIoTHub\",\"sharedAccessPolicyKey\":\"IOT HUB ACCESS KEY\",\"sharedAccessPolicyName\":\"iothubowner\"}},\"serialization\":{\"type\":\"Json\",\"encoding\":\"UTF8\"}}" \
    --input-name "asaiotinput" \
    --job-name "streamanalyticsjob" \
    --resource-group "streamanalyticsrg"
Configure output to the job
Add an output to your job by using the az stream-analytics output create cmdlet. This cmdlet takes the job name, job output name, resource group name, data source in JSON format, and serialization type as parameters.
Important
Replace STORAGEACCOUNTNAME> with the name of your Azure Storage account and STORAGEACCESSKEY> with the access key for your storage account. If you didn't note down these values, run the following commands to get them: echo $storageAccountName and echo $key. While replacing the values, make sure that you don't delete \ (escape) character for " (double quotes).
az stream-analytics output create \
    --job-name streamanalyticsjob \
    --datasource "{\"type\":\"Microsoft.Storage/Blob\",\"properties\":{\"container\":\"state\",\"dateFormat\":\"yyyy/MM/dd\",\"pathPattern\":\"{date}/{time}\",\"storageAccounts\":[{\"accountKey\":\"STORAGEACCESSKEY\",\"accountName\":\"STORAGEACCOUNTNAME\"}],\"timeFormat\":\"HH\"}}" \
    --serialization "{\"type\":\"Json\",\"properties\":{\"format\":\"Array\",\"encoding\":\"UTF8\"}}" \
    --output-name asabloboutput \
    --resource-group streamanalyticsrg
Define the transformation query
Add a transformation your job by using the az stream-analytics transformation create cmdlet.
az stream-analytics transformation create \
    --resource-group streamanalyticsrg \
    --job-name streamanalyticsjob \
    --name Transformation \
    --streaming-units "6" \
    --saql "SELECT * INTO asabloboutput FROM asaiotinput WHERE Temperature > 27"
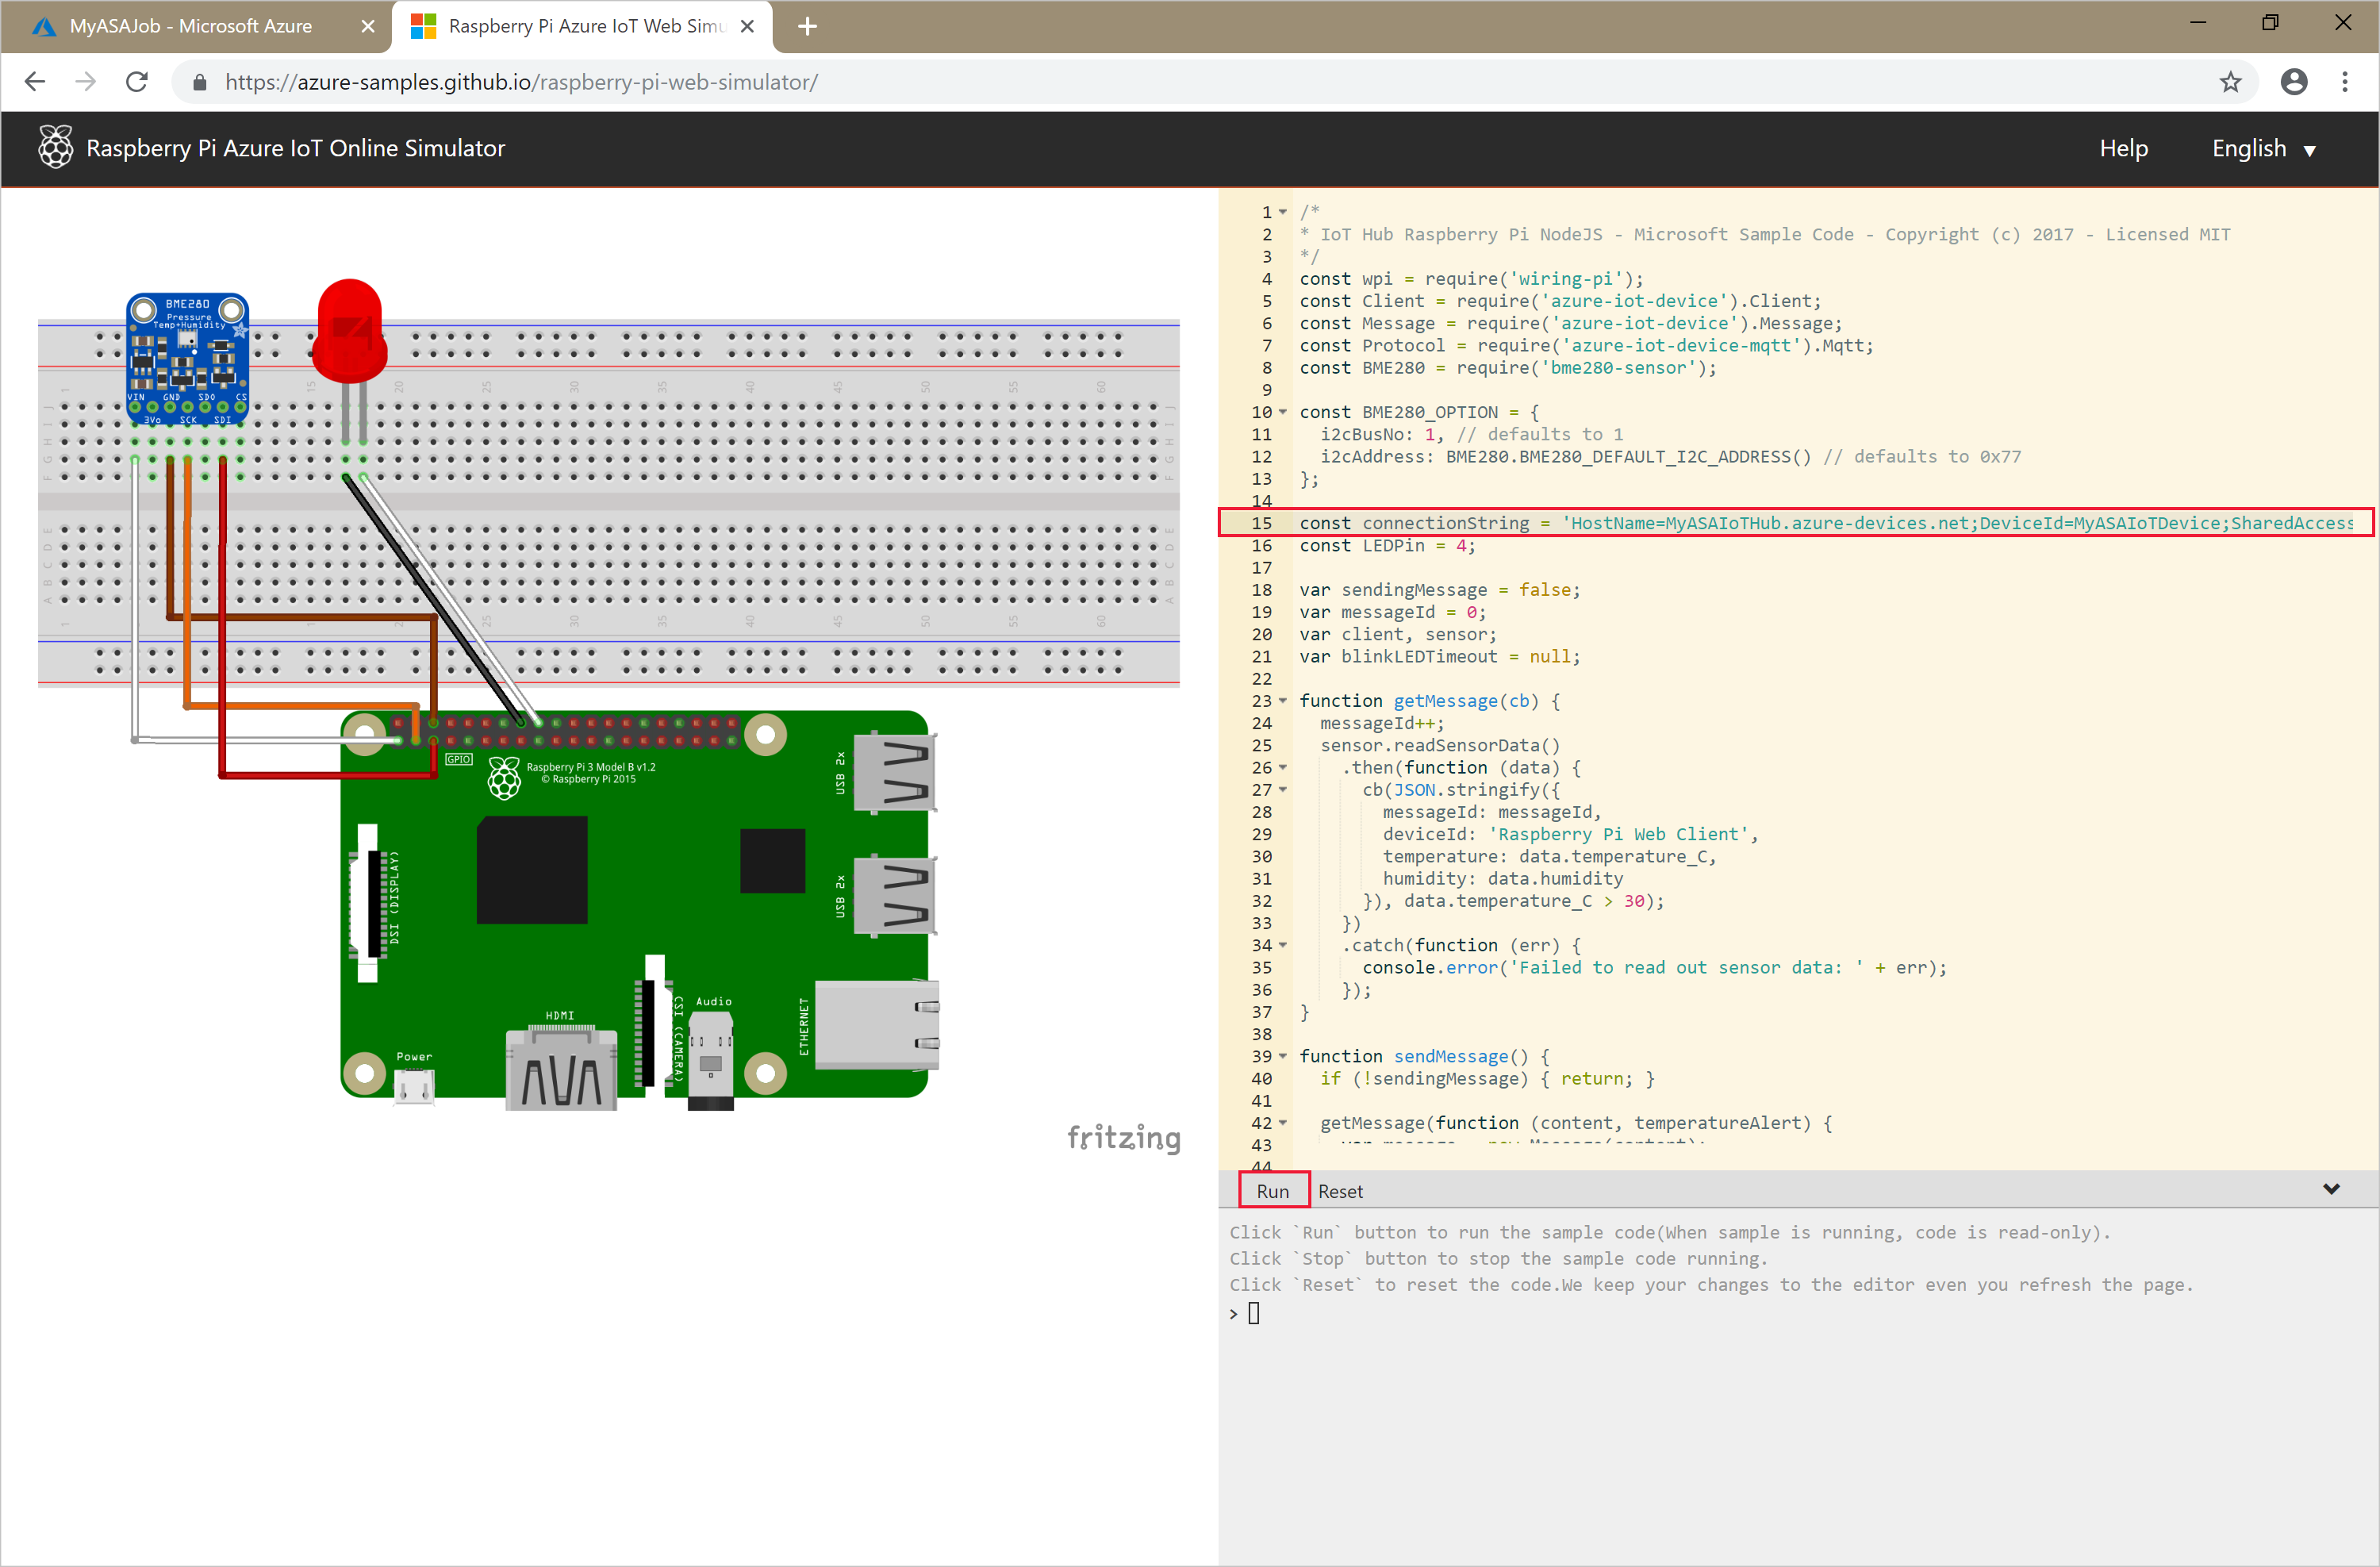
Run the IoT simulator
Open the Raspberry Pi Azure IoT Online Simulator.
Replace the placeholder in line 15 with the entire Azure IoT Hub Device connection string (not IoT Hub connection string) you saved at the beginning of the quickstart.
Select Run. The output should show the sensor data and messages that are being sent to your IoT Hub.
Start the Stream Analytics job and check the output
Start the job by using the az stream-analytics job start cmdlet. This cmdlet takes the job name, resource group name, output start mode, and start time as parameters. OutputStartMode accepts values of JobStartTime, CustomTime, or LastOutputEventTime.
After you run the following cmdlet, it returns True as output if the job starts.
az stream-analytics job start \
    --resource-group streamanalyticsrg \
    --name streamanalyticsjob \
    --output-start-mode JobStartTime
Give it a few minutes and then verify that an output file is created in the state blob container.
Download and open the file to see several entries similar to the following one:
{
    "messageId": 229,
    "deviceId": "Raspberry Pi Web Client",
    "temperature": 31.85214010589595,
    "humidity": 60.278830289656284,
    "EventProcessedUtcTime": "2023-02-28T22:06:33.5567789Z",
    "PartitionId": 3,
    "EventEnqueuedUtcTime": "2023-02-28T22:05:49.6520000Z",
    "IoTHub": {
        "MessageId": null,
        "CorrelationId": null,
        "ConnectionDeviceId": "MyASAIoTDevice",
        "ConnectionDeviceGenerationId": "638132150746523845",
        "EnqueuedTime": "2023-02-28T22:05:49.6520000Z",
        "StreamId": null
    }
}
Clean up resources
Delete the resource group, which will delete all the resources in the resource group including Stream Analytics job, IoT Hub, and Azure Storage account.
az group delete \
    --name streamanalyticsrg \
    --no-wait
Next steps
In this quickstart, you deployed a simple Stream Analytics job using Azure CLI. You can also deploy Stream Analytics jobs using the Azure portal and Visual Studio.
To learn about configuring other input sources and performing real-time detection, continue to the following article:
Feedback
Coming soon: Throughout 2024 we will be phasing out GitHub Issues as the feedback mechanism for content and replacing it with a new feedback system. For more information see: https://aka.ms/ContentUserFeedback.
Submit and view feedback for