Virtual networks and virtual machines in Azure
When you create a virtual machine (VM), you create a virtual network or use an existing one. Decide how your virtual machines are intended to be accessed on the virtual network. It's important to plan before creating resources and make sure you understand the limits of networking resources.
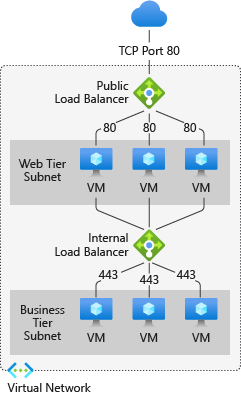
In the following figure, virtual machines are represented as web servers and application servers. Each set of virtual machines is assigned to separate subnets in the virtual network.
You can create a virtual network before you create a virtual machine or you can create the virtual network as you create a virtual machine.
You create these resources to support communication with a virtual machine:
Network interfaces
IP addresses
Virtual network and subnets
Additionally, consider these optional resources:
Network security groups
Load balancers
Network interfaces
A network interface (NIC) is the interconnection between a virtual machine and a virtual network. A virtual machine must have at least one NIC. A virtual machine can have more than one NIC, depending on the size of the VM you create. To learn about the number of NICs each virtual machine size supports, see VM sizes.
You can create a VM with multiple NICs, and add or remove NICs through the lifecycle of a VM. Multiple NICs allow a VM to connect to different subnets.
Each NIC attached to a VM must exist in the same location and subscription as the VM. Each NIC must be connected to a VNet that exists in the same Azure location and subscription as the NIC. You can change the subnet a VM is connected to after it's created. You can't change the virtual network. Each NIC attached to a VM is assigned a MAC address that doesn't change until the VM is deleted.
This table lists the methods that you can use to create a network interface.
| Method | Description |
|---|---|
| Azure portal | When you create a VM in the Azure portal, a network interface is automatically created for you. The portal creates a VM with only one NIC. If you want to create a VM with more than one NIC, you must create it with a different method. |
| Azure PowerShell | Use New-AzNetworkInterface with the -PublicIpAddressId parameter to provide the identifier of the public IP address that you previously created. |
| Azure CLI | To provide the identifier of the public IP address that you previously created, use az network nic create with the --public-ip-address parameter. |
| Template | For information on deploying a networking interface using a template, see Network Interface in a Virtual Network with Public IP Address. |
IP addresses
You can assign these types of IP addresses to a network interface in Azure:
Public IP addresses - Used to communicate inbound and outbound (without network address translation (NAT)) with the Internet and other Azure resources not connected to a virtual network. Assigning a public IP address to a NIC is optional. Public IP addresses have a nominal charge, and there's a maximum number that can be used per subscription.
Private IP addresses - Used for communication within a virtual network, your on-premises network, and the Internet (with NAT). At least one private IP address must be assigned to a VM. To learn more about NAT in Azure, read Understanding outbound connections in Azure.
You can assign public IP addresses to:
Virtual machines
Public load balancers
You can assign private IP address to:
Virtual machines
Internal load balancers
You assign IP addresses to a VM using a network interface.
There are two methods in which an IP address is given to a resource, dynamic or static. The default method that Azure gives IP addresses is dynamic. An IP address isn't given when it's created. Instead, the IP address is given when you create a VM or start a stopped VM. The IP address is released when you stop or delete the VM.
To ensure the IP address for the VM remains the same, you can set the allocation method explicitly to static. In this case, an IP address is assigned immediately. It's released only when you delete the VM or change its allocation method to dynamic.
This table lists the methods that you can use to create an IP address.
| Method | Description |
|---|---|
| Azure portal | By default, public IP addresses are dynamic. The IP address may change when the VM is stopped or deleted. To guarantee that the VM always uses the same public IP address, create a static public IP address. By default, the portal assigns a dynamic private IP address to a NIC when creating a VM. You can change this IP address to static after the VM is created. |
| Azure PowerShell | You use New-AzPublicIpAddress with the -AllocationMethod parameter as Dynamic or Static. |
| Azure CLI | You use az network public-ip create with the --allocation-method parameter as Dynamic or Static. |
| Template | For more information on deploying a public IP address using a template, see Network Interface in a Virtual Network with Public IP Address. |
After you create a public IP address, you can associate it with a VM by assigning it to a NIC.
Note
Azure provides a default outbound access IP for VMs that either aren't assigned a public IP address or are in the backend pool of an internal basic Azure load balancer. The default outbound access IP mechanism provides an outbound IP address that isn't configurable.
The default outbound access IP is disabled when one of the following events happens:
- A public IP address is assigned to the VM.
- The VM is placed in the backend pool of a standard load balancer, with or without outbound rules.
- An Azure NAT Gateway resource is assigned to the subnet of the VM.
VMs that you create by using virtual machine scale sets in flexible orchestration mode don't have default outbound access.
For more information about outbound connections in Azure, see Default outbound access in Azure and Use Source Network Address Translation (SNAT) for outbound connections.
Virtual network and subnets
A subnet is a range of IP addresses in the virtual network. You can divide a virtual network into multiple subnets for organization and security. Each NIC in a VM is connected to one subnet in one virtual network. NICs connected to subnets (same or different) within a virtual network can communicate with each other without any extra configuration.
When you set up a virtual network, you specify the topology, including the available address spaces and subnets. Select address ranges that don't overlap if the virtual network is connected to other virtual networks or on-premises networks. The IP addresses are private and can't be accessed from the Internet. Azure treats any address range as part of the private virtual network IP address space. The address range is only reachable within the virtual network, within interconnected virtual networks, and from your on-premises location.
If you work within an organization in which someone else is responsible for the internal networks, talk to that person before selecting your address space. Ensure there's no overlap in the address space. Communicate to them the space you want to use so they don't try to use the same range of IP addresses.
There aren't security boundaries by default between subnets. Virtual machines in each of these subnets can communicate. If your deployment requires security boundaries, use Network Security Groups (NSGs), which control the traffic flow to and from subnets and to and from VMs.
This table lists the methods that you can use to create a virtual network and subnets.
| Method | Description |
|---|---|
| Azure portal | If you let Azure create a virtual network when you create a VM, the name is a combination of the resource group name that contains the virtual network and -vnet. The address space is 10.0.0.0/24, the required subnet name is default, and the subnet address range is 10.0.0.0/24. |
| Azure PowerShell | You use New-AzVirtualNetworkSubnetConfig and New-AzVirtualNetwork to create a subnet and a virtual network. You can also use Add-AzVirtualNetworkSubnetConfig to add a subnet to an existing virtual network. |
| Azure CLI | The subnet and the virtual network are created at the same time. Provide a --subnet-name parameter to az network vnet create with the subnet name. |
| Template | For more information on using a template to create a virtual network and subnets, see Virtual Network with two subnets. |
Network security groups
A network security group (NSG) contains a list of Access Control List (ACL) rules that allow or deny network traffic to subnets, NICs, or both. NSGs can be associated with either subnets or individual NICs connected to a subnet. When an NSG is associated with a subnet, the ACL rules apply to all the VMs in that subnet. Traffic to an individual NIC can be restricted by associating an NSG directly to a NIC.
NSGs contain two sets of rules, inbound and outbound. The priority for a rule must be unique within each set.
Each rule has properties of:
Protocol
Source and destination port ranges
Address prefixes
Direction of traffic
Priority
Access type
All NSGs contain a set of default rules. You can't delete or override these default rules, as they have the lowest priority and any rules you create can't supersede them.
When you associate an NSG to a NIC, the network access rules in the NSG are applied only to that NIC. If an NSG is applied to a single NIC on a multi-NIC VM, it doesn't affect traffic to the other NICs. You can associate different NSGs to a NIC (or VM, depending on the deployment model) and the subnet that a NIC or VM is bound to. Priority is given based on the direction of traffic.
Be sure to plan your NSGs when you plan your virtual machines and virtual network.
This table lists the methods that you can use to create a network security group.
| Method | Description |
|---|---|
| Azure portal | When you create a VM in the Azure portal, an NSG is automatically created and associated to the NIC the portal creates. The name of the NSG is a combination of the name of the VM and -nsg. This NSG contains one inbound rule: With a priority of 1000. The service set to RDP. The protocol set to TCP. The port set to 3389. The action set to Allow. If you want to allow any other inbound traffic to the VM, create another rule or rules. |
| Azure PowerShell | Use New-AzNetworkSecurityRuleConfig and provide the required rule information. Use New-AzNetworkSecurityGroup to create the NSG. Use Set-AzVirtualNetworkSubnetConfig to configure the NSG for the subnet. Use Set-AzVirtualNetwork to add the NSG to the virtual network. |
| Azure CLI | Use az network nsg create to initially create the NSG. Use az network nsg rule create to add rules to the NSG. Use az network vnet subnet update to add the NSG to the subnet. |
| Template | Use Create a Network Security Group as a guide for deploying a network security group using a template. |
Load balancers
Azure Load Balancer delivers high availability and network performance to your applications. A load balancer can be configured to balance incoming Internet traffic to VMs or balance traffic between VMs in a VNet. A load balancer can also balance traffic between on-premises computers and VMs in a cross-premises network, or forward external traffic to a specific VM.
The load balancer maps incoming and outgoing traffic between:
The public IP address and port on the load balancer.
The private IP address and port of the VM.
When you create a load balancer, you must also consider these configuration elements:
Front-end IP configuration – A load balancer can include one or more front-end IP addresses. These IP addresses serve as ingress for the traffic.
Back-end address pool – IP addresses that are associated with the NIC to which load is distributed.
Port Forwarding - Defines how inbound traffic flows through the front-end IP and distributed to the back-end IP using inbound NAT rules.
Load balancer rules - Maps a given front-end IP and port combination to a set of back-end IP addresses and port combination. A single load balancer can have multiple load-balancing rules. Each rule is a combination of a front-end IP and port and back-end IP and port associated with VMs.
Probes - Monitors the health of VMs. When a probe fails to respond, the load balancer stops sending new connections to the unhealthy VM. The existing connections aren't affected, and new connections are sent to healthy VMs.
Outbound rules - An outbound rule configures outbound Network Address Translation (NAT) for all virtual machines or instances identified by the backend pool of your Standard Load Balancer to be translated to the frontend.
This table lists the methods that you can use to create an internet-facing load balancer.
| Method | Description |
|---|---|
| Azure portal | You can load balance internet traffic to VMs using the Azure portal. |
| Azure PowerShell | To provide the identifier of the public IP address that you previously created, use New-AzLoadBalancerFrontendIpConfig with the -PublicIpAddress parameter. Use New-AzLoadBalancerBackendAddressPoolConfig to create the configuration of the back-end address pool. Use New-AzLoadBalancerInboundNatRuleConfig to create inbound NAT rules associated with the front-end IP configuration that you created. Use New-AzLoadBalancerProbeConfig to create the probes that you need. Use New-AzLoadBalancerRuleConfig to create the load balancer configuration. Use New-AzLoadBalancer to create the load balancer. |
| Azure CLI | Use az network lb create to create the initial load balancer configuration. Use az network lb frontend-ip create to add the public IP address that you previously created. Use az network lb address-pool create to add the configuration of the back-end address pool. Use az network lb inbound-nat-rule create to add NAT rules. Use az network lb rule create to add the load balancer rules. Use az network lb probe create to add the probes. |
| Template | Use 3 VMs in a Load Balancer as a guide for deploying a load balancer using a template. |
This table lists the methods that you can use to create an internal load balancer.
| Method | Description |
|---|---|
| Azure portal | You can balance internal traffic load with a load balancer in the Azure portal. |
| Azure PowerShell | To provide a private IP address in the network subnet, use New-AzLoadBalancerFrontendIpConfig with the -PrivateIpAddress parameter. Use New-AzLoadBalancerBackendAddressPoolConfig to create the configuration of the back-end address pool. Use New-AzLoadBalancerInboundNatRuleConfig to create inbound NAT rules associated with the front-end IP configuration that you created. Use New-AzLoadBalancerProbeConfig to create the probes that you need. Use New-AzLoadBalancerRuleConfig to create the load balancer configuration. Use New-AzLoadBalancer to create the load balancer. |
| Azure CLI | Use the az network lb create command to create the initial load balancer configuration. To define the private IP address, use az network lb frontend-ip create with the --private-ip-address parameter. Use az network lb address-pool create to add the configuration of the back-end address pool. Use az network lb inbound-nat-rule create to add NAT rules. Use az network lb rule create to add the load balancer rules. Use az network lb probe create to add the probes. |
| Template | Use 2 VMs in a Load Balancer as a guide for deploying a load balancer using a template. |
Virtual machines
Virtual machines can be created in the same virtual network and they can connect to each other using private IP addresses. Virtual machines can connect if they're in different subnets. They connect without the need to configure a gateway or use public IP addresses. To put VMs into a virtual network, you create the virtual network. As you create each VM, you assign it to the virtual network and subnet. Virtual machines acquire their network settings during deployment or startup.
Virtual machines are assigned an IP address when they're deployed. When you deploy multiple VMs into a virtual network or subnet, they're assigned IP addresses as they boot up. You can also assign a static IP to a VM. If you assign a static IP, you should consider using a specific subnet to avoid accidentally reusing a static IP for another VM.
If you create a VM and later want to migrate it into a virtual network, it isn't a simple configuration change. Redeploy the VM into the virtual network. The easiest way to redeploy is to delete the VM, but not any disks attached to it, and then re-create the VM using the original disks in the virtual network.
This table lists the methods that you can use to create a VM in a VNet.
| Method | Description |
|---|---|
| Azure portal | Uses the default network settings that were previously mentioned to create a VM with a single NIC. To create a VM with multiple NICs, you must use a different method. |
| Azure PowerShell | Includes the use of Add-AzVMNetworkInterface to add the NIC that you previously created to the VM configuration. |
| Azure CLI | Create and connect a VM to a virtual network, subnet, and NIC that builds as individual steps. |
| Template | Use Very simple deployment of a Windows VM as a guide for deploying a VM using a template. |
NAT Gateway
Azure NAT Gateway simplifies outbound-only Internet connectivity for virtual networks. When configured on a subnet, all outbound connectivity uses your specified static public IP addresses. Outbound connectivity is possible without load balancer or public IP addresses directly attached to virtual machines. NAT is fully managed and highly resilient.
Outbound connectivity can be defined for each subnet with NAT. Multiple subnets within the same virtual network can have different NATs. A subnet is configured by specifying which NAT gateway resource to use. All UDP and TCP outbound flows from any virtual machine instance use a NAT gateway. NAT is compatible with standard SKU public IP address resources or public IP prefix resources or a combination of both. You can use a public IP prefix directly or distribute the public IP addresses of the prefix across multiple NAT gateway resources. NAT grooms all traffic to the range of IP addresses of the prefix. Any IP filtering of your deployments is easier.
NAT Gateway automatically processes all outbound traffic without any customer configuration. User-defined routes aren't necessary. NAT takes precedence over other outbound scenarios and replaces the default Internet destination of a subnet.
Virtual machine scale sets that create virtual machines with Flexible Orchestration mode don't have default outbound access. Azure NAT Gateway is the recommended outbound access method for Virtual machine scale sets Flexible Orchestration Mode.
For more information about Azure NAT Gateway, see What is Azure NAT Gateway?.
This table lists the methods that you can use to create a NAT gateway resource.
| Method | Description |
|---|---|
| Azure portal | Creates a virtual network, subnet, public IP, NAT gateway, and a virtual machine to test the NAT gateway resource. |
| Azure PowerShell | Includes the use of New-AzNatGateway to create a NAT gateway resource. Creates a virtual network, subnet, public IP, NAT gateway, and a virtual machine to test the NAT gateway resource. |
| Azure CLI | Includes the use of az network nat gateway create to create a NAT gateway resource. Creates a virtual network, subnet, public IP, NAT gateway, and a virtual machine to test the NAT gateway resource. |
| Template | Creates a virtual network, subnet, public IP, and NAT gateway resource. |
Azure Bastion
Azure Bastion is deployed to provide secure management connectivity to virtual machines in a virtual network. Azure Bastion Service enables you to securely and seamlessly RDP & SSH to the VMs in your virtual network. Azure bastion enables connections without exposing a public IP on the VM. Connections are made directly from the Azure portal, without the need of an extra client/agent or piece of software. Azure Bastion supports standard SKU public IP addresses.
Hourly pricing starts from the moment that Bastion is deployed, regardless of outbound data usage. For more information, see Pricing and SKUs. If you're deploying Bastion as part of a tutorial or test, we recommend that you delete this resource after you finish using it.
For more information about Azure Bastion, see What is Azure Bastion?.
This table lists the methods you can use to create an Azure Bastion deployment.
| Method | Description |
|---|---|
| Azure portal | Creates a virtual network, subnets, public IP, bastion host, and virtual machines. |
| Azure PowerShell | Creates a virtual network, subnets, public IP, and bastion host. Includes the use of New-AzBastion to create the bastion host. |
| Azure CLI | Creates a virtual network, subnets, public IP, and bastion host. Includes the use of az network bastion create to create the bastion host. |
| Template | For an example of a template deployment that integrates an Azure Bastion host with a sample deployment, see Quickstart: Create a public load balancer to load balance VMs by using an ARM template. |
Next steps
For VM-specific steps on how to manage Azure virtual networks for VMs, see the Windows or Linux tutorials.
There are also quickstarts on how to load balance VMs and create highly available applications using the CLI or PowerShell
Learn how to configure VNet to VNet connections.
Learn how to Troubleshoot routes.
Learn more about Virtual machine network bandwidth.
Feedback
Coming soon: Throughout 2024 we will be phasing out GitHub Issues as the feedback mechanism for content and replacing it with a new feedback system. For more information see: https://aka.ms/ContentUserFeedback.
Submit and view feedback for