Configuring your Azure project in Visual Studio to use multiple service configurations
Note
This article applies to Azure Cloud Services (classic), which is now deprecated for new customers and will be retired on August 31, 2024. Existing services built with this technology are still supported through Azure Cloud Services (extended support). For new development, we recommend that you use a newer service type designed for your specific purpose, such as Azure App Service, Azure Functions, or Azure Container Apps. For the latest list of available services, see Directory of Azure products.
An Azure cloud service project in Visual Studio includes three configuration files: ServiceDefinition.csdef, ServiceConfiguration.Local.cscfg, and ServiceConfiguration.Cloud.cscfg:
ServiceDefinition.csdefis deployed to Azure to describe the requirements of the cloud service and its roles, and to provide settings that apply to all instances. Settings can be read at run time using the Azure Service Hosting Runtime API. This file can be updated on Azure only when the cloud service is stopped.ServiceConfiguration.Local.cscfgandServiceConfiguration.Cloud.cscfgprovide values for settings in the definition file and specify the number of instances to run for each role. The "Local" file contains values used in local debugging; the "Cloud" file is deployed to Azure asServiceConfiguration.cscfgand provides settings for the server environment. This file can be updated while your cloud service is running in Azure.
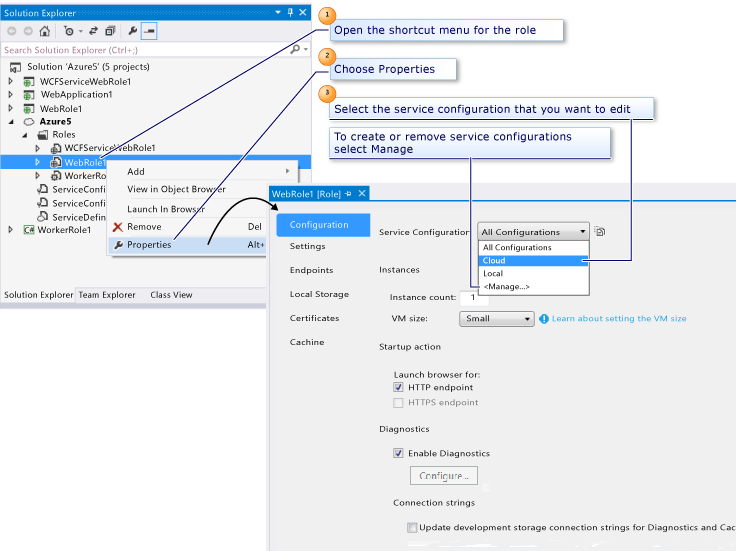
Configuration settings are managed and modified in Visual Studio using property pages for the applicable role (right-click the role and select Properties, or double-click the role). Changes can be scoped to whichever configuration is chosen in the Service Configuration dropdown list. The properties for web and worker roles are similar, except where described in the following sections.
For information about the underlying schemas for the service definition and service configuration files, see the .csdef XML Schema and .cscfg XML Schema articles. For more information about service configuration, see How to Configure Cloud Services.
Configuration page
Service Configuration
Selects which ServiceConfiguration.*.cscfg file is affected by changes. By default, there are Local and Cloud variants, and you can use the Manage... command to copy, rename, and remove configuration files. These files are added to your cloud service project and appear in Solution Explorer. However, renaming or removing configurations can be done only from this control.
Instances
Set the Instance count property to the number of instances the service should run for this role.
Set the VM size property to Extra Small, Small, Medium, Large, or Extra Large. For more information, see Sizes for Cloud Services.
Startup Action (Web role only)
Set this property to specify that Visual Studio should launch a web browser for either the HTTP endpoints or the HTTPS endpoints, or both when you start debugging.
The HTTPS endpoint option is available only if you have already defined an HTTPS endpoint for your role. You can define an HTTPS endpoint on the Endpoints property page.
If you have already added an HTTPS endpoint, the HTTPS endpoint option is enabled by default, and Visual Studio launches a browser for this endpoint when you start debugging, in addition to a browser for your HTTP endpoint, assuming both startup options are enabled.
Diagnostics
By default, diagnostics are enabled for the Web role. The Azure cloud service project and storage account are set to use the local storage emulator. When you are ready to deploy to Azure, you can select the builder button (...) to use Azure Storage instead. You can transfer the diagnostics data to the storage account on demand or at automatically scheduled intervals. For more information about Azure Diagnostics, see Enabling Diagnostics in Azure Cloud Services and Virtual Machines.
Settings page
On the Settings page, you can add settings to a configuration as name-value pairs. Code running in the role can read the values of your configuration settings at run time using classes provided by the Azure Managed Library, specifically, the GetConfigurationSettingValue method.
Configuring a connection string for a storage account
A connection string is a setting that provides connection and authentication information for the storage emulator or for an Azure Storage account. Whenever code in a role accesses Azure Storage (blobs, queues, or tables), it needs a connection string.
Note
A connection string for Azure Storage account must use a defined format (see Configure Azure Storage Connection Strings).
You can set the connection string to use local storage as needed, then set to an Azure Storage account when you deploy the application the cloud service. Failure to set the connection string properly might cause your role not to start, or to cycle through the initializing, busy, and stopping states.
To create a connection string, select Add Setting and set Type to "Connection String".
For new or existing connection strings, select ...* on the right of the Value field to open the Create Storage Connection String dialog:
- Under Connect using, choose the Your subscription option to select a storage account from a subscription. Visual Studio then obtains the storage account credentials automatically from the
.publishsettingsfile. - Selecting Manually entered credentials lets you specify the account name and key directly using information from the Azure portal. To copy the account key:
- Navigate to the storage account on the Azure portal and select Manage Keys.
- To copy the account key, navigate to the storage account on the Azure portal, select Settings > Access keys, then use the copy button to copy the primary access key to the clipboard.
- Select one of the connection options. Specify custom endpoints asks you to specify specific URLs for blobs, tables, and queues. Custom endpoints allow you to use custom domains and to control access more exactly. See Configure Azure Storage Connection Strings.
- Select OK, then File > Save to update the configuration with the new connection string.
Again, when you publish your application to Azure, choose the service configuration that contains the Azure Storage account for the connection string. After your application is published, verify that the application works as expected against the Azure Storage services.
For more information about how to update service configurations, see the section Manage connection strings for storage accounts.
Endpoints page
A web role typically has a single HTTP endpoint on port 80. A worker role, on the other hand, can have any number of HTTP, HTTPS, or TCP endpoints. Endpoints can be input endpoints, which are available to external clients, or internal endpoints, which are available to other roles that are running in the service.
- To make an HTTP endpoint available to external clients and Web browsers, change the endpoint type to input, and specify a name and a public port number.
- To make an HTTPS endpoint available to external clients and Web browsers, change the endpoint type to input, and specify a name, a public port number, and a management certificate name. You must also define the certificate on the Certificates property page before you can specify a management certificate.
- To make an endpoint available for internal access by other roles in the cloud service, change the endpoint type to internal, and specify a name and possible private ports for this endpoint.
Local storage page
You can use the Local Storage property page to reserve one or more local storage resources for a role. A local storage resource is a reserved directory in the file system of the Azure virtual machine in which an instance of a role is running.
Certificates page
The Certificates property page adds information about your certificates to your service configuration. Note that your certificates are not packaged with your service; you must upload your certificates separately to Azure through the Azure portal.
Adding a certificate here adds information about your certificates to your service configuration. Certificates are not packaged with the service; you must upload your certificates separately through the Azure portal.
To associate a certificate with your role, provide a name for the certificate. You use this name to refer to the certificate when you configure an HTTPS endpoint on the Endpoints page. Next, specify whether the certificate store is Local Machine or Current User and the name of the store. Finally, enter the certificate's thumbprint. If the certificate is in the Current User\Personal (My) store, you can enter the certificate's thumbprint by selecting the certificate from a populated list. If it resides in any other location, enter the thumbprint value by hand.
When you add a certificate from the certificate store, any intermediate certificates are automatically added to the configuration settings for you. In addition, these intermediate certificates must be uploaded to Azure to correctly configure your service for SSL.
Any management certificates that you associate with your service apply to your service only when it is running in the cloud. When your service is running in the local development environment, it uses a standard certificate that is managed by the compute emulator.
Feedback
Coming soon: Throughout 2024 we will be phasing out GitHub Issues as the feedback mechanism for content and replacing it with a new feedback system. For more information see: https://aka.ms/ContentUserFeedback.
Submit and view feedback for