Enable browser connection to DevTest Labs VMs with Azure Bastion
Azure DevTest Labs integrates with Azure Bastion to allow connecting to lab virtual machines (VMs) through a browser. As a lab owner, you can enable browser access to all your lab VMs through Azure Bastion.
Azure Bastion provides secure and seamless remote desktop protocol (RDP) and secure shell (SSH) connectivity over transport layer security (TLS), directly from the Azure portal. You don't need any other client, agent, or software to connect to your lab VMs through your browser. Your VMs don't need public IP addresses.
This article covers two different ways to enable Azure Bastion browser connectivity to DevTest Labs VMs:
- You can create a new Azure Bastion-enabled virtual network for your lab and its VMs.
- You can deploy Azure Bastion in your existing lab virtual network.
Prerequisites
- Have or create a lab in DevTest Labs.
- To use Azure Bastion browser access, lab users must have Reader role on the Azure Bastion host and on the lab virtual network that has Azure Bastion configured.
Option 1: Connect a lab to an Azure Bastion-enabled virtual network
First, create a new virtual network with an Azure Bastion subnet and another subnet in it. An Azure Bastion subnet doesn't allow creating non-Azure Bastion resources in it, so you need the other subnet for creating lab VMs.
In the Azure portal, search for and select virtual networks.
Select + Create at the top of the Virtual networks page.
On the Create virtual network screen, enter a Name for the new virtual network, and select the same Subscription, Resource group, and Region as your lab.
Select Next: IP Addresses.
On the IP Addresses tab, there's already one subnet, default. Select Add subnet.
On the Add subnet pane, enter AzureBastionSubnet under Name.
Under Subnet address range, enter an address range that's within the virtual network's address space but doesn't overlap with the default subnet. If necessary, you can add new address spaces in the blank fields on the Create virtual network page.
Select Add.

Select Review + create, and when validation passes, select Create.
Once the new virtual network is created, go to its page, select Subnets in the left navigation, and confirm that there are two subnets, default and AzureBastionSubnet.

Next, connect your lab to the new virtual network:
From your lab Overview page, select Configuration and policies in the left navigation.
On the Configuration and policies page, in the left navigation under External resources, select Virtual networks.
On the Configuration and policies | Virtual networks page, select Add.
On the Virtual network page, select Select virtual network.
On the Choose virtual network page, select the Azure Bastion-enabled virtual network you just created.
On the Virtual network page, select Save.
On the Configuration and policies | Virtual networks page, remove any previous virtual network from the lab. Select ... next to that virtual network, select Delete, and then select Yes.

Enable VM creation in the non-Azure Bastion subnet:
On the Configuration and policies | Virtual networks page, select the Azure Bastion-enabled virtual network.
On the Virtual network page, make sure that both the AzureBastionSubnet subnet and the default subnet appear. If you don't see both subnets, close and reopen the page.
Select the default subnet.
On the Lab Subnet pane, under Use in virtual machine creation, select Yes, and then select Save. You can now create VMs in the default subnet of your lab virtual network.

Option 2: Deploy Azure Bastion in a lab's existing virtual network
First, create a new Azure Bastion subnet in your lab's existing virtual network:
In the Azure portal, search for and select Virtual networks.
On the Virtual networks page, select your lab's existing virtual network from the list.
On the virtual network page, select Subnets.
On the Subnets page, select + Subnet on the top menu.
On the Add Subnet screen, enter AzureBastionSubnet under Name.
Under Subnet address range, enter an address range that's within the virtual network's address space, but doesn't overlap with the existing lab subnet.
Tip
You might have to cancel out of this dialog, select Address space in the virtual network's left navigation, and create a new address space for the subnet.
Select Save.

Next, deploy the Azure Bastion host in the new Azure Bastion subnet:
In the Azure portal, search for and select Bastions.
On the Bastions page, select + Create at the top.
On the Create a Bastion page, enter a Name, and select the same Subscription, Resource group, and Region as your lab.
Under Virtual networks, select your lab's virtual network from the dropdown list, and make sure AzureBastionSubnet is selected under Subnet.
Select Review + create, and when validation passes, select Create.

Connect to lab VMs through Azure Bastion
Once you deploy Azure Bastion in your lab virtual network, enable browser connections for the lab:
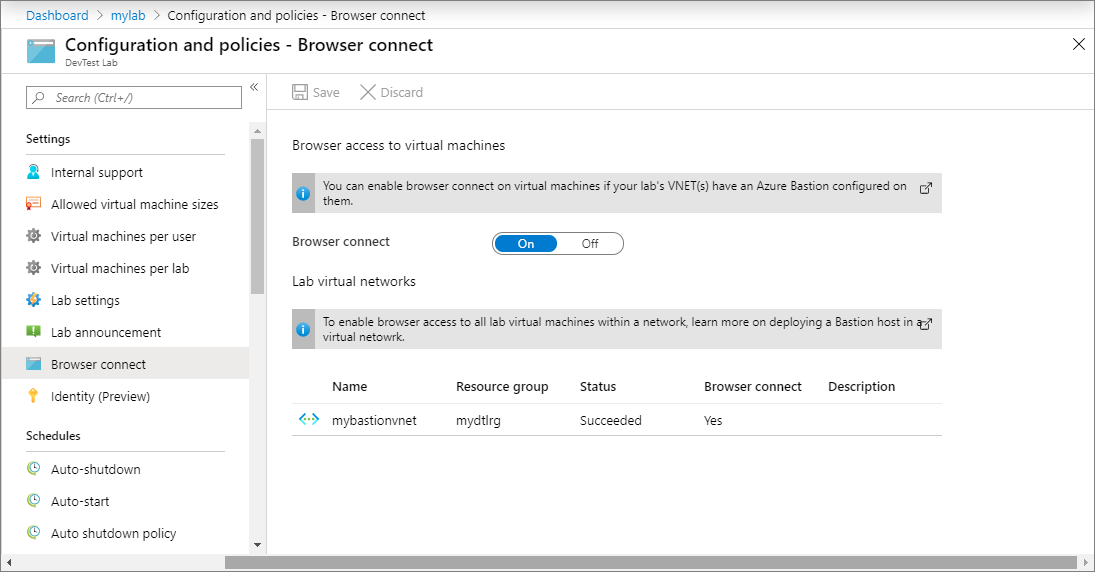
On the lab Overview page, select Configuration and policies, and then under Settings, select Browser connect.
On the Browser connect page, select On.
Select Save at the top of the page.
To connect to a lab VM through Azure Bastion:
- On the lab Overview page, from My virtual machines, select a lab VM.
- At the top of the VM's page, select Browser connect.
- In the Browser connect pane, enter your VM's username and password, and select Connect.
Next steps
Povratne informacije
Uskoro: tokom 2024. postepeno ćemo ukidati probleme s uslugom GitHub kao mehanizam povratnih informacija za sadržaj i zamijeniti ga novim sistemom povratnih informacija. Za više informacija, pogledajte https://aka.ms/ContentUserFeedback.
Pošalјite i prikažite povratne informacije za