Tutorial: Migrate SQL Server to an Azure SQL Managed Instance offline using DMS (classic)
Important
Azure Database Migration Service (classic) - SQL scenarios are on a deprecation path. Since August 1, 2023, you're no longer able to create new Database Migration Service (classic) resources for SQL Server scenarios from Azure portal. The service will be retired on March 15, 2026 for all customers. For seamless migrations from multiple database sources to Azure SQL Targets, Microsoft recommend using the latest version of Azure Database Migration Service, which is available as Azure SQL Migration an extension in Azure Data Studio, or via Azure Portal, or through Azure PowerShell and Azure CLI. For more information, see Retirement notice: Database Migration Service (classic).
Note
This tutorial uses an older version of the Azure Database Migration Service. For improved functionality and supportability, consider migrating to Azure SQL Managed Instance by using the Azure SQL migration extension for Azure Data Studio.
To compare features between versions, review compare versions.
You can use Azure Database Migration Service to migrate the databases from a SQL Server instance to an Azure SQL Managed Instance. For additional methods that may require some manual effort, see the article SQL Server to Azure SQL Managed Instance.
In this tutorial, you migrate the AdventureWorks2016 database from an on-premises instance of SQL Server to a SQL Managed Instance by using Azure Database Migration Service.
You will learn how to:
- Register the Azure DataMigration resource provider.
- Create an instance of Azure Database Migration Service.
- Create a migration project by using Azure Database Migration Service.
- Run the migration.
- Monitor the migration.
Important
For offline migrations from SQL Server to SQL Managed Instance, Azure Database Migration Service can create the backup files for you. Alternately, you can provide the latest full database backup in the SMB network share that the service will use to migrate your databases. Each backup can be written to either a separate backup file or multiple backup files. However, appending multiple backups into a single backup media is not supported. Note that you can use compressed backups as well, to reduce the likelihood of experiencing potential issues with migrating large backups.
Tip
In Azure Database Migration Service, you can migrate your databases offline or while they are online. In an offline migration, application downtime starts when the migration starts. To limit downtime to the time it takes you to cut over to the new environment after the migration, use an online migration. We recommend that you test an offline migration to determine whether the downtime is acceptable. If the expected downtime isn't acceptable, do an online migration.
This article describes an offline migration from SQL Server to a SQL Managed Instance. For an online migration, see Migrate SQL Server to an SQL Managed Instance online using DMS.
Prerequisites
To complete this tutorial, you need to:
Download and install SQL Server 2016 or later.
Enable the TCP/IP protocol, which is disabled by default during SQL Server Express installation, by following the instructions in the article Enable or Disable a Server Network Protocol.
Restore the AdventureWorks2016 database to the SQL Server instance.
Create a Microsoft Azure Virtual Network for Azure Database Migration Service by using the Azure Resource Manager deployment model, which provides site-to-site connectivity to your on-premises source servers by using either ExpressRoute or VPN. Learn network topologies for SQL Managed Instance migrations using Azure Database Migration Service. For more information about creating a virtual network, see the Virtual Network Documentation, and especially the quickstart articles with step-by-step details.
Note
During virtual network setup, if you use ExpressRoute with network peering to Microsoft, add the following service endpoints to the subnet in which the service will be provisioned:
- Target database endpoint (for example, SQL endpoint, Azure Cosmos DB endpoint, and so on)
- Storage endpoint
- Service bus endpoint
This configuration is necessary because Azure Database Migration Service lacks internet connectivity.
Ensure that your virtual network Network Security Group rules don't block the outbound port 443 of ServiceTag for ServiceBus, Storage, and AzureMonitor. For more detail on virtual network NSG traffic filtering, see the article Filter network traffic with network security groups.
Configure your Windows Firewall for source database engine access.
Open your Windows Firewall to allow Azure Database Migration Service to access the source SQL Server, which by default is TCP port 1433. If your default instance is listening on some other port, add that to the firewall.
If you're running multiple named SQL Server instances using dynamic ports, you may wish to enable the SQL Browser Service and allow access to UDP port 1434 through your firewalls so that Azure Database Migration Service can connect to a named instance on your source server.
If you're using a firewall appliance in front of your source databases, you may need to add firewall rules to allow Azure Database Migration Service to access the source database(s) for migration, as well as files via SMB port 445.
Create a SQL Managed Instance by following the detail in the article Create a SQL Managed Instance in the Azure portal.
Ensure that the logins used to connect the source SQL Server and target SQL Managed Instance are members of the sysadmin server role.
Note
By default, Azure Database Migration Service only supports migrating SQL logins. However, you can enable the ability to migrate Windows logins by:
- Ensuring that the target SQL Managed Instance has AAD read access, which can be configured via the Azure portal by a user with the Global Administrator role.
- Configuring your Azure Database Migration Service instance to enable Windows user/group login migrations, which is set up via the Azure portal, on the Configuration page. After enabling this setting, restart the service for the changes to take effect.
After restarting the service, Windows user/group logins appear in the list of logins available for migration. For any Windows user/group logins you migrate, you are prompted to provide the associated domain name. Service user accounts (account with domain name NT AUTHORITY) and virtual user accounts (account name with domain name NT SERVICE) are not supported.
Create a network share that Azure Database Migration Service can use to back up the source database.
Ensure that the service account running the source SQL Server instance has write privileges on the network share that you created and that the computer account for the source server has read/write access to the same share.
Make a note of a Windows user (and password) that has full control privilege on the network share that you previously created. Azure Database Migration Service impersonates the user credential to upload the backup files to Azure Storage container for restore operation.
Create a blob container and retrieve its SAS URI by using the steps in the article Manage Azure Blob Storage resources with Storage Explorer, be sure to select all permissions (Read, Write, Delete, List) on the policy window while creating the SAS URI. This detail provides Azure Database Migration Service with access to your storage account container for uploading the backup files used for migrating databases to SQL Managed Instance.
Note
- Azure Database Migration Service does not support using an account level SAS token when configuring the Storage Account settings during the Configure Migration Settings step.
Ensure both the Azure Database Migration Service IP address and the Azure SQL Managed Instance subnet can communicate with the blob container.
Register the resource provider
Register the Microsoft.DataMigration resource provider before you create your first instance of the Database Migration Service.
Sign in to the Azure portal. Search for and select Subscriptions.

Select the subscription in which you want to create the instance of Azure Database Migration Service, and then select Resource providers.

Search for migration, and then select Register for Microsoft.DataMigration.

Create an Azure Database Migration Service instance
In the Azure portal menu or on the Home page, select Create a resource. Search for and select Azure Database Migration Service.

On the Azure Database Migration Service screen, select Create.
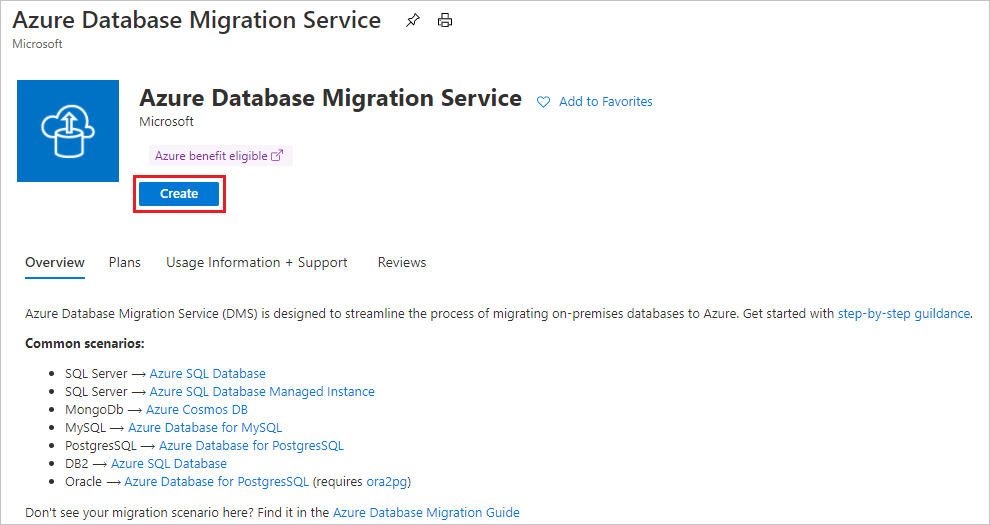
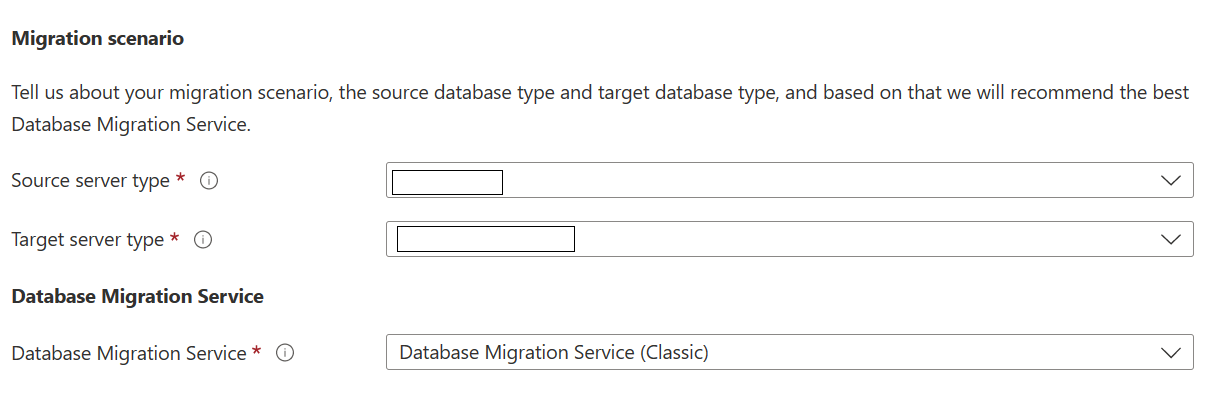
Select the appropriate Source server type and Target server type, and choose the Database Migration Service (Classic) option.
On the Create Migration Service basics screen:
- Select the subscription.
- Create a new resource group or choose an existing one.
- Specify a name for the instance of the Azure Database Migration Service.
- Select the location in which you want to create the instance of Azure Database Migration Service.
- Choose Azure as the service mode.
- Select a pricing tier. For more information on costs and pricing tiers, see the pricing page.
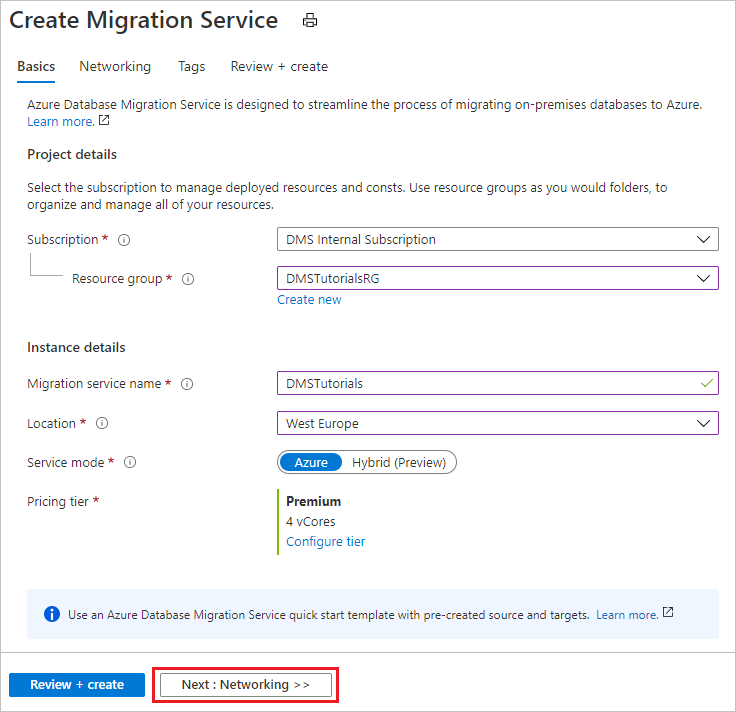
- Select Next: Networking.
On the Create Migration Service networking screen:
- Select an existing virtual network or create a new one. The virtual network provides Azure Database Migration Service with access to the source server and the target instance. For more information about how to create a virtual network in the Azure portal, see the article Create a virtual network using the Azure portal.

Select Review + Create to review the details and then select Create to create the service.
After a few moments, your instance of the Azure Database Migration service is created and ready to use:

Note
For additional detail, see the article Network topologies for Azure SQL Managed Instance migrations using Azure Database Migration Service.
Create a migration project
After an instance of the service is created, locate it within the Azure portal, open it, and then create a new migration project.
In the Azure portal menu, select All services. Search for and select Azure Database Migration Services.
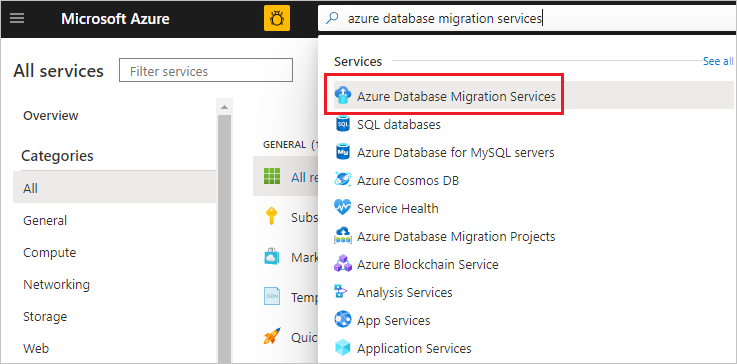
On the Azure Database Migration Services screen, select the Azure Database Migration Service instance that you created.
Select New Migration Project.

On the New migration project screen, specify a name for the project, in the Source server type text box, select SQL Server, in the Target server type text box, select Azure SQL Database Managed Instance, and then for Choose type of activity, select Offline data migration.
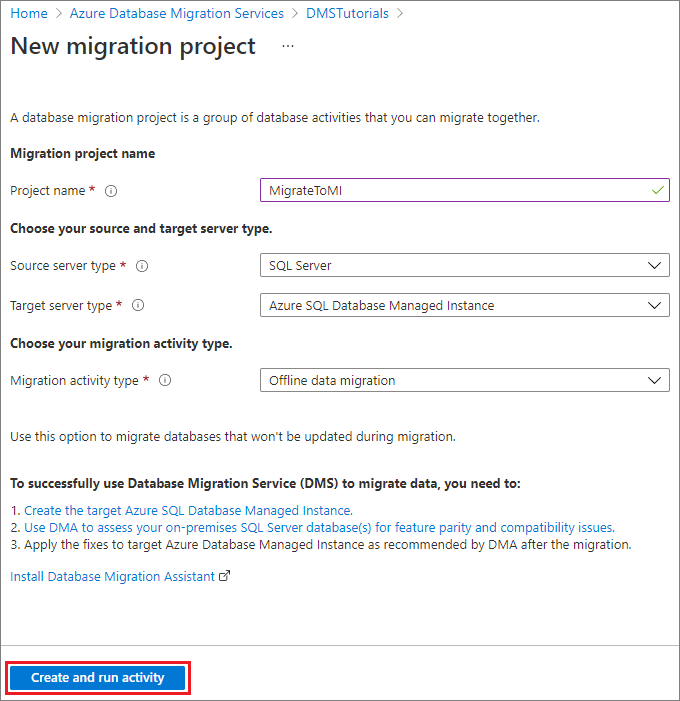
Select Create and run activity to create the project and run the migration activity.
Specify source details
On the Select source screen, specify the connection details for the source SQL Server instance.
Make sure to use a Fully Qualified Domain Name (FQDN) for the source SQL Server instance name. You can also use the IP Address for situations in which DNS name resolution isn't possible.
If you haven't installed a trusted certificate on your server, select the Trust server certificate check box.
When a trusted certificate isn't installed, SQL Server generates a self-signed certificate when the instance is started. This certificate is used to encrypt the credentials for client connections.
Caution
TLS connections that are encrypted using a self-signed certificate does not provide strong security. They are susceptible to man-in-the-middle attacks. You should not rely on TLS using self-signed certificates in a production environment or on servers that are connected to the internet.

Select Next: Select target
Specify target details
On the Select target screen, specify the connection details for the target, which is the pre-provisioned SQL Managed Instance to which you're migrating the AdventureWorks2016 database.
If you haven't already provisioned the SQL Managed Instance, select the link to help you provision the instance. You can still continue with project creation and then, when the SQL Managed Instance is ready, return to this specific project to execute the migration.
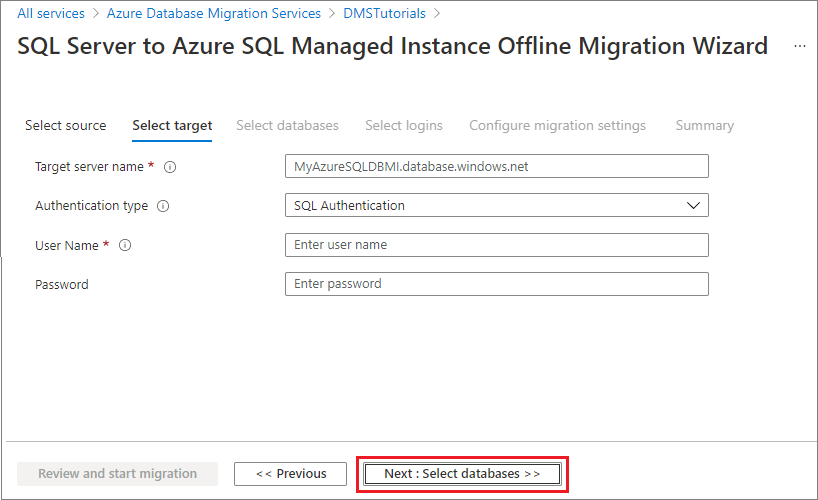
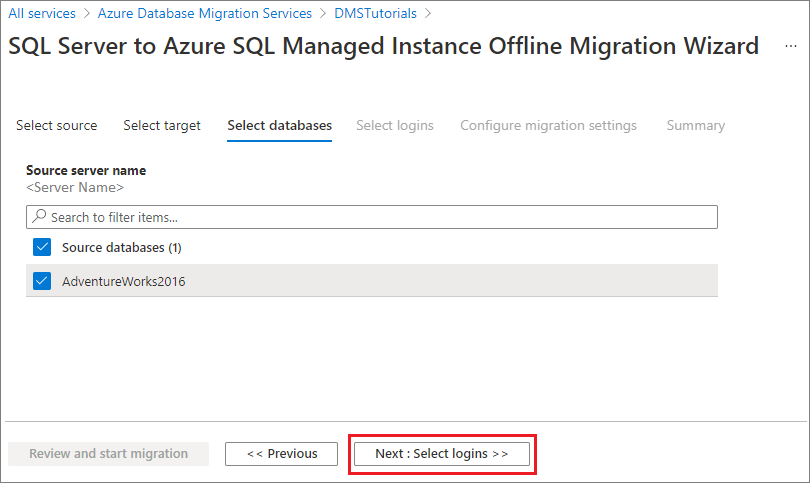
Select Next: Select databases. On the Select databases screen, select the AdventureWorks2016 database for migration.
Important
If you use SQL Server Integration Services (SSIS), DMS does not currently support migrating the catalog database for your SSIS projects/packages (SSISDB) from SQL Server to SQL Managed Instance. However, you can provision SSIS in Azure Data Factory (ADF) and redeploy your SSIS projects/packages to the destination SSISDB hosted by SQL Managed Instance. For more information about migrating SSIS packages, see the article Migrate SQL Server Integration Services packages to Azure.
Select Next: Select logins
Select logins
On the Select logins screen, select the logins that you want to migrate.
Note
By default, Azure Database Migration Service only supports migrating SQL logins. To enable support for migrating Windows logins, see the Prerequisites section of this tutorial.
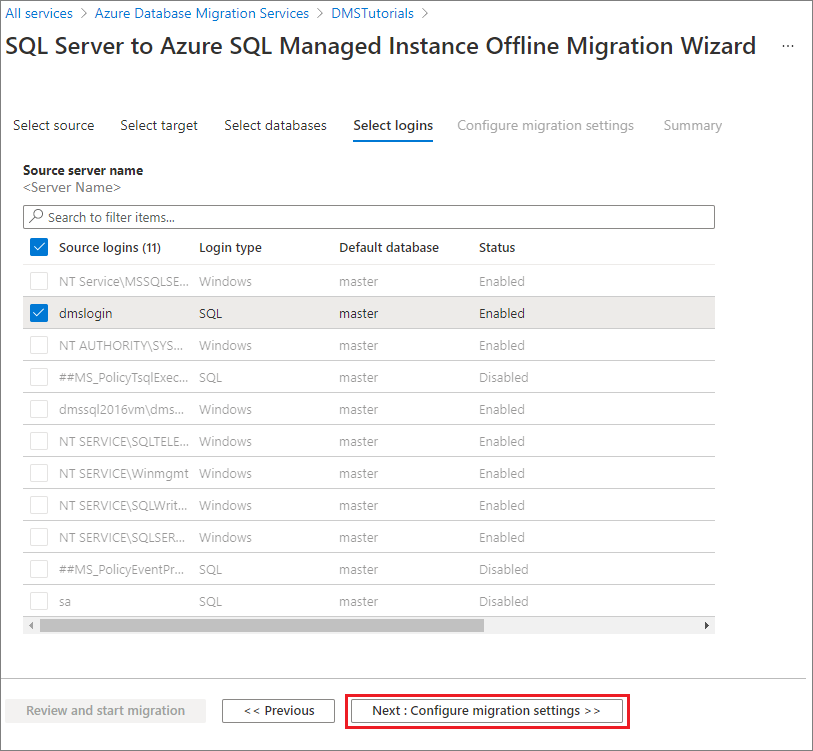
Select Next: Configure migration settings.
Configure migration settings
On the Configure migration settings screen, provide the following details:
Parameter Description Choose source backup option Choose the option I will provide latest backup files when you already have full backup files available for DMS to use for database migration. Choose the option I will let Azure Database Migration Service create backup files when you want DMS to take the source database full backup at first and use it for migration. Network location share The local SMB network share that Azure Database Migration Service can take the source database backups to. The service account running source SQL Server instance must have write privileges on this network share. Provide an FQDN or IP addresses of the server in the network share, for example, '\\servername.domainname.com\backupfolder' or '\\IP address\backupfolder'. User name Make sure that the Windows user has full control privilege on the network share that you provided above. Azure Database Migration Service will impersonate the user credential to upload the backup files to Azure Storage container for restore operation. If TDE-enabled databases are selected for migration, the above windows user must be the built-in administrator account and User Account Control must be disabled for Azure Database Migration Service to upload and delete the certificates files.) Password Password for the user. Storage account settings The SAS URI that provides Azure Database Migration Service with access to your storage account container to which the service uploads the backup files and that is used for migrating databases to SQL Managed Instance. Learn how to get the SAS URI for blob container. This SAS URI must be for the blob container, not for the storage account. TDE Settings If you're migrating the source databases with Transparent Data Encryption (TDE) enabled, you need to have write privileges on the target SQL Managed Instance. Select the subscription in which the SQL Managed Instance provisioned from the drop-down menu. Select the target Azure SQL Database Managed Instance in the drop-down menu. 
Select Next: Summary.
Review the migration summary
On the Summary screen, in the Activity name text box, specify a name for the migration activity.
Review and verify the details associated with the migration project.
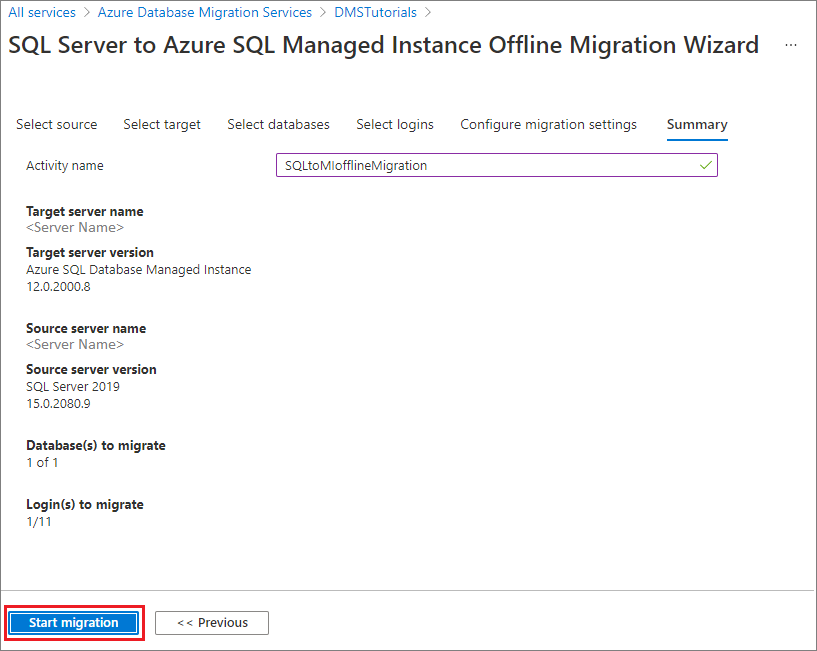
Run the migration
Select Start migration.
The migration activity window appears that displays the current migration status of the databases and logins.
Monitor the migration
In the migration activity screen, select Refresh to update the display.
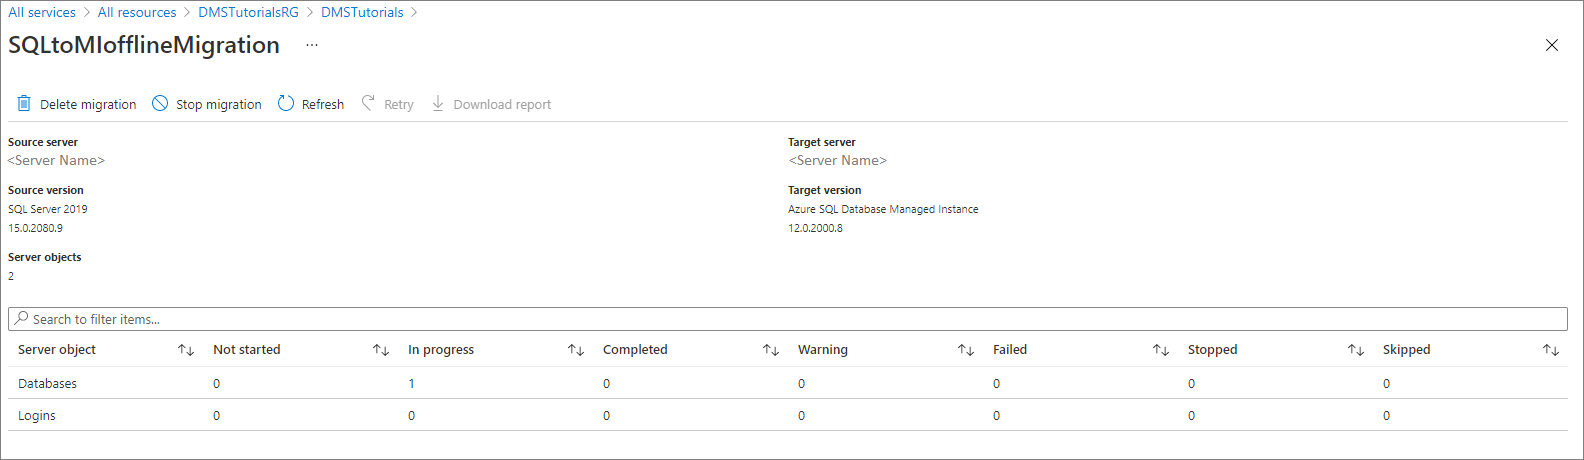
You can further expand the databases and logins categories to monitor the migration status of the respective server objects.

After the migration completes, verify the target database on the SQL Managed Instance environment.
Additional resources
- For a tutorial showing you how to migrate a database to SQL Managed Instance using the T-SQL RESTORE command, see Restore a backup to SQL Managed Instance using the restore command.
- For information about SQL Managed Instance, see What is SQL Managed Instance.
- For information about connecting apps to SQL Managed Instance, see Connect applications.
Feedback
Kommer snart: I hele 2024 udfaser vi GitHub-problemer som feedbackmekanisme for indhold og erstatter det med et nyt feedbacksystem. Du kan få flere oplysninger under: https://aka.ms/ContentUserFeedback.
Indsend og få vist feedback om