Access a project in Project for the web after its Office 365 group has been deleted
If the Office 365 group that is associated with your project has been deleted, users in the group won’t be able to access the project. However, there are ways for you to regain access.
- The group owner can restore the Office 365 group.
- An admin can reassign the project to a user who can then choose or create a new group.
The option you should choose depends on how long ago the group was deleted.
Restore the Office 365 group
If a group that you own has been deleted, it will be retained for 30 days by default. This 30-day period is considered a "soft-delete" because you can still restore the deleted group. After 30 days, the group will be permanently deleted and can’t be restored.
If you’re the owner of an Office 365 group, you can restore the group yourself by following these steps.
- On the Deleted groups page, select the Manage groups option under the Groups node, and then choose Deleted.
- Select on the Restore tab next to the group you want to restore.
After you've restored the group, members of the group should be able to access the associated project in Project for the web.
Note
To learn more about deleting an Office 365 group, see Restore a deleted Office 365 Group
Reassign the project
If the Office 365 group has been deleted for longer than 30 days, it isn’t restorable and an admin in your tenant will need to reassign the project to either the user who needs to access it or someone who can add a new Office 365 group in Project for the web.
The admin will need to:
- Find the project through the Advanced Find search function in the Dynamics 365 Admin Center.
- Assign the project to the user that needs to access it.
Find the project in Advanced Find search
Use Dynamics 365 Advanced Find search to look for the project you need.
In the Dynamics 365 Administration Center, select the default instance, and then select Open.
On the PowerApps Settings page, select Dynamics 365 Custom.
On the Projects page, select the filter icon in the menu bar and then select Advance Find.
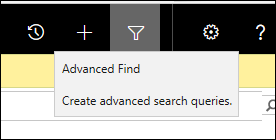
In Advanced Find, in the Look for menu, select Projects. In the Use Saved View menu, select All projects.
Select Select, and from the menu, select Name. From the next menu, select Equals, and then in the Enter text box type the name of the project you’re looking for.

Select Results to run the query. The project you’re looking for should display in the Projects tab.
Reassign the project to a new user
After locating the project through Advanced Find, the admin can now reassign the project to a user.
To reassign a project to a user:
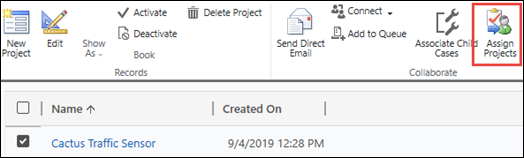
Select the checkbox next to the project name.
In the ribbon, select Assign Projects.
On the Assign Project screen, select in the Assign to box to change it to User or team.
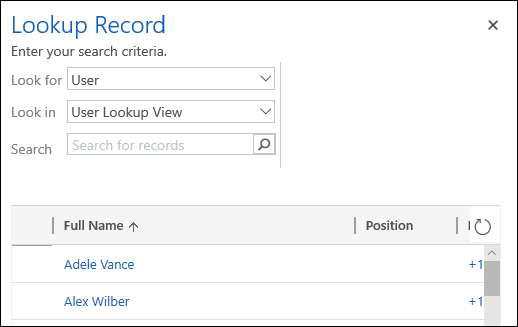
Select in the User or team box, and then select the magnifying glass icon. Then scroll to the bottom of the results and select Look up more records.
On the Lookup Record screen, select User in the Look for menu, select the user from the user list, and then select Add.
The user that you added will now be able to access the project in Project for the web. The user can also choose to associate a new Office 365 group with the project and add users to it if others also need to access the project.
See Also
Feedback
Kommer snart: I hele 2024 udfaser vi GitHub-problemer som feedbackmekanisme for indhold og erstatter det med et nyt feedbacksystem. Du kan få flere oplysninger under: https://aka.ms/ContentUserFeedback.
Indsend og få vist feedback om