Create your first bot with Composer
APPLIES TO: Composer v2.x
In this quickstart, you'll learn how to create a basic bot using Composer and test it in Web Chat.
Note
The nightly builds include pre-release features and may change how some operations are performed. The Composer documentation supports the latest stable release of Composer, and some aspects of the nightly builds may not work as described in the documentation. For more information about nightly builds, see Application settings.
Prerequisites
Create a bot
Create a bot from a template
- Open Composer.
- Select Create New (+) on the homepage.
- A list of templates is then shown which provides a starting point for your new bot. For the purposes of this quick-start, select the Empty bot template under the C# section. This template creates a bot containing a root dialog, initial greeting dialog, and an unknown intent handler. Then select Next.
- Fill in the Name for the bot as Menu_bot. Then select Azure Web App from the Runtime type, and a location for your bot on your machine.
- Select OK. It will take a few moments for Composer to create your bot from the template.
Add bot functionality
The bot created from the Empty bot template contains an unknown intent trigger, which acts as a fallback whenever your bot doesn't know how to respond. When your bot doesn't recognize the intent of user input, it will send a response letting the user know.
The next sections describe how to add basic bot functionality to your empty bot template. You'll add:
- A dialog called Menu that displays a text message with menu items.
- A trigger for the Menu dialog. The trigger makes it possible for your bot to recognize the intent and connect to the menu dialog.
Add a dialog
Now you can add functionality for intents that you want your bot to recognize.
Dialogs are a convenient way to organize conversational logic. This section shows you how to add a dialog. In the next section, you add a trigger to the bot's main dialog to call the new dialog.
Select the three dots next to your bot project, Menu_bot, and select + Add a dialog.
In the Name field, enter Menu, and in the Description field, enter A dialog that shows the menu.. Then select OK.
Select BeginDialog underneath the Menu dialog.
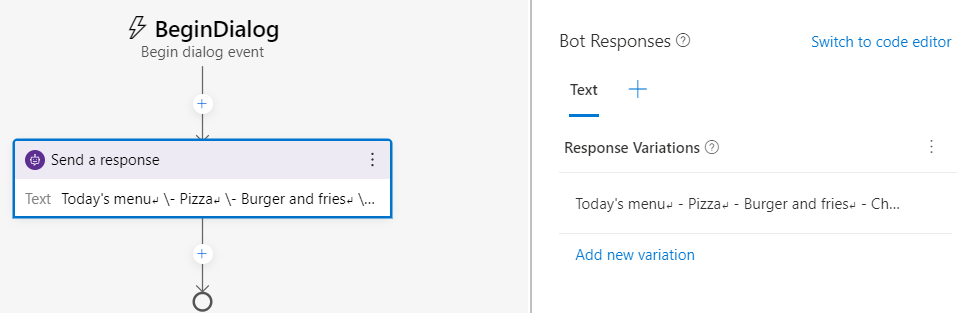
In the authoring canvas, select the + button under BeginDialog. Then select Send a response.
Enter the following menu text in the response editor on the right:
Today's menu
 - Pizza
 - Burger and fries
 - Chicken sandwich
Your authoring canvas should look like the following:
Create a trigger to recognize the menu intent
Now that your dialog is ready to send a response of menu options, you need to create a trigger so that your bot recognizes when users want the menu item displayed.
Select your bot project, Menu_bot.
In the properties pane, under *Recognizer/Dispatch type, select Change. Under Choose a recognizer type, select Regular expression and then Done. This recognizer provides a simple example without adding advanced natural language understanding. For a real-world bot, explore language understanding.
Now, add a trigger to the Menu_bot dialog.
- The default trigger type is Intent recognized.
- Enter
Menuin the What is the name of this trigger (RegEx) field. - Enter
menuin the Please input regEx pattern field. - Select Submit. Composer creates a trigger, named Menu, which will fire when the user sends a menu message to the bot.
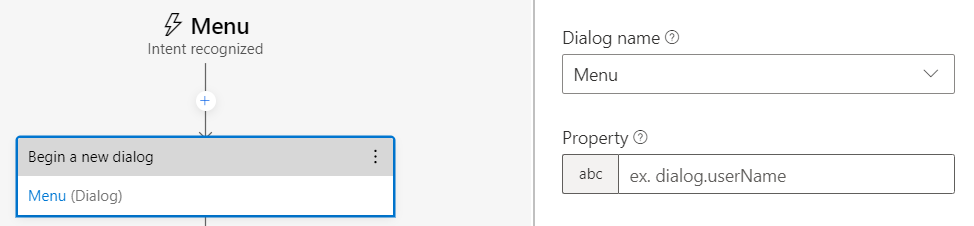
Now you need to start the Menu dialog you created previously from the trigger. Select the + under the Menu trigger on the authoring canvas. Go to Dialog management and select Begin a new dialog.
Go to the right and select the box underneath Dialog name. You should see the Menu dialog you created previously; select it. Your authoring screen should look like the following:
Your menu bot is now ready to test!
Test your bot
Select the Start bot button from the top right of Composer. The Local runtime manager will appear once the bot has finished building, seen below:
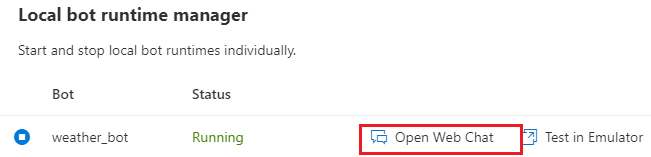
Select Open in Web Chat. The Web Chat panel will appear on the right.
Try testing different phrases. Notice that your bot will respond with the message in the Menu dialog if your response includes the word menu. Otherwise, the bot will display one of the responses from the Unknown intent trigger.
Congratulations! You've successfully created an echo bot!
Next Steps
- Create a weather bot using Composer.
Feedback
Bald verfügbar: Im Laufe des Jahres 2024 werden wir GitHub-Issues stufenweise als Feedbackmechanismus für Inhalte abbauen und durch ein neues Feedbacksystem ersetzen. Weitere Informationen finden Sie unter https://aka.ms/ContentUserFeedback.
Feedback senden und anzeigen für