Hinzufügen von Pushbenachrichtigungen zu Ihrer iOS-App
Übersicht
In diesem Tutorial fügen Sie Pushbenachrichtigungen zum iOS-Schnellstartprojekt hinzu, damit jedes Mal, wenn ein Datensatz eingefügt wird, eine Pushbenachrichtigung an das Gerät gesendet wird.
Wenn Sie das heruntergeladene Schnellstart-Serverprojekt nicht verwenden, müssen Sie Ihrem Projekt das Erweiterungspaket für Pushbenachrichtigungen hinzufügen. Weitere Informationen finden Sie im Leitfaden Arbeiten mit dem .NET Back-End-Server SDK für Azure Mobile Apps.
Der iOS-Simulator unterstützt keine Pushbenachrichtigungen. Sie benötigen ein physisches iOS-Gerät und eine Apple-Entwicklerprogramm-Mitgliedschaft.
Konfigurieren eines Notification Hubs
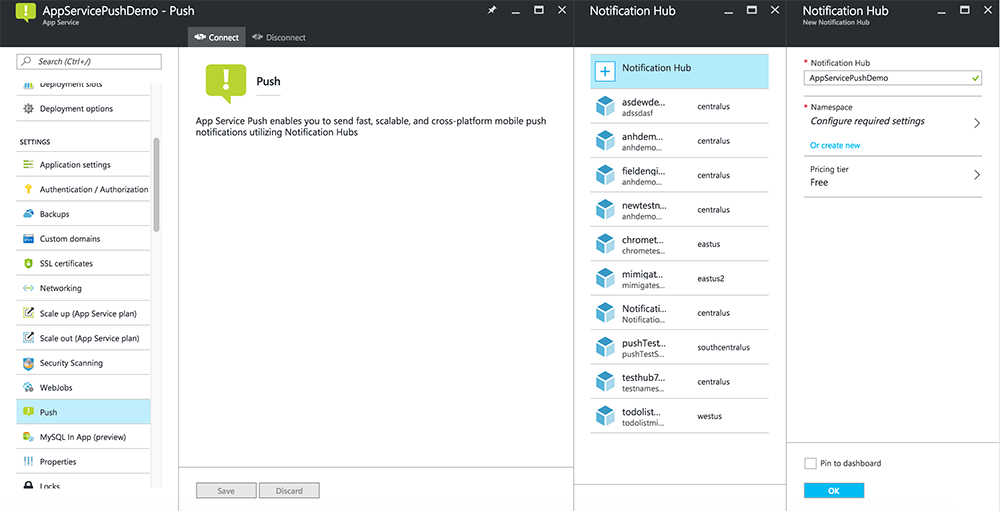
Das Mobile Apps-Feature von Azure App Service verwendet Azure Notification Hubs für den Versand von Pushbenachrichtigungen. Deshalb müssen Sie einen Benachrichtigungs-Hub für Ihre mobile App konfigurieren.
Navigieren Sie im Azure-Portal zu App Services, und wählen Sie dann Ihr App-Back-End aus. Wählen Sie unter Einstellungen die Option Push aus.
Wählen Sie Verbinden aus, um der App eine Notification Hub-Ressource hinzuzufügen. Sie können einen Hub erstellen oder einen vorhandenen Hub verwenden.
Sie haben nun einen Benachrichtigungs-Hub mit Ihrem Mobile Apps-Back-End-Projekt verbunden. Später konfigurieren Sie diesen Notification Hub so, dass eine Verbindung mit einem Plattformbenachrichtigungssystem (Platform Notification System, PNS) hergestellt wird, um Pushbenachrichtigungen an Geräte zu senden.
Registrieren der App für Pushbenachrichtigungen
- Registrieren Sie eine App-ID für Ihre App. Erstellen Sie eine explizite App-ID (keine Platzhalter-App-ID), und verwenden Sie für Paket-ID die gleiche Paket-ID wie in Ihrem Xcode-Schnellstartprojekt. Aktivieren Sie außerdem unbedingt die Option Pushbenachrichtigungen.
- Als Nächstes erstellen Sie zum Vorbereiten der Konfiguration von Pushbenachrichtigungen ein SSL-Zertifikat für die „Entwicklung“ oder für die „Verteilung“.
Konfigurieren von Azure zum Senden von Pushbenachrichtigungen
- Starten Sie auf dem Mac Keychain Access. Öffnen Sie auf der linken Navigationsleiste unter Kategorie den Eintrag Meine Zertifikate. Suchen Sie das SSL-Zertifikat, das Sie im vorigen Abschnitt heruntergeladen haben, und legen Sie den Inhalt offen. Wählen Sie nur das Zertifikat (ohne den privaten Schlüssel) aus. Exportieren Sie es dann.
- Wählen Sie im Azure-Portal die Option Alle durchsuchen>App Services aus. Wählen Sie dann Ihr Mobile Apps-Back-End aus.
- Wählen Sie unter Einstellungen die Option App Service Push aus. Wählen Sie dann den Namen Ihres Notification Hub aus.
- Wechseln Sie zu Apple Push Notification Services>Upload-Zertifikat. Laden Sie die P12-Datei hoch. Wählen Sie dabei den richtigen Modus aus (abhängig davon, ob Ihr Client-SSL-Zertifikat für die Produktion oder für den Sandkasten vorgesehen ist). Speichern Sie alle Änderungen.
Ihr Dienst ist jetzt so konfiguriert, dass er mit Pushbenachrichtigungen unter iOS arbeitet.
Aktualisieren des Back-Ends zum Senden von Pushbenachrichtigungen
.NET-Back-End (C#):
Klicken Sie in Visual Studio mit der rechten Maustaste auf das Serverprojekt, klicken Sie auf NuGet-Pakete verwalten, und suchen Sie nach
Microsoft.Azure.NotificationHubs. Klicken Sie anschließend auf Installieren. Dadurch wird die Notification Hubs-Bibliothek zum Senden von Benachrichtigungen von Ihrem Back-End installiert.Öffnen Sie im Visual Studio-Projekt des Backends Controller>TodoItemController.cs. Fügen Sie am Anfang der Datei die folgenden
using-Anweisung hinzu:using Microsoft.Azure.Mobile.Server.Config; using Microsoft.Azure.NotificationHubs;Ersetzen Sie die
PostTodoItem-Methode durch folgenden Code:public async Task<IHttpActionResult> PostTodoItem(TodoItem item) { TodoItem current = await InsertAsync(item); // Get the settings for the server project. HttpConfiguration config = this.Configuration; MobileAppSettingsDictionary settings = this.Configuration.GetMobileAppSettingsProvider().GetMobileAppSettings(); // Get the Notification Hubs credentials for the Mobile App. string notificationHubName = settings.NotificationHubName; string notificationHubConnection = settings .Connections[MobileAppSettingsKeys.NotificationHubConnectionString].ConnectionString; // Create a new Notification Hub client. NotificationHubClient hub = NotificationHubClient .CreateClientFromConnectionString(notificationHubConnection, notificationHubName); // iOS payload var appleNotificationPayload = "{\"aps\":{\"alert\":\"" + item.Text + "\"}}"; try { // Send the push notification and log the results. var result = await hub.SendAppleNativeNotificationAsync(appleNotificationPayload); // Write the success result to the logs. config.Services.GetTraceWriter().Info(result.State.ToString()); } catch (System.Exception ex) { // Write the failure result to the logs. config.Services.GetTraceWriter() .Error(ex.Message, null, "Push.SendAsync Error"); } return CreatedAtRoute("Tables", new { id = current.Id }, current); }Veröffentlichen Sie das Serverprojekt erneut.
Node.js Back-End:
Richten Sie das Back-End-Projekt ein.
Ersetzen Sie das Tabellenskript in „todoitem.js“ durch den folgenden Code:
var azureMobileApps = require('azure-mobile-apps'),
    promises = require('azure-mobile-apps/src/utilities/promises'),
    logger = require('azure-mobile-apps/src/logger');

var table = azureMobileApps.table();

// When adding record, send a push notification via APNS
table.insert(function (context) {
    // For details of the Notification Hubs JavaScript SDK,
    // see https://aka.ms/nodejshubs
    logger.info('Running TodoItem.insert');

    // Create a payload that contains the new item Text.
    var payload = "{\"aps\":{\"alert\":\"" + context.item.text + "\"}}";

    // Execute the insert; Push as a post-execute action when results are returned as a Promise.
    return context.execute()
        .then(function (results) {
            // Only do the push if configured
            if (context.push) {
                context.push.apns.send(null, payload, function (error) {
                    if (error) {
                        logger.error('Error while sending push notification: ', error);
                    } else {
                        logger.info('Push notification sent successfully!');
                    }
                });
            }
            return results;
        })
        .catch(function (error) {
            logger.error('Error while running context.execute: ', error);
        });
});

module.exports = table;
Beim Bearbeiten der Datei auf Ihrem lokalen Computer veröffentlichen Sie das Serverprojekt erneut.
Hinzufügen von Pushbenachrichtigungen zur App
Objective-C:
Importieren Sie das iOS-SDK und QSTodoService.h in QSAppDelegate.m:
#import <MicrosoftAzureMobile/MicrosoftAzureMobile.h>
#import "QSTodoService.h"
Fügen Sie in QSAppDelegate.m in
didFinishLaunchingWithOptionsdie folgenden Zeilen direkt vorreturn YES;ein:UIUserNotificationSettings* notificationSettings = [UIUserNotificationSettings settingsForTypes:UIUserNotificationTypeAlert | UIUserNotificationTypeBadge | UIUserNotificationTypeSound categories:nil]; [[UIApplication sharedApplication] registerUserNotificationSettings:notificationSettings]; [[UIApplication sharedApplication] registerForRemoteNotifications];Fügen Sie in QSAppDelegate.mdie folgenden Handlermethoden hinzu. Ihre App kann Pushbenachrichtigungen nun unterstützen.
// Registration with APNs is successful
- (void)application:(UIApplication *)application
didRegisterForRemoteNotificationsWithDeviceToken:(NSData *)deviceToken {

    QSTodoService *todoService = [QSTodoService defaultService];
    MSClient *client = todoService.client;

    [client.push registerDeviceToken:deviceToken completion:^(NSError *error) {
        if (error != nil) {
            NSLog(@"Error registering for notifications: %@", error);
        }
    }];
}

// Handle any failure to register
- (void)application:(UIApplication *)application didFailToRegisterForRemoteNotificationsWithError:
(NSError *)error {
    NSLog(@"Failed to register for remote notifications: %@", error);
}

// Use userInfo in the payload to display an alert.
- (void)application:(UIApplication *)application
        didReceiveRemoteNotification:(NSDictionary *)userInfo {
    NSLog(@"%@", userInfo);

    NSDictionary *apsPayload = userInfo[@"aps"];
    NSString *alertString = apsPayload[@"alert"];

    // Create alert with notification content.
    UIAlertController *alertController = [UIAlertController
                                    alertControllerWithTitle:@"Notification"
                                    message:alertString
                                    preferredStyle:UIAlertControllerStyleAlert];

    UIAlertAction *cancelAction = [UIAlertAction
                                    actionWithTitle:NSLocalizedString(@"Cancel", @"Cancel")
                                    style:UIAlertActionStyleCancel
                                    handler:^(UIAlertAction *action)
                                    {
                                        NSLog(@"Cancel");
                                    }];

    UIAlertAction *okAction = [UIAlertAction
                                actionWithTitle:NSLocalizedString(@"OK", @"OK")
                                style:UIAlertActionStyleDefault
                                handler:^(UIAlertAction *action)
                                {
                                    NSLog(@"OK");
                                }];

    [alertController addAction:cancelAction];
    [alertController addAction:okAction];

    // Get current view controller.
    UIViewController *currentViewController = [[[[UIApplication sharedApplication] delegate] window] rootViewController];
    while (currentViewController.presentedViewController)
    {
        currentViewController = currentViewController.presentedViewController;
    }

    // Display alert.
    [currentViewController presentViewController:alertController animated:YES completion:nil];

}
Swift:
Fügen Sie die Datei ClientManager.swift mit folgendem Inhalt hinzu: Ersetzen Sie %AppUrl% durch die URL des Azure-Back-Ends für mobile Apps.
class ClientManager {
    static let sharedClient = MSClient(applicationURLString: "%AppUrl%")
}
Ersetzen Sie in ToDoTableViewController.swift die Zeile
let client, dieMSClientinitialisiert, durch die folgende Zeile:let client = ClientManager.sharedClientErsetzen Sie in AppDelegate.swift den Text von
func applicationwie folgt:func application(application: UIApplication, didFinishLaunchingWithOptions launchOptions: [NSObject: AnyObject]?) -> Bool { application.registerUserNotificationSettings( UIUserNotificationSettings(forTypes: [.Alert, .Badge, .Sound], categories: nil)) application.registerForRemoteNotifications() return true }Fügen Sie in AppDelegate.swiftdie folgenden Handlermethoden hinzu. Ihre App kann Pushbenachrichtigungen nun unterstützen.
func application(application: UIApplication,
    didRegisterForRemoteNotificationsWithDeviceToken deviceToken: NSData) {
    ClientManager.sharedClient.push?.registerDeviceToken(deviceToken) { error in
        print("Error registering for notifications: ", error?.description)
    }
}

func application(application: UIApplication,
    didFailToRegisterForRemoteNotificationsWithError error: NSError) {
    print("Failed to register for remote notifications: ", error.description)
}

func application(application: UIApplication,
    didReceiveRemoteNotification userInfo: [NSObject: AnyObject]) {

    print(userInfo)

    let apsNotification = userInfo["aps"] as? NSDictionary
    let apsString       = apsNotification?["alert"] as? String

    let alert = UIAlertController(title: "Alert", message: apsString, preferredStyle: .Alert)
    let okAction = UIAlertAction(title: "OK", style: .Default) { _ in
        print("OK")
    }
    let cancelAction = UIAlertAction(title: "Cancel", style: .Default) { _ in
        print("Cancel")
    }

    alert.addAction(okAction)
    alert.addAction(cancelAction)

    var currentViewController = self.window?.rootViewController
    while currentViewController?.presentedViewController != nil {
        currentViewController = currentViewController?.presentedViewController
    }

    currentViewController?.presentViewController(alert, animated: true) {}

}
Testen von Pushbenachrichtigungen
- Klicken Sie in Xcode auf Ausführen, und starten Sie die App auf einem iOS-Gerät (Push funktioniert nicht in Simulatoren). Klicken Sie auf OK, um Pushbenachrichtigungen anzunehmen. Diese Aufforderung wird beim ersten Ausführen der App angezeigt.
- Fügen Sie in der App auf ein neues Element hinzu, und klicken Sie auf +.
- Stellen Sie sicher, dass Sie eine Benachrichtigung erhalten haben, und klicken Sie dann auf OK , um diese zu schließen. Sie haben dieses Lernprogramm erfolgreich abgeschlossen.
Mehr
- : Mithilfe von Vorlagen können Sie flexibel plattformübergreifende Pushvorgänge und lokalisierte Pushvorgänge senden. Verwenden der iOS-Clientbibliothek für Azure Mobile Apps wird erklärt, wie Sie Vorlagen registrieren.