Tutorial: Senden von Pushbenachrichtigungen an Android-Geräte mit Firebase SDK-Version 1.0.0-preview1
In diesem Tutorial erfahren Sie, wie Sie mithilfe von Azure Notification Hubs und der aktualisierten Version von Firebase Cloud Messaging (FCM) SDK (Version 1.0.0-preview1) Pushbenachrichtigungen an eine Android-Anwendung senden. In diesem Tutorial erstellen Sie eine leere Android-App, die Pushbenachrichtigungen mithilfe von Firebase Cloud Messaging (FCM) empfängt.
Hinweis
Informationen zur Einstellung und Migrationsschritte für Firebase Cloud Messaging finden Sie unter Google Firebase Cloud Messaging-Migration.
Den vollständigen Code für dieses Tutorial können Sie von GitHub herunterladen.
Dieses Tutorial enthält die folgenden Schritte:
- Erstellen eines Android Studio-Projekts.
- Erstellen eines Firebase-Projekts, das Firebase Cloud Messaging unterstützt.
- Erstellen eines Notification Hubs.
- Verbinden Sie Ihre App mit dem Hub.
- Testen der App.
Voraussetzungen
Sie benötigen ein aktives Azure-Konto, um dieses Lernprogramm abzuschließen. Wenn Sie über kein Konto verfügen, können Sie in nur wenigen Minuten ein kostenloses Testkonto erstellen. Ausführliche Informationen finden Sie unter Einen Monat kostenlos testen.
Hinweis
Google/Firebase APIs werden in den Azure China-Regionen nicht unterstützt.
Sie benötigen außerdem folgende Elemente:
- Die aktuelle Version von Android Studio wird empfohlen.
- Minimale Unterstützung ist API-Ebene 19.
Erstellen eines Android Studio-Projekts
Der erste Schritt zum Erstellen eines Projekts in Android Studio:
Starten Sie Android Studio.
Wählen Sie File (Datei) > New (Neu) > New Project (Neues Projekt) aus.
Wählen Sie auf der Seite Choose your project (Projekt auswählen) die Option Empty Activity (Leere Aktivität) und dann Next (Weiter) aus.
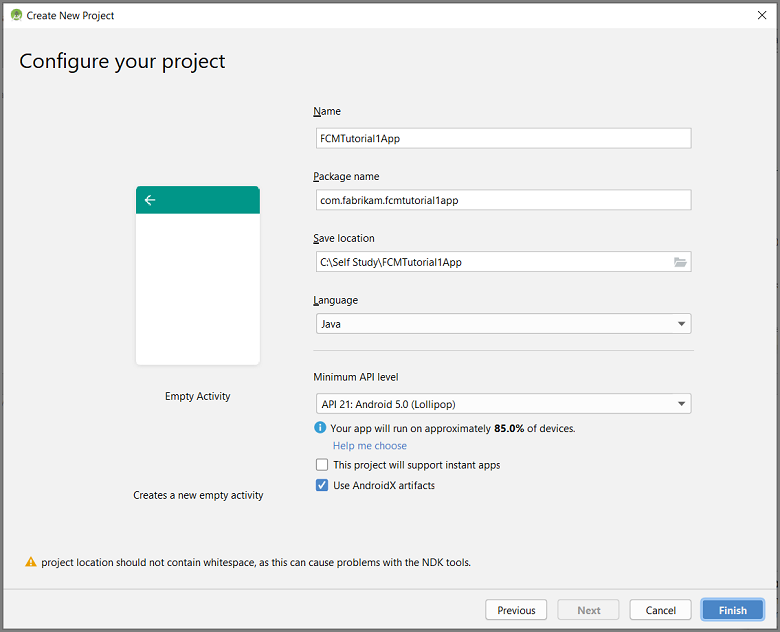
Gehen Sie auf der Seite Configure your project (Projekt konfigurieren) wie folgt vor:
- Geben Sie einen Namen für die Anwendung ein.
- Geben Sie einen Speicherort an, in dem die Projektdateien gespeichert werden.
- Wählen Sie Fertig stellen aus.
Erstellen eines Firebase-Projekts, das FCM unterstützt
Melden Sie sich bei der Firebase-Konsole an. Erstellen Sie ein neues Firebase-Projekt, falls Sie noch keins besitzen.
Klicken Sie nach der Erstellung Ihres Projekts auf Add Firebase to your Android app (Firebase der Android-App hinzufügen).

Gehen Sie auf der Seite Add Firebase to your Android app (Firebase der Android-App hinzufügen) wie folgt vor:
Kopieren Sie für Android package name (Name des Android-Pakets) den Wert von applicationId in die Datei build.gradle Ihrer Anwendung. In diesem Beispiel lautet er
com.fabrikam.fcmtutorial1app.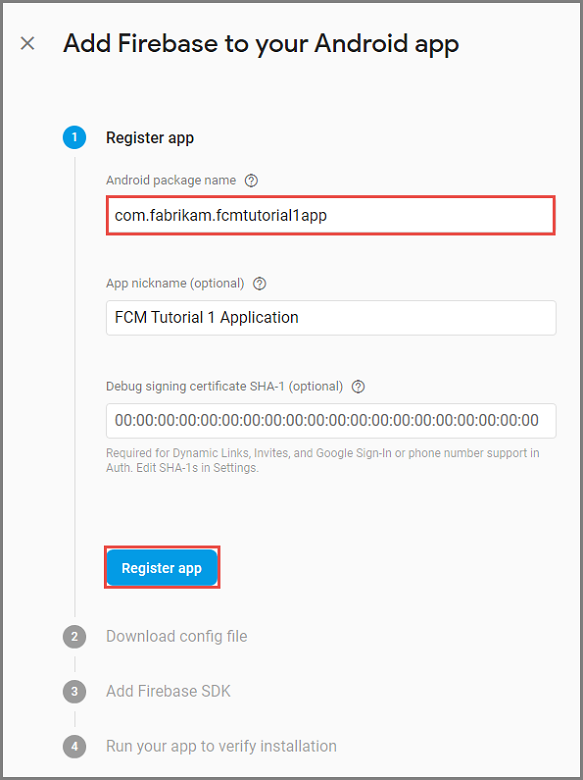
Wählen Sie Register app (App registrieren) aus.
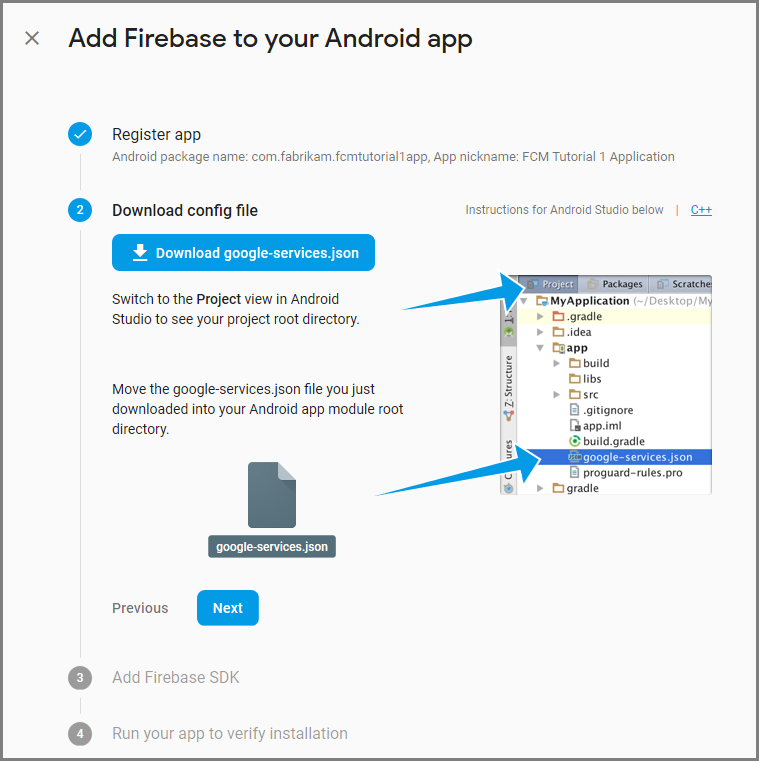
Wählen Sie Download google-services.json (google-services.json herunterladen) aus, speichern Sie die Datei im Ordner app des Projekts, und klicken Sie dann auf Next (Weiter).
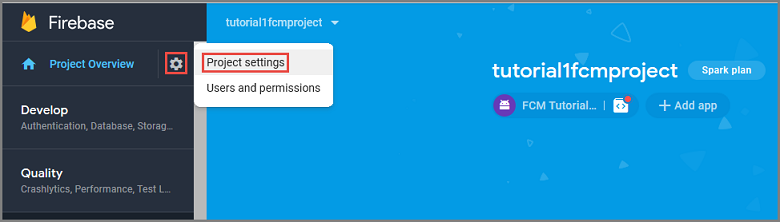
Klicken Sie in der Firebase-Konsole auf das Zahnrad für Ihr Projekt. Klicken Sie dann auf Projekteinstellungen.
Wenn Sie die Datei google-services.json nicht in den Ordner app Ihres Android Studio-Projekts heruntergeladen haben, können Sie dies auf dieser Seite tun.
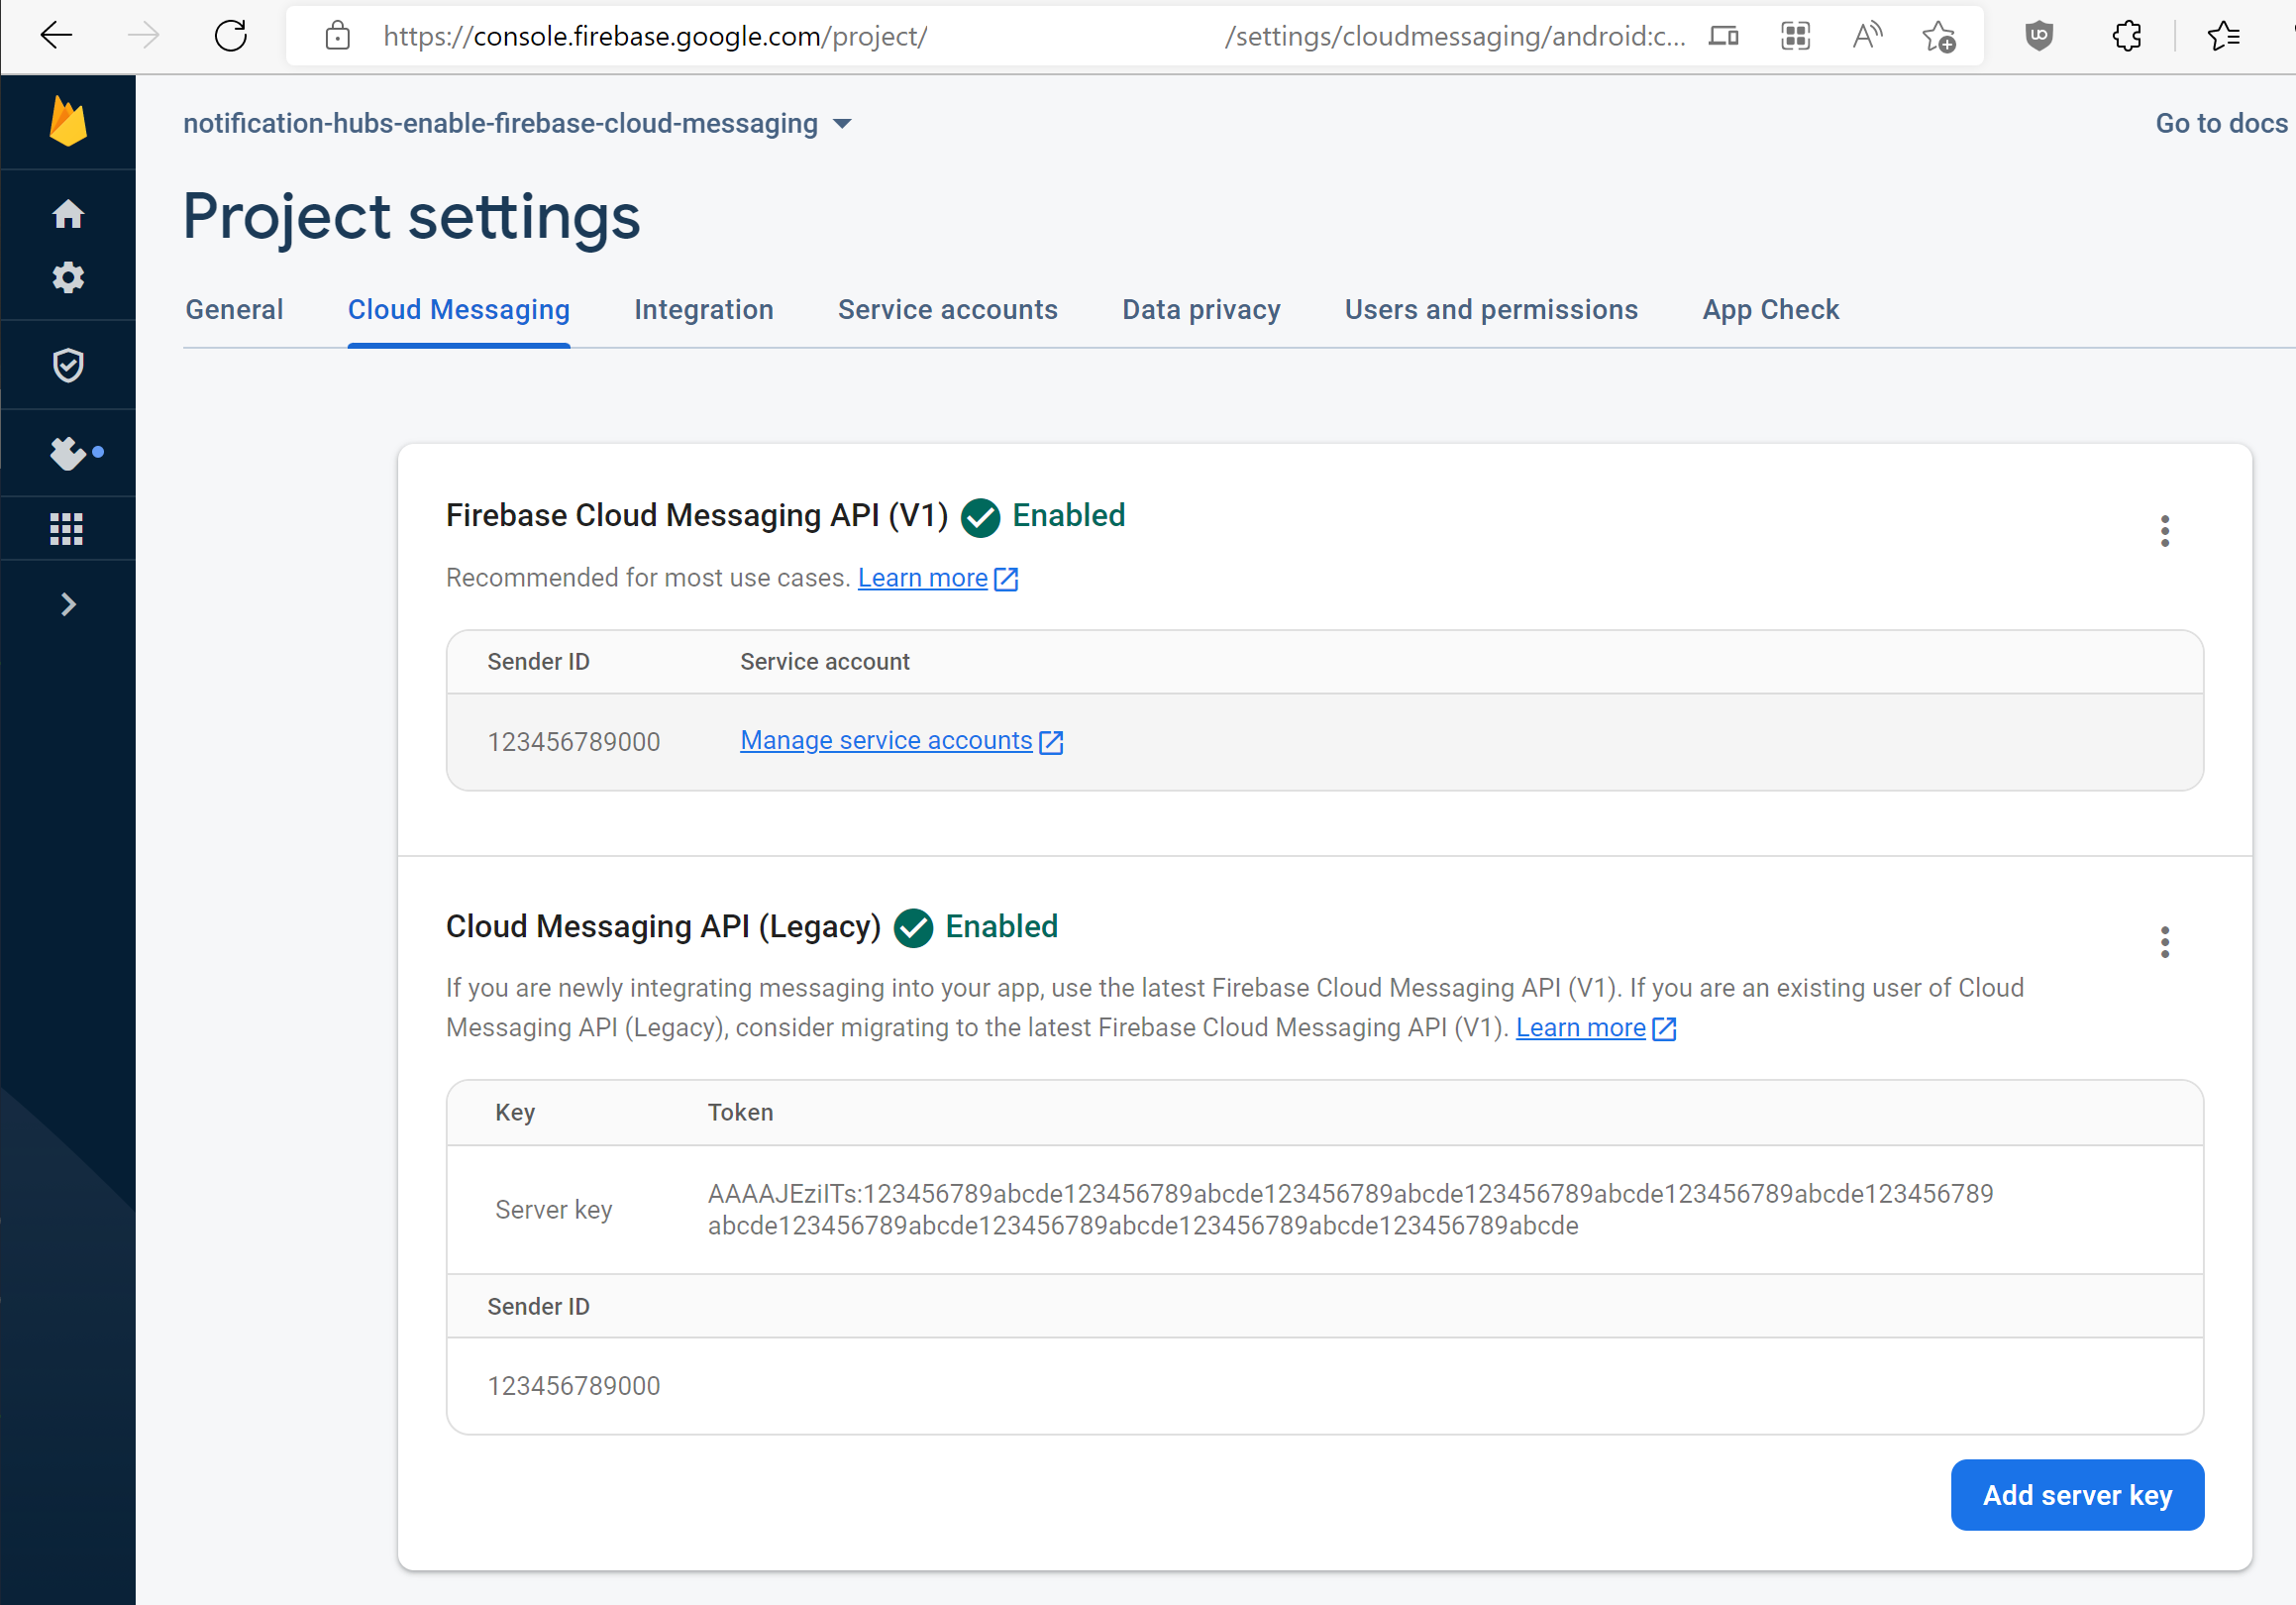
Wechseln Sie zur Registerkarte Cloud Messaging.
Kopieren und speichern Sie den Serverschlüssel für eine spätere Verwendung. Verwenden Sie diesen Wert zum Konfigurieren Ihres Hubs.
Wenn auf der Registerkarte „Cloud Messaging“ von Firebase kein Serverschlüssel angezeigt wird, befolgen Sie diese Schritte:
- Wählen Sie das Dreipunktmenü der Überschrift Cloud Messaging API (Legacy) deaktiviert aus.
- Folgen Sie dem Link zu API in der Google Cloud Console verwalten.
- Wählen Sie in der Google Cloud Console die Schaltfläche zum Aktivieren der Google Cloud Messaging-API aus.
- Warten Sie ein paar Minuten.
- Wechseln Sie zurück zur Registerkarte Cloud Messaging Ihres Firebase-Konsolenprojekts, und aktualisieren Sie die Seite.
- Beachten Sie, dass sich der Header der Cloud Messaging-API in Cloud Messaging-API (Legacy) aktiviert geändert hat und jetzt einen Serverschlüssel anzeigt.
Konfigurieren eines Notification Hubs
Melden Sie sich beim Azure-Portal an.
Wählen Sie im Menü auf der linken Seite die Option Alle Dienste und dann im Abschnitt Mobil die Option Notification Hubs aus. Wählen Sie das Sternsymbol neben dem Dienstnamen aus, um den Dienst im linken Menü zum Abschnitt FAVORITEN hinzuzufügen. Nachdem Notification Hubs unter FAVORITEN hinzugefügt wurde, können Sie diesen Eintrag im Menü auf der linken Seite auswählen.
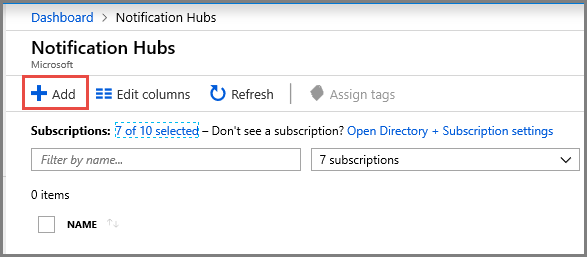
Wählen Sie auf der Seite Notification Hubs in der Symbolleiste die Option Hinzufügen.
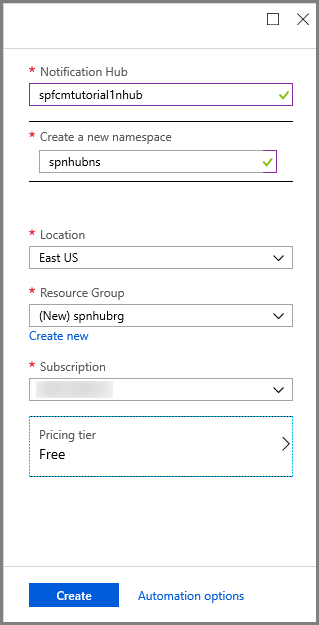
Gehen Sie auf der Seite Notification Hubs wie folgt vor:
Geben Sie ins Feld Notification Hub einen Namen ein.
Geben Sie ins Feld Neuen Namespace erstellen einen Namen ein. Ein Namespace enthält mindestens einen Hub.
Wählen Sie in der Dropdownliste Standort einen Wert aus. Dieser Wert gibt den Standort an, an dem der Hub erstellt werden soll.
Wählen Sie unter Ressourcengruppe eine vorhandene Ressourcengruppe aus, oder erstellen Sie eine neue.
Klicken Sie auf Erstellen.
Wählen Sie Benachrichtigungen (Glockensymbol) und dann Zu Ressource wechseln aus. Sie können auch die Liste auf der Seite Notification Hubs aktualisieren und Ihren Hub auswählen.

Wählen Sie in der Liste die Option Zugriffsrichtlinien aus. Beachten Sie, dass zwei Verbindungszeichenfolgen verfügbar sind. Sie werden später für die Behandlung von Pushbenachrichtigungen benötigt.
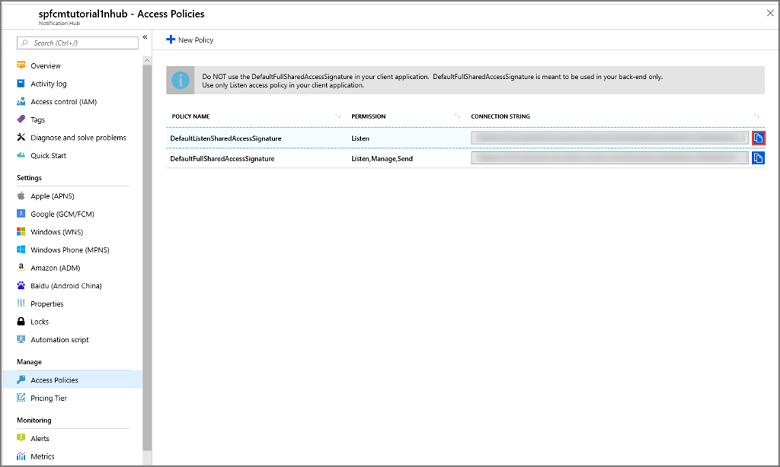
Wichtig
Verwenden Sie in Ihrer Anwendung nicht die Richtlinie DefaultFullSharedAccessSignature. Diese Richtlinie darf nur im App-Back-End verwendet werden.
Konfigurieren von Firebase Cloud Messaging-Einstellungen für den Hub
Wählen Sie im linken Bereich unter Einstellungen die Option Google (GCM/FCM) aus.
Geben Sie den Serverschlüssel für das FCM-Projekt ein, den Sie zuvor gespeichert haben.
Wählen Sie auf der Symbolleiste Save (Speichern) aus.
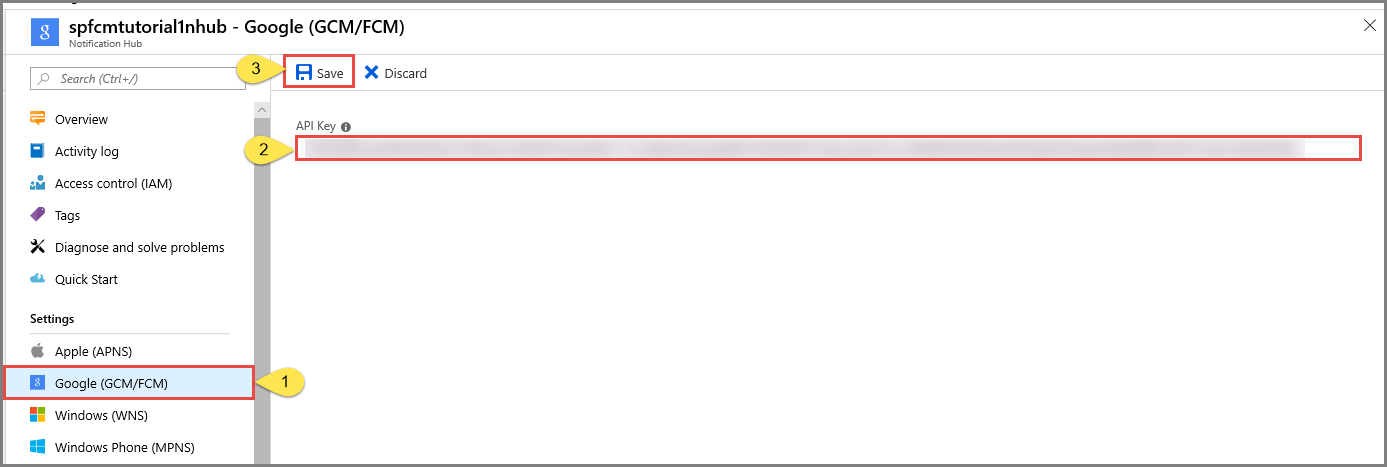
Im Azure-Portal wird in einer Meldung angezeigt, dass der Hub aktualisiert wurde. Die Schaltfläche Save (Speichern) ist deaktiviert.
Ihr Benachrichtigungshub ist jetzt für die Verwendung mit Firebase Cloud Messaging konfiguriert. Sie verfügen außerdem über die Verbindungszeichenfolgen, die erforderlich sind, um Benachrichtigungen an ein Gerät zu senden und eine App für den Empfang von Benachrichtigungen zu registrieren.
Verbinden Ihrer App mit dem Notification Hub
Hinzufügen von Google Play Services zum Projekt
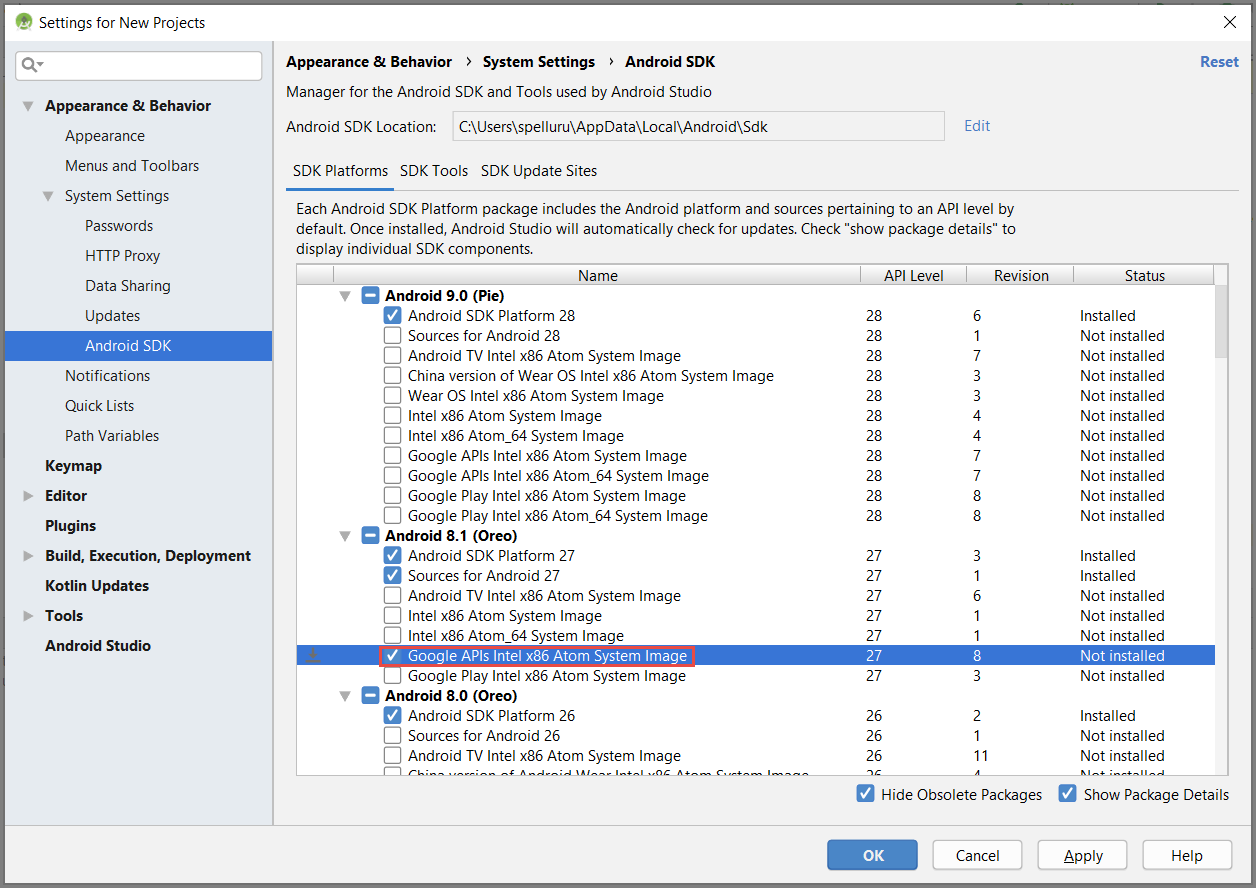
Wählen Sie in Android Studio im Menü die Option Tools und dann SDK Manager aus.
Wählen Sie die Zielversion des Android SDK aus, das in Ihrem Projekt verwendet wird. Wählen Sie dann Paketdetails anzeigen aus.
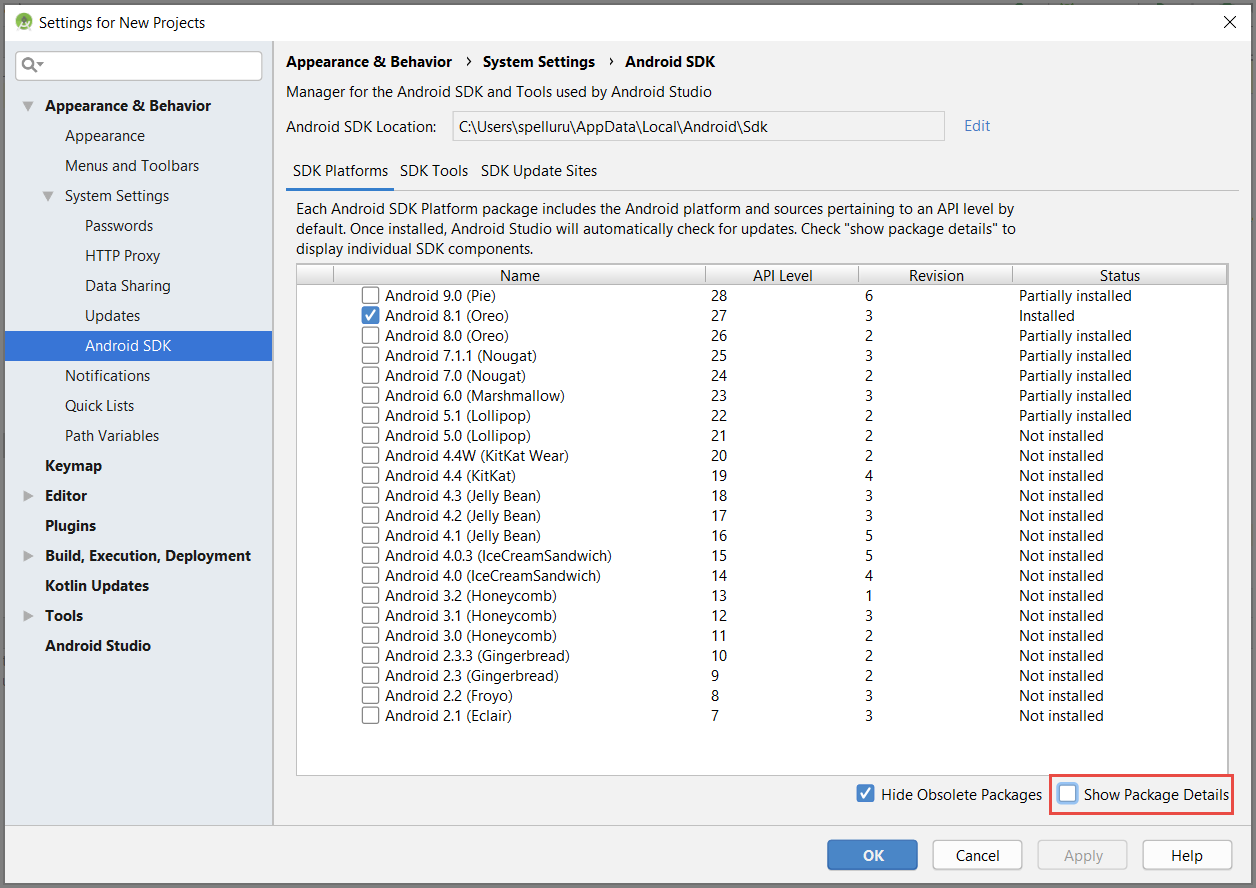
Wählen Sie die Option Google-APIs, falls diese Installation noch nicht durchgeführt wurde.
Wechseln Sie auf die Registerkarte SDK Tools (SDK-Tools). Wählen Sie wie in der folgenden Abbildung dargestellt die Option Google Play Services, falls Google Play Services noch nicht installiert ist. Wählen Sie dann Anwenden aus, um die Installation auszuführen. Notieren Sie den SDK-Pfad, den Sie in einem späteren Schritt angeben müssen.

Wählen Sie OK, wenn das Dialogfeld Änderung bestätigen angezeigt wird. Die gewünschten Komponenten werden mit dem entsprechenden Installationsprogramm installiert. Wählen Sie Fertig stellen, wenn die Installation der Komponenten abgeschlossen ist.
Wählen Sie OK, um das Dialogfeld Settings for New Projects (Einstellungen für neue Projekte) zu schließen.
Hinzufügen von Azure Notification Hubs-Bibliotheken
Fügen Sie in der Datei uild.gradle der App im Abschnitt „dependencies“ die folgenden Zeilen hinzu:
implementation 'com.microsoft.azure:notification-hubs-android-sdk-fcm:1.1.4'
implementation 'androidx.appcompat:appcompat:1.4.1'
implementation 'com.android.volley:volley:1.2.1'
Fügen Sie hinter dem Abschnitt „dependencies“ das folgende Repository hinzu:
dependencyResolutionManagement {
 repositoriesMode.set(RepositoriesMode.FAIL_ON_PROJECT_REPOS)
 repositories {
     google()
     mavenCentral()
     maven { url 'https://example.io' }
 }
}
Hinzufügen von Unterstützung für Google Firebase
Fügen Sie am Ende der Datei das folgende Plug-In hinzu, sofern es noch nicht vorhanden ist.
apply plugin: 'com.google.gms.google-services'Wählen Sie auf der Symbolleiste Sync Now (Jetzt synchronisieren) aus.
Code hinzufügen
Erstellen Sie ein NotificationHubListener-Objekt, das das Abfangen der Nachrichten von Azure Notification Hubs durchführt.
public class CustomNotificationListener implements NotificationListener {

   @override
   public void onNotificationReceived(Context context, RemoteMessage message) {

      /* The following notification properties are available. */
      Notification notification = message.getNotification();
      String title = notification.getTitle();
      String body = notification.getBody();
      Map<String, String> data = message.getData();

      if (message != null) {
         Log.d(TAG, "Message Notification Title: " + title);
         Log.d(TAG, "Message Notification Body: " + message);
      }

      if (data != null) {
          for (Map.Entry<String, String> entry : data.entrySet()) {
              Log.d(TAG, "key, " + entry.getKey() + " value " + entry.getValue());
          }
      }
   }
}
Fügen Sie in der Methode
OnCreateder KlasseMainActivityden folgenden Code hinzu, um den Initialisierungsprozess von Notification Hubs zu starten, wenn die Aktivität erstellt wird:@Override protected void onCreate(Bundle savedInstanceState) { super.onCreate(savedInstanceState); setContentView(R.layout.activity_main); NotificationHub.setListener(new CustomNotificationListener()); NotificationHub.start(this.getApplication(), "Hub Name", "Connection-String"); }Wählen Sie in Android Studio auf der Menüleiste die Option Build (Erstellen) und anschließend Rebuild Project (Projekt neu erstellen) aus, um sicherzustellen, dass im Code keine Fehler enthalten sind. Sollte eine Fehlermeldung im Zusammenhang mit dem Symbol ic_launcher angezeigt werden, entfernen Sie die folgende Anweisung aus der Datei „AndroidManifest.xml“:
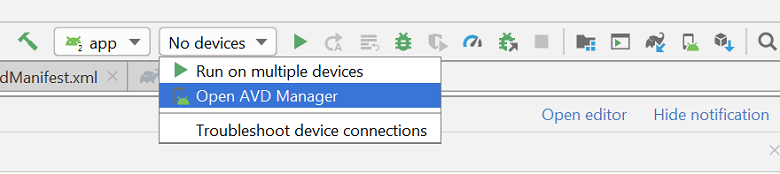
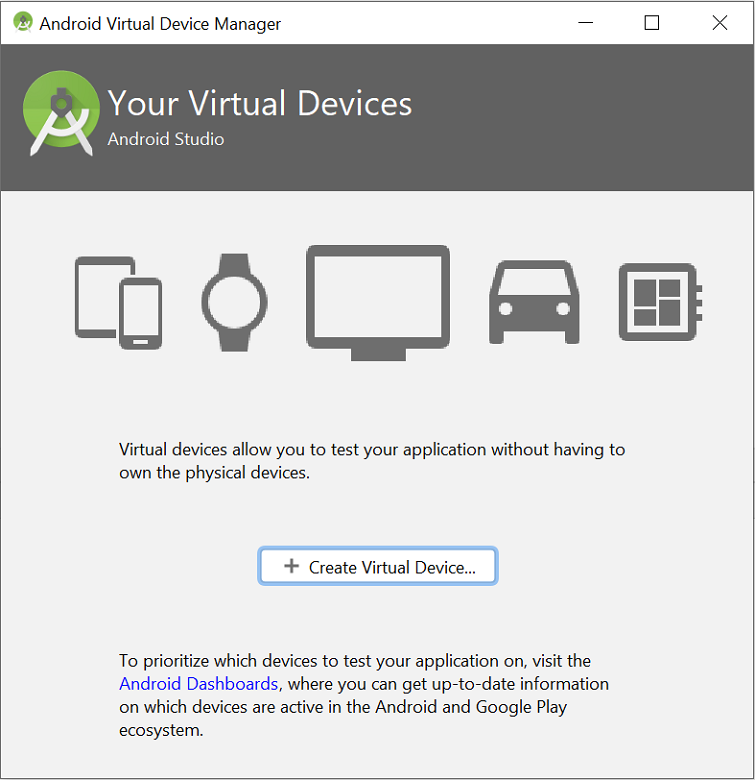
android:icon="@mipmap/ic_launcher"Stellen Sie sicher, dass Sie über ein virtuelles Gerät zum Ausführen der App verfügen. Wenn Sie keines haben, fügen Sie wie folgt eines hinzu:
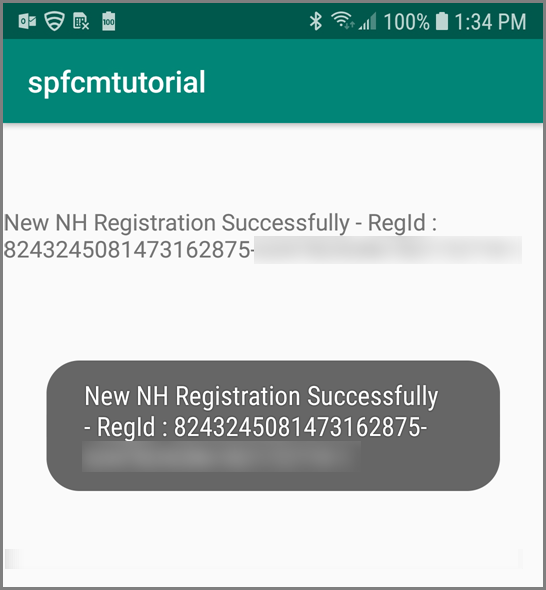
Führen Sie die App auf Ihrem ausgewählten Gerät aus, und vergewissern Sie sich, dass sie richtig beim Hub registriert wird.
Hinweis
Bei der Registrierung treten beim ersten Starten unter Umständen Fehler auf, bis die
onTokenRefresh()-Methode des Instanz-ID-Diensts aufgerufen wird. Durch eine Aktualisierung sollte eine erfolgreiche Registrierung beim Notification Hub initiiert werden.
Senden einer Testbenachrichtigung
Sie können Pushbenachrichtigungen aus dem Azure-Portal wie folgt an Ihren Notification Hub senden:
Wählen Sie im Azure-Portal auf der Seite „Notification Hub“ für Ihren Hub im Abschnitt Problembehandlung die Option Testsendevorgang aus.
Wählen Sie unter Plattformen die Option Android aus.
Wählen Sie Senden aus. Es wird noch keine Benachrichtigung auf dem Android-Gerät angezeigt, da Sie die mobile App nicht darauf ausgeführt haben. Wählen Sie nach dem Ausführen der mobilen App erneut die Schaltfläche Senden aus, um die Benachrichtigung anzuzeigen.
Sie sehen das Ergebnis des Vorgangs in der Liste am unteren Rand der Portalseite.

Die Benachrichtigung wird auf Ihrem Gerät angezeigt.
Pushbenachrichtigungen werden normalerweise mithilfe einer kompatiblen Bibliothek über einen Back-End-Dienst wie Mobile Apps oder ASP.NET gesendet. Falls für Ihr Back-End keine Bibliothek verfügbar ist, können Sie Benachrichtigungen auch direkt über die REST-API senden.
Ausführen der mobilen App im Emulator
Vor dem Testen von Pushbenachrichtigungen in einem Emulator müssen Sie sicherstellen, dass das Emulatorimage die Google-API-Ebene unterstützt, die Sie für die App ausgewählt haben. Falls Ihr Image keine nativen Google-APIs unterstützt, tritt unter Umständen eine Ausnahme vom Typ SERVICE_NOT_AVAILABLE auf.
Stellen Sie zusätzlich sicher, dass Ihr Google-Konto dem ausgeführten Emulator unter Einstellungen>Konten hinzugefügt wurde. Andernfalls führt die Registrierung bei FCM möglicherweise zur Ausnahme AUTHENTICATION_FAILED.
Nächste Schritte
In diesem Tutorial haben Sie mit Firebase Cloud Messaging Benachrichtigungen an alle Android-Geräte gesendet, die bei dem Dienst registriert wurden. Um zu erfahren, wie Sie Pushbenachrichtigungen an bestimmte Geräte senden, fahren Sie mit dem folgenden Tutorial fort:
Im Folgenden finden Sie eine Liste einiger anderer Tutorials zum Senden von Benachrichtigungen:
Azure Mobile Apps: Ein Beispiel für das Senden von Benachrichtigungen von einem mit Notification Hubs integrierten Mobile Apps-Back-End finden Sie unter Hinzufügen von Pushbenachrichtigungen zu Ihrer iOS-App.
ASP.NET: Verwenden von Notification Hubs zum Senden von Pushbenachrichtigungen an Benutzer.
Azure Notification Hubs Java-SDK: Informationen zum Senden von Benachrichtigungen über Java finden Sie unter Verwenden von Notification Hubs von Java aus . Dies wurde für die Android-Entwicklung in Eclipse getestet.