.NET Aspire setup and tooling
.NET Aspire includes tooling to help you create and configure cloud-native apps. The tooling includes useful starter project templates and other features to streamline getting started with .NET Aspire for Visual Studio, Visual Studio Code, and CLI workflows. In the sections ahead, you'll learn how to work with .NET Aspire tooling and explore the following tasks:
- Install .NET Aspire and its dependencies
- Create starter project templates using Visual Studio, Visual Studio Code, or the .NET CLI
- Install .NET Aspire components
- Work with the .NET Aspire dashboard
Install .NET Aspire
To work with .NET Aspire, you'll need the following installed locally:
- .NET 8.0.
- .NET Aspire workload (installed either Visual Studio or the .NET CLI).
- An OCI compliant container runtime, such as:
- Docker Desktop or Podman. For more information, see Container runtime.
- An Integrated Developer Environment (IDE) or code editor, such as:
- Visual Studio 2022 version 17.10 or higher (Optional)
- Visual Studio Code (Optional)
- C# Dev Kit: Extension (Optional)
The .NET Aspire workload installs internal dependencies and makes available other tooling, such as project templates and Visual Studio features. There are two ways to install the .NET Aspire workload. If you prefer to use Visual Studio Code, follow the .NET CLI instructions:
Visual Studio 2022 17.10 or higher includes the latest .NET Aspire workload by default. To verify that you have the .NET Aspire workload installed, run the following command:
dotnet workload list
If you have an earlier version of Visual Studio 2022, you can either upgrade to Visual Studio 2022 17.10 or you can install the .NET Aspire workload using the following steps:
To install the .NET Aspire workload in Visual Studio 2022, use the Visual Studio installer.
Open the Visual Studio Installer.
Select Modify next to Visual Studio 2022.
Select the ASP.NET and web development workload.
On the Installation details panel, select .NET Aspire SDK (Preview).
Select Modify to install the .NET Aspire component.

To ensure that you install the latest version of the .NET Aspire workload, run the following dotnet workload update command before you install .NET Aspire:
dotnet workload updateTo install the .NET Aspire workload from the .NET CLI, use the dotnet workload install command:
dotnet workload install aspireTo check your version of .NET Aspire, run this command:
dotnet workload list

To ensure that you install the latest version of the .NET Aspire workload, run the following dotnet workload update command before you install .NET Aspire:
dotnet workload update
To install the .NET Aspire workload from the .NET CLI, use the dotnet workload install command:
dotnet workload install aspire
To check your version of .NET Aspire, run this command:
dotnet workload list
Container runtime
.NET Aspire apps are designed to run in containers. You can use either Docker Desktop or Podman as your container runtime. Docker Desktop is the most common container runtime. Podman is an open-source daemonless alternative to Docker, that can build and run Open Container Initiative (OCI) containers. If your host environment has both Docker and Podman installed, .NET Aspire defaults to using Docker. You can instruct .NET Aspire to use Podman instead, by setting the DOTNET_ASPIRE_CONTAINER_RUNTIME environment variable to podman:
export DOTNET_ASPIRE_CONTAINER_RUNTIME=podman
For more information, see Install Podman on Linux.
.NET Aspire project templates
The .NET Aspire workload makes available .NET Aspire project templates. These project templates allow you to create new apps pre-configured with the .NET Aspire project structure and default settings. These projects also provide a unified debugging experience across the different resources of your app.
There are currently four project templates available:
.NET Aspire Application: A minimal .NET Aspire app that includes the following:
AspireSample.AppHost: An orchestrator project designed to connect and configure the different projects and services of your app.
AspireSample.ServiceDefaults: A .NET Aspire shared project to manage configurations that are reused across the projects in your solution related to resilience, service discovery, and telemetry.
.NET Aspire Starter Application: In addition to the .AppHost and .ServiceDefaults projects, the .NET Aspire Starter Application also includes the following:
AspireSample.ApiService: An ASP.NET Core Minimal API project is used to provide data to the frontend. This project depends on the shared AspireSample.ServiceDefaults project.
AspireSample.Web: An ASP.NET Core Blazor App project with default .NET Aspire service configurations, this project depends on the AspireSample.ServiceDefaults project.
.NET Aspire App Host: A standalone .AppHost project that can be used to orchestrate and manage the different projects and services of your app.
.NET Aspire Test Project (xUnit): A project that contains xUnit.net integration of a .NET Aspire AppHost project.
.NET Aspire Service Defaults: A standalone .ServiceDefaults project that can be used to manage configurations that are reused across the projects in your solution related to resilience, service discovery, and telemetry.
Important
The service defaults project template takes a
FrameworkReferencedependency onMicrosoft.AspNetCore.App. This may not be ideal for some project types. For more information, see .NET Aspire service defaults.
Use Visual Studio, Visual Studio Code, or the .NET CLI to create new apps using these project templates. Explore additional .NET Aspire project templates in the .NET Aspire samples repository.
Note
The .NET 9.0 SDK causes issues with the .NET Aspire workloads ability to display templates, and create projects from the templates. If you're using .NET 9.0, know that your ability to create new .NET Aspire apps is currently limited. For more information, see .NET Aspire preview-3 cannot create app when .NET 9 is installed and .NET Aspire preview-3 installed with Visual Studio 17.10 doesn't show templates.
To create a .NET Aspire project using Visual Studio, search for Aspire in the Visual Studio new project window and select your desired template.

To see which .NET Aspire project templates are available, use the dotnet new list command, passing in the search term aspire:
dotnet new list aspire
When the .NET Aspire workload is installed, you'll see the following .NET Aspire templates:
These templates matched your input: 'aspire'

Template Name                     Short Name              Language  Tags
--------------------------------  ----------------------  --------  -------------------------------------------------------
.NET Aspire App Host              aspire-apphost          [C#]      Common/.NET Aspire/Cloud
.NET Aspire Application           aspire                  [C#]      Common/.NET Aspire/Cloud/Web/Web API/API/Service
.NET Aspire Service Defaults      aspire-servicedefaults  [C#]      Common/.NET Aspire/Cloud/Web/Web API/API/Service
.NET Aspire Starter Application   aspire-starter          [C#]      Common/.NET Aspire/Blazor/Web/Web API/API/Service/Cloud
.NET Aspire Test Project (xUnit)  aspire-xunit            [C#]      Common/.NET Aspire/Cloud/Web/Web API/API/Service/Test
To create a .NET Aspire project using the .NET CLI, use the dotnet new command and specify which template you would like to create.
To create a basic .NET Aspire project:
dotnet new aspire
To create a .NET Aspire project with a sample UI and API included:
dotnet new aspire-starter
.NET Aspire dashboard
.NET Aspire templates that expose the app host project also include a useful dashboard that can be used to monitor and inspect various aspects of your app, such as logs, traces, and environment configurations. This dashboard is designed to improve the local development experience and provides an overview of the overall state and structure of your app.
The .NET Aspire dashboard is only visible while the app is running and starts automatically when you start the .AppHost project. Visual Studio launches both your app and the .NET Aspire dashboard for you automatically in your browser. If you start the app using the .NET CLI, copy and paste the dashboard URL from the output into your browser, or hold Ctrl and select the link (if your terminal supports hyperlinks).

The left navigation provides links to the different parts of the dashboard, each of which you'll explore in the following sections.

Visual Studio tooling
Visual Studio provides additional features for working with .NET Aspire components and the App Host orchestrator project. Not all of these features are currently available in Visual Studio Code or through the CLI.
Add a component package
You add .NET Aspire components to your app like any other NuGet package using Visual Studio. However, Visual Studio also provides UI options to add .NET Aspire components directly.
In Visual Studio, right click on the project you want to add an .NET Aspire component to and select Add > .NET Aspire package....

The package manager will open with search results pre-configured (populating filter criteria) for .NET Aspire components, allowing you to easily browse and select the desired component.


For more information on .NET Aspire components, see .NET Aspire components overview.
Add hosting packages
.NET Aspire hosting packages are used to configure various resources and dependencies an app may depend on or consume. Hosting packages are differentiated from other component packages in that they are added to the .AppHost project. To add a hosting package to your app, follow these steps:
In Visual Studio, right click on the .AppHost project and select Add > .NET Aspire package....

The package manager will open with search results pre-configured (populating filter criteria) for .NET Aspire hosting packages, allowing you to easily browse and select the desired package.


Add orchestration projects
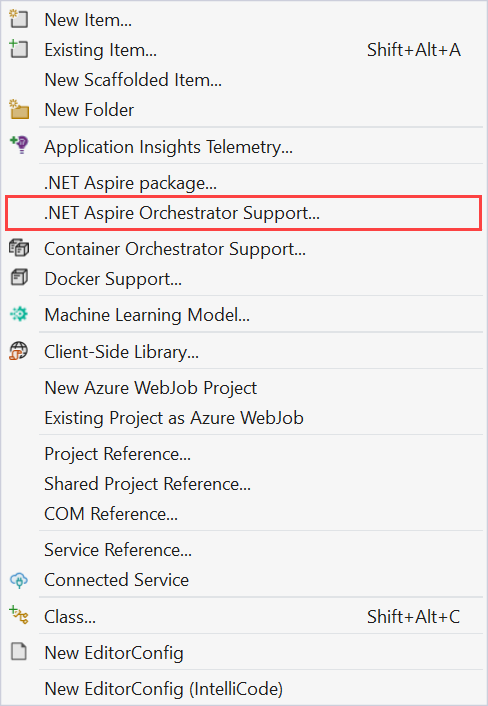
You can add .NET Aspire orchestration projects to an existing app using the following steps:
In Visual Studio, right click on an existing project and select Add > .NET Aspire Orchestrator Support...
A dialog window will open with a summary of the .AppHost and .ServiceDefaults projects that will be added to your solution.

Select OK and the following changes will be applied:
- The .AppHost and .ServiceDefault orchestration projects will be added to your solution.
- A call to
builder.AddServiceDefaultswill be added to the Program.cs file of your original project. - A reference to your original project will be added to the Program.cs file of the .AppHost project.

For more information on .NET Aspire orchestration, see .NET Aspire orchestration overview.
Enlist in orchestration
Visual Studio provides the option to Enlist in Aspire orchestration during the new project workflow. Select this option to have Visual Studio create .AppHost and .ServiceDefault projects alongside your selected project template.

Create test project
When you're using Visual Studio, and you select the .NET Aspire Start Application template, you have the option to include a test project. This test project is an xUnit project that includes a sample test that you can use as a starting point for your tests.

For more information, see Testing .NET Aspire apps.
Visual Studio Code tooling
You can use Visual Studio Code, in conjunction with the C# Dev Kit extension, to create and develop .NET Aspire apps. To create a new .NET Aspire app in Visual Studio Code, select the Create .NET Project button in the Explorer view, then select one of the .NET Aspire templates:

Once you've created a new .NET Aspire project, you run and debug the app, stepping through breakpoints, and inspecting variables using the Visual Studio Code debugger:

See also
Feedback
Bald verfügbar: Im Laufe des Jahres 2024 werden wir GitHub-Issues stufenweise als Feedbackmechanismus für Inhalte abbauen und durch ein neues Feedbacksystem ersetzen. Weitere Informationen finden Sie unter https://aka.ms/ContentUserFeedback.
Feedback senden und anzeigen für