Tutorial: Automated visual inspection using transfer learning with the ML.NET Image Classification API
Learn how to train a custom deep learning model using transfer learning, a pretrained TensorFlow model and the ML.NET Image Classification API to classify images of concrete surfaces as cracked or uncracked.
In this tutorial, you learn how to:
- Understand the problem
- Learn about ML.NET Image Classification API
- Understand the pretrained model
- Use transfer learning to train a custom TensorFlow image classification model
- Classify images with the custom model
Prerequisites
Image classification transfer learning sample overview
This sample is a C# console application that classifies images using a pretrained deep learning TensorFlow model. The code for this sample can be found on the samples browser.
Understand the problem
Image classification is a computer vision problem. Image classification takes an image as input and categorizes it into a prescribed class. Image classification models are commonly trained using deep learning and neural networks. See Deep learning vs. machine learning for more information.
Some scenarios where image classification is useful include:
- Facial recognition
- Emotion detection
- Medical diagnosis
- Landmark detection
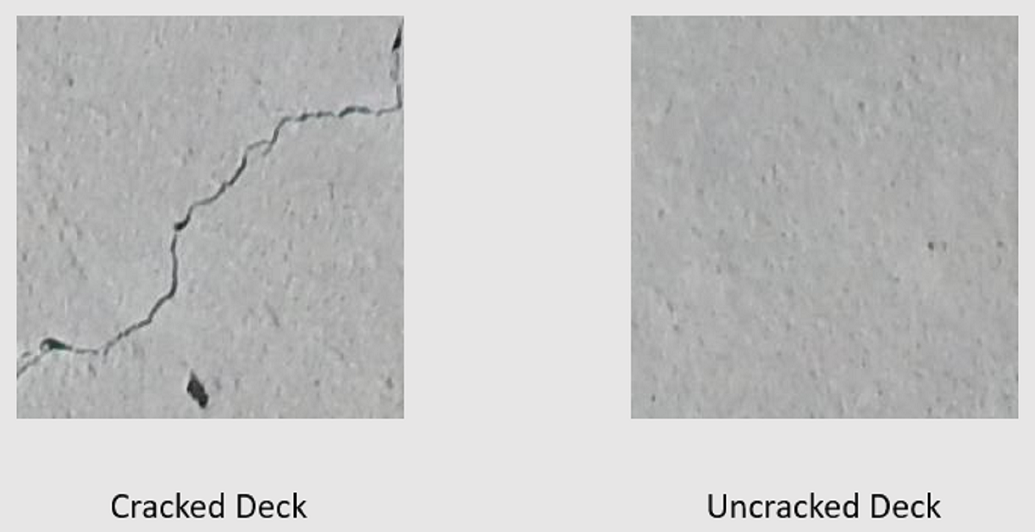
This tutorial trains a custom image classification model to perform automated visual inspection of bridge decks to identify structures that are damaged by cracks.
ML.NET Image Classification API
ML.NET provides various ways of performing image classification. This tutorial applies transfer learning using the Image Classification API. The Image Classification API makes use of TensorFlow.NET, a low-level library that provides C# bindings for the TensorFlow C++ API.
What is transfer learning?
Transfer learning applies knowledge gained from solving one problem to another related problem.
Training a deep learning model from scratch requires setting several parameters, a large amount of labeled training data, and a vast amount of compute resources (hundreds of GPU hours). Using a pretrained model along with transfer learning allows you to shortcut the training process.
Training process
The Image Classification API starts the training process by loading a pretrained TensorFlow model. The training process consists of two steps:
- Bottleneck phase
- Training phase
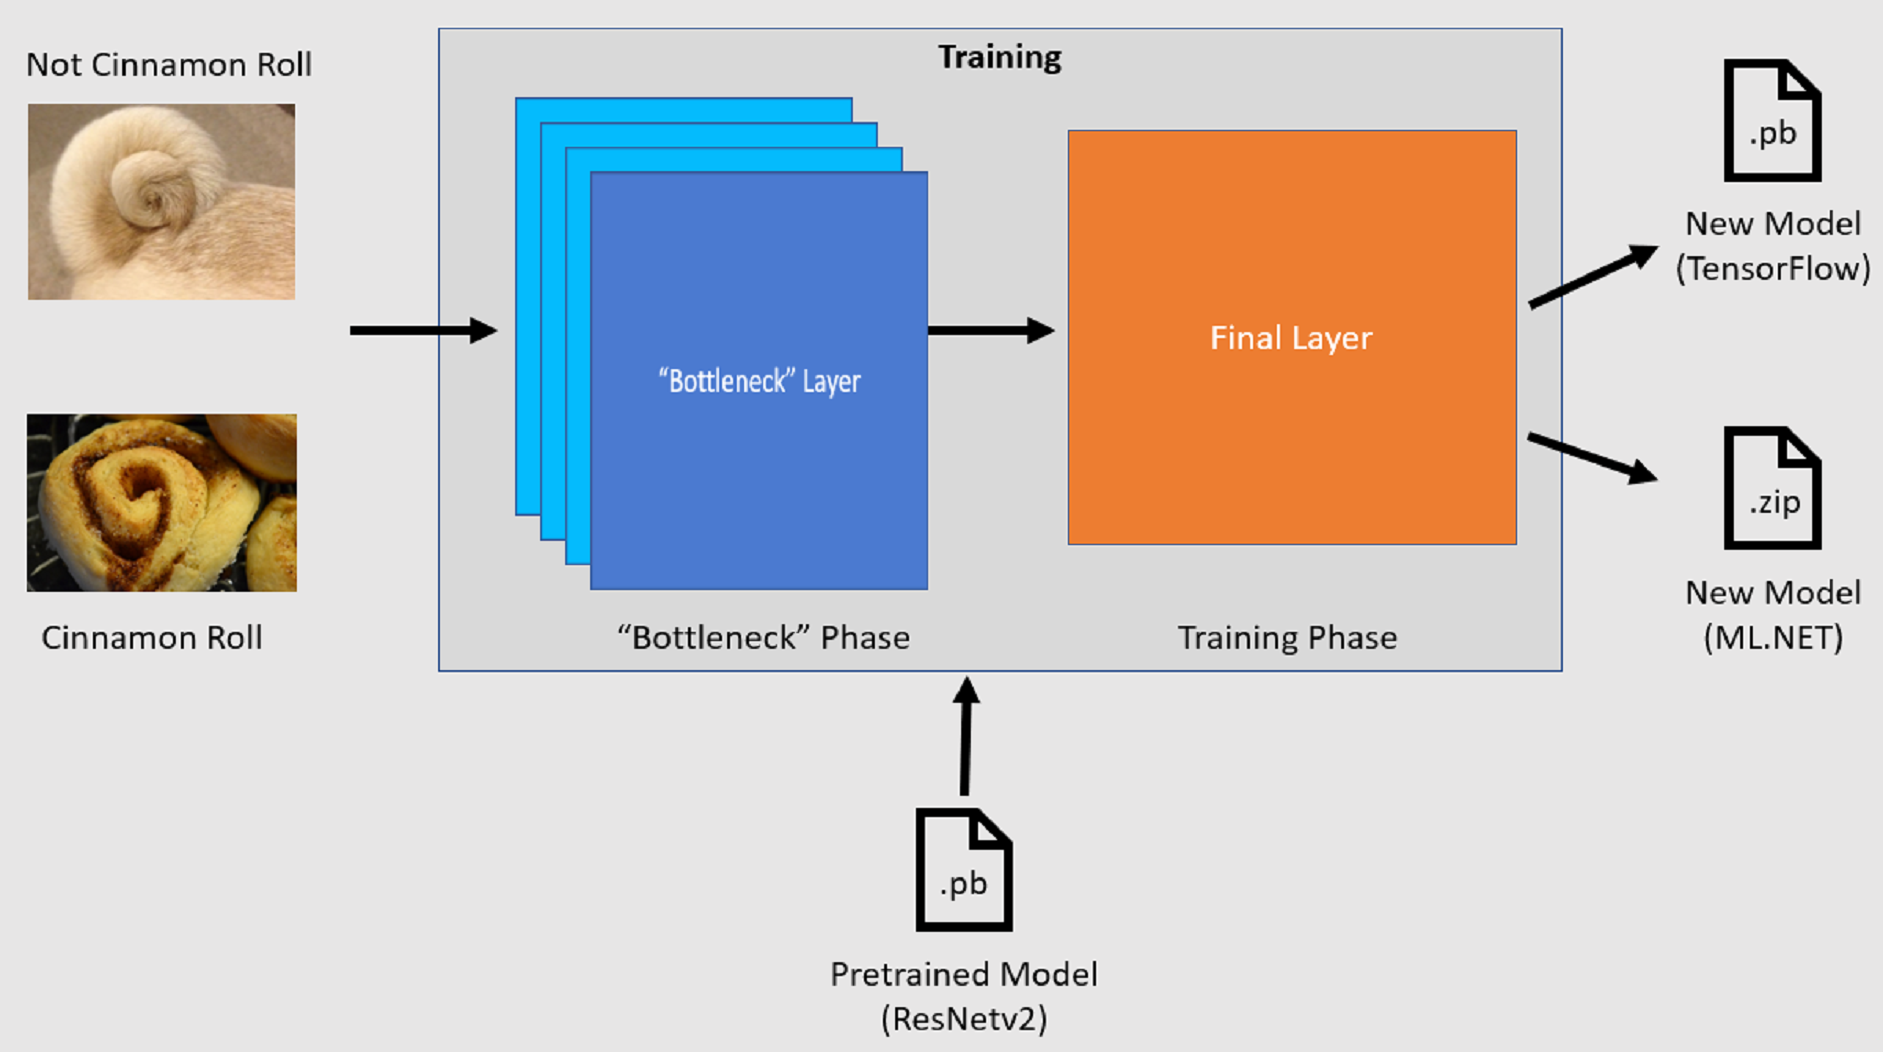
Bottleneck phase
During the bottleneck phase, the set of training images is loaded and the pixel values are used as input, or features, for the frozen layers of the pretrained model. The frozen layers include all of the layers in the neural network up to the penultimate layer, informally known as the bottleneck layer. These layers are referred to as frozen because no training will occur on these layers and operations are pass-through. It's at these frozen layers where the lower-level patterns that help a model differentiate between the different classes are computed. The larger the number of layers, the more computationally intensive this step is. Fortunately, since this is a one-time calculation, the results can be cached and used in later runs when experimenting with different parameters.
Training phase
Once the output values from the bottleneck phase are computed, they are used as input to retrain the final layer of the model. This process is iterative and runs for the number of times specified by model parameters. During each run, the loss and accuracy are evaluated. Then, the appropriate adjustments are made to improve the model with the goal of minimizing the loss and maximizing the accuracy. Once training is finished, two model formats are output. One of them is the .pb version of the model and the other is the .zip ML.NET serialized version of the model. When working in environments supported by ML.NET, it is recommended to use the .zip version of the model. However, in environments where ML.NET is not supported, you have the option of using the .pb version.
Understand the pretrained model
The pretrained model used in this tutorial is the 101-layer variant of the Residual Network (ResNet) v2 model. The original model is trained to classify images into a thousand categories. The model takes as input an image of size 224 x 224 and outputs the class probabilities for each of the classes it's trained on. Part of this model is used to train a new model using custom images to make predictions between two classes.
Create console application
Now that you have a general understanding of transfer learning and the Image Classification API, it's time to build the application.
Create a C# Console Application called "DeepLearning_ImageClassification_Binary". Click the Next button.
Choose .NET 6 as the framework to use. Click the Create button.
Install the Microsoft.ML NuGet Package:
Note
This sample uses the latest stable version of the NuGet packages mentioned unless otherwise stated.
- In Solution Explorer, right-click on your project and select Manage NuGet Packages.
- Choose "nuget.org" as the Package source.
- Select the Browse tab.
- Check the Include prerelease checkbox.
- Search for Microsoft.ML.
- Select the Install button.
- Select the OK button on the Preview Changes dialog and then select the I Accept button on the License Acceptance dialog if you agree with the license terms for the packages listed.
- Repeat these steps for the Microsoft.ML.Vision, SciSharp.TensorFlow.Redist version 2.3.1, and Microsoft.ML.ImageAnalytics NuGet packages.
Prepare and understand the data
Note
The datasets for this tutorial are from Maguire, Marc; Dorafshan, Sattar; and Thomas, Robert J., "SDNET2018: A concrete crack image dataset for machine learning applications" (2018). Browse all Datasets. Paper 48. https://digitalcommons.usu.edu/all_datasets/48
SDNET2018 is an image dataset that contains annotations for cracked and non-cracked concrete structures (bridge decks, walls, and pavement).
The data is organized in three subdirectories:
- D contains bridge deck images
- P contains pavement images
- W contains wall images
Each of these subdirectories contains two additional prefixed subdirectories:
- C is the prefix used for cracked surfaces
- U is the prefix used for uncracked surfaces
In this tutorial, only bridge deck images are used.
- Download the dataset and unzip.
- Create a directory named "assets" in your project to save your dataset files.
- Copy the CD and UD subdirectories from the recently unzipped directory to the assets directory.
Create input and output classes
Open the Program.cs file and replace the existing
usingstatements at the top of the file with the following:using System; using System.Collections.Generic; using System.Linq; using System.IO; using Microsoft.ML; using static Microsoft.ML.DataOperationsCatalog; using Microsoft.ML.Vision;Below the
Programclass in Program.cs, create a class calledImageData. This class is used to represent the initially loaded data.class ImageData { public string ImagePath { get; set; } public string Label { get; set; } }ImageDatacontains the following properties:ImagePathis the fully qualified path where the image is stored.Labelis the category the image belongs to. This is the value to predict.
Create classes for your input and output data
Below the
ImageDataclass, define the schema of your input data in a new class calledModelInput.class ModelInput { public byte[] Image { get; set; } public UInt32 LabelAsKey { get; set; } public string ImagePath { get; set; } public string Label { get; set; } }ModelInputcontains the following properties:Imageis thebyte[]representation of the image. The model expects image data to be of this type for training.LabelAsKeyis the numerical representation of theLabel.ImagePathis the fully qualified path where the image is stored.Labelis the category the image belongs to. This is the value to predict.
Only
ImageandLabelAsKeyare used to train the model and make predictions. TheImagePathandLabelproperties are kept for convenience to access the original image file name and category.Then, below the
ModelInputclass, define the schema of your output data in a new class calledModelOutput.class ModelOutput { public string ImagePath { get; set; } public string Label { get; set; } public string PredictedLabel { get; set; } }ModelOutputcontains the following properties:ImagePathis the fully qualified path where the image is stored.Labelis the original category the image belongs to. This is the value to predict.PredictedLabelis the value predicted by the model.
Similar to
ModelInput, only thePredictedLabelis required to make predictions since it contains the prediction made by the model. TheImagePathandLabelproperties are retained for convenience to access the original image file name and category.
Create workspace directory
When training and validation data do not change often, it is good practice to cache the computed bottleneck values for further runs.
- In your project, create a new directory called workspace to store the computed bottleneck values and
.pbversion of the model.
Define paths and initialize variables
Under the using statements, define the location of your assets, computed bottleneck values and
.pbversion of the model.var projectDirectory = Path.GetFullPath(Path.Combine(AppContext.BaseDirectory, "../../../")); var workspaceRelativePath = Path.Combine(projectDirectory, "workspace"); var assetsRelativePath = Path.Combine(projectDirectory, "assets");Initialize the
mlContextvariable with a new instance of MLContext.MLContext mlContext = new MLContext();The MLContext class is a starting point for all ML.NET operations, and initializing mlContext creates a new ML.NET environment that can be shared across the model creation workflow objects. It's similar, conceptually, to
DbContextin Entity Framework.
Load the data
Create data loading utility method
The images are stored in two subdirectories. Before loading the data, it needs to be formatted into a list of ImageData objects. To do so, create the LoadImagesFromDirectory method.
IEnumerable<ImageData> LoadImagesFromDirectory(string folder, bool useFolderNameAsLabel = true)
{

}
Inside the
LoadImagesFromDirectory, add the following code to get all of the file paths from the subdirectories:var files = Directory.GetFiles(folder, "*", searchOption: SearchOption.AllDirectories);Then, iterate through each of the files using a
foreachstatement.foreach (var file in files) { }Inside the
foreachstatement, check that the file extensions are supported. The Image Classification API supports JPEG and PNG formats.if ((Path.GetExtension(file) != ".jpg") && (Path.GetExtension(file) != ".png")) continue;Then, get the label for the file. If the
useFolderNameAsLabelparameter is set totrue, then the parent directory where the file is saved is used as the label. Otherwise, it expects the label to be a prefix of the file name or the file name itself.var label = Path.GetFileName(file); if (useFolderNameAsLabel) label = Directory.GetParent(file).Name; else { for (int index = 0; index < label.Length; index++) { if (!char.IsLetter(label[index])) { label = label.Substring(0, index); break; } } }Finally, create a new instance of
ModelInput.yield return new ImageData() { ImagePath = file, Label = label };
Prepare the data
Call the
LoadImagesFromDirectoryutility method to get the list of images used for training after initializing themlContextvariable.IEnumerable<ImageData> images = LoadImagesFromDirectory(folder: assetsRelativePath, useFolderNameAsLabel: true);Then, load the images into an
IDataViewusing theLoadFromEnumerablemethod.IDataView imageData = mlContext.Data.LoadFromEnumerable(images);The data is loaded in the order it was read from the directories. To balance the data, shuffle it using the
ShuffleRowsmethod.IDataView shuffledData = mlContext.Data.ShuffleRows(imageData);Machine learning models expect input to be in numerical format. Therefore, some preprocessing needs to be done on the data prior to training. Create an
EstimatorChainmade up of theMapValueToKeyandLoadRawImageBytestransforms. TheMapValueToKeytransform takes the categorical value in theLabelcolumn, converts it to a numericalKeyTypevalue and stores it in a new column calledLabelAsKey. TheLoadImagestakes the values from theImagePathcolumn along with theimageFolderparameter to load images for training.var preprocessingPipeline = mlContext.Transforms.Conversion.MapValueToKey( inputColumnName: "Label", outputColumnName: "LabelAsKey") .Append(mlContext.Transforms.LoadRawImageBytes( outputColumnName: "Image", imageFolder: assetsRelativePath, inputColumnName: "ImagePath"));Use the
Fitmethod to apply the data to thepreprocessingPipelineEstimatorChainfollowed by theTransformmethod, which returns anIDataViewcontaining the pre-processed data.IDataView preProcessedData = preprocessingPipeline .Fit(shuffledData) .Transform(shuffledData);To train a model, it's important to have a training dataset as well as a validation dataset. The model is trained on the training set. How well it makes predictions on unseen data is measured by the performance against the validation set. Based on the results of that performance, the model makes adjustments to what it has learned in an effort to improve. The validation set can come from either splitting your original dataset or from another source that has already been set aside for this purpose. In this case, the pre-processed dataset is split into training, validation and test sets.
TrainTestData trainSplit = mlContext.Data.TrainTestSplit(data: preProcessedData, testFraction: 0.3);
TrainTestData validationTestSplit = mlContext.Data.TrainTestSplit(trainSplit.TestSet);
The code sample above performs two splits. First, the pre-processed data is split and 70% is used for training while the remaining 30% is used for validation. Then, the 30% validation set is further split into validation and test sets where 90% is used for validation and 10% is used for testing.
A way to think about the purpose of these data partitions is taking an exam. When studying for an exam, you review your notes, books, or other resources to get a grasp on the concepts that are on the exam. This is what the train set is for. Then, you might take a mock exam to validate your knowledge. This is where the validation set comes in handy. You want to check whether you have a good grasp of the concepts before taking the actual exam. Based on those results, you take note of what you got wrong or didn't understand well and incorporate your changes as you review for the real exam. Finally, you take the exam. This is what the test set is used for. You've never seen the questions that are on the exam and now use what you learned from training and validation to apply your knowledge to the task at hand.
Assign the partitions their respective values for the train, validation and test data.
IDataView trainSet = trainSplit.TrainSet;
IDataView validationSet = validationTestSplit.TrainSet;
IDataView testSet = validationTestSplit.TestSet;
Define the training pipeline
Model training consists of a couple of steps. First, Image Classification API is used to train the model. Then, the encoded labels in the PredictedLabel column are converted back to their original categorical value using the MapKeyToValue transform.
Create a new variable to store a set of required and optional parameters for an ImageClassificationTrainer.
var classifierOptions = new ImageClassificationTrainer.Options()
{
    FeatureColumnName = "Image",
    LabelColumnName = "LabelAsKey",
    ValidationSet = validationSet,
    Arch = ImageClassificationTrainer.Architecture.ResnetV2101,
    MetricsCallback = (metrics) => Console.WriteLine(metrics),
    TestOnTrainSet = false,
    ReuseTrainSetBottleneckCachedValues = true,
    ReuseValidationSetBottleneckCachedValues = true
};
An ImageClassificationTrainer takes several optional parameters:
FeatureColumnNameis the column that is used as input for the model.LabelColumnNameis the column for the value to predict.ValidationSetis theIDataViewcontaining the validation data.Archdefines which of the pretrained model architectures to use. This tutorial uses the 101-layer variant of the ResNetv2 model.MetricsCallbackbinds a function to track the progress during training.TestOnTrainSettells the model to measure performance against the training set when no validation set is present.ReuseTrainSetBottleneckCachedValuestells the model whether to use the cached values from the bottleneck phase in subsequent runs. The bottleneck phase is a one-time pass-through computation that is computationally intensive the first time it is performed. If the training data does not change and you want to experiment using a different number of epochs or batch size, using the cached values significantly reduces the amount of time required to train a model.ReuseValidationSetBottleneckCachedValuesis similar toReuseTrainSetBottleneckCachedValuesonly that in this case it's for the validation dataset.WorkspacePathdefines the directory where to store the computed bottleneck values and.pbversion of the model.
Define the
EstimatorChaintraining pipeline that consists of both themapLabelEstimatorand the ImageClassificationTrainer.var trainingPipeline = mlContext.MulticlassClassification.Trainers.ImageClassification(classifierOptions) .Append(mlContext.Transforms.Conversion.MapKeyToValue("PredictedLabel"));Use the
Fitmethod to train your model.ITransformer trainedModel = trainingPipeline.Fit(trainSet);
Use the model
Now that you have trained your model, it's time to use it to classify images.
Create a new utility method called OutputPrediction to display prediction information in the console.
private static void OutputPrediction(ModelOutput prediction)
{
    string imageName = Path.GetFileName(prediction.ImagePath);
    Console.WriteLine($"Image: {imageName} | Actual Value: {prediction.Label} | Predicted Value: {prediction.PredictedLabel}");
}
Classify a single image
Create a new method called
ClassifySingleImageto make and output a single image prediction.void ClassifySingleImage(MLContext mlContext, IDataView data, ITransformer trainedModel) { }Create a
PredictionEngineinside theClassifySingleImagemethod. ThePredictionEngineis a convenience API, which allows you to pass in and then perform a prediction on a single instance of data.PredictionEngine<ModelInput, ModelOutput> predictionEngine = mlContext.Model.CreatePredictionEngine<ModelInput, ModelOutput>(trainedModel);To access a single
ModelInputinstance, convert thedataIDataViewinto anIEnumerableusing theCreateEnumerablemethod and then get the first observation.ModelInput image = mlContext.Data.CreateEnumerable<ModelInput>(data,reuseRowObject:true).First();Use the
Predictmethod to classify the image.ModelOutput prediction = predictionEngine.Predict(image);Output the prediction to the console with the
OutputPredictionmethod.Console.WriteLine("Classifying single image"); OutputPrediction(prediction);Call
ClassifySingleImagebelow calling theFitmethod using the test set of images.ClassifySingleImage(mlContext, testSet, trainedModel);
Classify multiple images
Add a new method called
ClassifyImagesbelow theClassifySingleImagemethod to make and output multiple image predictions.void ClassifyImages(MLContext mlContext, IDataView data, ITransformer trainedModel) { }Create an
IDataViewcontaining the predictions by using theTransformmethod. Add the following code inside theClassifyImagesmethod.IDataView predictionData = trainedModel.Transform(data);In order to iterate over the predictions, convert the
predictionDataIDataViewinto anIEnumerableusing theCreateEnumerablemethod and then get the first 10 observations.IEnumerable<ModelOutput> predictions = mlContext.Data.CreateEnumerable<ModelOutput>(predictionData, reuseRowObject: true).Take(10);Iterate and output the original and predicted labels for the predictions.
Console.WriteLine("Classifying multiple images");
foreach (var prediction in predictions)
{
    OutputPrediction(prediction);
}
Finally, call
ClassifyImagesbelow theClassifySingleImage()method using the test set of images.ClassifyImages(mlContext, testSet, trainedModel);
Run the application
Run your console app. The output should be similar to that below. You may see warnings or processing messages, but these messages have been removed from the following results for clarity. For brevity, the output has been condensed.
Bottleneck phase
No value is printed for the image name because the images are loaded as a byte[] therefore there is no image name to display.
Phase: Bottleneck Computation, Dataset used:      Train, Image Index: 279
Phase: Bottleneck Computation, Dataset used:      Train, Image Index: 280
Phase: Bottleneck Computation, Dataset used: Validation, Image Index:   1
Phase: Bottleneck Computation, Dataset used: Validation, Image Index:   2
Training phase
Phase: Training, Dataset used: Validation, Batch Processed Count:   6, Epoch:  21, Accuracy:  0.6797619
Phase: Training, Dataset used: Validation, Batch Processed Count:   6, Epoch:  22, Accuracy:  0.7642857
Phase: Training, Dataset used: Validation, Batch Processed Count:   6, Epoch:  23, Accuracy:  0.7916667
Classify images output
Classifying single image
Image: 7001-220.jpg | Actual Value: UD | Predicted Value: UD

Classifying multiple images
Image: 7001-220.jpg | Actual Value: UD | Predicted Value: UD
Image: 7001-163.jpg | Actual Value: UD | Predicted Value: UD
Image: 7001-210.jpg | Actual Value: UD | Predicted Value: UD
Upon inspection of the 7001-220.jpg image, you can see that it in fact is not cracked.

Congratulations! You've now successfully built a deep learning model for classifying images.
Improve the model
If you're not satisfied with the results of your model, you can try to improve its performance by trying some of the following approaches:
- More Data: The more examples a model learns from, the better it performs. Download the full SDNET2018 dataset and use it to train.
- Augment the data: A common technique to add variety to the data is to augment the data by taking an image and applying different transforms (rotate, flip, shift, crop). This adds more varied examples for the model to learn from.
- Train for a longer time: The longer you train, the more tuned the model will be. Increasing the number of epochs may improve the performance of your model.
- Experiment with the hyper-parameters: In addition to the parameters used in this tutorial, other parameters can be tuned to potentially improve performance. Changing the learning rate, which determines the magnitude of updates made to the model after each epoch may improve performance.
- Use a different model architecture: Depending on what your data looks like, the model that can best learn its features may differ. If you're not satisfied with the performance of your model, try changing the architecture.
Next steps
In this tutorial, you learned how to build a custom deep learning model using transfer learning, a pretrained image classification TensorFlow model and the ML.NET Image Classification API to classify images of concrete surfaces as cracked or uncracked.
Advance to the next tutorial to learn more.
Feedback
Coming soon: Throughout 2024 we will be phasing out GitHub Issues as the feedback mechanism for content and replacing it with a new feedback system. For more information see: https://aka.ms/ContentUserFeedback.
Submit and view feedback for