Modify menu commands for a report visual
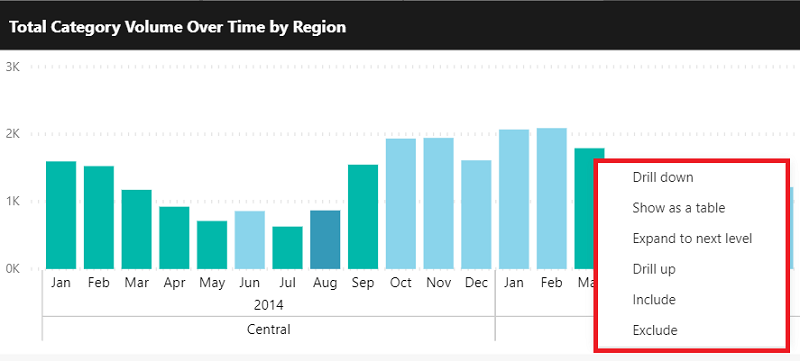
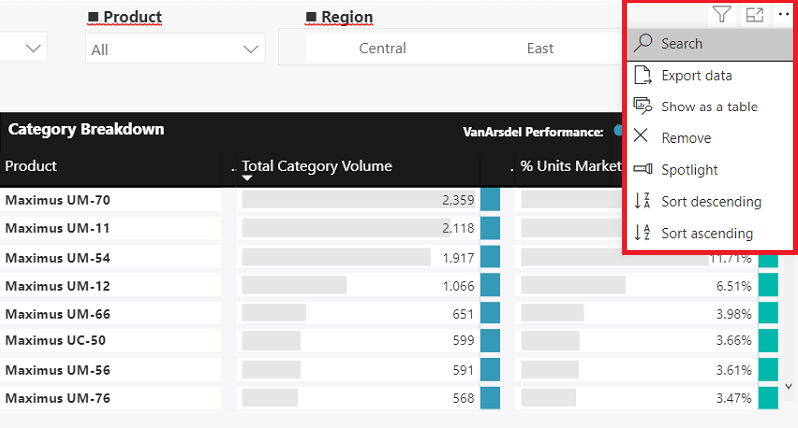
Visuals in Power BI have menus that let your app users change the way they see their data. For example, using the Context menu, data points can be included or excluded from a visual. The Options menu can be used to export the data contained in a visual to a spreadsheet.
Open the Context menu by right-clicking a visual or a specific data point within a visual.
Open the Options menu by selecting the ellipsis in the top-right corner of the visual.
Note
If the visual header for a visual is hidden, the ellipsis does not display.
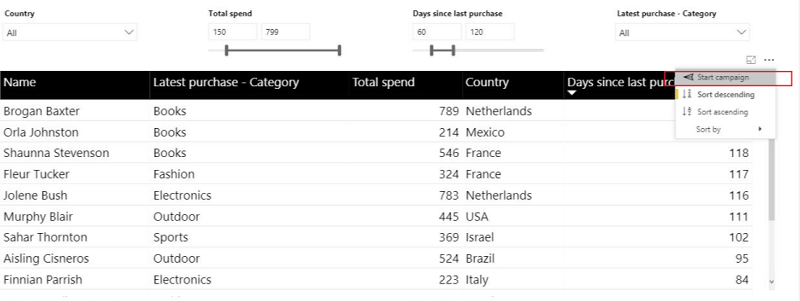
This API provides a way to extend these menus, so you to add commands for your users and enhance the app experience. You can further customize the menus by hiding or disabling actions. For example, you can hide the Spotlight built-in command for the options menu.
How to modify menu commands
Modify the menus by using extensions to add commands, and commands to change how the built-in commands display.
You can configure the API to work on report load (embed configuration), or you can call the report updateSettings method to update the added items after a report loads. See Configure report settings and Hide or show visual headers to learn more.
The new menu settings are applied on all visuals in the report. To apply a setting to a specific visual, use Selectors.
Extend menu commands
Use the following parameters to build a command definition:
- name - The command name.
- title - The title for the command. This is used as default, if there's no override inside
visualContextMenuandvisualOptionsMenu. - icon (optional) - The image you want to display as an icon. Icons are only supported in the options menu.
- extend - Define the menu that the command extends. You can add the command to the visual context menu, the visual options menu, or both. It's also possible to customize the properties in each menu, such as the menu title or icon location.
Add the command definition to the commands array in the extensions object, which is passed to the report settings. Commands is an array of ICommandExtension inside extensions, which is of type IExtensions.
let embedConfig = {
    ...
    settings: {
        extensions: {
            commands: [...]
        }
    }
};
You should also handle the commandTriggered event for the new command. This event is triggered specifically for the commandName.
report.on("commandTriggered", function(event) {
    let commandName = event.detail.command;
    ...
    if (commandName === "command name") {
        // Handler code
    }
});
For more information about handling events, see How to handle events.
Icons are optional. If you choose to use one, it must be converted to Base 64. See the following code for an example of a valid Base 64 icon.
"data:image/png;base64,iVBORw0KGgoAAAANSUhEUgAAAIAAAACACAMAAAD04JH5AAACcFBMVEUAAAAAAAAAAAAAAAA/Pz8zMzMqKiokJCQfHx8cHBwZGRkuLi4qKionJyckJCQiIiIfHx8cHBwoKCgmJiYkJCQiIiIhISEfHx8eHh4nJyclJSUkJCQjIyMiIiIgICAfHx8mJiYlJSUkJCQjIyMhISEgICAfHx8lJSUkJCQiIiIhISElJSUjIyMjIyMiIiIhISEhISElJSUkJCQjIyMiIiIhISEkJCQiIiIhISEkJCQjIyMjIyMiIiIiIiIhISEhISEjIyMjIyMjIyMiIiIiIiIhISEjIyMiIiIhISEkJCQjIyMiIiIiIiIiIiIhISEkJCQjIyMjIyMiIiIiIiIhISEkJCQjIyMjIyMiIiIiIiIiIiIkJCQjIyMjIyMiIiIiIiIiIiIjIyMjIyMjIyMiIiIiIiIiIiIiIiIjIyMjIyMjIyMiIiIiIiIiIiIjIyMjIyMjIyMjIyMiIiIiIiIiIiIiIiIhISEiIiIiIiIjIyMhISEiIiIiIiIiIiIjIyMjIyMjIyMjIyMhISEiIiIiIiIjIyMjIyMiIiIiIiIjIyMjIyMhISEiIiIiIiIjIyMjIyMjIyMjIyMjIyMjIyMhISEhISEiIiIjIyMjIyMhISEiIiIiIiIjIyMjIyMjIyMhISEhISEiIiIjIyMjIyMjIyMhISEhISEiIiIjIyMjIyMjIyMjIyMhISEhISEhISEiIiIjIyMjIyMjIyMhISEhISEhISEiIiIjIyMjIyMjIyMjIyMhISEhISEhISEjIyMjIyMjIyMhISEhISEhISEiIiIjIyMjIyMjIyMhISEhISEhISEhISEjIyMjIyMjIyMjIyNZpHNAAAAAz3RSTlMAAQIDBAUGBwgJCgsMDQ4PEBITFBUWFxgZGhscHR4fICEiIyQmJygpKiwtMDIzNDU2Nzg5Oz0/QkVGR0hJSktMTk9QUVJTVllbXF5fYGFiY2VmZ2hpamtsbm9wcXN0dXd4eXp7fH1+f4CBg4SFhoeIiYqLjI2OkpOUl5mam5ydnp+goaKjpKapqqyusLGys7W2uru9vr/AwsTGx8jJysvNzs/Q0dLU1dbX2Nna29zd3t/g4eLj5OXm5+jp6uvs7e7v8fLz9PX29/j5+vv8/f5uCdcaAAADyklEQVQYGe3B+0NTZQAG4NftsKFotUBFY5XiBexehnbTCEtLKaVMrKhhmVciTcuszIiiMivNUrNC0RTE1KC4RyACbrDz/ksxQISxs53z7Zzz/bLnQUJCQkJCLEmedE8yhCR70j1JEDf/xT2H6/0M6Tx3cNuyW6Fb2tPbv6u+whB/3aEPCubBKGVJeSPDqKc2ZUGH7C2nVYZpKHvcCf28u5oZ2YmVLkSV/PzvjKxp523QJ3NfgNr+XueCJvf6BmrzfzwLsaXsCDC62qXQkHuR0flLJiKGJfWM7atURDD1G8b216OIJmkXdWlehHEeaaMeaqkCTdN+oU79RQizIUidjqVBw+w/qd8eB0ZxfkT9zt+BiBY00YgvHBjhrKARjVmI4M4mGrN/AoZNKKcx/3gxztQLNGorhpXSqJpUhHEepXHLMeg5GnfEgbG2U0DXHAyY300BmzHGIpUiKhVAqaKIYA5GcddSzBvABoqpduGGjRTUk+HtpaBijJjRQ1Fln1NU93Rct5vCgkEK24Fhqd2UosuDIW9SEh+G1FKScxj0IKW5FyG7Kc1OhJyhNCcxIE2lNEEPgDxKlAvgLUpUDKCcEn0G4FdKdBzAJUp0AUAbJWoB0EuJegBco0R9AOooUQeAE5SoHsABSnQGwIeU6ACATZToPQCrKVEBgGxKdA8GNFKaqwoGlFGaHxGygtIUI2SaSlmyMKiKkpzHkC2UpARDZvZRCjUTwyooxU+4biGlWI4RlZSgTsGIVZTgFdzgbqXt2lMwSiFt58NoSg1t1jARYyylzQoQ5jBt9YeCMAv6aaccjLOXNvoS46W10jYdMxBBLm2zChHto02+R2RTLtEW/82EhoeDtMMyaHqXNtgLba5KWu7sJEThbaXFOuciqpw+WisPMbxMS5Uipk9ooYMOxOQ6TsucngwdptfTIs1e6DKvjZa4cjd0uq+LFggshm6L/TSd+iwMeCZIs62FIS/RZMUwyEdTbYNhRTRRCQSsp2negZC1Ks2xFYJWqzSDD8Ly+xk3tRBxeLKHcQqsQFwe+pdxufoY4jT3MuPQcj/iln6KwmpmwQRTDlHQUQ9MobxPIZ+6YJYX/DQsWAQTLWymQR1PwFQZJ2nI2UyYbNJ+GlAxGebL76FOgUJYIruaulx+ABZJKacOX98C66zsZAzda2Cp239mVL/NgcUcr12jpsBGBdbLrqSGqrtgC+erXYyg16fALhnfcpwfZsNOT9VyjIt5sFnSujaOaH/dDfvd9HYLB7VvvhlyuPOPdAePrUmBRIobCQkJCQnx+R9iLyo0N1V+hgAAAABJRU5ErkJggg=="
The following code is a full code example for adding a menu command extension.
// Get models. Models contain enums that can be used.
let models = window['powerbi-client'].models;

let embedConfiguration = {
    type: 'report',
    id: '5dac7a4a-4452-46b3-99f6-a25915e0fe55',
    embedUrl: 'https://app.powerbi.com/reportEmbed',
    tokenType: models.TokenType.Aad,
    accessToken: 'e4...rf',
    settings: {
        ...
        extensions: {
            commands: [{
                name: "command name",
                title: "command title",
                icon: "data:image/png;base64,iVBORw0KGgoAAAANSUhEU...AAABJRU5ErkJggg==",
                extend: {
                    visualContextMenu: {
                        title: "context menu title",
                    },
                    visualOptionsMenu: {
                        title: "options menu title",
                    }
                }
            }]
        }
    }
};

...

// Embed the report and display it within the div container.
let report = powerbi.embed(embedContainer, embedConfiguration);

// Report.on will add an event handler to commandTriggered event which prints to console window.
report.on("commandTriggered", function (command) {
    console.log(command);
});
Set the menu item location
Commands are added to the bottom of the menu by default. For non-grouped commands, you can use the menuLocation property to select whether a command is placed at the top or bottom of the menu.
Note
When adding more than one extension to the top of the menu, the last extension added will be at the top.
For example, the following code allows you to set the options menu command extension at the top of the menu, and the context menu command at the bottom of the menu.
extensions: {
    commands: [{
       name: "command name",
       title: "command title",
       icon: "data:image/png;base64,iVBORw0KGgoAAAANSUhEU...AAABJRU5ErkJggg==",
       extend:
       {
           visualContextMenu: {
               title: "context menu title",
               menuLocation: models.MenuLocation.Bottom
           },
           visualOptionsMenu: {
               title: "options menu title",
               menuLocation: models.MenuLocation.Top
           }
       }
    }]
}
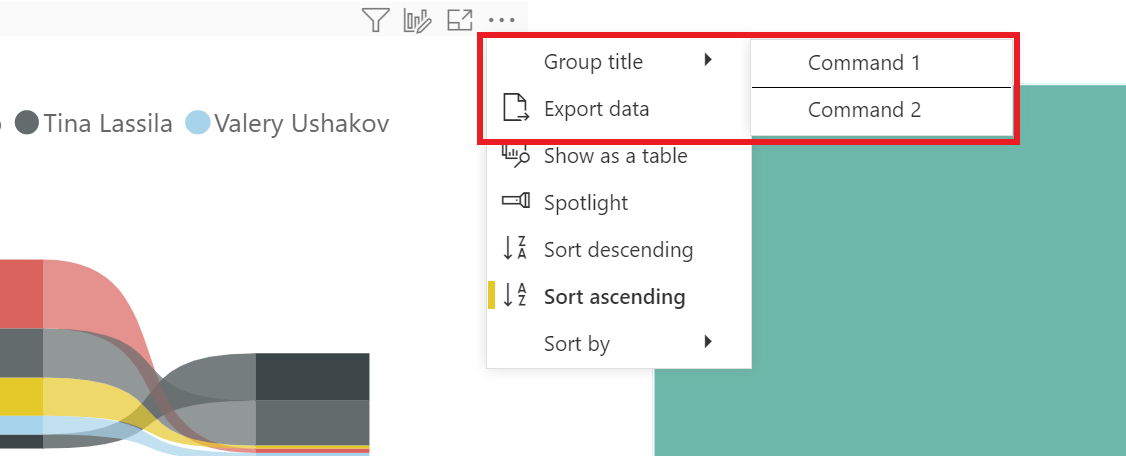
Group commands in a submenu
You can create a submenu to group commands with the following parameters:
- name - The group name. This is the group unique identifier.
- title - The title to show on the menu.
- menuLocation (optional) - Choose whether the group is placed at the top or bottom of the menu.
The group definition should be added to the groups array, which is an array of IMenuGroupExtension, inside the extensions object.
If you choose to use a menu location value, Top will place the group at the top of the menu at the time of adding the group's first command. If unused, or when using the Bottom value, the group will be added at the bottom of the menu at the time of adding the group's first command.
To add a command to a group that was defined in the group array, add the groupName property to the command.
The code below is a full code example of how to add a submenu to the options menu with two commands inside it.
extensions: {
    commands: [
        {
            name: "Command 1",
            title: "Command 1",
            extend: {
                visualOptionsMenu: {
                    groupName: "group-unique-identifier"
                }
            }
        },
        {
            name: "Command 2",
            title: "Command 2",
            extend: {
                visualOptionsMenu: {
                    groupName: "group-unique-identifier"
                }
            }
        }
    ],
    groups: [{
        name: "group-unique-identifier",
        title: "Group title",
        menuLocation: models.MenuLocation.Top
    }]
}
Customize menu commands
The display of built-in commands has three display modes.
- Enabled - The command appears if it's available for the visual.
- Disabled - The command appears if it's available for the visual but is grayed out (the user can't select the command).
- Hidden - The command doesn't appear.
The currently available built-in commands are:
- copy - Copy value, selection, or visual. Available only under the context menu (visual is available only in edit mode).
- drill - Use the drill mode. Available only under the context menu.
- drillthrough - Use the drill through feature. Available only under the context menu.
- expandCollapse - Expand or collapse selection, entire level, or entire hierarchy. Available only under the context menu.
- exportData - Export the data that was used to create a visualization. Available only under the options menu.
- includeExclude - Include or exclude data points. Available only under the context menu.
- removeVisual - Delete the visual. Available only under the options menu in edit mode.
- search - Toggle the search option for a slicer. Available only in edit mode.
- seeData - Display the data that was used to create a visualization (Also known as Show as a table).
- sort - Sort and select the sort order of the values by a selected data field. Available only under the options menu.
- spotlight - Spotlight a visual. Available only under the options menu.
- insightsAnalysis - Display insights about the visual. Available only under options menu.
- addComment - Add a comment to the visual. Available only under options menu.
- groupVisualContainers - Available only under context menu in edit mode.
- summarize - Display a summary of the visualization. Available only under the context menu.
- clearSelection - Available only under the context menu.
To customize the built-in commands display, define and pass a command object in the embed configuration settings. Commands are an array of ICommandsSettings.
let embedConfig = {
    ...
    settings: {
        commands: [...]
    }
};
The code below is a full code example for adding built-in commands.
// The new settings that you want to apply to the report.
const newSettings = {
    commands: [
        {
            spotlight: {
                displayOption: models.CommandDisplayOption.Hidden,
            },
            drill: {
                displayOption: models.CommandDisplayOption.Disabled,
            }
        }
    ]
};

// Update the settings by passing in the new settings you have configured.
await report.updateSettings(newSettings);