Azure SQL and Microsoft SQL Server Microsoft Graph connectors
The Microsoft SQL Server or Azure SQL Microsoft Graph connector allows your organization to discover and index data from an on-premises SQL Server database, or a database hosted in your Azure SQL instance in the cloud. The connector indexes specified content into Microsoft Search. To keep the index up to date with source data, it supports periodic full and incremental crawls. With these SQL connectors, you can also restrict access to search results for certain users.
Note
Read the Setup your Microsoft Graph connector article to understand the general Graph connectors setup instructions.
This article is for anyone who configures, runs, and monitors an Azure SQL or a Microsoft SQL server connector. It supplements the general setup process, and shows instructions that apply only for the Azure SQL and Microsoft SQL server connectors. This article also includes information about Limitations for both connectors.
Before you get started
Install the Microsoft Graph connector agent (required for on-premises Microsoft SQL Server connector only)
In order to access your on-premises third-party data, you must install and configure the connector agent. See Install the Microsoft Graph connector agent to learn more.
Note
If you use Windows authentication while configuring the Microsoft SQL Server connector, the user with which you are trying to sign in needs to have interactive logon rights to the machine where the connector agent is installed. Refer the documentation about logon policy management to check logon rights.
Step 1: Add a connector in the Microsoft 365 admin center
Follow the general setup instructions.
Step 2: Name the connection
Follow the general setup instructions.
Step 3: Configure the connection settings
Register an app (for Azure SQL connector only)
For Azure SQL connector, you must register an app in Microsoft Entra ID to allow Microsoft Search app to access data for indexing. To learn more about registering an app, refer to the Microsoft Graph documentation on how to register an app.
After completing the app registration and taking note of the app name, application (client) ID and tenant ID, you need to generate a new client secret. The client secret will only be displayed once. Remember to note & store the client secret securely. Use the client ID and client secret while configuring a new connection in Microsoft Search.
To add the registered app to your Azure SQL Database, you need to:
- Log in to your Azure SQL DB
- Open a new query window
- Create a new user by running the command 'CREATE USER [app name] FROM EXTERNAL PROVIDER'
- Add user to role by running command 'exec sp_addrolemember 'db_datareader', [app name]' Or 'ALTER ROLE db_datareader ADD MEMBER [app name]'
Note
To revoke access to any app registered in Microsoft Entra ID, refer the Azure documentation on removing a registered app.
Connection settings
To connect your Microsoft SQL Server connector to a data source, you must configure the database server you want crawled and the on-prem agent. You can then connect to the database with the required authentication method.
Note
- Your database must run SQL Server version 2008 or later for the Microsoft SQL Server connector to be able to connect.
- The Azure SQL connector only allows ingestion from an Azure SQL instance in the same tenant as of Microsoft 365. Cross-tenant data flow is not supported.
For the Azure SQL connector, you only need to specify the server name or IP address you want to connect to. Azure SQL connector only supports Microsoft Entra ID OpenID Connect (OIDC) authentication to connect to the database.
For added security, you may configure IP firewall rules for your Azure SQL Server or database. To learn more about setting up IP firewall rules, refer documentation on IP firewall rules. Add the following client IP ranges in the firewall settings.
| Region | M365 Enterprise | M365 Government |
|---|---|---|
| NAM | 52.250.92.252/30, 52.224.250.216/30 | 52.245.230.216/30, 20.141.117.64/30 |
| EUR | 20.54.41.208/30, 51.105.159.88/30 | NA |
| APC | 52.139.188.212/30, 20.43.146.44/30 | NA |
To search your database content, you must specify SQL queries when you configure the connector. These SQL queries need to name all the database columns that you want to index (that is, source properties), including any SQL joins that need to be performed to get all the columns. To restrict access to search results, you must specify Access Control Lists (ACLs) within SQL queries when you configure the connector.
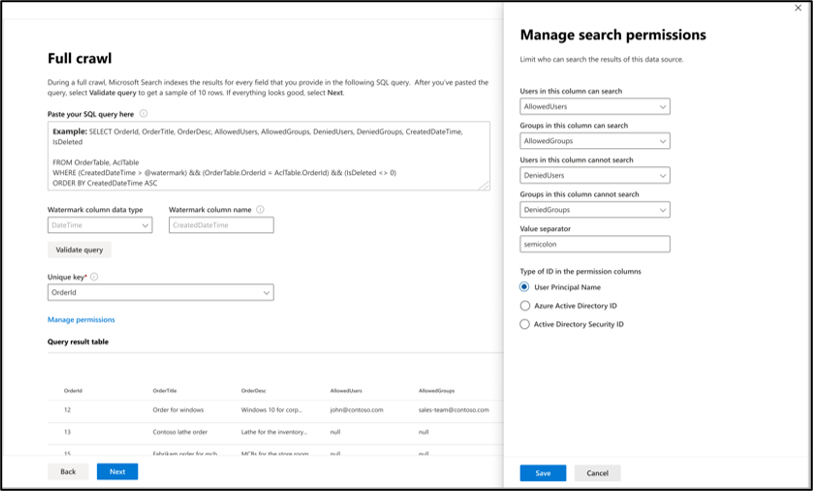
Step 3a: Full crawl (Required)
In this step, you configure the SQL query that runs a full crawl of the database. The full crawl selects all the columns or properties where you want to select the options Query, Search, or Retrieve. You can also specify ACL columns to restrict access of search results to specific users or groups.
Tip
To get all the columns that you need, you can join multiple tables.

Select data columns (Required) and ACL columns (Optional)
The example demonstrates a selection of five data columns that hold the data for the search: OrderId, OrderTitle, OrderDesc, CreatedDateTime, and IsDeleted. To set view permissions for each row of data, you can optionally select these ACL columns: AllowedUsers, AllowedGroups, DeniedUsers, and DeniedGroups. All these data columns also have the options to Query, Search, or Retrieve.
Select data columns as shown in this example query:
SELECT OrderId, OrderTitle, OrderDesc, AllowedUsers, AllowedGroups, DeniedUsers, DeniedGroups, CreatedDateTime, IsDeleted
Note that the SQL connectors do not allow column names with non-alphanumeric characters in the SELECT clause. Remove any non-alphanumeric characters from column names using an alias. Example - SELECT column_name AS columnName
To manage access to the search results, you can specify one or more ACL columns in the query. The SQL connector allows you to control access at per record level. You can choose to have the same access control for all records in a table. If the ACL information is stored in a separate table, you might have to do a join with those tables in your query.
The use of each of the ACL columns in the above query is described below. The following list explains the four access control mechanisms.
- AllowedUsers: This column specifies the list of user IDs who can access the search results. In the following example, list of users: john@contoso.com, keith@contoso.com, and lisa@contoso.com would only have access to a record with OrderId = 12.
- AllowedGroups: This column specifies the group of users who will be able to access the search results. In the following example, group sales-team@contoso.com would only have access to record with OrderId = 12.
- DeniedUsers: This column specifies the list of users who do not have access to the search results. In the following example, users john@contoso.com and keith@contoso.com do not have access to record with OrderId = 13, whereas everyone else has access to this record.
- DeniedGroups: This column specifies the group of users who do not have access to the search results. In the following example, groups engg-team@contoso.com and pm-team@contoso.com do not have access to record with OrderId = 15, whereas everyone else has access to this record.

Supported data types
The below table summarizes the SQL data types that are supported in the MS SQL and Azure SQL connectors. The table also summarizes the indexing data type for the supported SQL data type. To learn more about Microsoft Graph connectors supported data types for indexing, refer documentation on property resource types.
| Category | Source data type | Indexing data type |
|---|---|---|
| Date and time | date datetime datetime2 smalldatetime |
datetime |
| Exact numeric | bigint int smallint tinyint |
int64 |
| Exact numeric | bit | boolean |
| Approximate numeric | float real |
double |
| Character string | char varchar text |
string |
| Unicode character strings | nchar nvarchar ntext |
string |
| String collection | char varchar text |
stringcollection* |
| Other data types | uniqueidentifier | string |
*To index a column as StringCollection, you need to cast a string to string collection type. This can be done by clicking the 'Edit datatypes' link in Full crawl settings and selecting the appropriate columns as StringCollection along with specifying a delimiter to split the string.
For any other data type currently not directly supported, the column needs to be explicitly cast to a supported data type.
Watermark (Required)
To prevent overloading the database, the connector batches and resumes full-crawl queries with a full-crawl watermark column. By using the value of the watermark column, each subsequent batch is fetched, and querying is resumed from the last checkpoint. Essentially this mechanisms controls data refresh for full crawls.
Create query snippets for watermarks as shown in these examples:
WHERE (CreatedDateTime > @watermark). Cite the watermark column name with the reserved keyword@watermark. If the sort order of the watermark column is ascending, use>; otherwise, use<.ORDER BY CreatedDateTime ASC. Sort on the watermark column in ascending or descending order.
In the configuration shown in the following image, CreatedDateTime is the selected watermark column. To fetch the first batch of rows, specify the data type of the watermark column. In this case, the data type is DateTime.

The first query fetches the first N number of rows by using: "CreatedDateTime > January 1, 1753 00:00:00" (min value of DateTime data type). After the first batch is fetched, the highest value of CreatedDateTime returned in the batch is saved as the checkpoint if the rows are sorted in ascending order. An example is March 1, 2019 03:00:00. Then the next batch of N rows is fetched by using "CreatedDateTime > March 1, 2019 03:00:00" in the query.
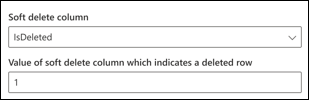
Skipping soft-deleted rows (Optional)
To exclude soft-deleted rows in your database from being indexed, specify the soft-delete column name and value that indicates the row is deleted.
Full crawl: Manage search permissions
Select Manage permissions to choose the various access control (ACL) columns that specify the access control mechanism. Select the column name you specified in the full crawl SQL query.
Each of the ACL columns is expected to be a multi-valued column. These multiple ID values can be separated by separators such as semicolon (;), comma (,), and so on. You need to specify this separator in the value separator field.
The following ID types are supported for using as ACLs:
- User Principal Name (UPN): A User Principal Name (UPN) is the name of a system user in an email address format. A UPN (for example: john.doe@domain.com) consists of the username (logon name), separator (the @ symbol), and domain name (UPN suffix).
- Microsoft Entra ID: In Microsoft Entra ID, every user or group has an object ID that looks something like 'e0d3ad3d-0000-1111-2222-3c5f5c52ab9b'.
- Active Directory (AD) Security ID: In an on-premises AD setup, every user and group have an immutable, unique security identifier that looks something like 'S-1-5-21-3878594291-2115959936-132693609-65242.'
Step 3b: Incremental crawl (Optional)
In this optional step, provide a SQL query to run an incremental crawl of the database. With this query, the SQL connector determines any changes to the data since the last incremental crawl. As in the full crawl, select all columns where you want to select the options Query, Search, or Retrieve. Specify the same set of ACL columns that you specified in the full crawl query.
The components in the following image resemble the full crawl components with one exception. In this case, "ModifiedDateTime" is the selected watermark column. Review the full crawl steps to learn how to write your incremental crawl query and see the following image as an example.

Step 4: Assign property labels
Follow the general setup instructions.
Step 5: Manage schema
Follow the general setup instructions.
Step 6: Manage search permissions
You can choose to use the ACLs specified in the full crawl screen or you can override them to make your content visible to everyone.
Step 7: Choose refresh settings
Follow the general setup instructions.
Step 8: Review connection
Follow the general setup instructions.
Troubleshooting
The following is a common error observed while configuring the connector, and its possible reason.
| Configuration step | Error message | Possible reason(s) |
|---|---|---|
| Full crawl | Error from database server: A transport level error has occurred when receiving results from the server. |
This error arises due to network issues. It is recommended to check network logs using Microsoft network monitor and reach out to Microsoft customer support. |
| Full crawl | Column column_name returned from full crawl SQL query contains non-alphanumeric character |
Non-alphanumeric characters (like underscores) are not allowed in column names in SELECT clause. Use aliases to rename columns and remove non-alphanumeric characters (Example - SELECT column_name AS columnName). |
Limitations
The SQL connectors have these limitations in the preview release:
- Microsoft SQL Server connector: The on-premises database must run SQL Server version 2008 or later.
- The Microsoft 365 subscription and Azure subscription (hosting Azure SQL database) must lie within the same Microsoft Entra ID.
- ACLs are only supported by using a User Principal Name (UPN), Microsoft Entra ID, or Active Directory Security.
- Indexing rich content inside database columns is not supported. Examples of such content are HTML, JSON, XML, blobs, and document parsings that exist as links inside the database columns.
Feedback
Coming soon: Throughout 2024 we will be phasing out GitHub Issues as the feedback mechanism for content and replacing it with a new feedback system. For more information see: https://aka.ms/ContentUserFeedback.
Submit and view feedback for