Tutorial: Configure Keyless with Azure Active Directory B2C
Learn to configure Azure Active Directory B2C (Azure AD B2C) with the Sift Keyless passwordless solution. With Azure AD B2C as an identity provider (IdP), integrate Keyless with customer applications to provide passwordless authentication. The Keyless Zero-Knowledge Biometric (ZKB) is passwordless multifactor authentication that helps eliminate fraud, phishing, and credential reuse, while enhancing the customer experience and protecting privacy.
Go to keyless.io to learn about:
Prerequisites
To get started, you'll need:
- An Azure subscription
- If you don't have one, get an Azure free account
- An Azure AD B2C tenant linked to the Azure subscription
- A Keyless cloud tenant
- Go to keyless.io to Request a demo
- The Keyless Authenticator app installed on a user device
Scenario description
The Keyless integration includes the following components:
- Azure AD B2C – authorization server that verifies user credentials. Also known as the IdP.
- Web and mobile applications – mobile or web applications to protect with Keyless and Azure AD B2C
- The Keyless Authenticator mobile app – Sift mobile app for authentication to the Azure AD B2C enabled applications
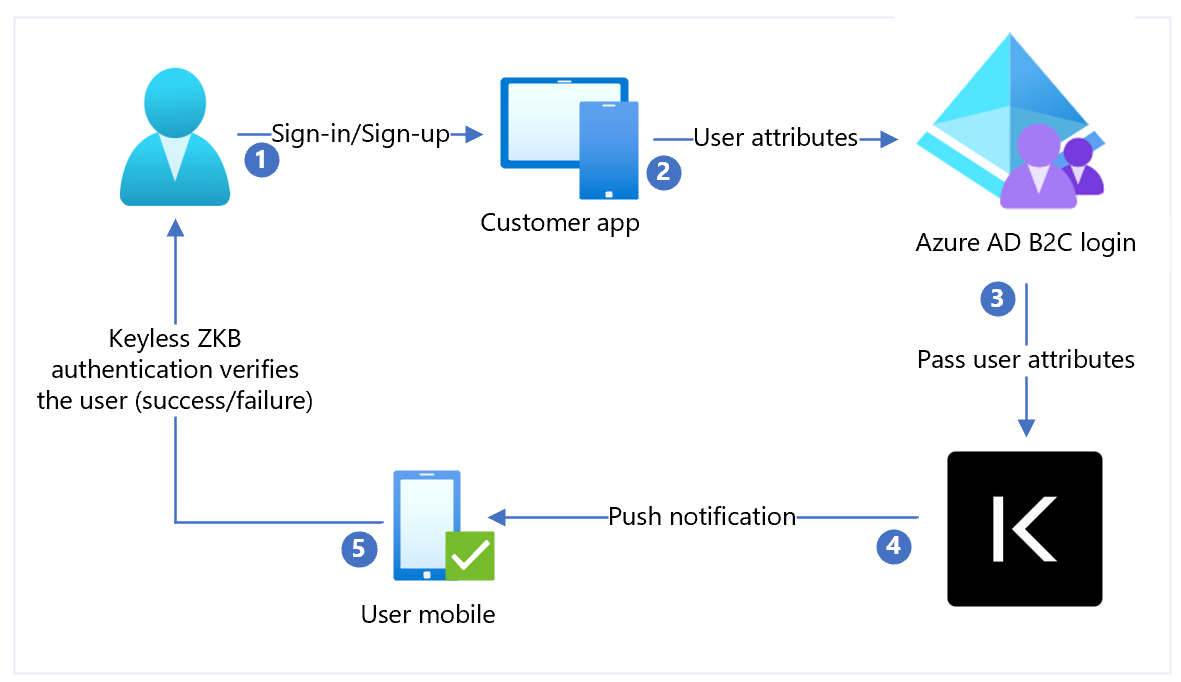
The following architecture diagram illustrates an implementation.

- User arrives at a sign-in page. User selects sign-in/sign-up and enters the username.
- The application sends user attributes to Azure AD B2C for identity verification.
- Azure AD B2C sends user attributes to Keyless for authentication.
- Keyless sends a push notification to the users' registered mobile device for authentication, a facial biometric scan.
- The user responds to the push notification and is granted or denied access.
Add an IdP, configure the IdP, and create a user flow policy
Use the following sections to add an IdP, configure the IdP, and create a user flow policy.
Add a new Identity provider
To add a new Identity provider:
- Sign in to the Azure portal as Global Administrator of the Azure AD B2C tenant.
- Select Directories + subscriptions.
- On the Portal settings, Directories + subscriptions page, in the Directory name list, find your Azure AD B2C directory.
- Select Switch.
- In the top-left corner of the Azure portal, select All services.
- Search for and select Azure AD B2C.
- Navigate to Dashboard > Azure Active Directory B2C > Identity providers.
- Select Identity providers.
- Select Add.
Configure an identity provider
To configure an IdP:
- Select Identity provider type > OpenID Connect (Preview).
- For Name, select Keyless.
- For Metadata URL, insert the hosted Keyless Authentication app URI, followed by the path, such as
https://keyless.auth/.well-known/openid-configuration. - For Client Secret, select the secret associated with the Keyless Authentication instance. The secret is used later in Keyless Container configuration.
- For Client ID, select the client ID. The Client ID is used later in Keyless Container configuration.
- For Scope, select openid.
- For Response type, select id_token.
- For Response mode, select form_post.
- Select OK.
- Select Map this identity provider’s claims.
- For UserID, select From subscription.
- For Display name, select From subscription.
- For Response mode, select From subscription.
- Select Save.
Create a user flow policy
Keyless appears as a new OpenID Connect (OIDC) IdP with B2C identity providers.
- Open the Azure AD B2C tenant.
- Under Policies, select User flows.
- Select New user flow.
- Select Sign up and sign in.
- Select a version.
- Select Create.
- Enter a Name for your policy.
- In the Identity providers section, select the created Keyless Identity Provider.
- Enter a name.
- Select the IdP you created.
- Add an email address. Azure won’t redirect the sign-in to Keyless; a screen appears with a user option.
- Leave the Multi-factor Authentication field.
- Select Enforce conditional access policies.
- Under User attributes and token claims, in the Collect attribute option, select Email Address.
- Add user attributes Microsoft Entra ID collects with claims Azure AD B2C returns to the client application.
- Select Create.
- Select the new User flow.
- On the left panel, select Application Claims.
- Under options, select the email checkbox.
- Select Save.
Test the user flow
- Open the Azure AD B2C tenant.
- Under Policies select Identity Experience Framework.
- Select the created SignUpSignIn.
- Select Run user flow.
- For Application, select the registered app (the example is JWT).
- For Reply URL, select the redirect URL.
- Select Run user flow.
- Complete the sign-up flow and create an account.
- After the user attribute is created, Keyless is called during the flow.
If the flow is incomplete, confirm user is or isn't saved in the directory.
Next steps
Feedback
Coming soon: Throughout 2024 we will be phasing out GitHub Issues as the feedback mechanism for content and replacing it with a new feedback system. For more information see: https://aka.ms/ContentUserFeedback.
Submit and view feedback for