Repair an Automanage Account
Important
This article is only relevant for machines that were onboarded to the earlier version of Automanage (API version 2020-06-30-preview). The status for these machines will be Needs upgrade.
Your Azure Automanage Account is the security context or identity under which the automated operations occur. If you've recently moved a subscription that contains an Automanage Account to a new tenant, you need to reconfigure the account. To reconfigure it, you need to reset the identity type and assign the appropriate roles for the account.
Step 1: Reset the Automanage Account identity type
Reset the Automanage Account identity type by using the following Azure Resource Manager (ARM) template. Save the file locally as armdeploy.json or a similar name. Note your Automanage Account name and location because they're required parameters in the ARM template.
Create a Resource Manager deployment by using the following template. Use
identityType = None.- You can create the deployment in the Azure CLI by using
az deployment sub create. For more information, see az deployment sub. - You can create the deployment in PowerShell by using the
New-AzDeploymentmodule. For more information, see New-AzDeployment.
- You can create the deployment in the Azure CLI by using
Run the same ARM template again with
identityType = SystemAssigned.
{
    "$schema": "https://schema.management.azure.com/schemas/2019-04-01/deploymentTemplate.json#",
    "contentVersion": "1.0.0.0",
    "parameters": {
        "accountName": {
            "type": "string"
        },
        "location": {
            "type": "string"
        },
        "identityType": {
            "type": "string",
            "allowedValues": [ "None", "SystemAssigned" ]
        }
    },
    "resources": [
        {
            "apiVersion": "2020-06-30-preview",
            "name": "[parameters('accountName')]",
            "location": "[parameters('location')]",
            "type": "Microsoft.Automanage/accounts",
            "identity": {
                "type": "[parameters('identityType')]"
            }
        }
    ]
}
Step 2: Assign appropriate roles for the Automanage Account
The Automanage Account requires the Contributor and Resource Policy Contributor roles on the subscription that contains the VMs that Automanage is managing. You can assign these roles by using the Azure portal, ARM templates, or the Azure CLI.
If you're using an ARM template or the Azure CLI, you'll need the Principal ID (also known as the Object ID) of your Automanage Account. (You don't need the ID if you're using the Azure portal.) You can find this ID by using these methods:
Azure CLI: Use the command
az ad sp list --display-name <name of your Automanage Account>.Azure portal: Go to Microsoft Entra ID and search for your Automanage Account by name. Under Enterprise Applications, select the Automanage Account name when it appears.
Azure portal
Under Subscriptions, go to the subscription that contains your automanaged VMs.
Select Access control (IAM).
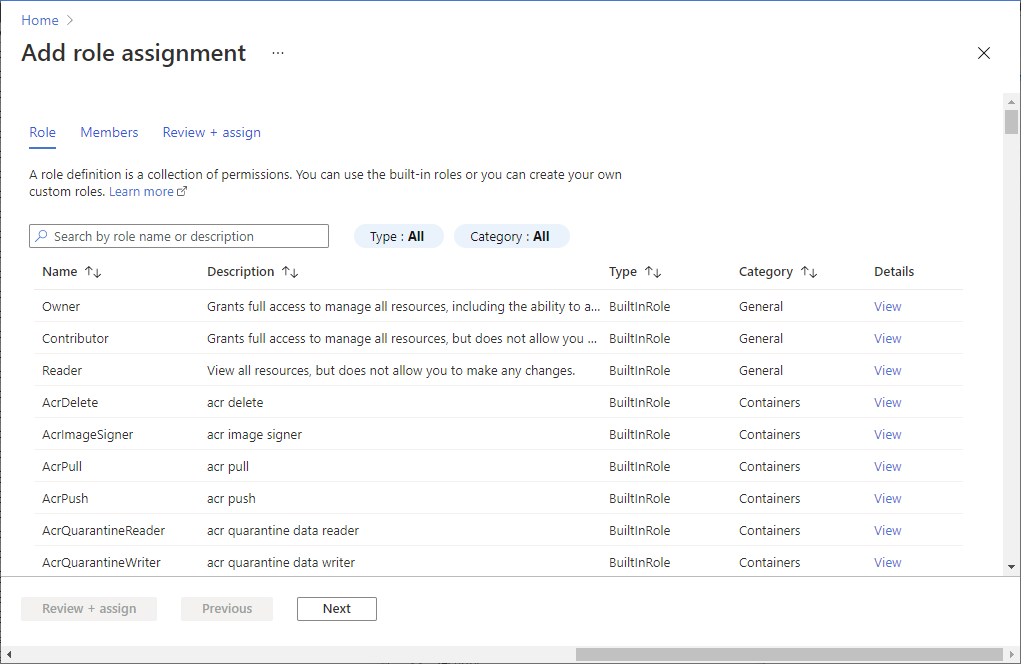
Select Add > Add role assignment to open the Add role assignment page.
Assign the following role. For detailed steps, see Assign Azure roles using the Azure portal.
Setting Value Role Contributor Assign access to User, group, or service principal Members <Name of your Automanage account> 
Repeat steps 2 through 4, selecting the Resource Policy Contributor role.
ARM template
Run the following ARM template. You'll need the Principal ID of your Automanage Account. The steps to get it are at the start of this section. Enter the ID when you're prompted.
{
    "$schema": "https://schema.management.azure.com/schemas/2015-01-01/deploymentTemplate.json#",
    "contentVersion": "1.0.0.0",
    "parameters": {
        "principalId": {
            "type": "string",
            "metadata": {
                "description": "The principal to assign the role to"
            }
        }
    },
    "variables": {
        "Contributor": "[concat('/subscriptions/', subscription().subscriptionId, '/providers/Microsoft.Authorization/roleDefinitions/', 'b24988ac-6180-42a0-ab88-20f7382dd24c')]",
        "Resource Policy Contributor": "[concat('/subscriptions/', subscription().subscriptionId, '/providers/Microsoft.Authorization/roleDefinitions/', '36243c78-bf99-498c-9df9-86d9f8d28608')]"
    },
    "resources": [
        {
            "type": "Microsoft.Authorization/roleAssignments",
            "apiVersion": "2018-09-01-preview",
            "name": "[guid(uniqueString(variables('Contributor')))]",
            "properties": {
                "roleDefinitionId": "[variables('Contributor')]",
                "principalId": "[parameters('principalId')]"
            }
        },
        {
            "type": "Microsoft.Authorization/roleAssignments",
            "apiVersion": "2018-09-01-preview",
            "name": "[guid(uniqueString(variables('Resource Policy Contributor')))]",
            "properties": {
                "roleDefinitionId": "[variables('Resource Policy Contributor')]",
                "principalId": "[parameters('principalId')]"
            }
        }
    ]
}
Azure CLI
Run these commands:
az role assignment create --assignee-object-id <your Automanage Account Object ID> --role "Contributor" --scope /subscriptions/<your subscription ID>

az role assignment create --assignee-object-id <your Automanage Account Object ID> --role "Resource Policy Contributor" --scope /subscriptions/<your subscription ID>
Next steps
Feedback
Coming soon: Throughout 2024 we will be phasing out GitHub Issues as the feedback mechanism for content and replacing it with a new feedback system. For more information see: https://aka.ms/ContentUserFeedback.
Submit and view feedback for