Set up and configure Microsoft Defender for Business
This article describes the overall setup process for Defender for Business.
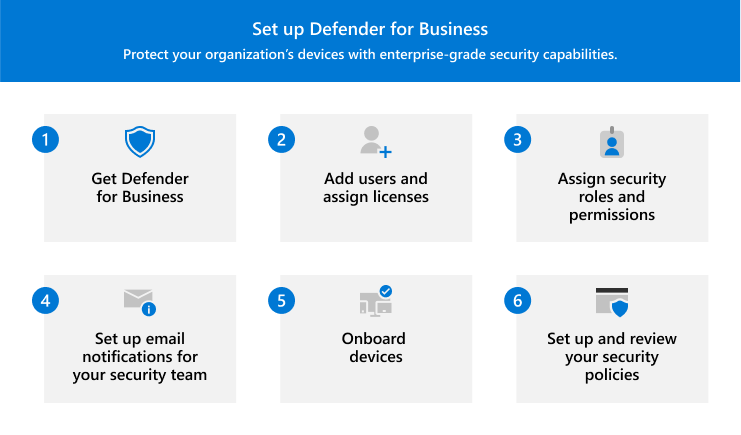
The process includes:
- Getting Defender for Business.
- Adding users and assigning licenses.
- Assigning security roles and permissions for your security team.
- Setting up email notifications for your security team.
- Onboarding devices so they're protected as soon as possible.
- Setting up and reviewing your security policies and settings.
Setup options
When you're ready to set up and configure Defender for Business, you can choose from several options:
- Use the setup wizard to grant access to your security team, set up email notifications for your security team, onboard your company's Windows devices, and apply default security settings to those devices; or
- Work through the setup process manually, step by step, and complete the setup steps yourself.
Note
Using the setup wizard is optional. If you choose not to use the wizard, or if the wizard is closed before your setup process is complete, you can complete the setup and configuration process on your own.
Important
You must be a global administrator to complete setup tasks, including running the setup wizard. See Security roles and permissions in Defender for Business.
Get Defender for Business. Start a trial or paid subscription today. You can choose from the standalone version of Defender for Business, or get it as part of Microsoft 365 Business Premium. See Get Microsoft Defender for Business. And, if you're planning to onboard servers, see How to get Microsoft Defender for Business servers.
In the Microsoft Defender portal (https://security.microsoft.com), in the navigation pane, select Assets > Devices. If Defender for Business isn't provisioned yet, that process begins now.
Add users and assign Defender for Business licenses. You'll want to do this task before you run the setup wizard. See Add users and assign licenses in Microsoft Defender for Business.
While you're adding users, make sure to create a list of your security team's names and email addresses. This list will come in handy while you are using the setup wizard. To view a list of users, in the Microsoft 365 admin center (https://admin.microsoft.com), go to Users > Active users.
In the Microsoft Defender portal (https://security.microsoft.com), in the navigation pane, select Assets > Devices. You should see the setup wizard home screen, as shown in the following image:

Select Get started to begin using the wizard.
Assign user permissions. In this first step of the setup wizard, you grant your security team access to the Microsoft Defender portal (https://security.microsoft.com). This portal is where you and your security team will manage your security capabilities, view alerts, and take any needed actions on detected threats. Portal access is granted through roles that imply certain permissions. Learn more about roles and permissions.
In Defender for Business, members of your security team can be assigned one of the following three roles:
- Global Admin: A global admin can view and edit all settings across your Microsoft 365 tenant. The global admin does the initial setup and configuration for your company's Microsoft 365 subscription.
- Security Administrator: A security administrator can view and edit security settings, and take action when threats are detected.
- Security Reader: A security reader can view information in reports, but can't change any security settings.
Set up email notifications. In this step of the setup wizard, you can set up email notifications for your security team using the list you created in step 2. Then, when an alert is generated or a new vulnerability is discovered, your security team won't miss it even if they're away from their desk. Learn more about email notifications.
Onboard and configure Windows devices. In this step of the setup wizard, you can onboard Windows devices to Defender for Business. Onboarding devices right away helps to protect those devices from day one. Note that this step of the wizard applies to Windows devices only. You can onboard other devices later. See Onboard devices to Microsoft Defender for Business.
Note
If your organization is using Microsoft Intune, and devices are already enrolled in Intune, Defender for Business prompts you to either continue using Intune, or switch to using the simplified configuration process in the Microsoft Defender portal. See Choose where to manage security policies and devices.
Defender for Business also offers automatic onboarding for Windows devices enrolled in Intune. Automatic onboarding is a simplified way to onboard Windows devices to Defender for Business. We recommend selecting the "all devices enrolled" option so that as Windows devices are enrolled in Intune, they're onboarded to Defender for Business automatically.
Configure your security policies. Defender for Business includes default security policies for next-generation protection and firewall protection that can be applied to your company's devices. These default policies use recommended settings and are designed to provide strong protection for your devices. You can start with your default policies and add more later. See Set up, review, and edit your security policies and settings.
Select your next step. After the setup wizard has completed, you're prompted to choose a next step. For example, you can onboard devices, view your security dashboard, or view your security policies.

Next steps
After reading this article, proceed to:
- Get Microsoft Defender for Business and Microsoft Defender for Business servers.
- Add users and assign licenses in Microsoft Defender for Business.
After you have set up and configured Defender for Business, your next steps are to:
Feedback
Coming soon: Throughout 2024 we will be phasing out GitHub Issues as the feedback mechanism for content and replacing it with a new feedback system. For more information see: https://aka.ms/ContentUserFeedback.
Submit and view feedback for