Configure Microsoft Tunnel for Intune
Microsoft Tunnel Gateway installs to a container on a Linux server that runs either on-premises or in the cloud. Depending on your environment and infrastructure, additional configurations and software like Azure ExpressRoute might be needed.
Before you start the installation, be sure to complete the following tasks:
- Review and Configure prerequisites for Microsoft Tunnel.
- Run the Microsoft Tunnel readiness tool to confirm your environment is ready to support use of the tunnel.
After your prerequisites are ready, return to this article to begin installation and configuration of the tunnel.
Create a Server configuration
Use of a Server configuration lets you create a configuration a single time and have that configuration used by multiple servers. The configuration includes IP address ranges, DNS servers, and split-tunneling rules. Later, you'll assign a Server configuration to a Site, which automatically applies that server configuration to each server that joins that Site.
To create a Server configuration
Sign in to Microsoft Intune admin center > Tenant administration > Microsoft Tunnel Gateway > select the Server configurations tab > Create new.
On the Basics tab, enter a Name and Description (optional) and select Next.
On the Settings tab, configure the following items:
IP address range: IP addresses within this range are leased to devices when they connect to Tunnel Gateway. The Tunnel Client IP address range specified must not conflict with an on-premises network range.
- Consider using the Automatic Private IP Addressing (APIPA) range of 169.254.0.0/16, as this range avoids conflicts with other corporate networks.
- If the client IP address range conflicts with the destination, it uses the loopback address and fails to communicate with the corporate network.
- You can select any client IP address range you want to use if it doesn't conflict with your corporate network IP address ranges.
Server port: Enter the port that the server listens to for connections.
DNS servers: These servers are used when a DNS request comes from a device that connects to Tunnel Gateway.
DNS suffix search (optional): This domain is provided to clients as the default domain when they connect to Tunnel Gateway.
Disable UDP Connections (optional): When selected, clients only connect to the VPN server using TCP connections. Because the standalone tunnel client requires use of UDP, select the checkbox to disable UDP connections only after you configure your devices to use Microsoft Defender for Endpoint as the tunnel client app.
Also on the Settings tab, configure Split tunneling rules, which are optional.
You can include or exclude addresses. Included addresses are routed to Tunnel Gateway. Excluded addresses aren't routed to Tunnel Gateway. For example, you might configure an include rule for 255.255.0.0 or 192.168.0.0/16.
Use the following options to include or exclude addresses:
- IP ranges to include
- IP ranges to exclude
Note
Do not use an IP range that specifies 0.0.0.0 in any of the include or exclude addresses, Tunnel Gateway cannot route traffic when this range is used.
On the Review + create tab, review the configuration, and then select Create to save it.
Note
By default, each VPN session will stay active for only 3,600 seconds (one hour) before it disconnects (a new session will be established immediately in case the client is set to use Always On VPN). However, you can modify the session timeout value along with other server configuration settings using graph calls (microsoftTunnelConfiguration).
Create a Site
Sites are logical groups of servers that host Microsoft Tunnel. You assign a Server configuration to each Site you create. That configuration is applied to each server that joins the Site.
To create a Site configuration
Sign in to Microsoft Intune admin center > Tenant administration > Microsoft Tunnel Gateway > select the Sites tab > Create.
On the Create a site pane, specify the following properties:
Name: Enter a name for this Site.
Description: Optionally, you can specify a friendly description for the Site.
Public IP address or FQDN: Specify a public IP address or FQDN, which is the connection point for devices that use the tunnel. This IP address or FQDN can identify an individual server or a load-balancing server. The IP address or FQDN must be resolvable in public DNS and the resolved IP address must be publicly routable.
Server configuration: To select a server configuration to associate with this Site, use the drop-down.
URL for internal network access check: Specify an HTTP or HTTPS URL for a location on your internal network. Every five minutes, each server that's assigned to this site attempts to access the URL to confirm that it can access your internal network. Servers report the status of this check as Internal network accessibility on the servers Health check tab.
Automatically upgrade servers at this site: If Yes, servers upgrade automatically when an upgrade is available. If No, upgrade is manual and an administrator must approve an upgrade before it can start.
For more information, see Upgrade Microsoft Tunnel.
Limit server upgrades to maintenance window: If Yes, server upgrades for this site can only start between the start time and end time specified. There must be at least an hour between the start time and end time. When set to No, there's no maintenance window and upgrades start as soon as possible depending on how Automatically upgrade servers at this site is configured.
When set to Yes, configure the following options:
- Time zone – The time zone you select determines when the maintenance window starts and ends on all servers in the site, regardless of the time zone of individual servers.
- Start time – Specify the earliest time that the upgrade cycle can start, based on the time zone you selected.
- End time - Specify the latest time that upgrade cycle can start, based on the time zone you selected. Upgrade cycles that start before this time will continue to run and can complete after this time.
For more information, see Upgrade Microsoft Tunnel.
Select Create to save the Site.
Install Microsoft Tunnel Gateway
Before installing Microsoft Tunnel Gateway on a Linux server, configure your tenant with at least one Server configuration, and then create a Site. Later, you'll specify the Site that a server joins when you install the tunnel on that server.
With a server configuration and a site, you can then use the following procedure to install the Microsoft Tunnel Gateway.
However, if you plan to install the Microsoft Tunnel Gateway to a rootless Podman container, see Use a rootless Podman container before you begin your install. The linked section details additional prerequisite requirements and a modified command-line for the installation script. After the extra prerequisites are configured, you can return here to continue with the following installation procedure.
Use the script to install Microsoft Tunnel
Download the Microsoft Tunnel installation script by using one of the following methods:
Download the tool directly by using a web browser. Go to https://aka.ms/microsofttunneldownload to download the file mstunnel-setup.
Sign in to Microsoft Intune admin center > Tenant administration > Microsoft Tunnel Gateway, select the Servers tab, select Create to open the Create a server pane, and then select Download script.
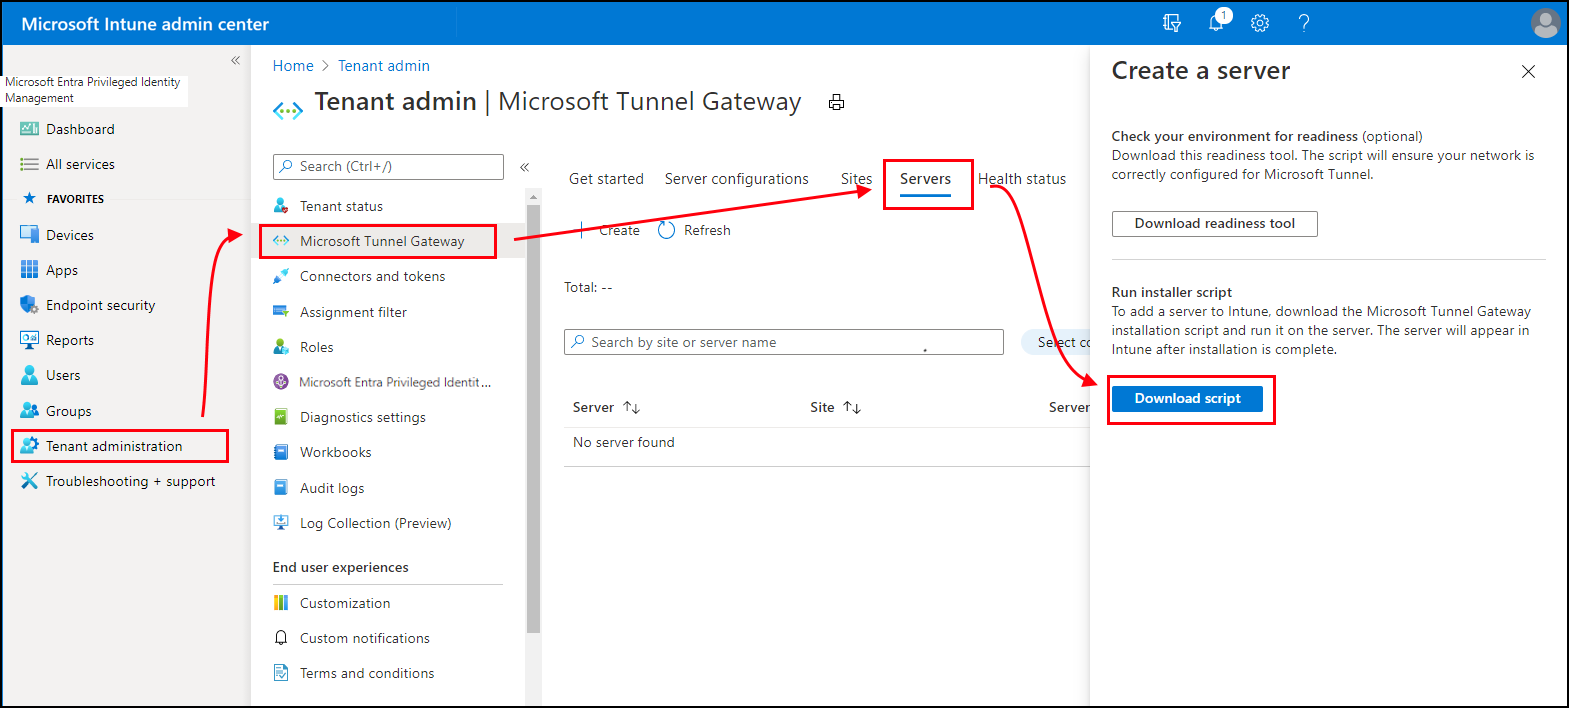
Use a Linux command to download the tunnel software directly. For example, on the server where you'll install the tunnel, you can use wget or curl to open the link https://aka.ms/microsofttunneldownload.
For example, to use wget and log details to mstunnel-setup during the download, run
wget --output-document=mstunnel-setup https://aka.ms/microsofttunneldownload
To start the server installation, run the script as root. For example, you might use the following command line:
sudo chmod +x ./mstunnel-setup. The script always installs the most recent version of Microsoft Tunnel.Important
If you are installing Tunnel to a rootless Podman container, use the the following modified command-line to start the script:
chmod mst_rootless_mode=1 ./mstunnel-setupTo see detailed console output during the tunnel and installation agent enrollment process:
Run
export mst_verbose_log="true"before you run the ./mstunnel-setup script. To confirm verbose logging is enabled, runexport.After setup completes, edit the environment file /etc/mstunnel/env.sh to add a new line:
mst_verbose_log="true". After adding the line, runmst-cli server restartto restart the server.
Important
For the U.S. government cloud, the command line must reference the government cloud environment. To do so, run the following commands to add intune_env=FXP to the command line:
- Run
sudo chmod +x ./mstunnel-setup - Run
sudo intune_env=FXP ./mstunnel-setup
Tip
If you stop the installation and script, you can restart it by running the command line again. Installation continues from where you left off.
When you start the script, it downloads container images from Microsoft Tunnel Gateway container images from the Intune service, and creates necessary folders and files on the server.
During setup, the script prompts you to complete several admin tasks.
When prompted by the script, accept the license agreement (EULA).
Review and configure variables in the following files to support your environment.
- Environment file: /etc/mstunnel/env.sh. For more information on these variables, see Environment variables in the reference for Microsoft Tunnel article.
When prompted, copy the full chain of your Transport Layer Security (TLS) certificate file to the Linux server. The script displays the correct location to use on the Linux server.
The TLS certificate secures the connection between the devices that use the tunnel and the Tunnel Gateway endpoint. The certificate must have the IP address or FQDN of the Tunnel Gateway server in its SAN.
The private key remains available on the machine where you create the certificate signing request for the TLS certificate. This file must be exported with a name of site.key.
Install the TLS certificate and private key. Use the following guidance that matches your file format:
PFX:
- The certificate file name must be site.pfx. Copy the certificate file to /etc/mstunnel/private/site.pfx.
PEM:
The full chain (root, intermediate, end-entity) must be in a single file named site.crt. If your using a certificate issued by a public provider like Digicert, you have the option of downloading the complete chain as a single .pem file.
The certificate file name must be *site.crt. Copy the full chain certificate into /etc/mstunnel/certs/site.crt. For example:
cp [full path to cert] /etc/mstunnel/certs/site.crtAlternatively, create a link to the full chain cert in /etc/mstunnel/certs/site.crt. For example:
ln -s [full path to cert] /etc/mstunnel/certs/site.crtCopy the private key file into /etc/mstunnel/private/site.key. For example:
cp [full path to key] /etc/mstunnel/private/site.keyAlternatively, create a link to the private key file in /etc/mstunnel/private/site.key. For example:
ln -s [full path to key file] /etc/mstunnel/private/site.keyThis key shouldn't be encrypted with a password. The private key file name must be site.key.
After setup installs the certificate and creates the Tunnel Gateway services, you're prompted to sign in and authenticate with Intune. The user account must have either the Intune Administrator or Global Administrator roles assigned. The account you use to complete the authentication must have an Intune license. The credentials of this account aren't saved and are only used for initial sign-in to Microsoft Entra ID. After successful authentication, Azure app IDs/secret keys are used for authentication between the Tunnel Gateway and Microsoft Entra.
This authentication registers Tunnel Gateway with Microsoft Intune and your Intune tenant.
Open a web browser to https://Microsoft.com/devicelogin and enter the device code that's provided by the installation script, and then sign in with your Intune admin credentials.
After Microsoft Tunnel Gateway registers with Intune, the script gets information about your Sites and Server configurations from Intune. The script then prompts you to enter the GUID of the tunnel Site you want this server to join. The script presents you with a list of your available sites.
After you select a Site, setup pulls the Server configuration for that Site from Intune, and applies it to your new server to complete the Microsoft Tunnel installation.
After the installation script finishes, you can navigate in Microsoft Intune admin center to the Microsoft Tunnel Gateway tab to view high-level status for the tunnel. You can also open the Health status tab to confirm that the server is online.
If you're using RHEL 8.4 or later, be sure to restart the Tunnel Gateway server by entering
mst-cli server restartbefore you attempt to connect clients to it.
Deploy the Microsoft Tunnel client app
To use the Microsoft Tunnel, devices need access to a Microsoft Tunnel client app. Microsoft Tunnel uses Microsoft Defender for Endpoint as the Tunnel client app:
Android: Download Microsoft Defender for Endpoint for use as the Microsoft Tunnel client app from the Google Play store. See Add Android store apps to Microsoft Intune.
When you use Microsoft Defender for Endpoint as your tunnel client application and as a mobile threat defense (MTD) application, see Use Microsoft Defender for Endpoint for MTD and as the Microsoft Tunnel client app for important configuration guidance.
iOS/iPadOS: Download Microsoft Defender for Endpoint for use as the Microsoft Tunnel client app from the Apple App store. See Add iOS store apps to Microsoft Intune.
For more information on deploying apps with Intune, see Add apps to Microsoft Intune.
Create a VPN profile
After the Microsoft Tunnel installs and devices install Microsoft Defender for Endpoint, you can deploy VPN profiles to direct devices to use the tunnel. To do so, create VPN profiles with a connection type of Microsoft Tunnel:
Android: The Android platform supports routing of traffic through a per-app VPN and split tunneling rules independently, or at the same time.
iOS/iPadOS The iOS platform supports routing traffic by either a per-app VPN or by split tunneling rules, but not both simultaneously. If you enable a per-app VPN for iOS, your split tunneling rules are ignored.
Android
Sign in to Microsoft Intune admin center > Devices > Configuration > on the Policies tab, select Create.
For Platform, select Android Enterprise. For Profile select VPN for either Corporate-Owned Work Profile or Personally-Owned Work Profile, and then select Create.
Note
Android Enterprise dedicated devices aren't supported by the Microsoft Tunnel.
On the Basics tab, enter a Name and Description (optional) and select Next.
For Connection type select Microsoft Tunnel, and then configure the following details:
Base VPN:
- For Connection name, specify a name that will display to users.
- For Microsoft Tunnel Site, select the Tunnel site that this VPN profile uses.
Per-app VPN:
- Apps that are assigned in the per-app VPN profile send app traffic to the tunnel.
- On Android, launching an app doesn't launch the per-app VPN. However, when the VPN has Always-on VPN set to Enable, the VPN is already connected and app traffic uses the active VPN. If the VPN isn't set to be Always-on, the user must manually start the VPN before it can be used.
- If you're using the Defender for Endpoint app to connect to Tunnel, have web protection enabled, and are using per-app VPN, web protection only applies to the apps in the per-app VPN list. On devices with a work profile, in this scenario we recommend adding all web browsers in the work profile to the per-app VPN list to ensure all work profile web traffic is protected.
- To enable a per-app VPN, select Add and then browse to the custom or public apps that have been imported to Intune.
Always-on VPN:
- For Always-on VPN, select Enable to set the VPN client to automatically connect and reconnect to the VPN. Always-on VPN connections stay connected. If Per-app VPN is set to Enable, only the traffic from apps you select go through the tunnel.
Proxy:
Configure proxy server details for your environment.
Note
Proxy server configurations are not supported with versions of Android prior to version 10. For more information, see VpnService.Builder in that Android developer documentation.
For more information about VPN settings, see Android Enterprise device settings to configure VPN
Important
For Android Enterprise devices that use Microsoft Defender for Endpoint as a Microsoft Tunnel client application and as a MTD app, you must use custom settings to configure Microsoft Defender for Endpoint instead of using a separate app configuration profile. If you do not intend to use any Defender for Endpoint functionality, including web protection, use custom settings in the VPN profile and set the defendertoggle setting to 0.
On the Assignments tab, configure groups that will receive this profile.
On the Review + create tab, review the configuration, and then select Create to save it.
iOS
Sign in to Microsoft Intune admin center > Devices > Configuration > Create.
For Platform, select iOS/iPadOS, and then for Profile select VPN, and then Create.
On the Basics tab, enter a Name and Description (optional) and select Next.
For Connection type, select Microsoft Tunnel and then configure the following items:
Base VPN:
- For Connection name, specify a name that will display to users.
- For Microsoft Tunnel Site, select the tunnel Site that this VPN profile uses.
Note
When using both Microsoft Tunnel VPN connection and Defender Web Protection in combined mode on iOS devices, it is crucial to configure the 'On Demand' rules to activate the 'Disconnect on Sleep' setting effectively. Failing to do so will result in both the Tunnel VPN and Defender VPN being disconnected when the iOS device enters sleep mode, while the VPN is turned on.
Per-app VPN:
To enable a per-app VPN, select Enable. Extra configuration steps are required for iOS per-app VPNs. When the per-app VPN is configured, iOS ignores your split tunneling rules.For more information, see Per-App VPN for iOS/iPadOS.
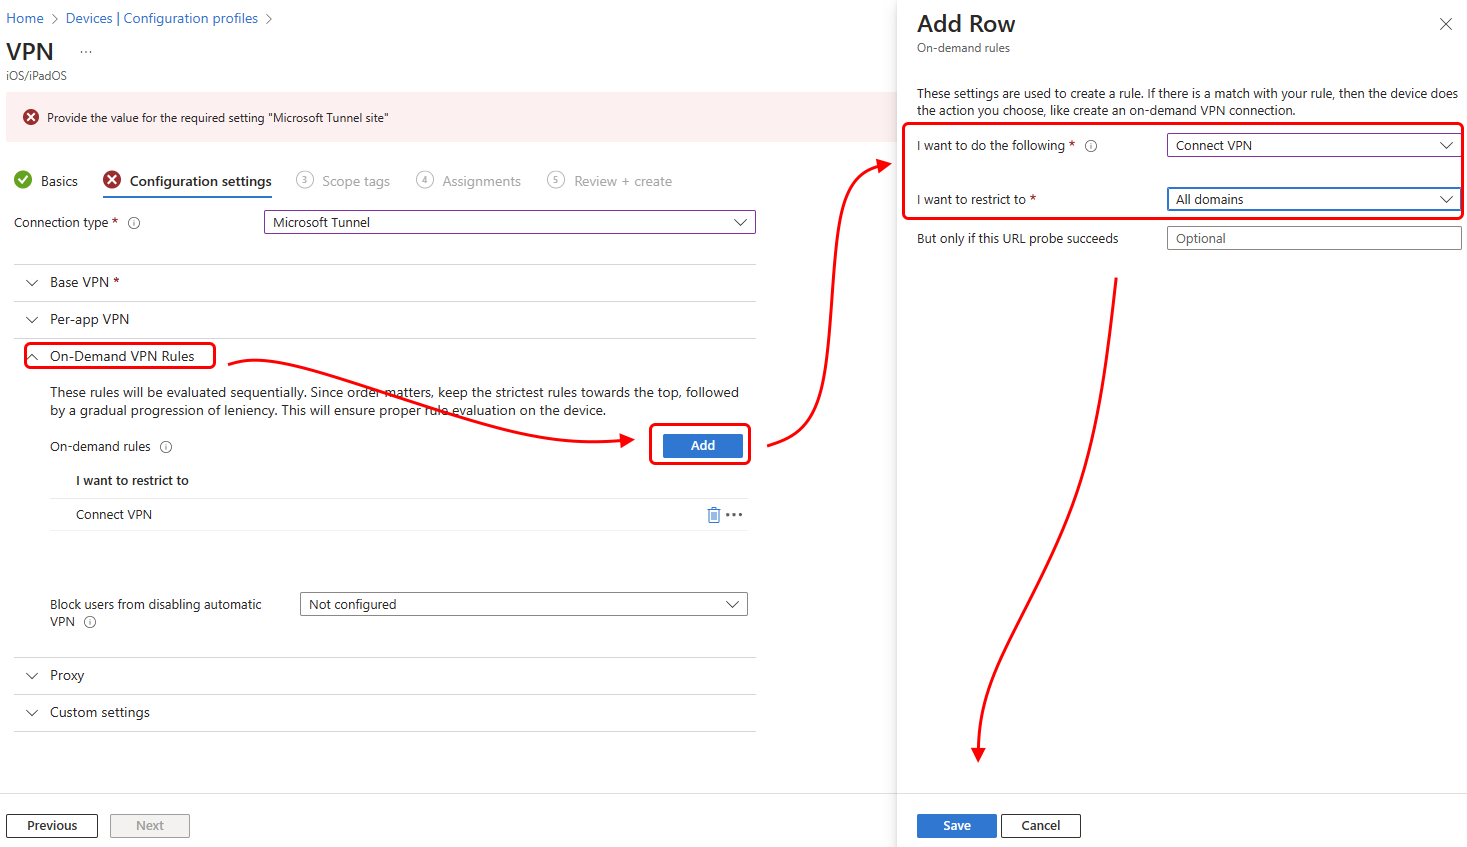
On-Demand VPN Rules:
Define on-demand rules that allow use of the VPN when conditions are met for specific FQDNs or IP addresses.For more information, see Automatic VPN settings.
Proxy:
Configure proxy server details for your environment.
Note
When using both Microsoft Tunnel VPN connection and Defender Web Protection in combined mode on iOS devices, it is crucial to configure the 'On-Demand' rules to activate the 'Disconnect on Sleep' setting effectively. To configure the on-demand rule when configuring the Tunnel VPN profile:
- On the Configuration setting page, expand the On-Demand VPN Rules section.
- For On-demand rules select Add to open the Add Row pane.
- On the Add Row pane, set I want to do the following to Connect VPN, and then for I want to restrict select a restriction, like All domains.
- Optionally, you can add a URL to the But only if this URL probe succeeds field.
- Select Save.
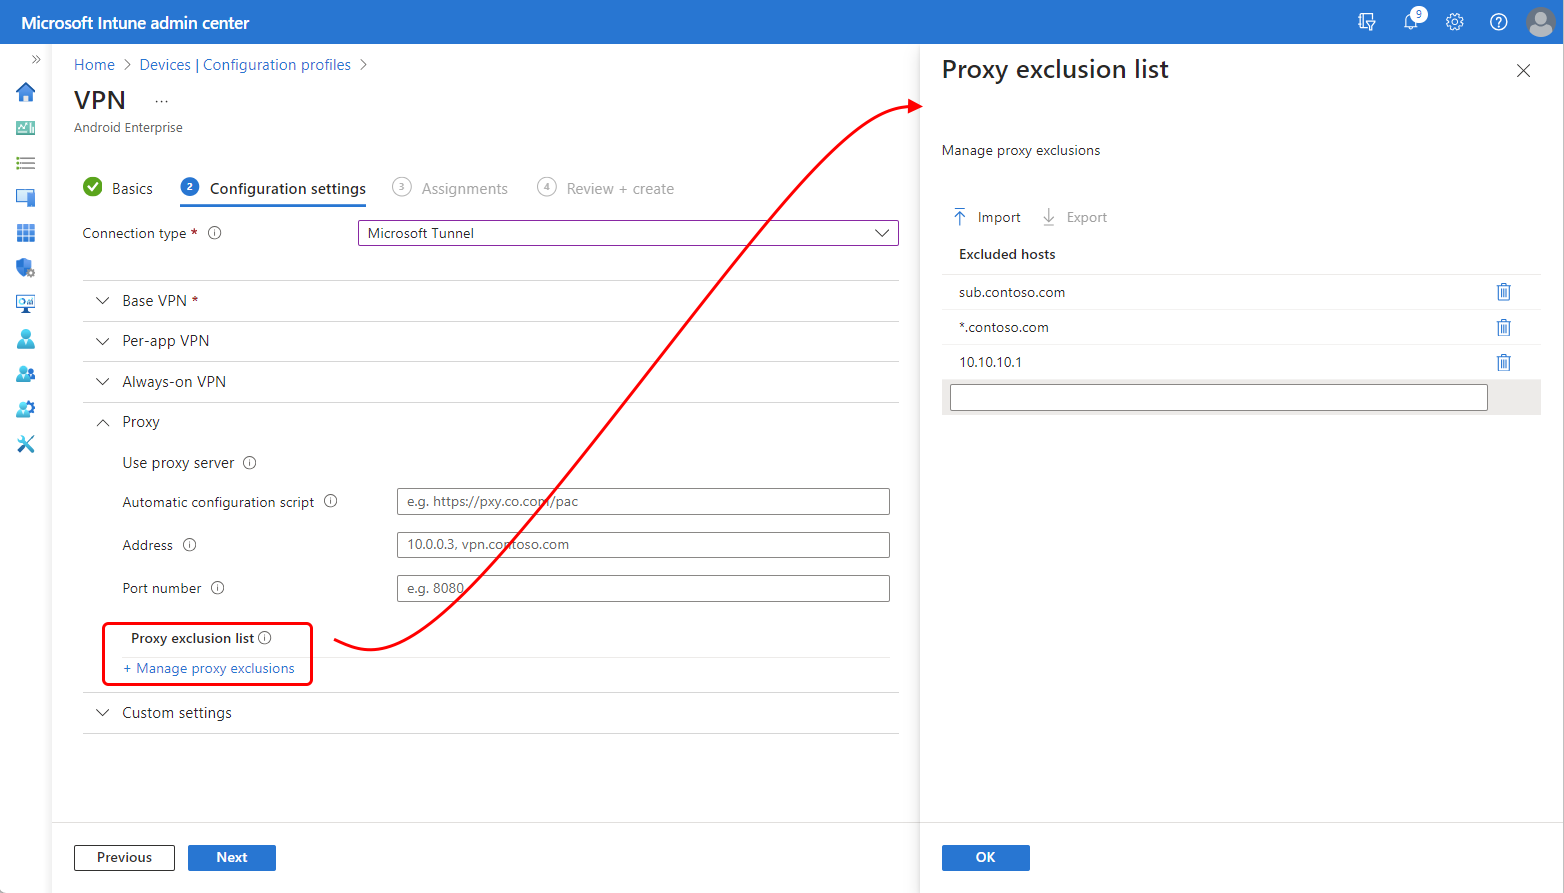
Use a proxy exclusion list for Android Enterprise
When you use a single direct proxy server in your environment, you can use a proxy exclusion list in your Microsoft Tunnel VPN profiles for Android Enterprise. Proxy exclusion lists are supported for Microsoft Tunnel and Microsoft Tunnel for MAM.
Important
The proxy exclusion list is supported only when you use a single proxy direct proxy server. They are not supported in environments where multiple proxy servers are in use.
The proxy exclusion list in the VPN profile supports entry of specific domains that are then excluded from your direct proxy configuration for devices that receive and use the profile.
The following are supported formats for exclusion list entries:
- Full URLs with exact subdomain match. For example,
sub.contoso.com - A leading wildcard in URLs. For example, using the full URL example, we can replace the leading sub domain name (sub) with an asterisk to expand support to include all subdomains of contso.com:
*.contoso.com - IPv4 and IPv6 addresses
Unsupported formats include:
- Internal wildcards. For example:
con*oso.com,contos*.com, andcontoso.*
Configure the proxy exclusion list
You can configure the exclusion list when you edit or create a Microsoft Tunnel VPN Profile for the Android Enterprise platform.
While on the Configuration settings page after you set the Connection type to Microsoft Tunnel:
Expand Proxy, and then for Proxy exclusion list, select Manage proxy exclusions.
On the Proxy exclusion list pane:
- In the text entry box, specify a single URL or IP address. Each time you add an entry, a new text entry box is provided for more entries.
- Select Import to open the Import proxy exclusions pane, where you can then import a list that is in CSV file format.
- Select Export to export the current exclusion list from this profile, in CSV file format.
Select OK to save your proxy exclusion list configuration, and continue editing the VPN profile.
Use custom settings for Microsoft Defender for Endpoint
Intune supports Microsoft Defender for Endpoint as both an MTD app and as the Microsoft Tunnel client application on Android Enterprise devices. If you use Defender for Endpoint for both the Microsoft Tunnel client application and as an MTD app, you can use custom settings in your VPN profile for Microsoft Tunnel to simplify your configurations. Use of custom settings in the VPN profile replaces the need to use a separate app configuration profile.
For devices enrolled as Android Enterprise personally owned work profile that use Defender for Endpoint for both purposes, you must use custom settings instead of an app configuration profile. On these devices, the app configuration profile for Defender for Endpoint conflicts with Microsoft Tunnel and can prevent the device from connecting to Microsoft Tunnel.
If you use Microsoft Defender for Endpoint for Microsoft Tunnel but not MTD, then you continue to use the app tunnel configuration profile to configure Microsoft Defender for Endpoint as a Tunnel Client.
Add app configuration support for Microsoft Defender for Endpoint to a VPN profile for Microsoft Tunnel
Use the following information to configure the custom settings in a VPN profile to configure Microsoft Defender for Endpoint in place of a separate app configuration profile. Available settings vary by platform.
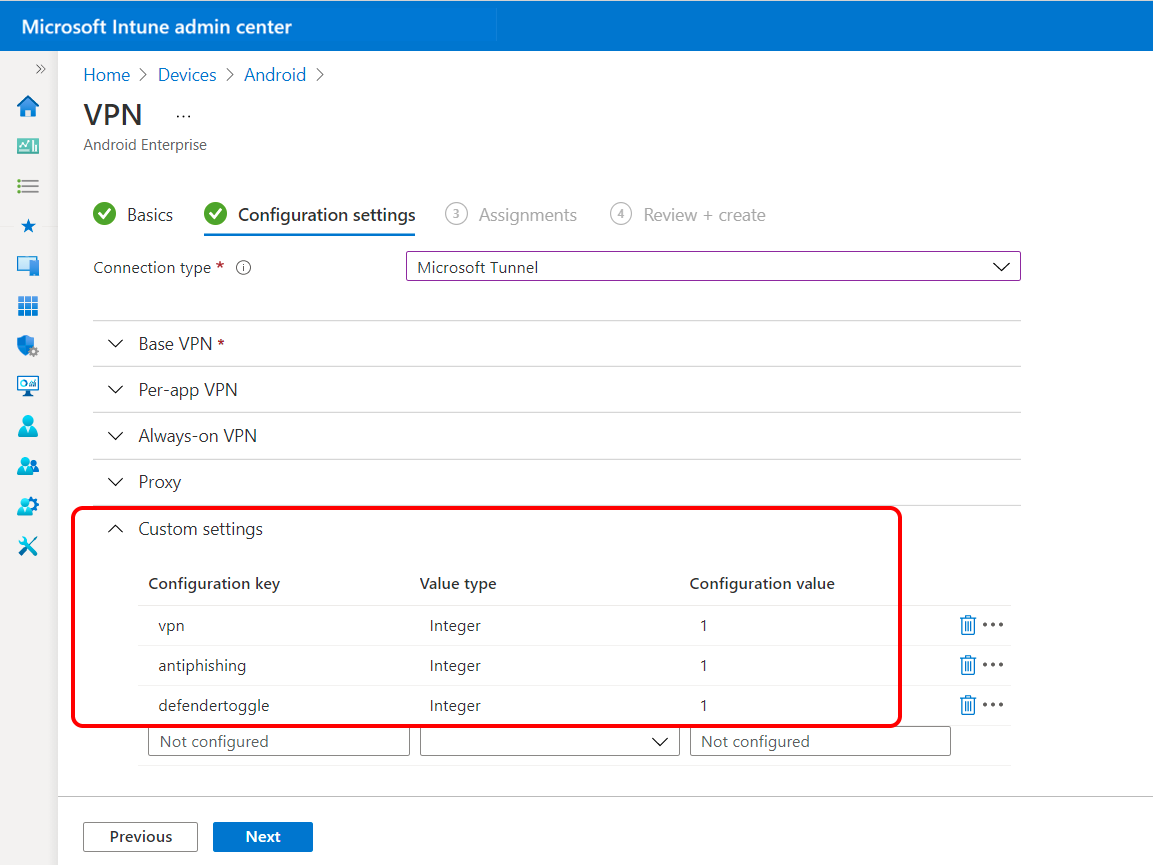
For Android Enterprise devices:
| Configuration key | Value type | Configuration value | Description |
|---|---|---|---|
| vpn | Integer | Options: 1 - Enable (default) 0 - Disable | Set to Enable to allow the Microsoft Defender for Endpoint anti-phishing capability to use a local VPN. |
| antiphishing | Integer | Options: 1 - Enable (default) 0 - Disable | Set to Enable to turn on Microsoft Defender for Endpoint anti-phishing. When disabled, the anti-phishing capability is turned off. |
| defendertoggle | Integer | Options: 1 - Enable (default) 0 - Disable | Set to Enable to use Microsoft Defender for Endpoint. When disabled, no Microsoft Defender for Endpoint functionality is available. |
For iOS/iPad devices:
| Configuration key | Values | Description |
|---|---|---|
| TunnelOnly | True – All Defender for Endpoint functionality is disabled. This setting should be used if you're using the app only for Tunnel capabilities. False (default) - Defender for Endpoint functionality is enabled. | Determines whether the Defender app is limited to only Microsoft Tunnel, or if the app also supports the full set of Defender for Endpoint capabilities. |
| WebProtection | True (default) – Web Protection is enabled, and users can see the web protection tab in the Defender for Endpoint app. False – Web Protection is disabled. If a Tunnel VPN profile is deployed, users can only see the Dashboard and Tunnel tabs in the Defender for Endpoint app. | Determines whether Defender for Endpoint Web Protection (anti-phishing functionality) is enabled for the app. By default, this functionality is on. |
| AutoOnboard | True – If Web Protection is enabled, the Defender for Endpoint app is automatically granted permissions for adding VPN connections without prompting the user. A "Connect VPN" On-Demand rule is required. For more information about On-Demand rules, see Automatic VPN settings. False (default) – If Web Protection is enabled, the user is prompted to allow the Defender for Endpoint app to add VPN configurations. | Determines whether Defender for Endpoint Web Protection is enabled without prompting the user to add a VPN connection (because a local VPN is needed for Web Protection functionality). This setting only applies if WebProtection is set to True. |
Configure TunnelOnly mode to comply with the European Union Data Boundary
By end of calendar year 2022, all personal data, including customer Content (CC), EUII, EUPI, and Support Data must be stored and processed in the European Union (EU) for EU tenants.
The Microsoft Tunnel VPN feature in Defender for Endpoint is European Union Data Boundary (EUDB) compliant. However, while the Defender for Endpoint threat protection components related to logging are not yet EUDB compliant, Defender for Endpoint is part of the Data Protection Addendum (DPA) and is compliant with the General Data Protection Regulation (GDPR).
In the meantime, Microsoft Tunnel customers with EU tenants can enable TunnelOnly mode in the Defender for Endpoint Client app. To configure this, use the following steps:
Follow the steps found in Install and configure Microsoft Tunnel VPN solution for Microsoft Intune | Microsoft Learn to create an app configuration policy, which disables Defender for Endpoint functionality.
Create a key called TunnelOnly and set the value to True.
By configuring TunnelOnly mode, all Defender for Endpoint functionality is disabled while Tunnel functionality remains available for use in the app.
Guest accounts and Microsoft Accounts (MSA) that are not specific to your organization's tenant are not supported for cross-tenant access using Microsoft Tunnel VPN. This means that these types of accounts cannot be used to access internal resources securely through the VPN. It is important to keep this limitation in mind when setting up secure access to internal resources using Microsoft Tunnel VPN.
For more information about the EU Data Boundary, see EU Data Boundary for the Microsoft Cloud | Frequently Asked Questions on the Microsoft security and compliance blog.
Upgrade Microsoft Tunnel
Intune periodically releases updates to the Microsoft Tunnel server. To stay in support, tunnel servers must run the most recent release, or at most be one version behind.
By default, after a new upgrade is available Intune automatically starts the upgrade of tunnel servers as soon as possible, at each of your tunnel sites. To help you manage upgrades, you can configure options that manage the upgrade process:
- You can allow automatic upgrade of servers at a site, or require admin approval before upgrades being.
- You can configure a maintenance window, which limits when upgrades at a site can start.
For more information about upgrades for Microsoft Tunnel, including how to view tunnel status and configure upgrade options, see Upgrade Microsoft Tunnel.
Update the TLS certificate on the Linux server
You can use the ./mst-cli command-line tool to update the TLS certificate on the server:
PFX:
- Copy the certificate file to /etc/mstunnel/private/site.pfx
- Run:
mst-cli import_cert - Run:
mst-cli server restart
PEM:
- Copy the new certificate to /etc/mstunnel/certs/site.crt
- Copy the private key to /etc/mstunnel/private/site.key
- Run:
mst-cli import_cert - Run:
mst-cli server restart
Note
The "import-cert" command with an additional parameter called "delay." This parameter allows you to specify the delay in minutes before the imported certificate is utilized. Example: mst-cli import_cert delay 10080
For more information about mst-cli, see Reference for Microsoft Tunnel.
Use a rootless Podman container
When you use Red Hat Linux with Podman containers to host your Microsoft Tunnel, you can configure the container as a rootless container.
Use of a rootless container can help to limit impact from a container escape, with all the files in and below the /etc/mstunnel folder on the server being owned by a nonprivileged user service account. The account name on the Linux server that runs Tunnel is unchanged from a standard installation, but is created without root user permissions.
To successfully use a rootless Podman container, you must:
- Configure additional prerequisites outlined in the following section.
- Modify the script command-line when starting the Microsoft Tunnel installation.
With prerequisites in place, you can then use the installation script procedure to first download the installation script, and then run the install by using the modified script command-line.
Additional prerequisites for rootless Podman containers
Use of a rootless Podman container requires your environment meet the following prerequisites, which are in addition to the default Microsoft Tunnel prerequisites:
Supported platform:
The Linux server must run Red Hat (RHEL) 8.8 or later.
The container must run Podman 4.6.1 or later. Rootless containers are not supported with Docker.
The rootless container must be installed under the /home folder.
The /home folder must have a minimum of 10 GB of free space.
Throughput
- The peak throughput should not exceed 230Mbps
Network: The following network settings, which are not available in a rootless namespace, must be set in /etc/sysctl.conf:
net.core.somaxconn=8192net.netfilter.nf_conntrack_acct=1net.netfilter.nf_conntrack_timestamp=1
In addition, if you bind the rootless Tunnel Gateway to a port that is smaller than 1024, you must also add the following setting in /etc/sysctl.conf and set it equal to the port you use:
net.ipv4.ip_unprivileged_port_start
For example, to specify port 443, use the following entry: net.ipv4.ip_unprivileged_port_start=443
After editing sysctl.conf, you must reboot the Linux server before the new configurations take effect.
Outbound proxy for the rootless user: To support an outbound proxy for the rootless user, edit /etc/profile.d/http_proxy.sh and add the following two lines. In the following lines, 10.10.10.1:3128 is an example address:port entry. When you add these lines, replace 10.10.10.1:3128 with the values for your proxy IP address and port:
export http_proxy=http://10.10.10.1:3128export https_proxy=http://10.10.10.1:3128
Modified installation command-line for rootless Podman containers
To install Microsoft Tunnel to a rootless Podman container, use the following command line to begin the installation script. This command line sets mst_rootless_mode as an environment variable and replaces use of the default installation command line during step 2 of the installation procedure:
mst_rootless_mode=1 ./mstunnel-setup
Uninstall the Microsoft Tunnel
To uninstall the product, run mst-cli uninstall from the Linux server as root.
After the product is uninstalled, delete the corresponding server record in the Microsoft Intune admin center under Tenant administration > Microsoft Tunnel Gateway > Servers.
Next steps
Use Conditional Access with the Microsoft Tunnel
Monitor Microsoft Tunnel
Feedback
Coming soon: Throughout 2024 we will be phasing out GitHub Issues as the feedback mechanism for content and replacing it with a new feedback system. For more information see: https://aka.ms/ContentUserFeedback.
Submit and view feedback for