Tutorial: Use shared-device mode in your Android application
In this tutorial, Android developers and Microsoft Entra tenant administrators learn about the code, Authenticator app, and tenant settings required to enable shared-device mode for an Android app.
In this tutorial:
- Download a code sample
- Enable and detect shared-device mode
- Detect single or multiple account mode
- Detect a user switch, and enable global sign-in and sign-out
- Set up tenant and register the application
- Set up an Android device in shared-device mode
- Run the sample app
Prerequisites
- An Azure account with an active subscription. Create an account for free.
Developer guide
This section of the tutorial provides developer guidance for implementing shared-device mode in an Android application using the Microsoft Authentication Library (MSAL). See the MSAL Android tutorial to see how to integrate MSAL with your Android app, sign in a user, call Microsoft graph, and sign out a user.
Download the sample
Clone the sample application from GitHub. The sample has the capability to work in single or multi account mode.
Add the MSAL SDK to your local Maven repository
If you're not using the sample app, add the MSAL library as a dependency in your build.gradle file, like so:
dependencies{
  implementation 'com.microsoft.identity.client.msal:4.9.+'
}
Configure your app to use shared-device mode
Refer to the configuration documentation for more information on setting up your config file.
Set "shared_device_mode_supported" to true in your MSAL configuration file.
You may not be planning to support multiple-account mode. That could be if you're not using a shared device, and the user can sign into the app with more than one account at the same time. If so, set "account_mode" to "SINGLE". This guarantees that your app will always get ISingleAccountPublicClientApplication, and significantly simplifies your MSAL integration. The default value of "account_mode" is "MULTIPLE", so it's important to change this value in the config file if you're using "single account" mode.
Here's an example of the auth_config.json file included in the app>main>res>raw directory of the sample app:
{
  "client_id": "Client ID after app registration at https://aka.ms/MobileAppReg",
  "authorization_user_agent": "DEFAULT",
  "redirect_uri": "Redirect URI after app registration at https://aka.ms/MobileAppReg",
  "account_mode": "SINGLE",
  "broker_redirect_uri_registered": true,
  "shared_device_mode_supported": true,
  "authorities": [
    {
      "type": "AAD",
      "audience": {
        "type": "AzureADandPersonalMicrosoftAccount",
        "tenant_id": "common"
      }
    }
  ]
}
Detect shared-device mode
Shared-device mode allows you to configure Android devices to be shared by multiple employees, while providing Microsoft Identity backed management of the device. Employees can sign in to their devices and access customer information quickly. When they're finished with their shift or task, they'll be able to sign-out of all apps on the shared device with a single click and the device will be immediately ready for the next employee to use.
Use isSharedDevice() to determine if an app is running on a device that is in shared-device mode. Your app could use this flag to determine if it should modify UX accordingly.
Here's a code snippet that shows how you could use isSharedDevice(). It's from the SingleAccountModeFragment class in the sample app:
deviceModeTextView.setText(mSingleAccountApp.isSharedDevice() ? "Shared" : "Non-Shared");
Initialize the PublicClientApplication object
If you set "account_mode":"SINGLE" in the MSAL config file, you can safely cast the returned application object as an ISingleAccountPublicCLientApplication.
private ISingleAccountPublicClientApplication mSingleAccountApp;

/*Configure your sample app and save state for this activity*/
PublicClientApplication.create(this.getApplicationCOntext(),
  R.raw.auth_config,
  new PublicClientApplication.ApplicationCreatedListener(){
  @Override
  public void onCreated(IPublicClientApplication application){
  mSingleAccountApp = (ISingleAccountPublicClientApplication)application;
  loadAccount();
  }
  @Override
  public void onError(MsalException exception){
  /*Fail to initialize PublicClientApplication */
  }
});
Detect single vs. multiple account mode
If you're writing an app that will only be used for frontline workers on a shared device, we recommend you write your app to only support single-account mode. This includes most applications that are task focused such as medical records apps, invoice apps, and most line-of-business apps. This will simplify your development as many features of the SDK won't need to be accommodated.
If your app supports multiple accounts and shared device mode, you must perform a type check and cast to the appropriate interface as shown below.
private IPublicClientApplication mApplication;

        if (mApplication instanceOf IMultipleAccountPublicClientApplication) {
          IMultipleAccountPublicClientApplication multipleAccountApplication = (IMultipleAccountPublicClientApplication) mApplication;
          ...
        } else if (mApplication instanceOf    ISingleAccountPublicClientApplication) {
           ISingleAccountPublicClientApplication singleAccountApplication = (ISingleAccountPublicClientApplication) mApplication;
            ...
        }
Get the signed in user and determine if a user has changed on the device
The loadAccount method retrieves the account of the signed in user. The onAccountChanged method determines if the signed-in user has changed, and if so, clean up:
private void loadAccount()
{
  mSingleAccountApp.getCurrentAccountAsync(new ISingleAccountPublicClientApplication.CurrentAccountCallback())
  {
    @Override
    public void onAccountLoaded(@Nullable IAccount activeAccount)
    {
      if (activeAccount != null)
      {
        signedInUser = activeAccount;
        mSingleAccountApp.acquireTokenSilentAsync(SCOPES,"http://login.microsoftonline.com/common",getAuthSilentCallback());
      }
    }
    @Override
    public void onAccountChanged(@Nullable IAccount priorAccount, @Nullable Iaccount currentAccount)
    {
      if (currentAccount == null)
      {
        //Perform a cleanup task as the signed-in account changed.
        updateSingedOutUI();
      }
    }
    @Override
    public void onError(@NonNull Exception exception)
    {
    }
  }
}
Globally sign in a user
The following signs in a user across the device to other apps that use MSAL with the Authenticator App:
private void onSignInClicked()
{
  mSingleAccountApp.signIn(getActivity(), SCOPES, null, getAuthInteractiveCallback());
}
Globally sign out a user
The following removes the signed-in account and clears cached tokens from not only the app but also from the device that is in shared device mode:
private void onSignOutClicked()
{
  mSingleAccountApp.signOut(new ISingleAccountPublicClientApplication.SignOutCallback()
  {
    @Override
    public void onSignOut()
    {
      updateSignedOutUI();
    }
    @Override
    public void onError(@NonNull MsalException exception)
    {
      /*failed to remove account with an exception*/
    }
  });
}
Receive broadcast to detect global sign out initiated from other applications
To receive the account change broadcast, you need to register a broadcast receiver. It’s recommended to register your broadcast receiver via the Context-registered receivers.
When an account change broadcast is received, immediately get the signed in user and determine if a user has changed on the device. If a change is detected, initiate data cleanup for previously signed-in account. It's recommended to properly stop any operations and do data cleanup.
The following code snippet shows how you could register a broadcast receiver.
private static final String CURRENT_ACCOUNT_CHANGED_BROADCAST_IDENTIFIER = "com.microsoft.identity.client.sharedmode.CURRENT_ACCOUNT_CHANGED";
private BroadcastReceiver mAccountChangedBroadcastReceiver;
private void registerAccountChangeBroadcastReceiver(){
    mAccountChangedBroadcastReceiver = new BroadcastReceiver() {
        @Override
        public void onReceive(Context context, Intent intent) {
            //INVOKE YOUR PRIOR ACCOUNT CLEAN UP LOGIC HERE
        }
    };
    IntentFilter filter = new

    IntentFilter(CURRENT_ACCOUNT_CHANGED_BROADCAST_IDENTIFIER);
    this.registerReceiver(mAccountChangedBroadcastReceiver, filter);
}
Administrator guide
The following steps describe setting up your application and putting your device into shared-device mode.
Register the application
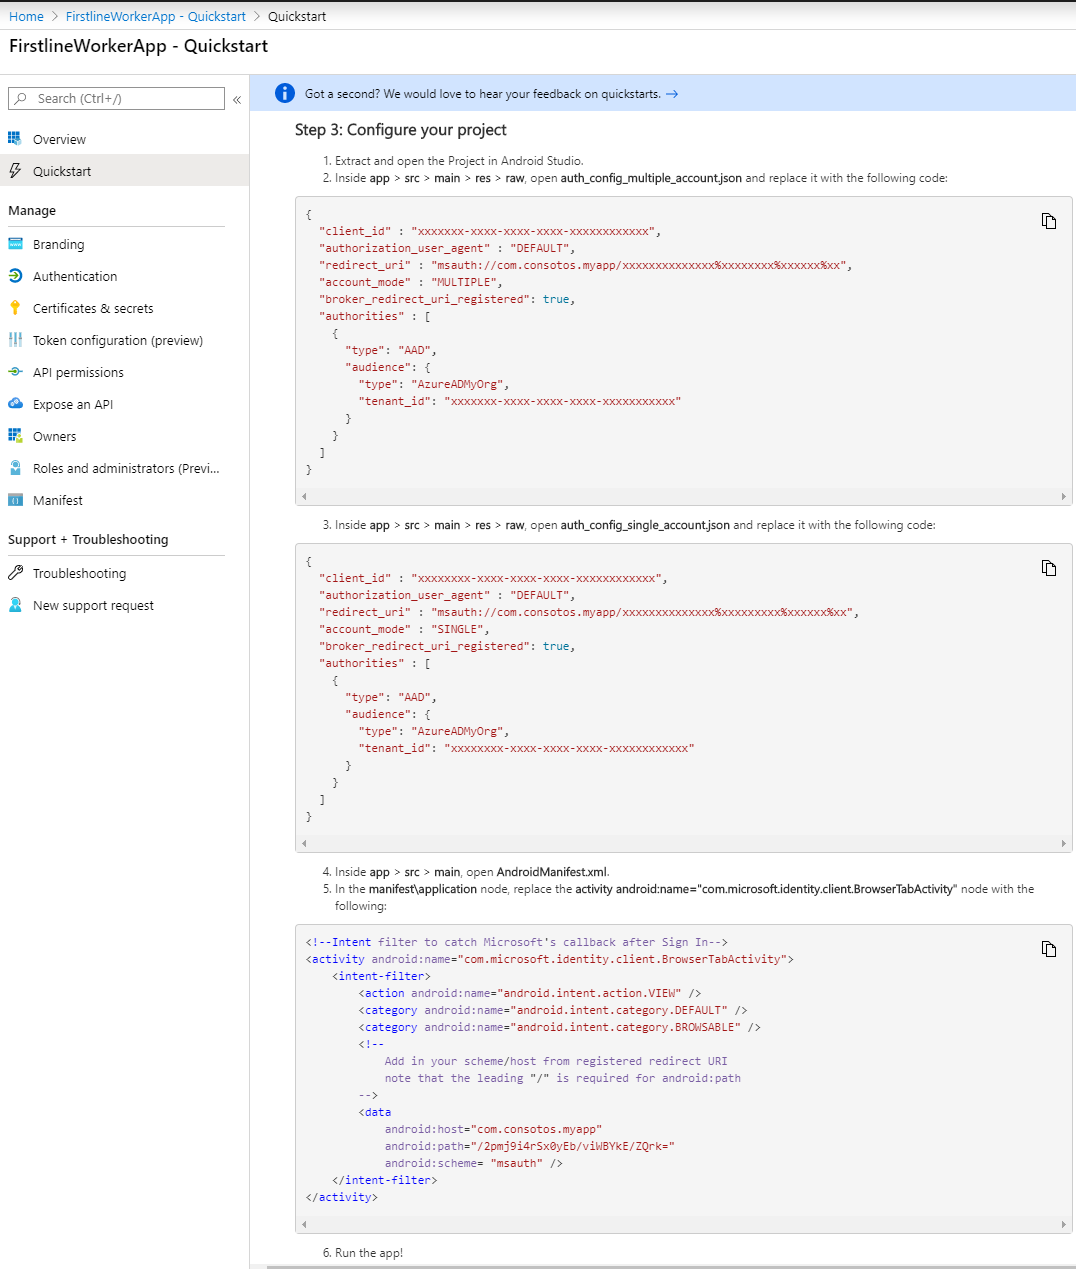
First, register the application within your organizational tenant. Then provide these values below in auth_config.json in order for your application to run correctly.
For information on how to do this, refer to Register your application.
Note
When you register your app, please use the quickstart guide on the left-hand side and then select Android. This will lead you to a page where you'll be asked to provide the Package Name and Signature Hash for your app. These are very important to ensure your app configuration will work. You'll then receive a configuration object that you can use for your app that you'll cut and paste into your auth_config.json file.
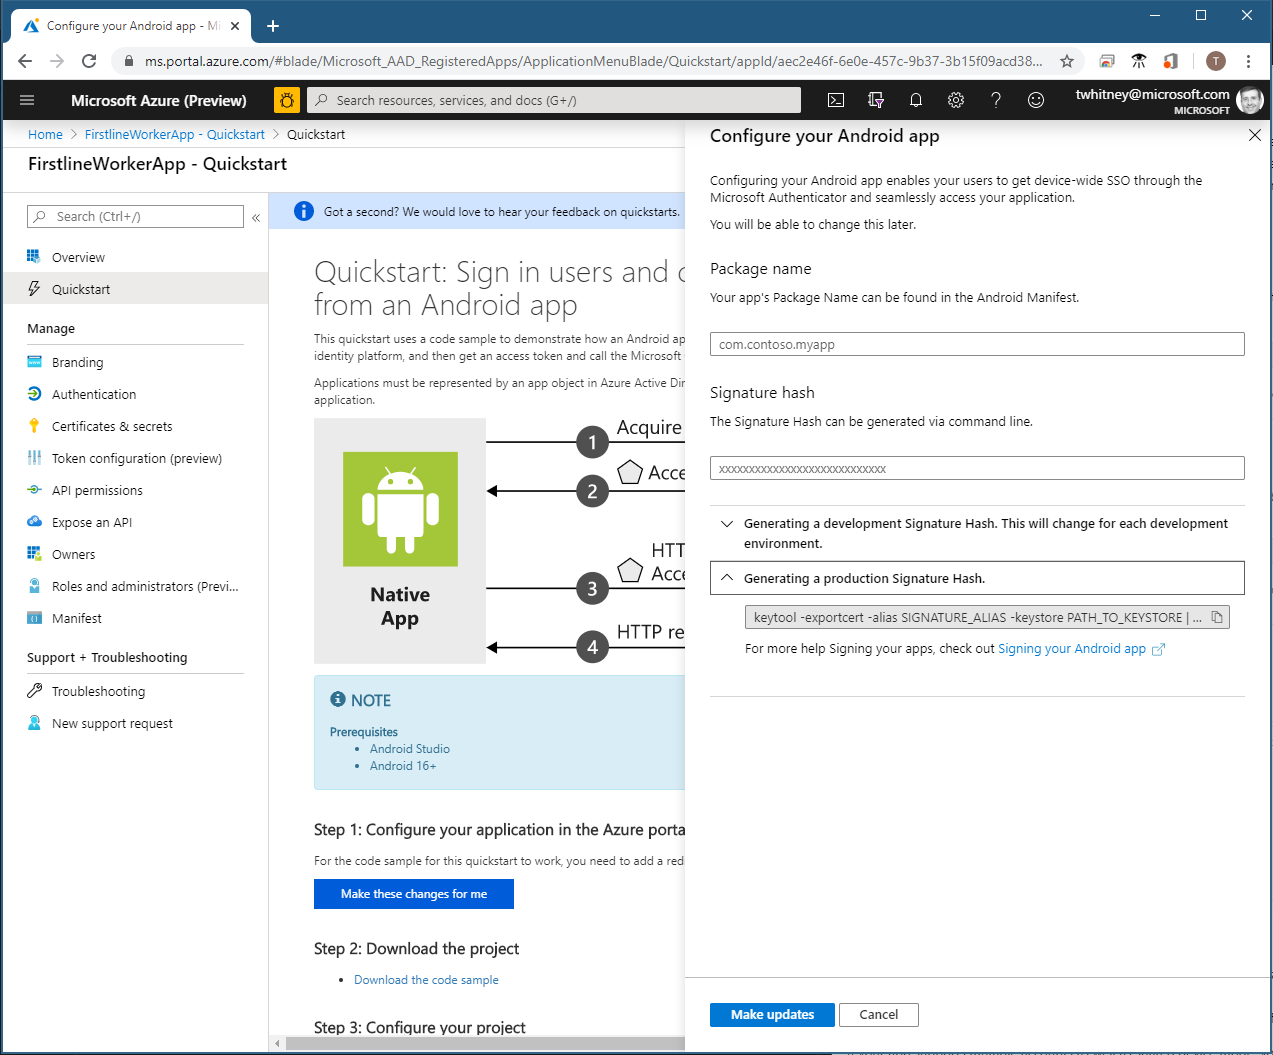
You should select Make this change for me and then provide the values the quickstart asks for. When that's done, we'll generate all the configuration files you need.
Set up a tenant
For testing purposes, set up the following in your tenant: at least two employees, one Cloud Device Administrator, and one Global Administrator. Set the Cloud Device Administrator by modifying Organizational Roles. Access your Organizational Roles by selecting Identity > Roles & admins > Roles & admins > All roles, and then select Cloud Device Administrator. Add the users that can put a device into shared mode.
Set up an Android device in shared mode
Download the Authenticator App
Download the Microsoft Authenticator App from the Google Play store. If you already have the app downloaded, ensure that it's the latest version.
Authenticator app settings & registering the device in the cloud
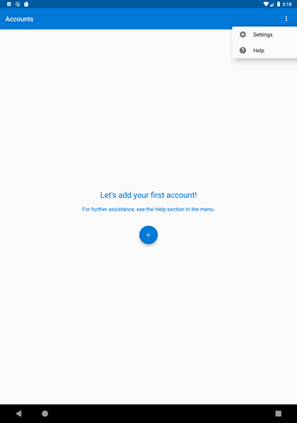
Launch the Authenticator App and navigate to main account page. Once you see the Add Account page, you're ready to make the device shared.
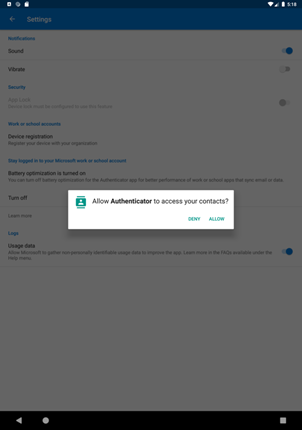
Go to the Settings pane using the right-hand menu bar. Select Device Registration under Work & School accounts.
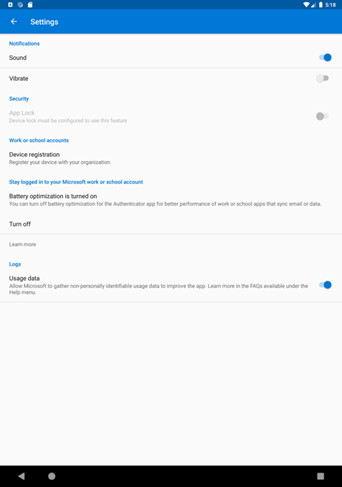
When you click this button, you'll be asked to authorize access to device contacts. This is due to Android's account integration on the device. Choose allow.
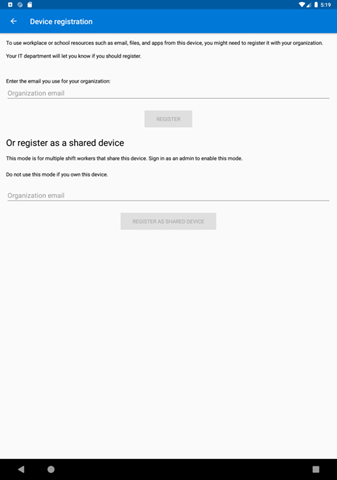
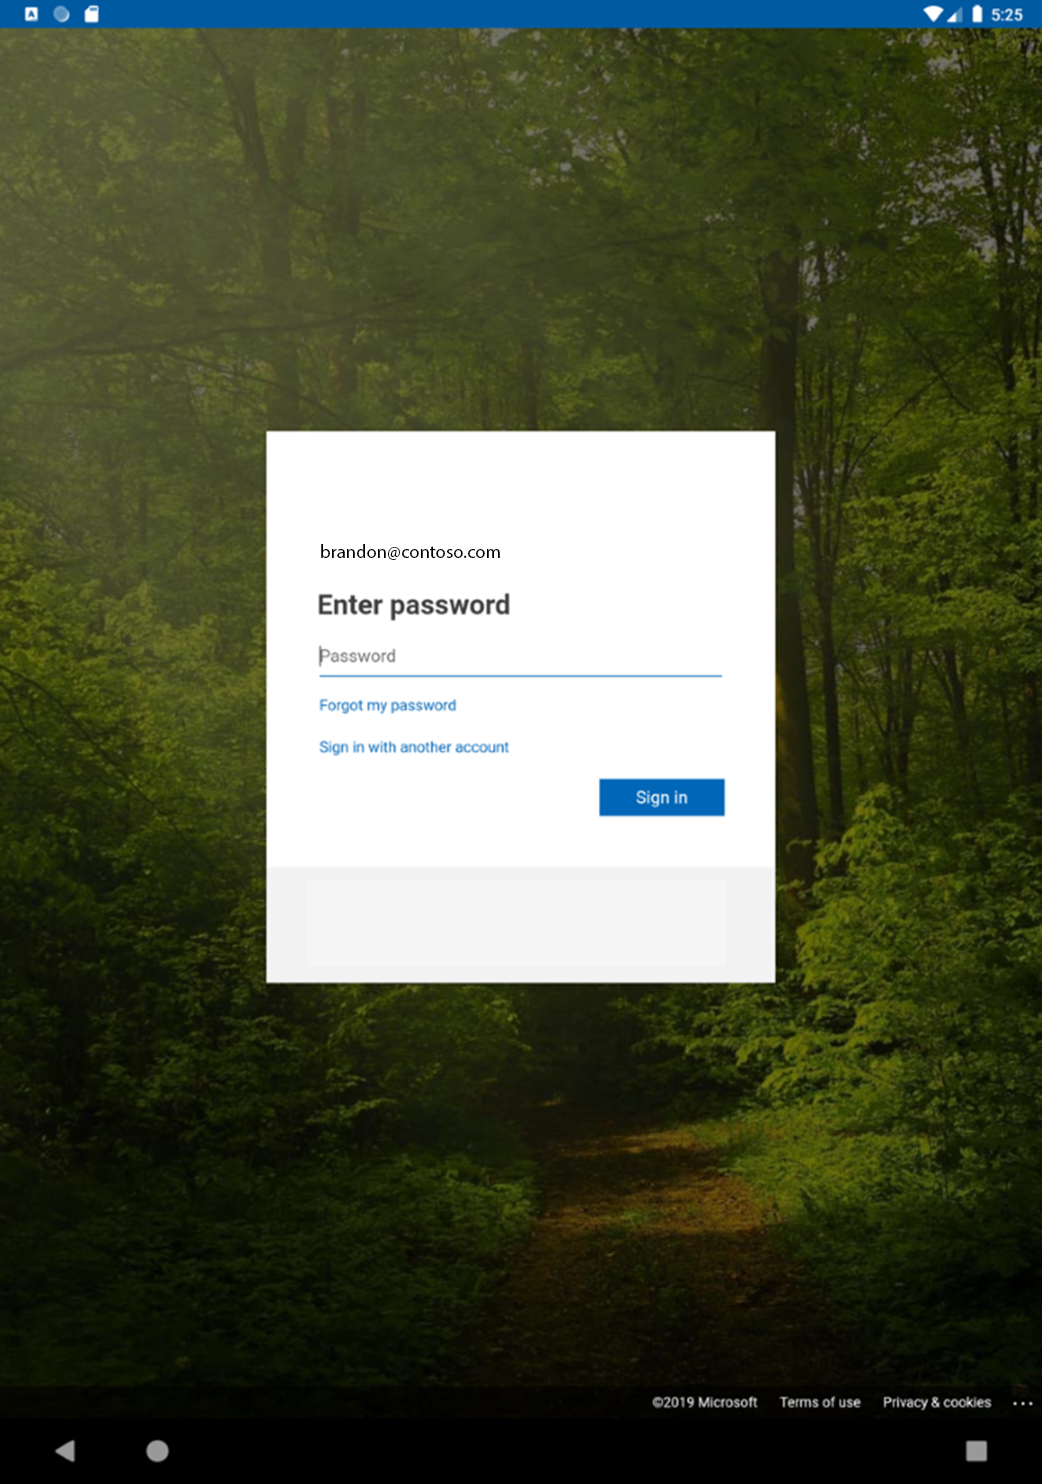
The Cloud Device Administrator should enter their organizational email under Or register as a shared device. Then click the register as shared device button, and enter their credentials.
The device is now in shared mode.
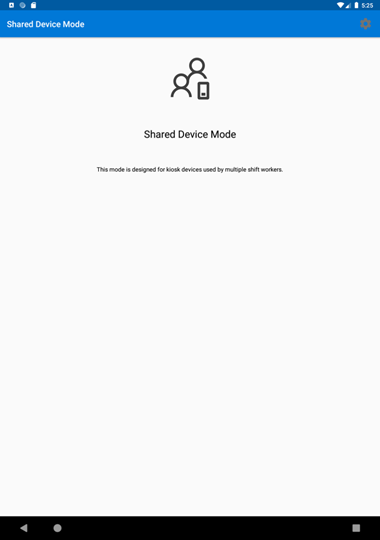
Any sign-ins and sign-outs on the device will be global, meaning they apply to all apps that are integrated with MSAL and Microsoft Authenticator on the device. You can now deploy applications to the device that use shared-device mode features.
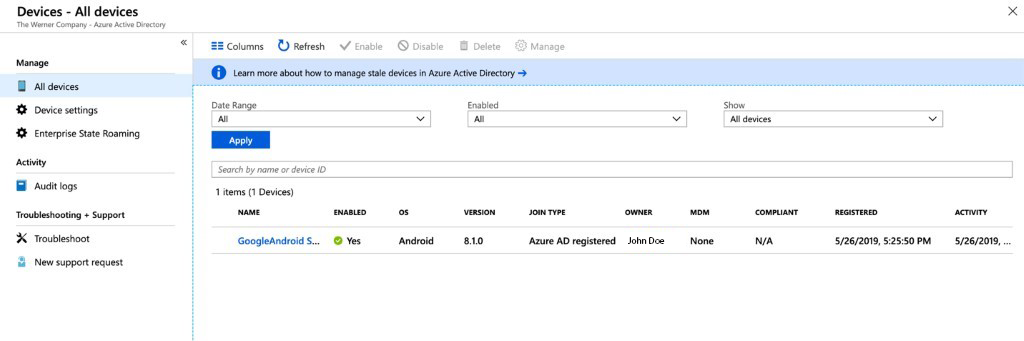
View the shared device
Once you've put a device in shared-mode, it becomes known to your organization and is tracked in your organizational tenant. You can view your shared devices by looking at the Join Type.
Running the sample app
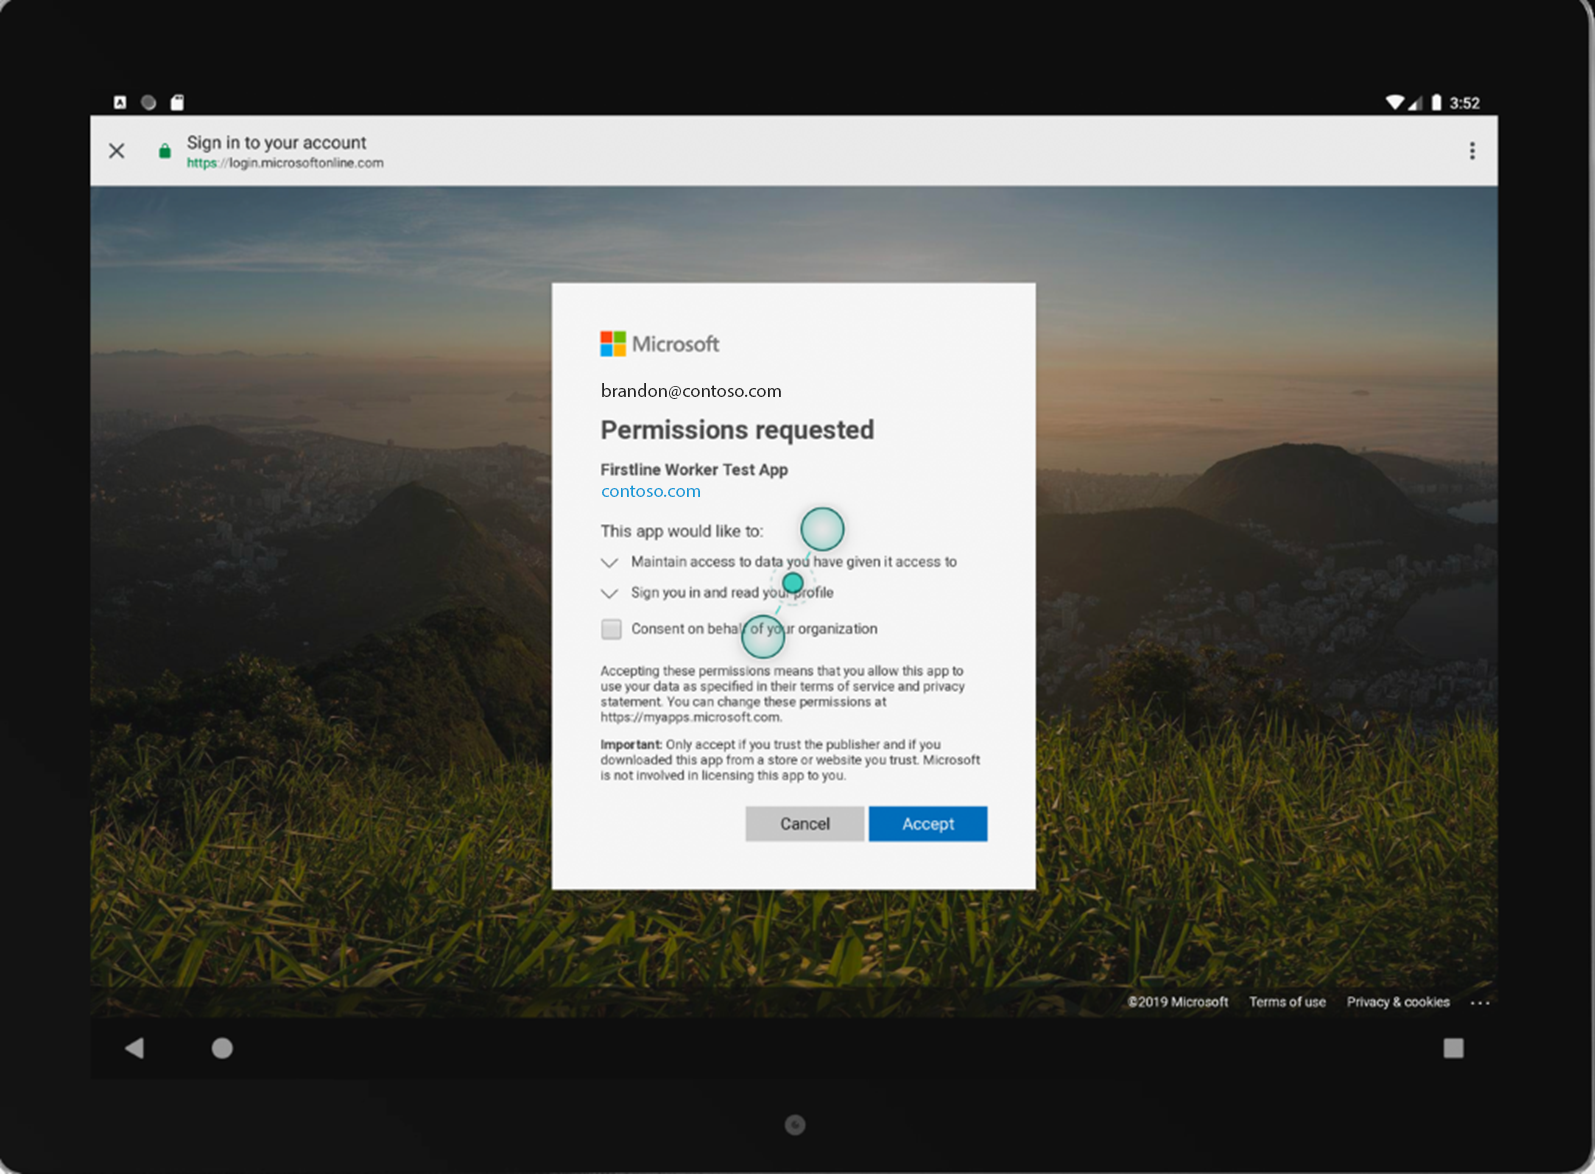
The Sample Application is a simple app that will call the Graph API of your organization. On first run, you'll be prompted to consent as the application is new to your employee account.
Next steps
Learn more about working with the Microsoft Authentication Library and shared device mode on Android devices:
Feedback
Coming soon: Throughout 2024 we will be phasing out GitHub Issues as the feedback mechanism for content and replacing it with a new feedback system. For more information see: https://aka.ms/ContentUserFeedback.
Submit and view feedback for