Quickstart: Configure a label for users to easily protect emails that contain sensitive information
In this quickstart, you'll configure an existing Azure Information Protection label to automatically apply the Do Not Forward protection setting.
The current Azure Information Protection policy already contains two labels that have this configuration:
Confidential \ Recipients Only
Highly Confidential \ Recipients Only
However, if your policy is older, or if protection wasn't activated at the time your organization's policy was created, you won't have these labels.
Time required: You can finish this configuration in 5 minutes.
Prerequisites
To complete this quickstart, you need:
| Requirement | Description |
|---|---|
| A supporting subscription | You'll need a subscription that includes Azure Information Protection. |
| AIP added to the Azure portal | You've added the Azure Information Protection pane to the Azure portal, and confirmed that the protection service is activated. For more information, see Quickstart: Get started in the Azure portal. |
| An existing Azure Information Protection label to configure | Use one of the default labels, or a label that you've created. For more information, see Quickstart: Create a new Azure Information Protection label for specific users. |
| Classic client installed | To test the new label, you'll need the classic client installed on your computer. The Azure Information Protection classic client is retired as of March 2022. To deploy the AIP classic client, open a support ticket to get download access. |
| A Windows computer, signed into Office apps | To test the new label, you'll need a computer running Windows (minimum of Windows 7 with Service Pack 1). On this computer, sign into one of the following Office app versions: - Office apps, for the versions listed in the table of supported versions for Microsoft 365 Apps by update channel, from Microsoft 365 Apps for Business or Microsoft 365 Business Premium, when the user is assigned a license for Azure Rights Management (also known as Azure Information Protection for Office 365). - Microsoft 365 Apps for Enterprise - Office Professional Plus 2019 - Office Professional Plus 2016 - Office Professional Plus 2013 with Service Pack 1 - Office Professional Plus 2010 with Service Pack 2 |
For a full list of prerequisites to use Azure Information Protection, see Requirements for Azure Information Protection.
Configure an existing label to apply the Do Not Forward protection
Open a new browser window and sign in to the Azure portal as a global admin. Then navigate to Azure Information Protection.
For example, in the search box for resources, services, and docs: Start typing Information and select Azure Information Protection.
If you are not the global admin, use the following link for alternative roles: Signing in to the Azure portal
From the Classifications > Labels menu option: On the Azure Information Protection - Labels pane, select the label you want to configure to apply the protection.
On the Label pane, locate Set permissions for documents and emails containing this label. Select Protect, and the Protection pane automatically opens if Not configured or Remove Protection was previously selected.
If the Protection pane does not automatically open, select Protection:
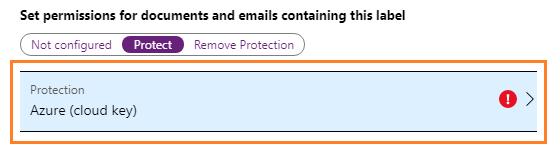
On the Protection pane, make sure that Azure (cloud key) is selected.
Select Set user-defined permissions (Preview).
Make sure that the following option is selected: In Outlook apply Do Not Forward.
If selected, clear the following option: In Word, Excel, PowerPoint and File Explorer prompt user for custom permissions.
Click OK on the Protection pane, and then click Save on the Label pane.
Your label is now configured to display in Outlook only, and apply the Do Not Forward protection to emails.
Test your new label
Your configured label displays only in Outlook and is suitable for emails sent to any recipient outside your organization when Exchange Online is configured for the new capabilities in Office 365 Message Encryption.
On your computer, open Outlook and create a new email message. If Outlook is already open, restart it to force a policy refresh.
Specify the recipients, some text for the email message, and then apply the label that you just created.
The email message is classified according to the label name, and protected with the Do Not Forward restriction.
Send the email.
The result is that recipients cannot forward the email, or print it, copy from it, or save attachments, or save the email as a different name. The protected email message can be read by any user, on any device.
Clean up resources
Do the following if you do not want to keep this configuration and return your label such that it doesn't apply protection:
From the Classifications > Labels menu option: On the Azure Information Protection - Labels pane, select the label you configured.
On the Label pane, locate Set permissions for documents and emails containing this label, select Not configured, and select Save.
Next steps
This quickstart includes the minimum options so that you can quickly configure a label that makes it easy for users to protect their emails. However, if the configuration is too restrictive, or not restrictive enough, see the other example configurations:
Label for protected email that supports less restrictive permissions than Do Not Forward
Label that encrypts content but doesn't restrict who can access it
For full instructions how to configure a label that applies protection, see How to configure a label for Rights Management protection.