SAP ASCS/SCS instance multi-SID high availability with Windows Server Failover Clustering and Azure shared disk
Windows
This article focuses on how to move from a single SAP ASCS/SCS installation to configuration of multiple SAP system IDs (SIDs) by installing additional SAP ASCS/SCS clustered instances into an existing Windows Server Failover Clustering (WSFC) cluster with an Azure shared disk. When you complete this process, you've configured an SAP multi-SID cluster.
Prerequisites and limitations
You can use Azure Premium SSD disks as Azure shared disks for the SAP ASCS/SCS instance. The following limitations are currently in place:
- Azure Ultra Disk Storage disks and Azure Standard SSD disks aren't supported as Azure shared disks for SAP workloads.
- Azure shared disks with Premium SSD disks are supported for SAP deployment in availability sets and availability zones.
- Azure shared disks with Premium SSD disks come with two storage options:
- Locally redundant storage (LRS) for Premium SSD shared disks (
skuNamevalue ofPremium_LRS) is supported with deployment in availability sets. - Zone-redundant storage (ZRS) for Premium SSD shared disks (
skuNamevalue ofPremium_ZRS) is supported with deployment in availability zones.
- Locally redundant storage (LRS) for Premium SSD shared disks (
- The Azure shared disk value maxShares determines how many cluster nodes can use the shared disk. For an SAP ASCS/SCS instance, you typically configure two nodes in WSFC. You then set the value for
maxSharesto2. - An Azure proximity placement group (PPG) isn't required for Azure shared disks. But for SAP deployment with PPGs, follow these guidelines:
- If you're using PPGs for an SAP system deployed in a region, all virtual machines that share a disk must be part of the same PPG.
- If you're using PPGs for an SAP system deployed across zones, as described in Proximity placement groups with zonal deployments, you can attach
Premium_ZRSstorage to virtual machines that share a disk.
For more information, review the Limitations section of the documentation for Azure shared disks.
Important considerations for Premium SSD shared disks
Consider these important points about Azure Premium SSD shared disks:
LRS for Premium SSD shared disks:
- SAP deployment with LRS for Premium SSD shared disks operates with a single Azure shared disk on one storage cluster. If there's a problem with the storage cluster where the Azure shared disk is deployed, it affects your SAP ASCS/SCS instance.
ZRS for Premium SSD shared disks:
- Write latency for ZRS is higher than that of LRS because cross-zonal copying of data.
- The distance between availability zones in different regions varies, and so does ZRS disk latency across availability zones. Benchmark your disks to identify the latency of ZRS disks in your region.
- ZRS for Premium SSD shared disks synchronously replicates data across three availability zones in the region. If there's a problem in one of the storage clusters, your SAP ASCS/SCS instance continues to run because storage failover is transparent to the application layer.
- For more information, review the Limitations section of the documentation about ZRS for managed disks.
Important
The setup must meet the following conditions:
- The SID for each database management system (DBMS) must have its own dedicated WSFC cluster.
- SAP application servers that belong to one SAP SID must have their own dedicated virtual machines (VMs).
- A mix of Enqueue Replication Server 1 (ERS1) and Enqueue Replication Server 2 (ERS2) in the same cluster is not supported.
Supported OS versions
Windows Server 2016, 2019, and later are supported. Use the latest datacenter images.
We strongly recommend using at least Windows Server 2019 Datacenter, for these reasons:
- WSFC in Windows Server 2019 is Azure aware.
- Windows Server 2019 Datacenter includes integration and awareness of Azure host maintenance and improved experience by monitoring for Azure scheduled events.
- You can use distributed network names. (It's the default option.) There's no need to have a dedicated IP address for the cluster network name. Also, you don't need to configure an IP address on an Azure internal load balancer.
Architecture
Both ERS1 and ERS2 are supported in a multi-SID configuration. A mix of ERS1 and ERS2 isn't supported in the same cluster.
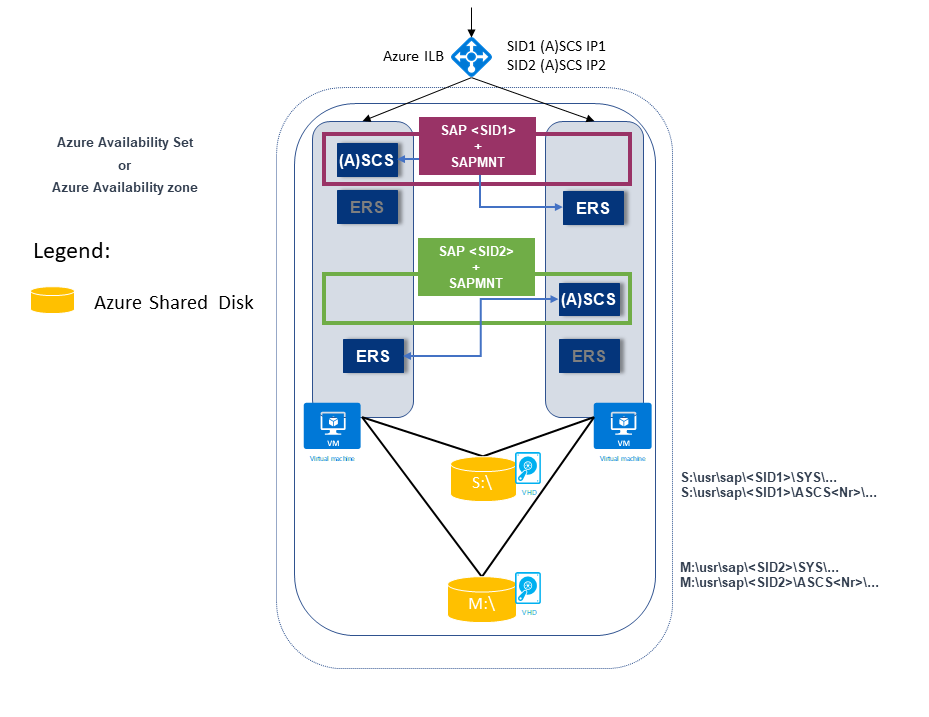
The following example shows two SAP SIDs. Both have an ERS1 architecture where:
SAP SID1 is deployed on a shared disk with ERS1. The ERS instance is installed on a local host and on a local drive.
SAP SID1 has its own virtual IP address (SID1 (A)SCS IP1), which is configured on the Azure internal load balancer.
SAP SID2 is deployed on a shared disk with ERS1. The ERS instance is installed on a local host and on a local drive.
SAP SID2 has own virtual IP address (SID2 (A)SCS IP2), which is configured on the Azure internal load balancer.
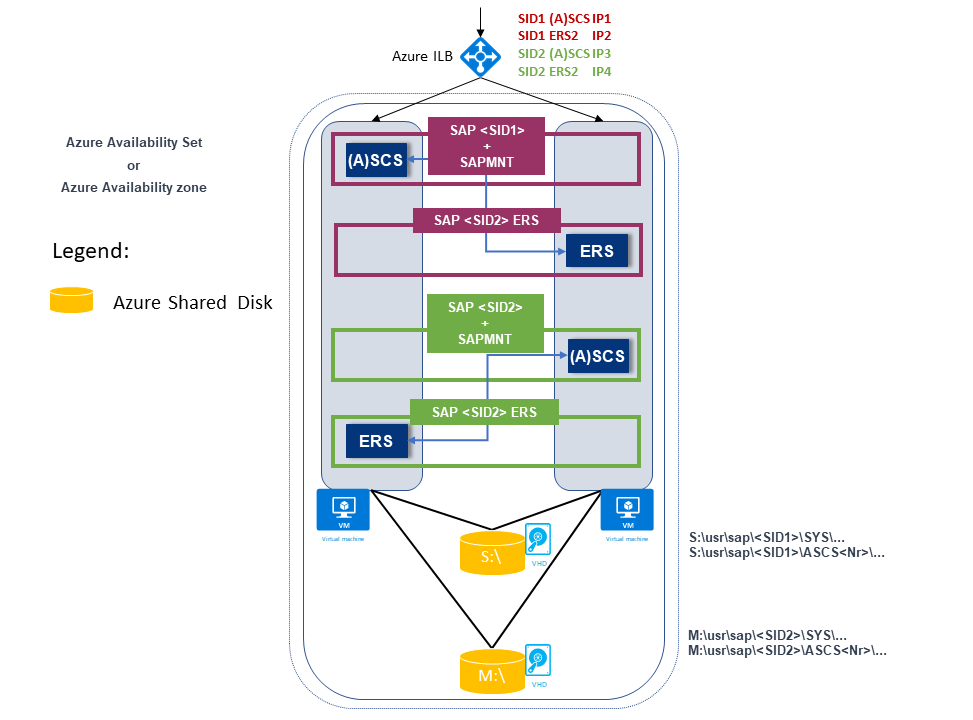
The next example also shows two SAP SIDs. Both have an ERS2 architecture where:
SAP SID1 is deployed on a shard disk with ERS2, which is clustered and is deployed on a local drive.
SAP SID1 has its own virtual IP address (SID1 (A)SCS IP1), which is configured on the Azure internal load balancer.
SAP ERS2 has its own virtual IP address (SID1 ERS2 IP2), which is configured on the Azure internal load balancer.
SAP SID2 is deployed on a shard disk with ERS2, which is clustered and is deployed on a local drive.
SAP SID2 has own virtual IP address (SID2 (A)SCS IP3), which is configured on the Azure internal load balancer.
SAP ERS2 has its own virtual IP address (SID2 ERS2 IP4), which is configured on the Azure internal load balancer.
There's a total of four virtual IP addresses:
- SID1 (A)SCS IP1
- SID2 ERS2 IP2
- SID2 (A)SCS IP3
- SID2 ERS2 IP4
Infrastructure preparation
You install a new SAP SID PR2 instance, in addition to the existing clustered SAP PR1 ASCS/SCS instance.
Host names and IP addresses
Based on your deployment type, the host names and the IP addresses of the scenario should be like the following examples.
Here are the details for an SAP deployment in an Azure availability set:
| Host name role | Host name | Static IP address | Availability set | Disk SkuName value |
|---|---|---|---|---|
| First cluster node ASCS/SCS cluster | pr1-ascs-10 | 10.0.0.4 | pr1-ascs-avset | Premium_LRS |
| Second cluster node ASCS/SCS cluster | pr1-ascs-11 | 10.0.0.5 | pr1-ascs-avset | |
| Cluster network name | pr1clust | 10.0.0.42 (only for a Windows Server 2016 cluster) | Not applicable | |
| SID1 ASCS cluster network name | pr1-ascscl | 10.0.0.43 | Not applicable | |
| SID1 ERS cluster network name (only for ERS2) | pr1-erscl | 10.0.0.44 | Not applicable | |
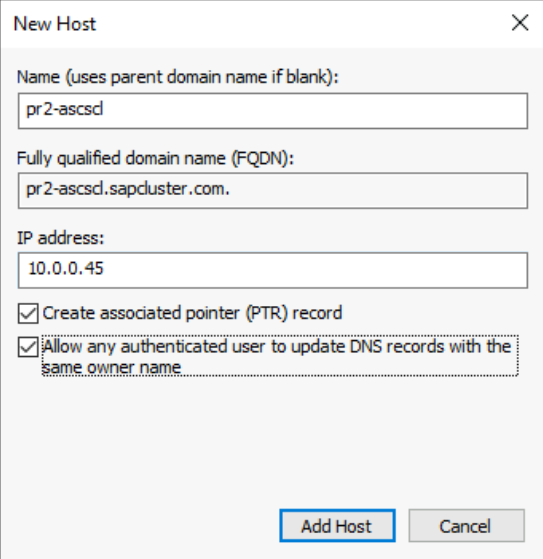
| SID2 ASCS cluster network name | pr2-ascscl | 10.0.0.45 | Not applicable | |
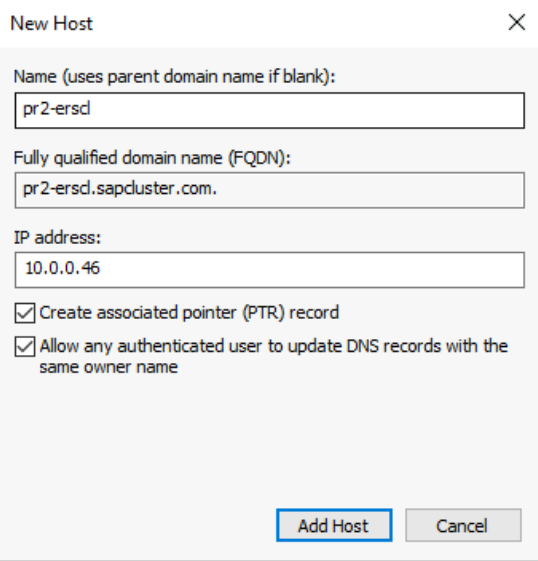
| SID2 ERS cluster network name (only for ERS2) | pr1-erscl | 10.0.0.46 | Not applicable |
Here are the details for an SAP deployment in Azure availability zones:
| Host name role | Host name | Static IP address | Availability zone | Disk SkuName value |
|---|---|---|---|---|
| First cluster node ASCS/SCS cluster | pr1-ascs-10 | 10.0.0.4 | AZ01 | Premium_ZRS |
| Second cluster node ASCS/SCS cluster | pr1-ascs-11 | 10.0.0.5 | AZ02 | |
| Cluster network name | pr1clust | 10.0.0.42 (only for a Windows Server 2016 cluster) | Not applicable | |
| SID1 ASCS cluster network name | pr1-ascscl | 10.0.0.43 | Not applicable | |
| SID2 ERS cluster network name (only for ERS2) | pr1-erscl | 10.0.0.44 | Not applicable | |
| SID2 ASCS cluster network name | pr2-ascscl | 10.0.0.45 | Not applicable | |
| SID2 ERS cluster network name (only for ERS2) | pr1-erscl | 10.0.0.46 | Not applicable |
The steps in this article remain the same for both deployment types. But if your cluster is running in an availability set, you need to deploy LRS for Azure Premium SSD shared disks (Premium_LRS). If your cluster is running in an availability zone, you need to deploy ZRS for Azure Premium SSD shared disks (Premium_ZRS).
Create an Azure internal load balancer
For multi-sid configuration of SAP SID, PR2, you could use the same internal load balancer that you have created for SAP SID, PR1 system. For the ENSA1 architecture on Windows, you would need only one virtual IP address for SAP ASCS/SCS. On the other hand, the ENSA2 architecture necessitates two virtual IP addresses - one for SAP ASCS and another for ERS2.
Configure additional frontend IP and load balancing rule for SAP SID, PR2 system on the existing load balancer using following guidelines. This section assumes that the configuration of standard internal load balancer for SAP SID, PR1 is already in place as described in create load balancer.
- Open the same standard internal load balancer that you have created for SAP SID, PR1 system.
- Frontend IP Configuration: Create frontend IP (example: 10.0.0.45).
- Backend Pool: Backend Pool is same as that of SAP SID PR1 system.
- Inbound rules: Create load balancing rule.
- Frontend IP address: Select frontend IP
- Backend pool: Select backend pool
- Check "High availability ports"
- Protocol: TCP
- Health Probe: Create health probe with below details
- Protocol: TCP
- Port: [for example: 620<Instance-no.> for SAP SID, PR2 ASCS]
- Interval: 5
- Probe Threshold: 2
- Idle timeout (minutes): 30
- Check "Enable Floating IP"
- Applicable to only ENSA2 architecture: Create additional frontend IP (10.0.0.44), load balancing rule (use 621<Instance-no.> for ERS2 health probe port) as described in point 1 and 3.
Note
Health probe configuration property numberOfProbes, otherwise known as "Unhealthy threshold" in Portal, isn't respected. So to control the number of successful or failed consecutive probes, set the property "probeThreshold" to 2. It is currently not possible to set this property using Azure portal, so use either the Azure CLI or PowerShell command.
Important
A floating IP address isn't supported on a network interface card (NIC) secondary IP configuration in load-balancing scenarios. For details, see Azure Load Balancer limitations. If you need another IP address for the VM, deploy a second NIC.
Note
When VMs without public IP addresses are placed in the back-end pool of an internal (no public IP address) Standard Azure load balancer, there will be no outbound internet connectivity unless you perform additional configuration to allow routing to public endpoints. For details on how to achieve outbound connectivity, see Public endpoint connectivity for virtual machines using Azure Standard Load Balancer in SAP high-availability scenarios.
Create and attach a second Azure shared disk
Run this command on one of the cluster nodes. Adjust the values for details like your resource group, Azure region, and SAP SID.
$ResourceGroupName = "MyResourceGroup"
$location = "MyRegion"
$SAPSID = "PR2"
$DiskSizeInGB = 512
$DiskName = "$($SAPSID)ASCSSharedDisk"
$NumberOfWindowsClusterNodes = 2

# For SAP deployment in an availability set, use this storage SkuName value
$SkuName = "Premium_LRS"
# For SAP deployment in an availability zone, use this storage SkuName value
$SkuName = "Premium_ZRS"

$diskConfig = New-AzDiskConfig -Location $location -SkuName $SkuName  -CreateOption Empty  -DiskSizeGB $DiskSizeInGB -MaxSharesCount $NumberOfWindowsClusterNodes

$dataDisk = New-AzDisk -ResourceGroupName $ResourceGroupName -DiskName $DiskName -Disk $diskConfig
##################################
## Attach the disk to cluster VMs
##################################
# ASCS cluster VM1
$ASCSClusterVM1 = "pr1-ascs-10"
# ASCS cluster VM2
$ASCSClusterVM2 = "pr1-ascs-11"
# Next free LUN
$LUNNumber = 1

# Add the Azure shared disk to Cluster Node 1
$vm = Get-AzVM -ResourceGroupName $ResourceGroupName -Name $ASCSClusterVM1
$vm = Add-AzVMDataDisk -VM $vm -Name $DiskName -CreateOption Attach -ManagedDiskId $dataDisk.Id -Lun $LUNNumber
Update-AzVm -VM $vm -ResourceGroupName $ResourceGroupName -Verbose

# Add the Azure shared disk to Cluster Node 2
$vm = Get-AzVM -ResourceGroupName $ResourceGroupName -Name $ASCSClusterVM2
$vm = Add-AzVMDataDisk -VM $vm -Name $DiskName -CreateOption Attach -ManagedDiskId $dataDisk.Id -Lun $LUNNumber
Update-AzVm -VM $vm -ResourceGroupName $ResourceGroupName -Verbose
Format the shared disk by using PowerShell
Get the disk number. Run these PowerShell commands on one of the cluster nodes:
 Get-Disk | Where-Object PartitionStyle -Eq "RAW"  | Format-Table -AutoSize
 # Example output
 # Number Friendly Name     Serial Number HealthStatus OperationalStatus Total Size Partition Style
 # ------ -------------     ------------- ------------ ----------------- ---------- ---------------
 # 3      Msft Virtual Disk               Healthy      Online                512 GB RAW
Format the disk. In this example, it's disk number 3:
 # Format SAP ASCS disk number 3, with drive letter S
 $SAPSID = "PR2"
 $DiskNumber = 3
 $DriveLetter = "S"
 $DiskLabel = "$SAPSID" + "SAP"

 Get-Disk -Number $DiskNumber | Where-Object PartitionStyle -Eq "RAW" | Initialize-Disk -PartitionStyle GPT -PassThru |  New-Partition -DriveLetter $DriveLetter -UseMaximumSize | Format-Volume  -FileSystem ReFS -NewFileSystemLabel $DiskLabel -Force -Verbose
 # Example outout
 # DriveLetter FileSystemLabel FileSystem DriveType HealthStatus OperationalStatus SizeRemaining      Size
 # ----------- --------------- ---------- --------- ------------ ----------------- -------------      ----
 # S           PR2SAP          ReFS       Fixed     Healthy      OK                    504.98 GB 511.81 GB
Verify that the disk is now visible as a cluster disk:
 # List all disks
 Get-ClusterAvailableDisk -All
 # Example output
 # Cluster    : pr1clust
 # Id         : c469b5ad-d089-4d8f-ae4c-d834cbbde1a2
 # Name       : Cluster Disk 2
 # Number     : 3
 # Size       : 549755813888
 # Partitions : {\\?\GLOBALROOT\Device\Harddisk3\Partition2\}
Register the disk in the cluster:
 # Add the disk to the cluster
 Get-ClusterAvailableDisk -All | Add-ClusterDisk
 # Example output
 # Name           State  OwnerGroup        ResourceType
 # ----           -----  ----------        ------------
 # Cluster Disk 2 Online Available Storage Physical Disk
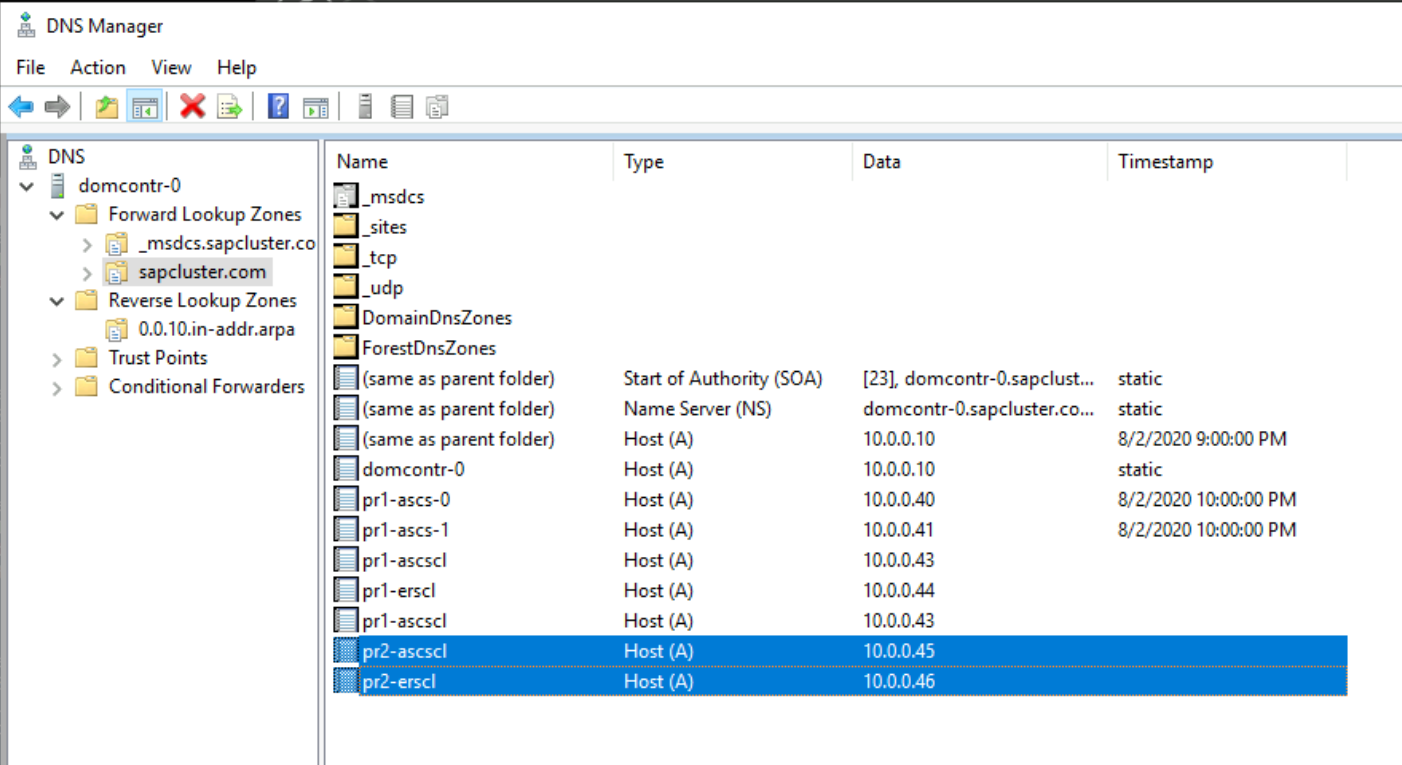
Create a virtual host name for the clustered SAP ASCS/SCS instance
Create a DNS entry for the virtual host name for new the SAP ASCS/SCS instance in the Windows DNS manager.
The IP address that you assigned to the virtual host name in DNS must be the same as the IP address that you assigned in Azure Load Balancer.
If you're using a clustered instance of SAP ERS2, you need to reserve in DNS a virtual host name for ERS2.
The IP address that you assigned to the virtual host name for ERS2 in DNS must be the same as the IP address that you assigned in Azure Load Balancer.
To define the IP address assigned to the virtual host name, select DNS Manager > Domain.
SAP installation
Install the SAP first cluster node
Follow the SAP-described installation procedure. Be sure to select First Cluster Node as the option for starting installation. Select Cluster Shared Disk as the configuration option. Choose the newly created shared disk.
Modify the SAP profile of the ASCS/SCS instance
If you're running ERS1, add the SAP profile parameter enque/encni/set_so_keepalive. The profile parameter prevents connections between SAP work processes and the enqueue server from closing when they're idle for too long. The SAP parameter isn't required for ERS2.
Add this profile parameter to the SAP ASCS/SCS instance profile, if you're using ERS1:
enque/encni/set_so_keepalive = trueFor both ERS1 and ERS2, make sure that the
keepaliveOS parameters are set as described in SAP note 1410736.To apply the changes to the SAP profile parameter, restart the SAP ASCS/SCS instance.
Configure a probe port on the cluster resource
Use the internal load balancer's probe functionality to make the entire cluster configuration work with Azure Load Balancer. The Azure internal load balancer usually distributes the incoming workload equally between participating virtual machines.
However, this approach won't work in some cluster configurations because only one instance is active. The other instance is passive and can't accept any of the workload. A probe functionality helps when the Azure internal load balancer detects which instance is active and targets only the active instance.
Important
In this example configuration, the probe port is set to 620nr. For SAP ASCS with instance number 02, it's 62002.
You need to adjust the configuration to match your SAP instance numbers and your SAP SID.
To add a probe port, run this PowerShell module on one of the cluster VMs:
If you're using SAP ASC/SCS with instance number 02:
Set-AzureLoadBalancerHealthCheckProbePortOnSAPClusterIPResource -SAPSID PR2 -ProbePort 62002If you're using ERS2 with instance number 12, configure a probe port. There's no need to configure a probe port for ERS1. ERS2 with instance number 12 is clustered, whereas ERS1 isn't clustered.
Set-AzureLoadBalancerHealthCheckProbePortOnSAPClusterIPResource -SAPSID PR2 -ProbePort 62012 -IsSAPERSClusteredInstance $True
The code for the function Set-AzureLoadBalancerHealthCheckProbePortOnSAPClusterIPResource looks like this example:
 function Set-AzureLoadBalancerHealthCheckProbePortOnSAPClusterIPResource {
 <#
 .SYNOPSIS
 Set-AzureLoadBalancerHealthProbePortOnSAPClusterIPResource will set a new Azure Load Balancer health probe port on the SAP $SAPSID IP cluster resource.

 .DESCRIPTION
 Set-AzureLoadBalancerHealthProbePortOnSAPClusterIPResource will set a new Azure Load Balancer health probe port on the SAP $SAPSID IP cluster resource.
 It will also restart the SAP cluster group (default behavior), to activate the changes.

 You need to run it on one of the SAP ASCS/SCS Windows cluster nodes.

 The expectation is that the SAP group is installed with the official SWPM installation tool, which will set the default expected naming convention for:
 - SAP cluster group:               SAP $SAPSID
 - SAP cluster IP address resource: SAP $SAPSID IP

 .PARAMETER SAPSID
 SAP SID - three characters, starting with a letter.

 .PARAMETER ProbePort
 Azure Load Balancer health check probe port.

 .PARAMETER RestartSAPClusterGroup
 Optional parameter. Default value is $True, so the SAP cluster group will be restarted to activate the changes.

 .PARAMETER IsSAPERSClusteredInstance
 Optional parameter. Default value is $False.
 If it's set to $True, then handle the clustered new SAP ERS2 instance.


 .EXAMPLE
 # Set the probe port to 62000 on SAP cluster resource SAP AB1 IP, and restart the SAP cluster group SAP AB1 to activate the changes.
 Set-AzureLoadBalancerHealthCheckProbePortOnSAPClusterIPResource -SAPSID AB1 -ProbePort 62000

 .EXAMPLE
 # Set the probe port to 62000 on SAP cluster resource SAP AB1 IP. SAP cluster group SAP AB1 is not restarted, so the changes are not active.
 # To activate the changes, you need to manually restart the SAP AB1 cluster group.
 Set-AzureLoadBalancerHealthCheckProbePortOnSAPClusterIPResource -SAPSID AB1 -ProbePort 62000 -RestartSAPClusterGroup $False

 .EXAMPLE
 # Set the probe port to 62001 on SAP cluster resource SAP AB1 ERS IP. SAP cluster group SAP AB1 ERS is restarted to activate the changes.
 Set-AzureLoadBalancerHealthCheckProbePortOnSAPClusterIPResource -SAPSID AB1 -ProbePort 62000 -IsSAPERSClusteredInstance $True

 #>

     [CmdletBinding()]
     param(

         [Parameter(Mandatory=$True)]
         [ValidateNotNullOrEmpty()]
         [ValidateLength(3,3)]
         [string]$SAPSID,

         [Parameter(Mandatory=$True)]
         [ValidateNotNullOrEmpty()]
         [int] $ProbePort,

         [Parameter(Mandatory=$False)]
         [bool] $RestartSAPClusterGroup = $True,

         [Parameter(Mandatory=$False)]
         [bool] $IsSAPERSClusteredInstance = $False

     )

     BEGIN{}

     PROCESS{
         try{

             if($IsSAPERSClusteredInstance){
                 #Handle clustered SAP ERS instance
                 $SAPClusterRoleName = "SAP $SAPSID ERS"
                 $SAPIPresourceName = "SAP $SAPSID ERS IP"
             }else{
                 #Handle clustered SAP ASCS/SCS instance
                 $SAPClusterRoleName = "SAP $SAPSID"
                 $SAPIPresourceName = "SAP $SAPSID IP"
             }

             $SAPIPResourceClusterParameters =  Get-ClusterResource $SAPIPresourceName | Get-ClusterParameter
             $IPAddress = ($SAPIPResourceClusterParameters | Where-Object {$_.Name -eq "Address" }).Value
             $NetworkName = ($SAPIPResourceClusterParameters | Where-Object {$_.Name -eq "Network" }).Value
             $SubnetMask = ($SAPIPResourceClusterParameters | Where-Object {$_.Name -eq "SubnetMask" }).Value
             $OverrideAddressMatch = ($SAPIPResourceClusterParameters | Where-Object {$_.Name -eq "OverrideAddressMatch" }).Value
             $EnableDhcp = ($SAPIPResourceClusterParameters | Where-Object {$_.Name -eq "EnableDhcp" }).Value
             $OldProbePort = ($SAPIPResourceClusterParameters | Where-Object {$_.Name -eq "ProbePort" }).Value

             $var = Get-ClusterResource | Where-Object {  $_.name -eq $SAPIPresourceName  }

             #Write-Host "Current configuration parameters for SAP IP cluster resource '$SAPIPresourceName' are:" -ForegroundColor Cyan
             Write-Output "Current configuration parameters for SAP IP cluster resource '$SAPIPresourceName' are:"

             Get-ClusterResource -Name $SAPIPresourceName | Get-ClusterParameter

             Write-Output " "
             Write-Output "Current probe port property of the SAP cluster resource '$SAPIPresourceName' is '$OldProbePort'."
             Write-Output " "
             Write-Output "Setting the new probe port property of the SAP cluster resource '$SAPIPresourceName' to '$ProbePort' ..."
             Write-Output " "

             $var | Set-ClusterParameter -Multiple @{"Address"=$IPAddress;"ProbePort"=$ProbePort;"Subnetmask"=$SubnetMask;"Network"=$NetworkName;"OverrideAddressMatch"=$OverrideAddressMatch;"EnableDhcp"=$EnableDhcp}

             Write-Output " "

             #$ActivateChanges = Read-Host "Do you want to take restart SAP cluster role '$SAPClusterRoleName', to activate the changes (yes/no)?"

             if($RestartSAPClusterGroup){
                 Write-Output ""
                 Write-Output "Activating changes..."

                 Write-Output " "
                 Write-Output "Taking SAP cluster IP resource '$SAPIPresourceName' offline ..."
                 Stop-ClusterResource -Name $SAPIPresourceName
                 sleep 5

                 Write-Output "Starting SAP cluster role '$SAPClusterRoleName' ..."
                 Start-ClusterGroup -Name $SAPClusterRoleName

                 Write-Output "New ProbePort parameter is active."
                 Write-Output " "

                 Write-Output "New configuration parameters for SAP IP cluster resource '$SAPIPresourceName':"
                 Write-Output " "
                 Get-ClusterResource -Name $SAPIPresourceName | Get-ClusterParameter
             }else
             {
                 Write-Output "SAP cluster role '$SAPClusterRoleName' is not restarted, therefore changes are not activated."
             }
         }
         catch{
            Write-Error  $_.Exception.Message
        }

     }

     END {}
 }
Continue with the SAP installation
Install the database instance by following the process described in the SAP installation guide.
Install SAP on the second cluster node by following the steps that are described in the SAP installation guide.
Install the SAP Primary Application Server (PAS) instance on the virtual machine that is designated to host the PAS.
Follow the process described in the SAP installation guide. There are no dependencies on Azure.
Install additional SAP application servers on the virtual machines that are designated to host SAP application server instances.
Follow the process described in the SAP installation guide. There are no dependencies on Azure.
Test SAP ASCS/SCS instance failover
The outlined failover tests assume that SAP ASCS is active on node A.
Verify that the SAP system can successfully fail over from node A to node B. In this example, the test is for SAP SID PR2.
Make sure that each SAP SID can successfully move to the other cluster node. Choose one of these options to initiate a failover of the SAP <SID> cluster group from cluster node A to cluster node B:
- Failover Cluster Manager
- PowerShell commands for failover clusters
$SAPSID = "PR2"     # SAP <SID>

$SAPClusterGroup = "SAP $SAPSID"
Move-ClusterGroup -Name $SAPClusterGroup
Restart cluster node A within the Windows guest operating system. This step initiates an automatic failover of the SAP <SID> cluster group from node A to node B.
Restart cluster node A from the Azure portal. This step initiates an automatic failover of the SAP <SID> cluster group from node A to node B.
Restart cluster node A by using Azure PowerShell. This step initiates an automatic failover of the SAP <SID> cluster group from node A to node B.
Next steps
Feedback
Coming soon: Throughout 2024 we will be phasing out GitHub Issues as the feedback mechanism for content and replacing it with a new feedback system. For more information see: https://aka.ms/ContentUserFeedback.
Submit and view feedback for