Couple and Synchronise Records between Dataverse and Business Central
This topic describes how to couple one or more records in Business Central with records in Dataverse or Dynamics 365 Sales. Coupling records lets you view Dataverse information from Business Central, and vice versa. The coupling also enables you to synchronise data between the records. You can couple existing records, or create and couple new records.
Note
Coupling and synchronising data is available only if your system administrator has created a connection between Business Central and Dataverse or Dynamics 365 Sales. A quick way to check is to open the Customer card and look for the Set Up Coupling action. If the action is available, the apps are connected.
Video Example
This video shows coupling and synchronising data in the context of an integration with Dynamics 365 Sales.
To couple a record
In Business Central, open the card for the record you want to couple. For example, the Customer or Contact card.
You can also just open the list page and select the record that you want to couple.
Choose the Set Up Coupling action.
Fill in the fields, and then choose OK.
To synchronise a single record
- In Business Central, open the card for the record you want to couple. For example, the Customer or Contact card.
- Choose the Synchronise Now action.
- If a record can be synchronised in one direction, select the option that specifies the direction of data update, and then choose OK.
To synchronise a single record from Dynamics 365 Sales
In Dynamics 365 Sales, open the form for the record you want to couple. For example, the Account card or Contact card form.
Choose the Business Central action in the ribbon to open and couple record automatically.
Note
You can synchronise a single record from Dynamics 365 Sales automatically only when Sync. Only Coupled Records is disabled and the synchronisation direction is set to Bidirectional or From Integration Table on the Integration Table Mapping page for the record. For more information, see Mapping the Tables and Fields to Synchronise.
To couple multiple records using match-based coupling
Specify the data to synchronise for an entity, such as a customer or contact, by coupling records based on matches. Refine the matches by making the search case sensitive, and assigning a priority for each match. If no match is found, you can also specify that you want to create the entity in Dataverse. For more information, go to Customise the match-based coupling.
Note
The match-based coupling process skips records that are already matched. To include those records when you run match-based coupling, uncouple the records and then try again. To learn more about uncoupling records, go to Uncoupling Records.
- In Business Central, open the list page for the record, such as the Customers or Contacts list pages.
- Choose the Match-Based Coupling action.
- Fill in the fields as necessary. Hover over a field to read a short description.
To synchronise multiple records
- In Business Central, open the list page for the record, such as the Customers or Contacts pages.
- Select the records that you want to synchronise, and then choose the Synchronise Now action.
- If records can be synchronised in one direction, select the option that specifies the direction, and then choose OK.
Bulk-insert and couple records
If you have a large number of Dataverse entities that correspond to records in Business Central, you can insert and couple them in-bulk. For example, you might want to bulk-insert and couple records when you're setting up synchronisation for the first time.
You'll use the Data import wizard in the Microsoft Power Platform admin centre.
The following example describes how to bulk-insert and couple customers with accounts in Dataverse. Use the same process for other types of entities, such as vendors, items, and resources.
Choose the
 icon, enter Customers, and then choose the related link.
Choose the Open in Excel action to open customer data in Excel.
To map and import data to the Account entity in Dataverse, follow the steps described in Import data (all record types) from multiple sources.
If the Account entity has a bcbi_companyid column, when you map the data columns make sure that the import assigns the appropriate company ID in the column for every imported record. To find the company ID in Business Central, follow these steps:
- Open the Integration Table Mappings page.
- Choose the CUSTOMER mapping, and then choose Edit List.
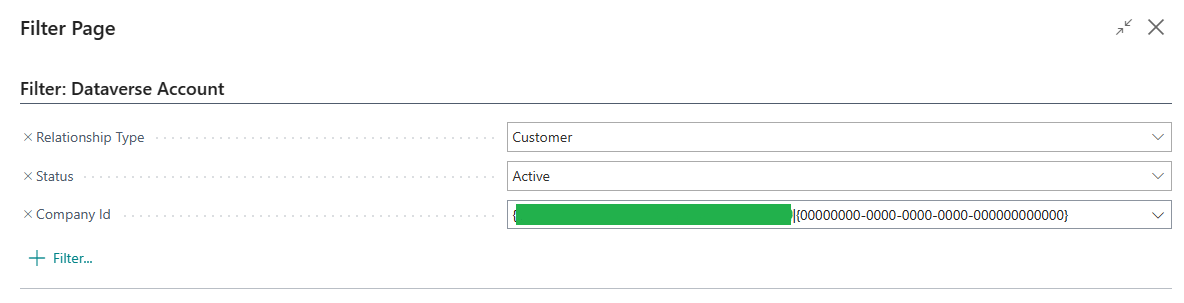
- Scroll to the right, and choose the assist edit
 button in the Integration Table Filter field. This shows the default filter for customer mapping, and it contains the company ID. The company ID is the first part of the value. Copy only that part, and disregard the 0s. The following example highlights the part to copy.
Note
Not all of the names of Dataverse entities and Business Central records match. Depending on what you're importing, double-check that the following columns have the following values after you import:
- For customers, the CustomerTypeCode column should contain Customer.
- For vendors, the CustomerTypeCode column should contain Vendors.
- For items, ProductTypeCode column should contain Sales Inventory.
- For resources, the ProductTypeCode column should contain Service.
After you import data to the Dataverse environment, in Business Central, follow the steps To couple multiple records using match-based coupling to couple the Dataverse entities with Business Central records.
Uncoupling Records
You can uncouple one or more records from list pages or the Coupled Data Synchronisation Errors page by choosing one or more lines and choosing Delete Coupling. You can also remove all couplings for one or more table mappings on the Integration Table Mappings page.
See Also
Feedback
Coming soon: Throughout 2024 we will be phasing out GitHub Issues as the feedback mechanism for content and replacing it with a new feedback system. For more information see: https://aka.ms/ContentUserFeedback.
Submit and view feedback for