Branching and chaining activities in a Data Factory pipeline
APPLIES TO:  Azure Data Factory
  Azure Synapse Analytics
Tip
Try out Data Factory in Microsoft Fabric, an all-in-one analytics solution for enterprises. Microsoft Fabric covers everything from data movement to data science, real-time analytics, business intelligence, and reporting. Learn how to start a new trial for free!
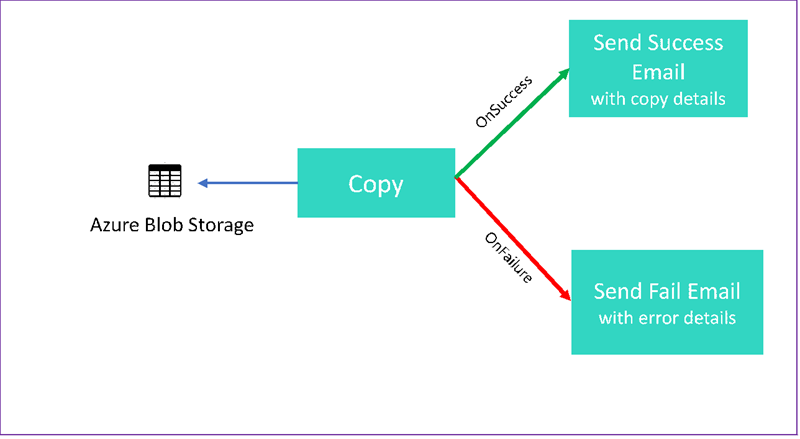
In this tutorial, you create a Data Factory pipeline that showcases some control flow features. This pipeline copies from a container in Azure Blob Storage to another container in the same storage account. If the copy activity succeeds, the pipeline sends details of the successful copy operation in an email. That information could include the amount of data written. If the copy activity fails, it sends details of the copy failure, such as the error message, in an email. Throughout the tutorial, you see how to pass parameters.
This graphic provides an overview of the scenario:
This tutorial shows you how to do the following tasks:
- Create a data factory
- Create an Azure Storage linked service
- Create an Azure Blob dataset
- Create a pipeline that contains a copy activity and a web activity
- Send outputs of activities to subsequent activities
- Use parameter passing and system variables
- Start a pipeline run
- Monitor the pipeline and activity runs
This tutorial uses .NET SDK. You can use other mechanisms to interact with Azure Data Factory. For Data Factory quickstarts, see 5-Minute Quickstarts.
If you don't have an Azure subscription, create a free account before you begin.
Prerequisites
- Azure Storage account. You use blob storage as a source data store. If you don't have an Azure storage account, see Create a storage account.
- Azure Storage Explorer. To install this tool, see Azure Storage Explorer.
- Azure SQL Database. You use the database as a sink data store. If you don't have a database in Azure SQL Database, see the Create a database in Azure SQL Database.
- Visual Studio. This article uses Visual Studio 2019.
- Azure .NET SDK. Download and install the Azure .NET SDK.
For a list of Azure regions in which Data Factory is currently available, see Products available by region. The data stores and computes can be in other regions. The stores include Azure Storage and Azure SQL Database. The computes include HDInsight, which Data Factory uses.
Create an application as described in Create a Microsoft Entra application. Assign the application to the Contributor role by following instructions in the same article. You'll need several values for later parts of this tutorial, such as Application (client) ID and Directory (tenant) ID.
Create a blob table
Open a text editor. Copy the following text and save it locally as input.txt.
Ethel|Berg
Tamika|Walsh
Open Azure Storage Explorer. Expand your storage account. Right-click Blob Containers and select Create Blob Container.
Name the new container adfv2branch and select Upload to add your input.txt file to the container.
Create Visual Studio project
Create a C# .NET console application:
- Start Visual Studio and select Create a new project.
- In Create a new project, choose Console App (.NET Framework) for C# and select Next.
- Name the project ADFv2BranchTutorial.
- Select .NET version 4.5.2 or above and then select Create.
Install NuGet packages
Select Tools > NuGet Package Manager > Package Manager Console.
In the Package Manager Console, run the following commands to install packages. Refer to Microsoft.Azure.Management.DataFactory nuget package for details.
Install-Package Microsoft.Azure.Management.DataFactory
Install-Package Microsoft.Azure.Management.ResourceManager -IncludePrerelease
Install-Package Microsoft.IdentityModel.Clients.ActiveDirectory
Create a data factory client
Open Program.cs and add the following statements:
using System;
using System.Collections.Generic;
using System.Linq;
using Microsoft.Rest;
using Microsoft.Azure.Management.ResourceManager;
using Microsoft.Azure.Management.DataFactory;
using Microsoft.Azure.Management.DataFactory.Models;
using Microsoft.IdentityModel.Clients.ActiveDirectory;
Add these static variables to the
Programclass. Replace place-holders with your own values.// Set variables static string tenantID = "<tenant ID>"; static string applicationId = "<application ID>"; static string authenticationKey = "<Authentication key for your application>"; static string subscriptionId = "<Azure subscription ID>"; static string resourceGroup = "<Azure resource group name>"; static string region = "East US"; static string dataFactoryName = "<Data factory name>"; // Specify the source Azure Blob information static string storageAccount = "<Azure Storage account name>"; static string storageKey = "<Azure Storage account key>"; // confirm that you have the input.txt file placed in th input folder of the adfv2branch container. static string inputBlobPath = "adfv2branch/input"; static string inputBlobName = "input.txt"; static string outputBlobPath = "adfv2branch/output"; static string emailReceiver = "<specify email address of the receiver>"; static string storageLinkedServiceName = "AzureStorageLinkedService"; static string blobSourceDatasetName = "SourceStorageDataset"; static string blobSinkDatasetName = "SinkStorageDataset"; static string pipelineName = "Adfv2TutorialBranchCopy"; static string copyBlobActivity = "CopyBlobtoBlob"; static string sendFailEmailActivity = "SendFailEmailActivity"; static string sendSuccessEmailActivity = "SendSuccessEmailActivity";Add the following code to the
Mainmethod. This code creates an instance ofDataFactoryManagementClientclass. You then use this object to create data factory, linked service, datasets, and pipeline. You can also use this object to monitor the pipeline run details.// Authenticate and create a data factory management client var context = new AuthenticationContext("https://login.windows.net/" + tenantID); ClientCredential cc = new ClientCredential(applicationId, authenticationKey); AuthenticationResult result = context.AcquireTokenAsync("https://management.azure.com/", cc).Result; ServiceClientCredentials cred = new TokenCredentials(result.AccessToken); var client = new DataFactoryManagementClient(cred) { SubscriptionId = subscriptionId };
Create a data factory
Add a
CreateOrUpdateDataFactorymethod to your Program.cs file:static Factory CreateOrUpdateDataFactory(DataFactoryManagementClient client) { Console.WriteLine("Creating data factory " + dataFactoryName + "..."); Factory resource = new Factory { Location = region }; Console.WriteLine(SafeJsonConvert.SerializeObject(resource, client.SerializationSettings)); Factory response; { response = client.Factories.CreateOrUpdate(resourceGroup, dataFactoryName, resource); } while (client.Factories.Get(resourceGroup, dataFactoryName).ProvisioningState == "PendingCreation") { System.Threading.Thread.Sleep(1000); } return response; }Add the following line to the
Mainmethod that creates a data factory:Factory df = CreateOrUpdateDataFactory(client);
Create an Azure Storage linked service
Add a
StorageLinkedServiceDefinitionmethod to your Program.cs file:static LinkedServiceResource StorageLinkedServiceDefinition(DataFactoryManagementClient client) { Console.WriteLine("Creating linked service " + storageLinkedServiceName + "..."); AzureStorageLinkedService storageLinkedService = new AzureStorageLinkedService { ConnectionString = new SecureString("DefaultEndpointsProtocol=https;AccountName=" + storageAccount + ";AccountKey=" + storageKey) }; Console.WriteLine(SafeJsonConvert.SerializeObject(storageLinkedService, client.SerializationSettings)); LinkedServiceResource linkedService = new LinkedServiceResource(storageLinkedService, name:storageLinkedServiceName); return linkedService; }Add the following line to the
Mainmethod that creates an Azure Storage linked service:client.LinkedServices.CreateOrUpdate(resourceGroup, dataFactoryName, storageLinkedServiceName, StorageLinkedServiceDefinition(client));
For more information about supported properties and details, see Linked service properties.
Create datasets
In this section, you create two datasets, one for the source and one for the sink.
Create a dataset for a source Azure Blob
Add a method that creates an Azure blob dataset. For more information about supported properties and details, see Azure Blob dataset properties.
Add a SourceBlobDatasetDefinition method to your Program.cs file:
static DatasetResource SourceBlobDatasetDefinition(DataFactoryManagementClient client)
{
Console.WriteLine("Creating dataset " + blobSourceDatasetName + "...");
AzureBlobDataset blobDataset = new AzureBlobDataset
{
FolderPath = new Expression { Value = "@pipeline().parameters.sourceBlobContainer" },
FileName = inputBlobName,
LinkedServiceName = new LinkedServiceReference
{
ReferenceName = storageLinkedServiceName
}
};
Console.WriteLine(SafeJsonConvert.SerializeObject(blobDataset, client.SerializationSettings));
DatasetResource dataset = new DatasetResource(blobDataset, name:blobSourceDatasetName);
return dataset;
}
You define a dataset that represents the source data in Azure Blob. This Blob dataset refers to the Azure Storage linked service supported in the previous step. The Blob dataset describes the location of the blob to copy from: FolderPath and FileName.
Notice the use of parameters for the FolderPath. sourceBlobContainer is the name of the parameter and the expression is replaced with the values passed in the pipeline run. The syntax to define parameters is @pipeline().parameters.<parameterName>
Create a dataset for a sink Azure Blob
Add a
SourceBlobDatasetDefinitionmethod to your Program.cs file:static DatasetResource SinkBlobDatasetDefinition(DataFactoryManagementClient client) { Console.WriteLine("Creating dataset " + blobSinkDatasetName + "..."); AzureBlobDataset blobDataset = new AzureBlobDataset { FolderPath = new Expression { Value = "@pipeline().parameters.sinkBlobContainer" }, LinkedServiceName = new LinkedServiceReference { ReferenceName = storageLinkedServiceName } }; Console.WriteLine(SafeJsonConvert.SerializeObject(blobDataset, client.SerializationSettings)); DatasetResource dataset = new DatasetResource(blobDataset, name: blobSinkDatasetName); return dataset; }Add the following code to the
Mainmethod that creates both Azure Blob source and sink datasets.client.Datasets.CreateOrUpdate(resourceGroup, dataFactoryName, blobSourceDatasetName, SourceBlobDatasetDefinition(client)); client.Datasets.CreateOrUpdate(resourceGroup, dataFactoryName, blobSinkDatasetName, SinkBlobDatasetDefinition(client));
Create a C# class: EmailRequest
In your C# project, create a class named EmailRequest. This class defines what properties the pipeline sends in the body request when sending an email. In this tutorial, the pipeline sends four properties from the pipeline to the email:
- Message. Body of the email. For a successful copy, this property contains the amount of data written. For a failed copy, this property contains details of the error.
- Data factory name. Name of the data factory.
- Pipeline name. Name of the pipeline.
- Receiver. Parameter that passes through. This property specifies the receiver of the email.
class EmailRequest
{
[Newtonsoft.Json.JsonProperty(PropertyName = "message")]
public string message;
[Newtonsoft.Json.JsonProperty(PropertyName = "dataFactoryName")]
public string dataFactoryName;
[Newtonsoft.Json.JsonProperty(PropertyName = "pipelineName")]
public string pipelineName;
[Newtonsoft.Json.JsonProperty(PropertyName = "receiver")]
public string receiver;
public EmailRequest(string input, string df, string pipeline, string receiverName)
{
message = input;
dataFactoryName = df;
pipelineName = pipeline;
receiver = receiverName;
}
}
Create email workflow endpoints
To trigger sending an email, you use Azure Logic Apps to define the workflow. For more information, see Create an example Consumption logic app workflow.
Success email workflow
In the Azure portal, create a logic app workflow named CopySuccessEmail. Add the Request trigger named When an HTTP request is received. In the Request trigger, fill in the Request Body JSON schema box with the following JSON:
{
"properties": {
"dataFactoryName": {
"type": "string"
},
"message": {
"type": "string"
},
"pipelineName": {
"type": "string"
},
"receiver": {
"type": "string"
}
},
"type": "object"
}
Your workflow looks something like the following example:
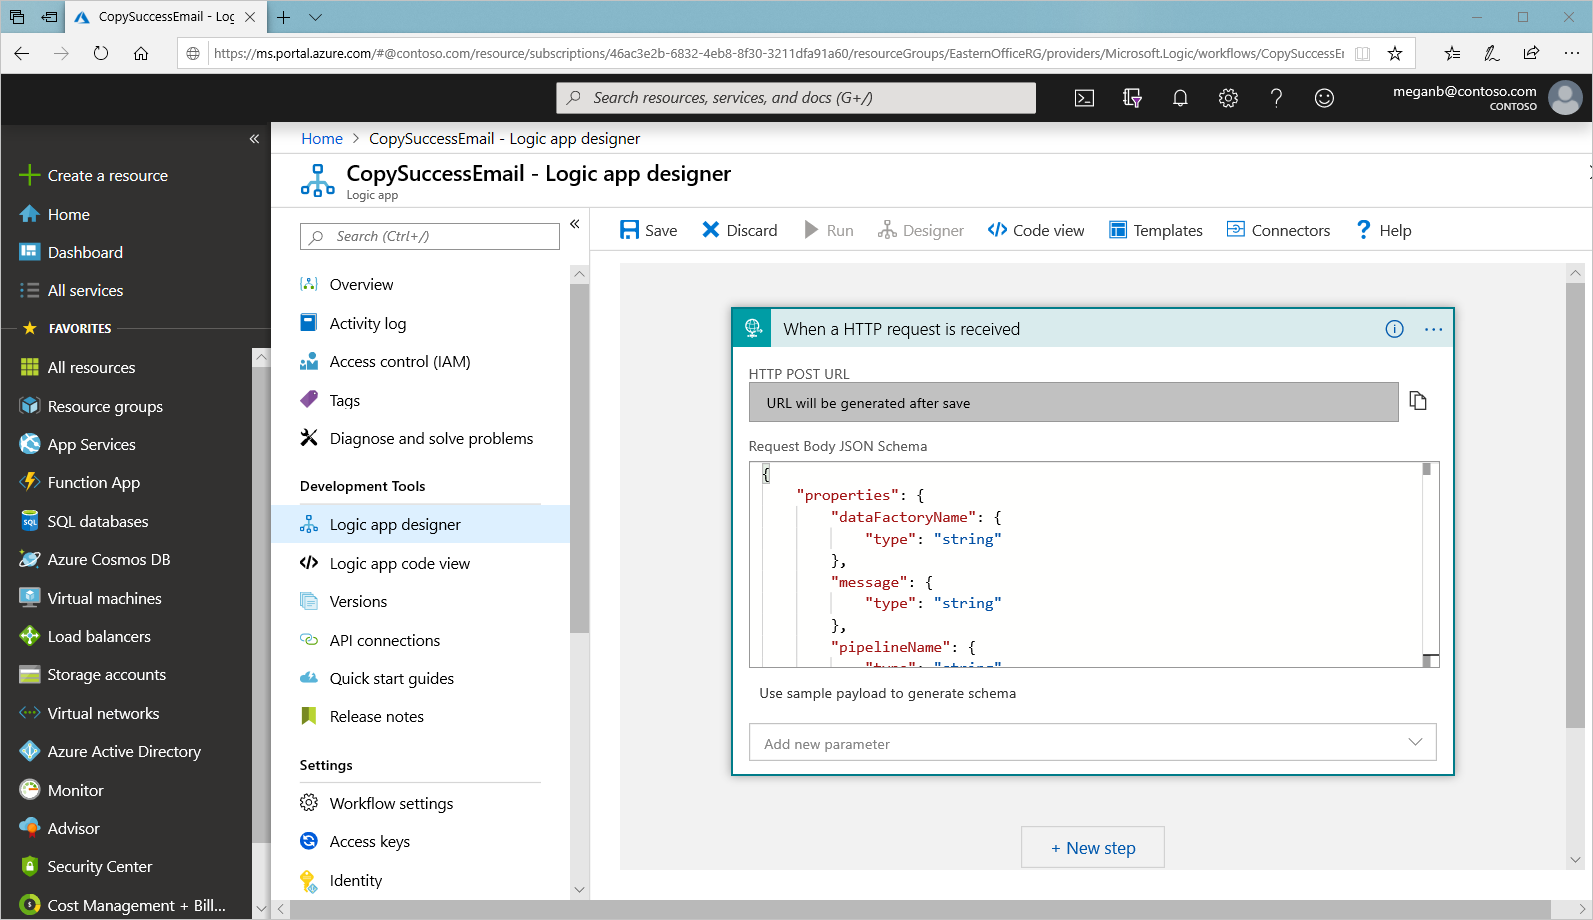
This JSON content aligns with the EmailRequest class you created in the previous section.
Add the Office 365 Outlook action named Send an email. For this action, customize how you wish to format the email, using the properties passed in the request Body JSON schema. Here's an example:
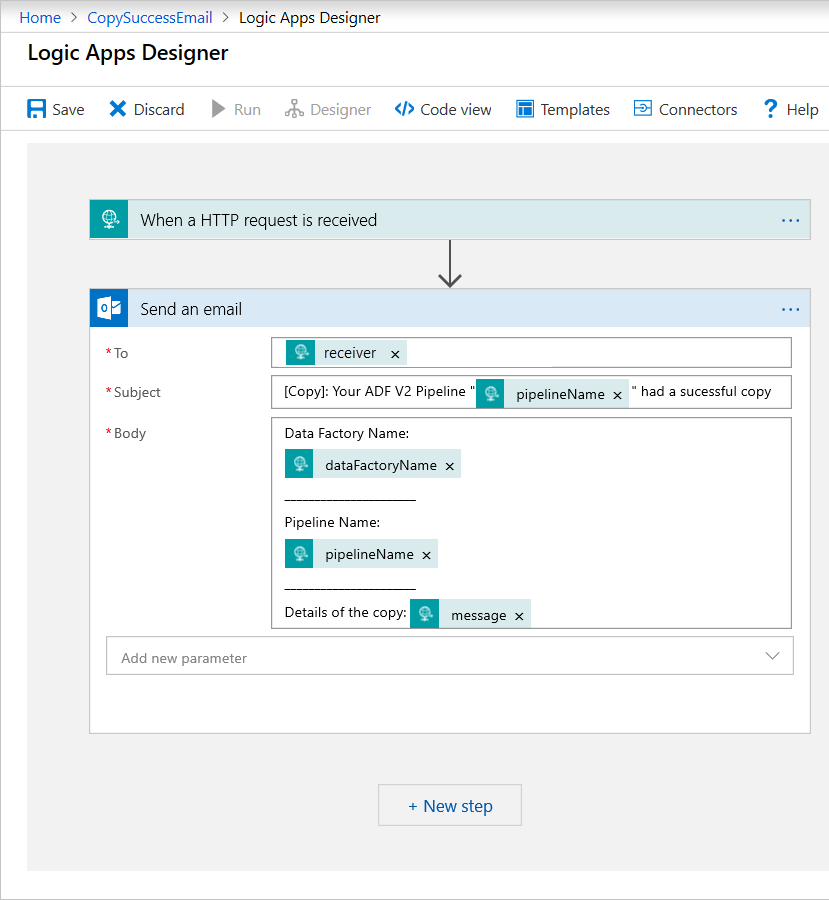
After you save the workflow, copy and save the HTTP POST URL value from the trigger.
Fail email workflow
Clone the CopySuccessEmail logic app workflow to a new workflow named CopyFailEmail. In the Request trigger, the Request Body JSON schema is the same. Change the format of your email like the Subject to tailor toward a failure email. Here is an example:
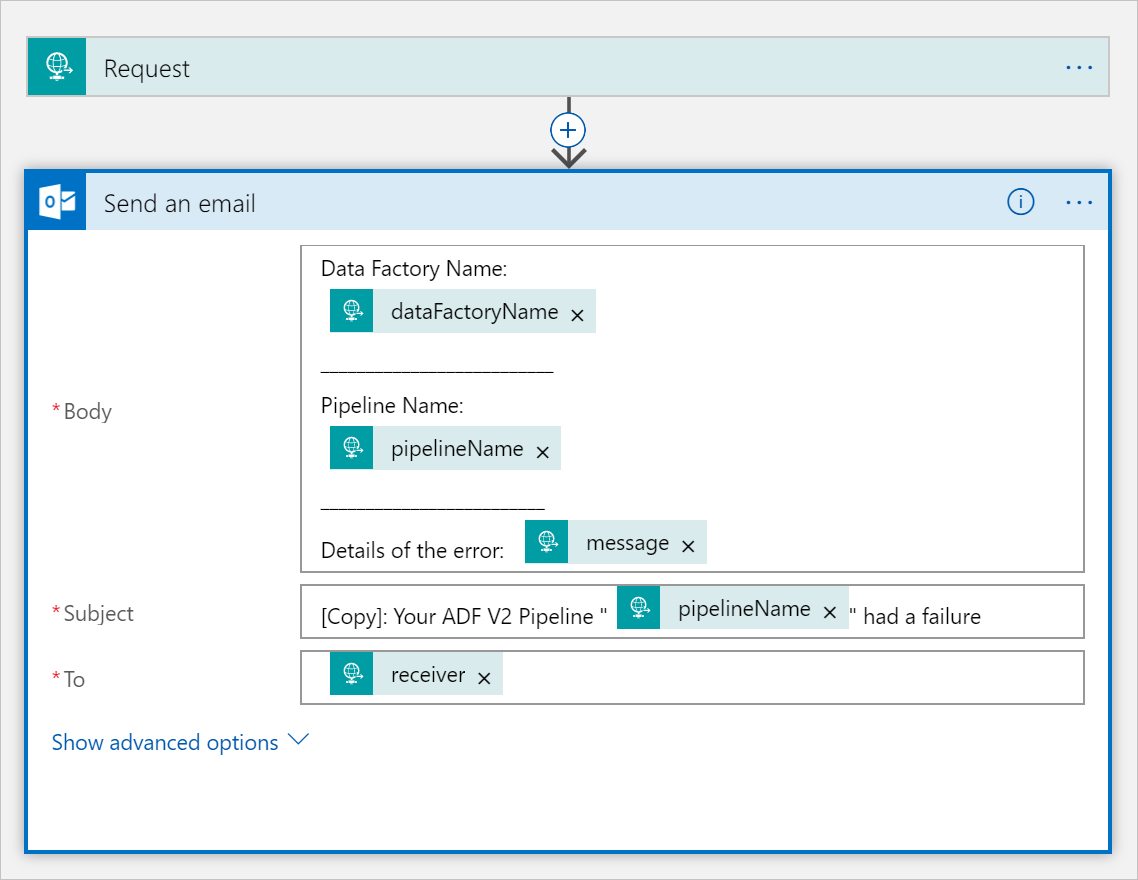
After you save the workflow, copy and save the HTTP POST URL value from the trigger.
You should now have two workflow URLs, like the following examples:
//Success Request Url
https://prodxxx.eastus.logic.azure.com:443/workflows/000000/triggers/manual/paths/invoke?api-version=2016-10-01&sp=%2Ftriggers%2Fmanual%2Frun&sv=1.0&sig=000000
//Fail Request Url
https://prodxxx.eastus.logic.azure.com:443/workflows/000000/triggers/manual/paths/invoke?api-version=2016-10-01&sp=%2Ftriggers%2Fmanual%2Frun&sv=1.0&sig=000000
Create a pipeline
Go back to your project in Visual Studio. We'll now add the code that creates a pipeline with a copy activity and DependsOn property. In this tutorial, the pipeline contains one activity, a copy activity, which takes in the Blob dataset as a source and another Blob dataset as a sink. If the copy activity succeeds or fails, it calls different email tasks.
In this pipeline, you use the following features:
- Parameters
- Web activity
- Activity dependency
- Using output from an activity as an input to another activity
Add this method to your project. The following sections provide in more detail.
static PipelineResource PipelineDefinition(DataFactoryManagementClient client) { Console.WriteLine("Creating pipeline " + pipelineName + "..."); PipelineResource resource = new PipelineResource { Parameters = new Dictionary<string, ParameterSpecification> { { "sourceBlobContainer", new ParameterSpecification { Type = ParameterType.String } }, { "sinkBlobContainer", new ParameterSpecification { Type = ParameterType.String } }, { "receiver", new ParameterSpecification { Type = ParameterType.String } } }, Activities = new List<Activity> { new CopyActivity { Name = copyBlobActivity, Inputs = new List<DatasetReference> { new DatasetReference { ReferenceName = blobSourceDatasetName } }, Outputs = new List<DatasetReference> { new DatasetReference { ReferenceName = blobSinkDatasetName } }, Source = new BlobSource { }, Sink = new BlobSink { } }, new WebActivity { Name = sendSuccessEmailActivity, Method = WebActivityMethod.POST, Url = "https://prodxxx.eastus.logic.azure.com:443/workflows/00000000000000000000000000000000000/triggers/manual/paths/invoke?api-version=2016-10-01&sp=%2Ftriggers%2Fmanual%2Frun&sv=1.0&sig=0000000000000000000000000000000000000000000000", Body = new EmailRequest("@{activity('CopyBlobtoBlob').output.dataWritten}", "@{pipeline().DataFactory}", "@{pipeline().Pipeline}", "@pipeline().parameters.receiver"), DependsOn = new List<ActivityDependency> { new ActivityDependency { Activity = copyBlobActivity, DependencyConditions = new List<String> { "Succeeded" } } } }, new WebActivity { Name = sendFailEmailActivity, Method =WebActivityMethod.POST, Url = "https://prodxxx.eastus.logic.azure.com:443/workflows/000000000000000000000000000000000/triggers/manual/paths/invoke?api-version=2016-10-01&sp=%2Ftriggers%2Fmanual%2Frun&sv=1.0&sig=0000000000000000000000000000000000000000000", Body = new EmailRequest("@{activity('CopyBlobtoBlob').error.message}", "@{pipeline().DataFactory}", "@{pipeline().Pipeline}", "@pipeline().parameters.receiver"), DependsOn = new List<ActivityDependency> { new ActivityDependency { Activity = copyBlobActivity, DependencyConditions = new List<String> { "Failed" } } } } } }; Console.WriteLine(SafeJsonConvert.SerializeObject(resource, client.SerializationSettings)); return resource; }Add the following line to the
Mainmethod that creates the pipeline:client.Pipelines.CreateOrUpdate(resourceGroup, dataFactoryName, pipelineName, PipelineDefinition(client));
Parameters
The first section of our pipeline code defines parameters.
sourceBlobContainer. The source blob dataset consumes this parameter in the pipeline.sinkBlobContainer. The sink blob dataset consumes this parameter in the pipeline.receiver. The two Web activities in the pipeline that send success or failure emails to the receiver use this parameter.
Parameters = new Dictionary<string, ParameterSpecification>
{
{ "sourceBlobContainer", new ParameterSpecification { Type = ParameterType.String } },
{ "sinkBlobContainer", new ParameterSpecification { Type = ParameterType.String } },
{ "receiver", new ParameterSpecification { Type = ParameterType.String } }
},
Web activity
The Web activity allows a call to any REST endpoint. For more information about the activity, see Web activity in Azure Data Factory. This pipeline uses a web activity to call the Logic Apps email workflow. You create two web activities: one that calls to the CopySuccessEmail workflow and one that calls the CopyFailWorkFlow.
new WebActivity
{
Name = sendCopyEmailActivity,
Method = WebActivityMethod.POST,
Url = "https://prodxxx.eastus.logic.azure.com:443/workflows/12345",
Body = new EmailRequest("@{activity('CopyBlobtoBlob').output.dataWritten}", "@{pipeline().DataFactory}", "@{pipeline().Pipeline}", "@pipeline().parameters.receiver"),
DependsOn = new List<ActivityDependency>
{
new ActivityDependency
{
Activity = copyBlobActivity,
DependencyConditions = new List<String> { "Succeeded" }
}
}
}
In the Url property, paste the HTTP POST URL endpoints from your Logic Apps workflows. In the Body property, pass an instance of the EmailRequest class. The email request contains the following properties:
- Message. Passes value of
@{activity('CopyBlobtoBlob').output.dataWritten. Accesses a property of the previous copy activity and passes the value ofdataWritten. For the failure case, pass the error output instead of@{activity('CopyBlobtoBlob').error.message. - Data Factory Name. Passes value of
@{pipeline().DataFactory}This system variable allows you to access the corresponding data factory name. For a list of system variables, see System Variables. - Pipeline Name. Passes value of
@{pipeline().Pipeline}. This system variable allows you to access the corresponding pipeline name. - Receiver. Passes value of
"@pipeline().parameters.receiver". Accesses the pipeline parameters.
This code creates a new Activity Dependency that depends on the previous copy activity.
Create a pipeline run
Add the following code to the Main method that triggers a pipeline run.
// Create a pipeline run
Console.WriteLine("Creating pipeline run...");
Dictionary<string, object> arguments = new Dictionary<string, object>
{
{ "sourceBlobContainer", inputBlobPath },
{ "sinkBlobContainer", outputBlobPath },
{ "receiver", emailReceiver }
};
CreateRunResponse runResponse = client.Pipelines.CreateRunWithHttpMessagesAsync(resourceGroup, dataFactoryName, pipelineName, arguments).Result.Body;
Console.WriteLine("Pipeline run ID: " + runResponse.RunId);
Main class
Your final Main method should look like this.
// Authenticate and create a data factory management client
var context = new AuthenticationContext("https://login.windows.net/" + tenantID);
ClientCredential cc = new ClientCredential(applicationId, authenticationKey);
AuthenticationResult result = context.AcquireTokenAsync("https://management.azure.com/", cc).Result;
ServiceClientCredentials cred = new TokenCredentials(result.AccessToken);
var client = new DataFactoryManagementClient(cred) { SubscriptionId = subscriptionId };
Factory df = CreateOrUpdateDataFactory(client);
client.LinkedServices.CreateOrUpdate(resourceGroup, dataFactoryName, storageLinkedServiceName, StorageLinkedServiceDefinition(client));
client.Datasets.CreateOrUpdate(resourceGroup, dataFactoryName, blobSourceDatasetName, SourceBlobDatasetDefinition(client));

client.Datasets.CreateOrUpdate(resourceGroup, dataFactoryName, blobSinkDatasetName, SinkBlobDatasetDefinition(client));
client.Pipelines.CreateOrUpdate(resourceGroup, dataFactoryName, pipelineName, PipelineDefinition(client));
Console.WriteLine("Creating pipeline run...");
Dictionary<string, object> arguments = new Dictionary<string, object>
{
{ "sourceBlobContainer", inputBlobPath },
{ "sinkBlobContainer", outputBlobPath },
{ "receiver", emailReceiver }
};
CreateRunResponse runResponse = client.Pipelines.CreateRunWithHttpMessagesAsync(resourceGroup, dataFactoryName, pipelineName, arguments).Result.Body;
Console.WriteLine("Pipeline run ID: " + runResponse.RunId);
Build and run your program to trigger a pipeline run!
Monitor a pipeline run
Add the following code to the
Mainmethod:// Monitor the pipeline run Console.WriteLine("Checking pipeline run status..."); PipelineRun pipelineRun; while (true) { pipelineRun = client.PipelineRuns.Get(resourceGroup, dataFactoryName, runResponse.RunId); Console.WriteLine("Status: " + pipelineRun.Status); if (pipelineRun.Status == "InProgress") System.Threading.Thread.Sleep(15000); else break; }This code continuously checks the status of the run until it finishes copying the data.
Add the following code to the
Mainmethod that retrieves copy activity run details, for example, size of the data read/written:// Check the copy activity run details Console.WriteLine("Checking copy activity run details..."); List<ActivityRun> activityRuns = client.ActivityRuns.ListByPipelineRun( resourceGroup, dataFactoryName, runResponse.RunId, DateTime.UtcNow.AddMinutes(-10), DateTime.UtcNow.AddMinutes(10)).ToList(); if (pipelineRun.Status == "Succeeded") { Console.WriteLine(activityRuns.First().Output); //SaveToJson(SafeJsonConvert.SerializeObject(activityRuns.First().Output, client.SerializationSettings), "ActivityRunResult.json", folderForJsons); } else Console.WriteLine(activityRuns.First().Error); Console.WriteLine("\nPress any key to exit..."); Console.ReadKey();
Run the code
Build and start the application, then verify the pipeline execution.
The application displays the progress of creating data factory, linked service, datasets, pipeline, and pipeline run. It then checks the pipeline run status. Wait until you see the copy activity run details with data read/written size. Then, use tools such as Azure Storage Explorer to check the blob was copied to outputBlobPath from inputBlobPath as you specified in variables.
Your output should resemble the following sample:
Creating data factory DFTutorialTest...
{
  "location": "East US"
}
Creating linked service AzureStorageLinkedService...
{
  "type": "AzureStorage",
  "typeProperties": {
    "connectionString": "DefaultEndpointsProtocol=https;AccountName=***;AccountKey=***"
  }
}
Creating dataset SourceStorageDataset...
{
  "type": "AzureBlob",
  "typeProperties": {
    "folderPath": {
      "type": "Expression",
      "value": "@pipeline().parameters.sourceBlobContainer"
    },
    "fileName": "input.txt"
  },
  "linkedServiceName": {
    "type": "LinkedServiceReference",
    "referenceName": "AzureStorageLinkedService"
  }
}
Creating dataset SinkStorageDataset...
{
  "type": "AzureBlob",
  "typeProperties": {
    "folderPath": {
      "type": "Expression",
      "value": "@pipeline().parameters.sinkBlobContainer"
    }
  },
  "linkedServiceName": {
    "type": "LinkedServiceReference",
    "referenceName": "AzureStorageLinkedService"
  }
}
Creating pipeline Adfv2TutorialBranchCopy...
{
  "properties": {
    "activities": [
      {
        "type": "Copy",
        "typeProperties": {
          "source": {
            "type": "BlobSource"
          },
          "sink": {
            "type": "BlobSink"
          }
        },
        "inputs": [
          {
            "type": "DatasetReference",
            "referenceName": "SourceStorageDataset"
          }
        ],
        "outputs": [
          {
            "type": "DatasetReference",
            "referenceName": "SinkStorageDataset"
          }
        ],
        "name": "CopyBlobtoBlob"
      },
      {
        "type": "WebActivity",
        "typeProperties": {
          "method": "POST",
          "url": "https://xxxx.eastus.logic.azure.com:443/workflows/... ",
          "body": {
            "message": "@{activity('CopyBlobtoBlob').output.dataWritten}",
            "dataFactoryName": "@{pipeline().DataFactory}",
            "pipelineName": "@{pipeline().Pipeline}",
            "receiver": "@pipeline().parameters.receiver"
          }
        },
        "name": "SendSuccessEmailActivity",
        "dependsOn": [
          {
            "activity": "CopyBlobtoBlob",
            "dependencyConditions": [
              "Succeeded"
            ]
          }
        ]
      },
      {
        "type": "WebActivity",
        "typeProperties": {
          "method": "POST",
          "url": "https://xxx.eastus.logic.azure.com:443/workflows/... ",
          "body": {
            "message": "@{activity('CopyBlobtoBlob').error.message}",
            "dataFactoryName": "@{pipeline().DataFactory}",
            "pipelineName": "@{pipeline().Pipeline}",
            "receiver": "@pipeline().parameters.receiver"
          }
        },
        "name": "SendFailEmailActivity",
        "dependsOn": [
          {
            "activity": "CopyBlobtoBlob",
            "dependencyConditions": [
              "Failed"
            ]
          }
        ]
      }
    ],
    "parameters": {
      "sourceBlobContainer": {
        "type": "String"
      },
      "sinkBlobContainer": {
        "type": "String"
      },
      "receiver": {
        "type": "String"
      }
    }
  }
}
Creating pipeline run...
Pipeline run ID: 00000000-0000-0000-0000-0000000000000
Checking pipeline run status...
Status: InProgress
Status: InProgress
Status: Succeeded
Checking copy activity run details...
{
  "dataRead": 20,
  "dataWritten": 20,
  "copyDuration": 4,
  "throughput": 0.01,
  "errors": [],
  "effectiveIntegrationRuntime": "DefaultIntegrationRuntime (East US)"
}
{}

Press any key to exit...
Related content
You did the following tasks in this tutorial:
- Create a data factory
- Create an Azure Storage linked service
- Create an Azure Blob dataset
- Create a pipeline that contains a copy activity and a web activity
- Send outputs of activities to subsequent activities
- Use parameter passing and system variables
- Start a pipeline run
- Monitor the pipeline and activity runs
You can now continue to the Concepts section for more information about Azure Data Factory.
Feedback
Coming soon: Throughout 2024 we will be phasing out GitHub Issues as the feedback mechanism for content and replacing it with a new feedback system. For more information see: https://aka.ms/ContentUserFeedback.
Submit and view feedback for