Load balance HPC Cache client traffic
This article explains some basic methods for balancing client traffic to all of the mount points on your Azure HPC Cache.
Every HPC Cache has at least three different IP addresses, and caches with larger throughput values can have up to 12. It's important to use all the IP addresses to get the full benefits of Azure HPC Cache.
There are various options for load-balancing your client mounts:
- Manually choose a different mount IP for each client
- Include IP address rotation in your client mounting scripts
- Configure a DNS system to automatically route client requests among all the available addresses (round-robin DNS)
The right load-balancing system for you depends on the complexity of your workflow, the number of IP addresses in your cache, and a large number of other factors. Consult your Azure advisor if you need help deciding which approach is best for you.
Assign IP addresses manually
Your cache's mount IP addresses are shown on the cache Overview and Mount instructions pages in the Azure portal, and on the success message that prints when you create a cache with Azure CLI or PowerShell.
You can use the Mount instructions page to generate a customized mount command for each client. Select all the Cache mount address values when creating multiple commands.
Read Mount the Azure HPC Cache for details.
Use scripted load balancing
There are several ways to programmatically rotate client mounts among the available IP addresses. Here are two examples.
Mount command script cksum example
This example mount command uses the hash function cksum and the client host name to automatically distribute the client connections among all available IP addresses on your HPC Cache. If all of the client machines have unique host names, you can run this command on each client to ensure that all available mount points are used.
mount -o hard,proto=tcp,mountproto=tcp,retry=30 $(X=(10.0.0.{1..3});echo ${X[$(($(hostname|cksum|cut -f 1 -d ' ')%3))]}):/${NAMESPACE} /mnt
To use this example in your workflow, customize these terms:
In the
X=expression, use a space-separated list of all of the cache's mount addresses, in sorted order.The expression
(X=(10.0.0.{7..9})sets the variable X as this set of mount addresses: {10.0.0.7, 10.0.0.8, 10.0.0.9}. Use the cache's base IP address and the exact addresses shown in your cache Overview page. If the addresses aren't consecutive, list them all in numeric order.In the
%3term, use the actual number of mount IP addresses that your cache has (typically 3, 6, 9, or 12).For example, use
%9if your cache exposes nine client mount IP addresses.For the expression
${NAMESPACE}, use the storage target namespace path that the client will access.You can use a variable that you have defined (NAMESPACE in the example), or pass the literal value instead.
The command example at the end of this section uses a literal value for the namespace path,
/blob-target-1.If you want to use a custom local path on your client machines, change the value
/mntto the path you want.
Here is an example of a populated client mount command:
mount -o hard,proto=tcp,mountproto=tcp,retry=30 $(X=(10.7.0.{1..3});echo ${X[$(($(hostname|cksum|cut -f 1 -d ' ')%3))]}):/blob-target-1 /hpc-cache/blob1
Round robin function example
This code example uses client IP addresses as a randomizing element to distribute clients to all of the HPC Cache's available IP addresses.
function mount_round_robin() {

  # to ensure the clients are spread out somewhat evenly the default
  # mount point is based on this client's IP octet4 % number of HPC cache mount IPs.

  declare -a MOUNT_IPS="($(echo ${NFS_IP_CSV} | sed "s/,/ /g"))"
  HASH=$(hostname | cksum | cut -f 1 -d ' ')
  DEFAULT_MOUNT_INDEX=$((${HASH} % ${#MOUNT_IPS[@]}))
  ROUND_ROBIN_IP=${MOUNT_IPS[${DEFAULT_MOUNT_INDEX}]}

  DEFAULT_MOUNT_POINT="${BASE_DIR}/default"

  # no need to write again if it is already there
  if ! grep --quiet "${DEFAULT_MOUNT_POINT}" /etc/fstab; then
      echo "${ROUND_ROBIN_IP}:${NFS_PATH} ${DEFAULT_MOUNT_POINT} nfs hard,proto=tcp,mountproto=tcp,retry=30 0 0" >> /etc/fstab
      mkdir -p "${DEFAULT_MOUNT_POINT}"
      chown nfsnobody:nfsnobody "${DEFAULT_MOUNT_POINT}"
  fi
  if ! grep -qs "${DEFAULT_MOUNT_POINT} " /proc/mounts; then
      retrycmd_if_failure 12 20 mount "${DEFAULT_MOUNT_POINT}" || exit 1
  fi
}
Use DNS load balancing
This section explains the basics of configuring a DNS system to distribute client connections to all of the mount points on your Azure HPC Cache. This method doesn't account for the amount of traffic each client generates, but it does make sure that clients are evenly spread out over all of the cache's interfaces instead of just using one or two.
This document does not include instructions for setting up and managing a DNS server for your clients in the Azure environment.
DNS is not required in order to mount clients using the NFS protocol and IP addresses. DNS is needed if you want to use domain names instead of IP addresses to reach hardware NAS systems, or if your workflow includes certain advanced protocol settings.
The DNS system that you use to distribute addresses to clients does not need to be accessed by the HPC Cache. In some situations you might want to use a custom DNS system for the cache itself, but configuring that system is much more complicated than setting up this kind of client round-robin system. You must consult Azure support if you are thinking about changing your HPC Cache's DNS server to a custom system.
Configure round-robin distribution for cache mount points
A round-robin DNS (RRDNS) system automatically routes client requests among multiple addresses.
To set this system up, you need to customize the DNS server's configuration file so that when it gets mount requests to the HPC Cache's main domain address, it assigns the traffic among all of the HPC Cache system's mount points. Clients mount the HPC Cache using its domain name as the server argument, and are routed to the next mount IP automatically.
There are two main steps to configure RRDNS:
Modify your DNS server’s
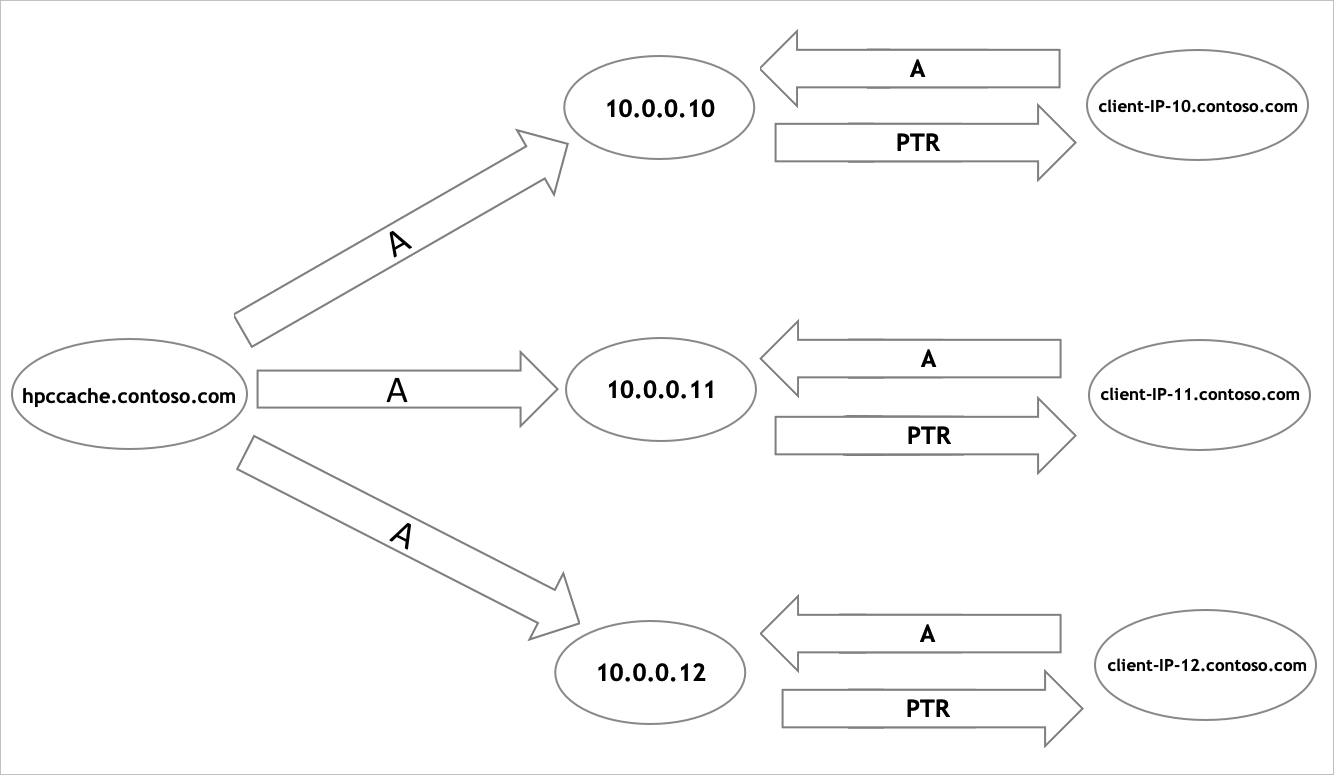
named.conffile to set cyclic order for queries to your HPC Cache. This option causes the server to cycle through all of the available IP values. Add a statement like the following:options { rrset-order { class IN A name "hpccache.contoso.com" order cyclic; }; };Configure A records and pointer (PTR) records for each available IP address as in the following example.
These
nsupdatecommands provide an example of configuring DNS correctly for an HPC Cache with the domain name hpccache.contoso.com and three mount addresses (10.0.0.10, 10.0.0.11, and 10.0.0.12):update add hpccache.contoso.com. 86400 A 10.0.0.10 update add hpccache.contoso.com. 86400 A 10.0.0.11 update add hpccache.contoso.com. 86400 A 10.0.0.12 update add client-IP-10.contoso.com. 86400 A 10.0.0.10 update add client-IP-11.contoso.com. 86400 A 10.0.0.11 update add client-IP-12.contoso.com. 86400 A 10.0.0.12 update add 10.0.0.10.in-addr.arpa. 86400 PTR client-IP-10.contoso.com update add 11.0.0.10.in-addr.arpa. 86400 PTR client-IP-11.contoso.com update add 12.0.0.10.in-addr.arpa. 86400 PTR client-IP-12.contoso.comThese commands create an A record for each of the HPC Cache's mount addresses, and also set up pointer records to support reverse DNS checks appropriately.
The diagram below shows the basic structure of this configuration.
After the RRDNS system is configured, tell your client machines to use it to resolve the HPC Cache address in their mount commands.
Next steps
- For help balancing client load, contact support.
- To move data to the cache's storage targets, read Populate new Azure Blob storage.
Feedback
Coming soon: Throughout 2024 we will be phasing out GitHub Issues as the feedback mechanism for content and replacing it with a new feedback system. For more information see: https://aka.ms/ContentUserFeedback.
Submit and view feedback for