Order device connection events from Azure IoT Hub using Azure Cosmos DB
Azure Event Grid helps you build event-based applications and easily integrates IoT events in your business solutions. This article walks you through a setup using Cosmos DB, Logic App, IoT Hub Events, and a simulated Raspberry Pi to collect and store connection and disconnection events of a device.
From the moment your device runs, an order of operations activates:
The Pi device, using your IoT hub device key, is started and then stopped
An IoT Hub event captures the device activity, then sends an HTTP request to your Logic App
The Logic App processes the HTTP request based on a condition you set
The Logic App logs connection or disconnection events into a new document in Cosmos DB


Prerequisites
An active Azure Cosmos DB for NoSQL account. If you haven't created one yet, see Create a database account for a walkthrough.
A collection in your database. See Add a collection for a walkthrough. When you create your collection, use
/idfor the partition key.An Azure subscription. If you don't have an Azure subscription, create one for free before you begin.
An IoT hub under your Azure subscription. Create one with the CLI or the Azure portal.
Create a logic app
Let's create a logic app and add an Event Grid trigger that monitors the resource group for your virtual machine.
Create a logic app resource
In the Azure portal, select +Create a resource, select Integration and then Logic App.

Complete the form to create a new Logic App that includes:
Your subscription
Your resource group (or create a new one)
A Logic App name that's unique in your subscription
The region of your IoT hub
A No for enabling log analytics
A plan type of Consumption
Note
The Consumption plan type is the option that enables the Logic app designer in the UI. If you choose Standard (the default), then you must create a new workflow in order for the Logic app designer to become available.

Select Review + Create to review your configuration, then select Create to create the logic app.
You've now created an Azure resource for your logic app. After Azure deploys your logic app, select Go to resource. Logic app designer shows you templates for common patterns so you can get started faster.
In the Logic app designer, scroll until you see the Templates section, then choose Blank Logic App so that you can build your logic app from scratch.


Select a trigger
A trigger is a specific event that starts your logic app. For this tutorial, the trigger that sets off the workflow is receiving a request over HTTP.
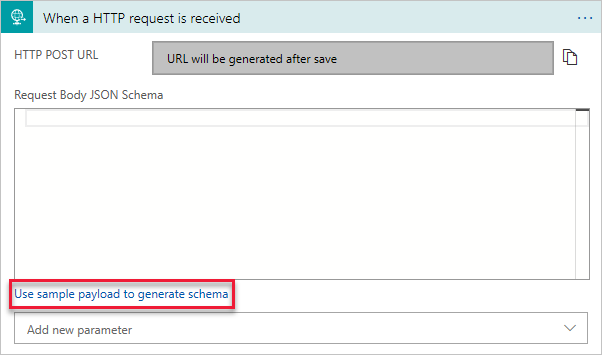
In the connectors and triggers search bar, type HTTP and hit Enter.
Select the request When a HTTP request is received as the trigger.

Select Use sample payload to generate schema.
Paste the following sample JSON code into the text box, then select Done.
This JSON is only used as a template, so the exact values aren't important.
[{
 "id": "fbfd8ee1-cf78-74c6-dbcf-e1c58638ccbd",
 "topic":
   "/SUBSCRIPTIONS/DEMO5CDD-8DAB-4CF4-9B2F-C22E8A755472/RESOURCEGROUPS/EGTESTRG/PROVIDERS/MICROSOFT.DEVICES/IOTHUBS/MYIOTHUB",
 "subject": "devices/Demo-Device-1",
 "eventType": "Microsoft.Devices.DeviceConnected",
 "eventTime": "2018-07-03T23:20:11.6921933+00:00",
 "data": {
   "deviceConnectionStateEventInfo": {
     "sequenceNumber":
       "000000000000000001D4132452F67CE200000002000000000000000000000001"
   },
   "hubName": "MYIOTHUB",
   "deviceId": "48e44e11-1437-4907-83b1-4a8d7e89859e",
   "moduleId": ""
 },
 "dataVersion": "1",
 "metadataVersion": "1"
}]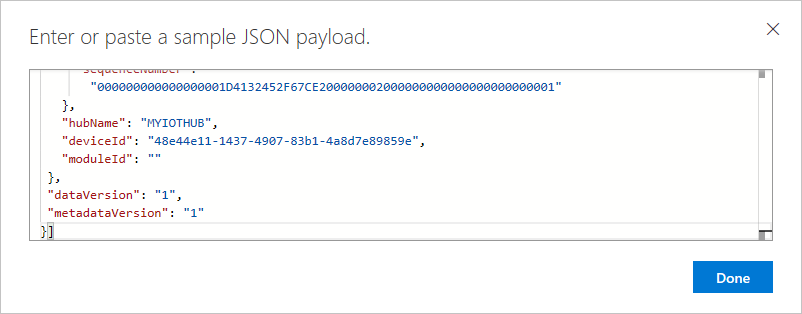


Create a condition
Conditions help run specific actions after passing that specific condition. For this article, the condition is to check whether eventType is either device connected or device disconnected. The action executed when that eventType is true is the creation of a document in Azure Cosmos DB. This condition is created in the Logic app designer.
Select + New step, then the Built-in tab, then find and select the control called Condition.
In your condition, change And to Or, since we want to capture either connection events or disconnection events in a single parse.
Select inside the Choose a value box and a pop up appears, showing the Dynamic content — the fields that can be selected.
Choose eventType. The popup closes and you see Body is placed in Select an output from previous steps, automatically. Select Condition to reopen your conditional statement.
Keep the is equal to value.
Type in Microsoft.Devices.DeviceConnected as the last value of that row.
Select + Add to add another row.
This second row is similar to the first row, except we look for disconnection events.
Use eventType, is equal to, and Microsoft.Devices.DeviceDisconnected for the row values.

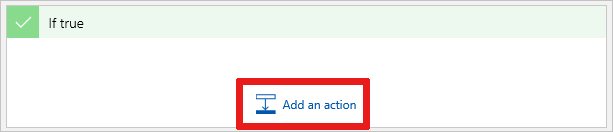
In the if true dialog, click on Add an action.
Search for Cosmos DB and select Azure Cosmos DB — Create or update document (V3)
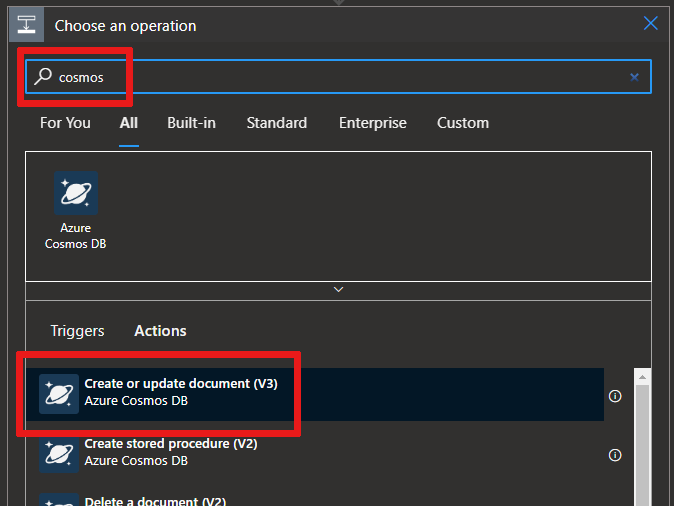
You see the Create or update document (V3) panel. Enter these values for the fields:
Azure Cosmos DB account name: {Add your account name}
Database ID: ToDoList
Collection ID: Items
Document: Choose
Current itemfrom the dynamic content parameter list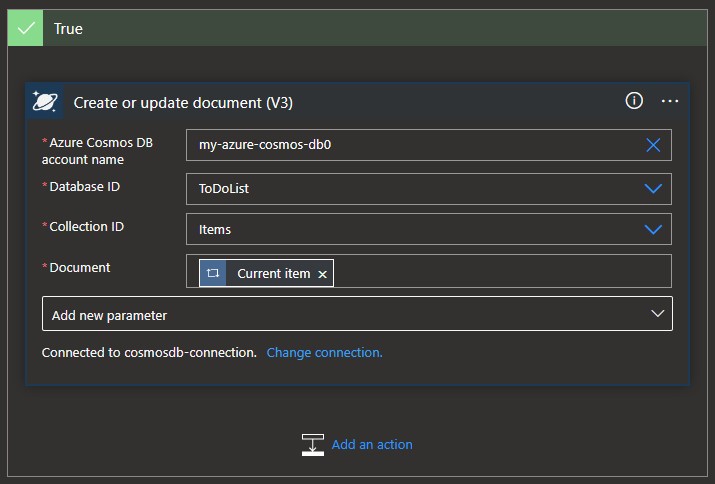
Save your logic app.


Copy the HTTP URL
Before you leave the Logic Apps Designer, copy the URL that your logic app is listening to for a trigger. You use this URL to configure Event Grid.
Expand the When a HTTP request is received trigger configuration box by selecting it.
Copy the value of HTTP POST URL by selecting the copy button next to it.

Save this URL so that you can use it in the next section.

Configure subscription for IoT Hub events
In this section, you configure your IoT Hub to publish events as they occur.
In the Azure portal, navigate to your IoT hub.
Select Events.

Select + Event subscription.

Fill in Event Subscription Details: provide a descriptive Name and select Event Grid Schema as the Event Schema.
Create a System Topic Name for your IoT hub resource.
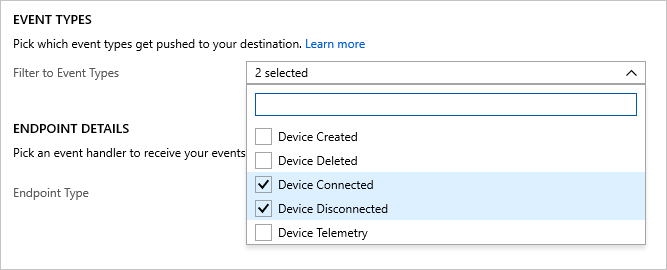
Fill in the Event Types fields. In the dropdown list, select only Device Connected and Device Disconnected from the menu. Click anywhere else on the screen to close the list and save your selections.
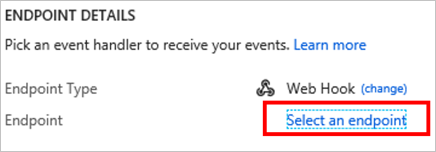
For Endpoint Details, select Endpoint Type as Web Hook and click on select endpoint and paste the URL that you copied from your logic app and confirm selection.
The form should now look similar to the following example:
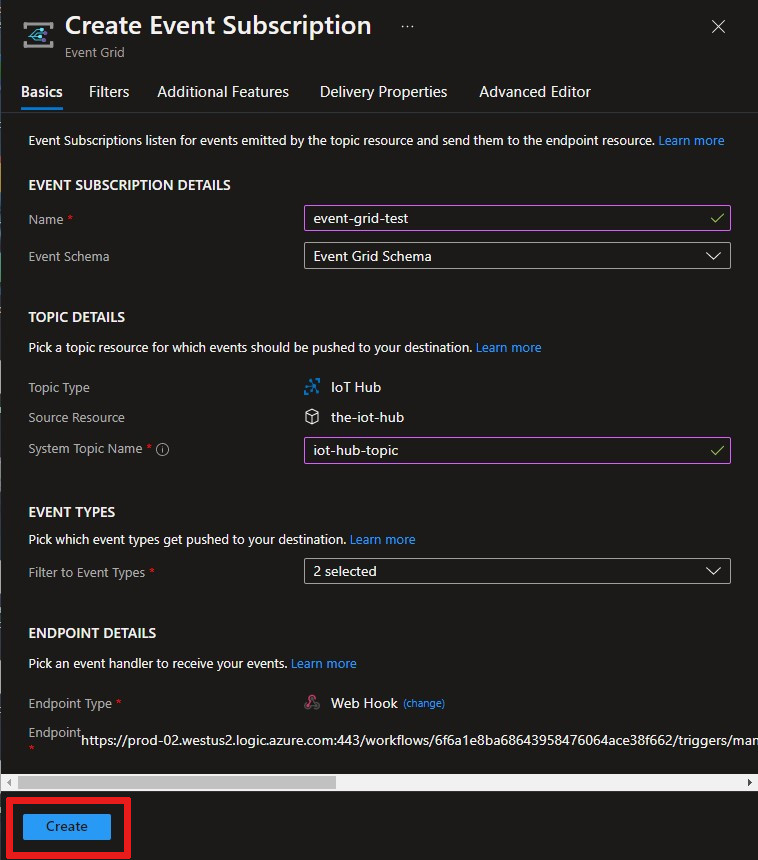
Select Create to save the event subscription.
Important
Wait a few minutes for your event to process before running your device. Anytime Azure services are created or changed, initiating the next step in your pipeline too soon could result in unnecessary errors. For example, if your IoT hub is not in an active state, it won't be ready to receive events. Check your IoT hub Overview page to see if your IoT hub is in an active state or not. If it's not, you'll see a warning at the top of the page.


Run device and observe events
Now that your event subscription is set up, let's test by connecting a device.
Register a device in IoT Hub
From your IoT hub, select Devices.
Select + Add Device at the top of the pane.
For Device ID, enter
Demo-Device-1.Select Save.

Click on the device again; now the connection strings and keys will be filled in. Copy and save the Primary Connection String for later use.


Start Raspberry Pi simulator
Let's use the Raspberry Pi web simulator to simulate device connection.
Run a sample application on the Raspberry Pi web simulator
This sample app will trigger a device connected event.
In the coding area, replace the placeholder in Line 15 with your Azure IoT Hub device connection string that you saved at the end of the previous section.

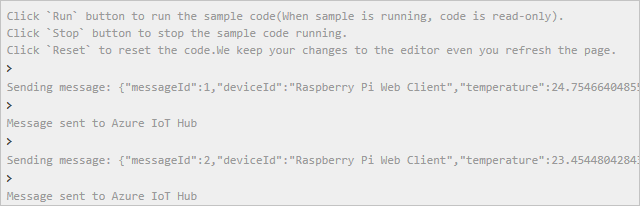
Run the application by selecting Run.
You see something similar to the following output that shows the sensor data and the messages that are sent to your IoT hub.
You can check your Logic App Overview page to check if your logic is being triggered. It'll say Succeeded or Failed. Checking here let's you know your logic app state if troubleshooting is needed. Expect a 15-30 second delay from when your trigger runs. If you need to troubleshoot your logic app, view this Troubleshoot errors article.

Select Stop to stop the simulator, which triggers a Device Disconnected event. This event will log on the Logic App Overview page, just as the connection event logged there.


You have now run a sample application to collect connection and disconnection events of your device, which go to your IoT hub.
Observe events in Azure Cosmos DB
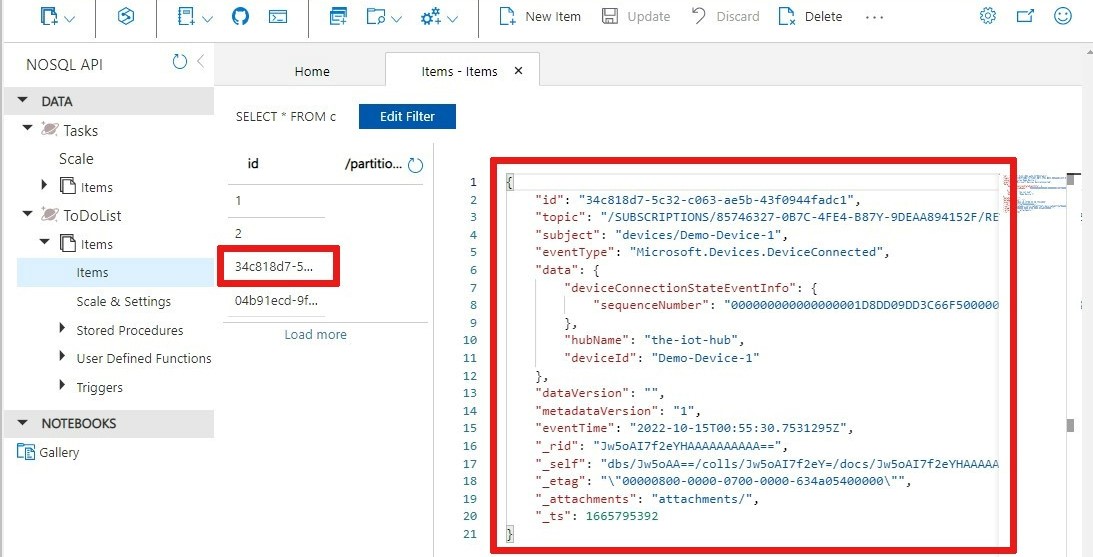
You can see results of the executed logic app in your Cosmos DB document. The document appears in your Items collection when you refresh the page. Each connection state event generates a new document that's assigned a unique id. The following image shows the document created when the device was started (connected). The connected event type is listed in the JSON output.
Use the Azure CLI
Instead of using the Azure portal, you can accomplish the IoT Hub steps using the Azure CLI. For details, see the Azure CLI pages for creating an event subscription and creating an IoT device.
Clean up resources
This tutorial used resources that incur charges on your Azure subscription. When you're finished trying out the tutorial and testing your results, disable or delete resources that you don't want to keep.
Logic app
If you don't want to lose the work on your logic app, disable it instead of deleting it.
Navigate to your logic app.
On the Overview blade, select Delete or Disable.
Each subscription can have one free IoT hub. If you created a free hub for this tutorial, then you don't need to delete it to prevent charges.
IoT hub or Event Grid
Navigate to your IoT hub.
On the Overview blade, select Delete.
Even if you keep your IoT hub, you may want to delete the event subscription that you created. In your IoT hub, select Event Grid.
Select the event subscription that you want to remove, then select Delete.
Cosmos DB
To remove an Azure Cosmos DB account from the Azure portal, go to your resource and select Delete account from the top menu bar. See detailed instructions for deleting an Azure Cosmos DB account.
Next steps
Learn more about Reacting to IoT Hub events by using Event Grid to trigger actions
Learn about what else you can do with Event Grid
Learn how to use Event Grid and Azure Monitor to Monitor, diagnose, and troubleshoot device connectivity to IoT Hub
Feedback
Coming soon: Throughout 2024 we will be phasing out GitHub Issues as the feedback mechanism for content and replacing it with a new feedback system. For more information see: https://aka.ms/ContentUserFeedback.
Submit and view feedback for