Create, edit, or extend JSON for logic app workflow definitions in Azure Logic Apps
Applies to: Azure Logic Apps (Consumption)
When you create enterprise integration solutions with automated workflows in Azure Logic Apps, the underlying workflow definitions use simple and declarative JavaScript Object Notation (JSON) along with the Workflow Definition Language (WDL) schema for their description and validation. These formats make workflow definitions easier to read and understand without knowing much about code. When you want to automate creating and deploying logic app resources, you can include workflow definitions as Azure resources inside Azure Resource Manager templates. To create, manage, and deploy logic apps, you can then use Azure PowerShell, Azure CLI, or the Azure Logic Apps REST APIs.
To work with workflow definitions in JSON, open the Code View editor when working in the Azure portal or in Visual Studio, or copy the definition into any editor that you want. If you're new to Azure Logic Apps, review Create an example Consumption logic app workflow.
Note
Some Azure Logic Apps capabilities, such as defining parameters and multiple triggers in workflow definitions, are available only in JSON, not the workflow designer. So for these tasks, you must work in Code View or another editor.
Edit JSON - Azure portal
Sign in to the Azure portal.
From the left menu, choose All services. In the search box, find "logic apps", and then from the results, select your logic app.
On your logic app's menu, under Development Tools, select Logic App Code View.
The Code View editor opens and shows your workflow definition in JSON format.
Edit JSON - Visual Studio
Before you can work on your workflow definition in Visual Studio, make sure that you've installed the required tools. To create a logic app with Visual Studio, review Quickstart: Automate tasks and processes with Azure Logic Apps - Visual Studio.
In Visual Studio, you can open logic apps that were created and deployed either directly from the Azure portal or as Azure Resource Manager projects from Visual Studio.
Open the Visual Studio solution, or Azure Resource Group project, that contains your logic app.
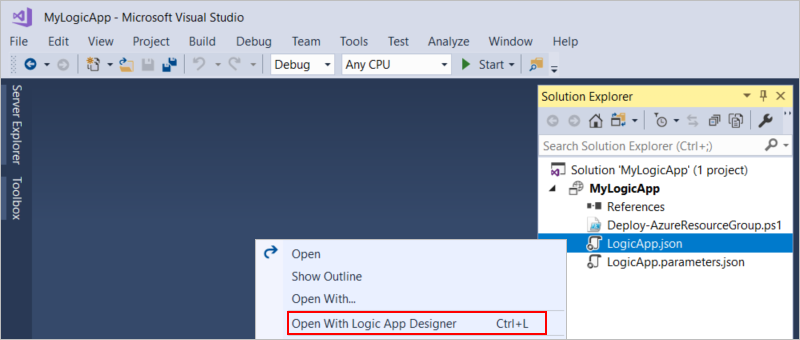
Find and open your workflow definition, which by default, appears in an Resource Manager template, named LogicApp.json. You can use and customize this template for deployment to different environments.
Open the shortcut menu for your workflow definition and template. Select Open With Logic App Designer.
Tip
If you don't have this command in Visual Studio 2019, check that you have the latest updates for Visual Studio.
At the bottom of the workflow designer, choose Code View.
The Code View editor opens and shows your workflow definition in JSON format.
To return to designer view, at the bottom of the Code View editor, choose Design.
Parameters
The deployment lifecycle usually has different environments for development, test, staging, and production. When you have values that you want to reuse throughout your logic app without hardcoding or that vary based on your deployment needs, you can create an Azure Resource Manager template for your workflow definition so that you can also automate logic app deployment.
Follow these general steps to parameterize, or define and use parameters for, those values instead. You can then provide the values in a separate parameter file that passes those values to your template. That way, you can change those values more easily without having to update and redeploy your logic app. For full details, see Overview: Automate deployment for logic apps with Azure Resource Manager templates.
In your template, define template parameters and workflow definition parameters for accepting the values to use at deployment and runtime, respectively.
Template parameters are defined in a parameters section that's outside your workflow definition, while workflow definition parameters are defined in a parameters section that's inside your workflow definition.
Replace the hardcoded values with expressions that reference these parameters. Template expressions use syntax that differs from workflow definition expressions.
Avoid complicating your code by not using template expressions, which are evaluated at deployment, inside workflow definition expressions, which are evaluated at runtime. Use only template expressions outside your workflow definition. Use only workflow definition expressions inside your workflow definition.
When you specify the values for your workflow definition parameters, you can reference template parameters by using the parameters section that's outside your workflow definition but still inside the resource definition for your logic app. That way, you can pass template parameter values into your workflow definition parameters.
Store the values for your parameters in a separate parameter file and include that file with your deployment.
Process strings with functions
Azure Logic Apps has various functions for working with strings. For example, suppose you want to pass a company name from an order to another system. However, you're not sure about proper handling for character encoding. You could perform base64 encoding on this string, but to avoid escapes in the URL, you can replace several characters instead. Also, you only need a substring for the company name because the first five characters aren't used.
{
  "$schema": "https://schema.management.azure.com/schemas/2016-06-01/Microsoft.Logic.json",
  "contentVersion": "1.0.0.0",
  "parameters": {
    "order": {
      "defaultValue": {
        "quantity": 10,
        "id": "myorder1",
        "companyName": "NAME=Contoso"
      },
      "type": "Object"
    }
  },
  "triggers": {
    "request": {
      "type": "Request",
      "kind": "Http"
    }
  },
  "actions": {
    "order": {
      "type": "Http",
      "inputs": {
        "method": "GET",
        "uri": "https://www.example.com/?id=@{replace(replace(base64(substring(parameters('order').companyName,5,sub(length(parameters('order').companyName), 5) )),'+','-') ,'/' ,'_' )}"
      }
    }
  },
  "outputs": {}
}
These steps describe how this example processes this string, working from the inside to the outside:
"uri": "https://www.example.com/?id=@{replace(replace(base64(substring(parameters('order').companyName,5,sub(length(parameters('order').companyName), 5) )),'+','-') ,'/' ,'_' )}"
Get the
length()for the company name, so you get the total number of characters.To get a shorter string, subtract
5.Now get a
substring(). Start at index5, and go to the remainder of the string.Convert this substring to a
base64()string.Now
replace()all the+characters with-characters.Finally,
replace()all the/characters with_characters.
Map list items to property values, then use maps as parameters
To get different results based a property's value, you can create a map that matches each property value to a result, then use that map as a parameter.
For example, this workflow defines some categories as parameters and a map that matches those categories with a specific URL. First, the workflow gets a list of articles. Then, the workflow uses the map to find the URL matching the category for each article.
The
intersection()function checks whether the category matches a known defined category.After getting a matching category, the example pulls the item from the map using square brackets:
parameters[...]
{
  "$schema": "https://schema.management.azure.com/schemas/2016-06-01/Microsoft.Logic.json",
  "contentVersion": "1.0.0.0",
  "parameters": {
    "specialCategories": {
      "defaultValue": [
        "science",
        "google",
        "microsoft",
        "robots",
        "NSA"
      ],
      "type": "Array"
    },
    "destinationMap": {
      "defaultValue": {
        "science": "https://www.nasa.gov",
        "microsoft": "https://www.microsoft.com/en-us/default.aspx",
        "google": "https://www.google.com",
        "robots": "https://en.wikipedia.org/wiki/Robot",
        "NSA": "https://www.nsa.gov/"
      },
      "type": "Object"
    }
  },
  "triggers": {
    "Request": {
      "type": "Request",
      "kind": "http"
    }
  },
  "actions": {
    "getArticles": {
      "type": "Http",
      "inputs": {
        "method": "GET",
        "uri": "https://ajax.googleapis.com/ajax/services/feed/load?v=1.0&q=https://feeds.wired.com/wired/index"
      }
    },
    "forEachArticle": {
      "type": "foreach",
      "foreach": "@body('getArticles').responseData.feed.entries",
      "actions": {
        "ifGreater": {
          "type": "if",
          "expression": "@greater(length(intersection(item().categories, parameters('specialCategories'))), 0)",
          "actions": {
            "getSpecialPage": {
              "type": "Http",
              "inputs": {
                "method": "GET",
                "uri": "@parameters('destinationMap')[first(intersection(item().categories, parameters('specialCategories')))]"
              }
            }
          }
        }
      },
      "runAfter": {
        "getArticles": [
          "Succeeded"
        ]
      }
    }
  }
}
Get data with Date functions
To get data from a data source that doesn't natively support triggers, you can use Date functions for working with times and dates instead. For example, this expression finds how long this workflow's steps are taking, working from the inside to the outside:
"expression": "@less(actions('order').startTime,addseconds(utcNow(),-1))",
From the
orderaction, extract thestartTime.Get the current time with
utcNow().Subtract one second:
You can use other units of time, like
minutesorhours.Now, you can compare these two values.
If the first value is less than the second value, then more than one second has passed since the order was first placed.
To format dates, you can use string formatters. For example, to get the RFC1123,
use utcnow('r').
Learn more about date formatting.
{
"$schema": "https://schema.management.azure.com/schemas/2016-06-01/Microsoft.Logic.json",
"contentVersion": "1.0.0.0",
"parameters": {
"order": {
"defaultValue": {
"quantity": 10,
"id": "myorder-id"
},
"type": "Object"
}
},
"triggers": {
"Request": {
"type": "request",
"kind": "http"
}
},
"actions": {
"order": {
"type": "Http",
"inputs": {
"method": "GET",
"uri": "https://www.example.com/?id=@{parameters('order').id}"
}
},
"ifTimingWarning": {
"type": "If",
"expression": "@less(actions('order').startTime,addseconds(utcNow(),-1))",
"actions": {
"timingWarning": {
"type": "Http",
"inputs": {
"method": "GET",
"uri": "https://www.example.com/?recordLongOrderTime=@{parameters('order').id}¤tTime=@{utcNow('r')}"
}
}
},
"runAfter": {
"order": [
"Succeeded"
]
}
}
},
"outputs": {}
}
Next steps
- Run steps based on a condition (conditional statements)
- Run steps based on different values (switch statements)
- Run and repeat steps (loops)
- Run or merge parallel steps (branches)
- Run steps based on grouped action status (scopes)
- Learn more about the Workflow Definition Language schema for Azure Logic Apps
- Learn more about workflow actions and triggers for Azure Logic Apps
Feedback
Coming soon: Throughout 2024 we will be phasing out GitHub Issues as the feedback mechanism for content and replacing it with a new feedback system. For more information see: https://aka.ms/ContentUserFeedback.
Submit and view feedback for