Implement Oracle Golden Gate on an Azure Linux virtual machine
Applies to: ✔️ Linux VMs
The Azure CLI is used to create and manage Azure resources from the command line or in scripts. This guide details how to use the Azure CLI to deploy an Oracle 19c database from the Azure Marketplace gallery image.
This document shows you step-by-step how to create, install, and configure Oracle Golden Gate on an Azure VM. In this tutorial, two virtual machines are set up in an availability set in a single region. The same tutorial can be used to set up OracleGolden Gate for VMs in different Availability Zones in a single Azure region or for VMs set up in two different regions.
Before you start, make sure that the Azure CLI has been installed. For more information, see Azure CLI installation guide.
Introduction
GoldenGate is a logical replication software that enables real-time replication, filtering, and transformation of data from a source database to a target database. This feature ensures that changes in the source database are replicated in real-time, making it possible for the target database to be up-to-date with the latest data.
Use GoldenGate mainly for heterogeneous replication cases, such as replicating data from different source databases to a single database. For example, a data warehouse. You can also use it for cross-platform migrations, such as from SPARC and AIX to Linux x86 environments, and advanced high availability and scalability scenarios.
Additionally, GoldenGate is also suitable for near-zero downtime migrations since it supports online migrations with minimal disruption to the source systems.
While GoldenGate facilitates bi-directional replication, the application must be configured accordingly. Additionally, the software permits filtering and transformation of data to meet specific business requirements, enabling users to make use of the replicated data for various purposes.
Prepare the environment
To perform the Oracle Golden Gate installation, you need to create two Azure VMs on the same availability set. The Marketplace image you use to create the VMs is Oracle:oracle-database-19-3:oracle-database-19-0904:19.3.1.
You also need to be familiar with Unix editor vi and have a basic understanding of X Server.
The following table is a summary of the environment configuration:
| Primary site | Replicate site | |
|---|---|---|
| Oracle release | Oracle Database 19.3.1.0 | Oracle Database 19.3.1.0 |
| Machine name | ggVM1 | ggVM2 |
| Operating system | Oracle Linux 7.x | Oracle Linux 7.x |
| Oracle SID | CDB1 | CDB1 |
| Replication schema | TEST | TEST |
| Golden Gate owner/replicate | C##GGADMIN | REPUSER |
| Golden Gate process | EXTORA | REPORA |
Sign in to Azure
Open your preferred shell on Windows, Linux or Azure Shell.
Sign in to your Azure subscription with the az login command. Then follow the on-screen directions.
$ az loginEnsure you're connected to the correct subscription by verifying subscription name and/or ID.
$ az account show{ "environmentName": "XXXXX", "homeTenantId": "XXXXXXXX-XXXX-XXXX-XXXX-XXXXXXXXXXXX", "id": "<SUBSCRIPTION_ID>", "isDefault": true, "managedByTenants": [], "name": "<SUBSCRIPTION_NAME>", "state": "Enabled", "tenantId": XXXXXXXX-XXXX-XXXX-XXXX-XXXXXXXXXXXX", "user": { "cloudShellID": true, "name": "aaaaa@bbbbb.com", "type": "user" } }
Generate authentication keys
We use key file based authentication with ssh to connect to the Oracle Database VM. Ensure that you have your private (named id_rsa) and public (named id_rsa.pub) key files are created on your shell.
Location of key files depends on your source system.
Windows: %USERPROFILE%.ssh Linux: ~/.ssh
If they don't exist you can create a new keyfile pair.
ssh-keygen -m PEM -t rsa -b 4096
The .ssh directory and key files are created. For more information, refer to Create and manage SSH keys for authentication to a Linux VM in Azure
Create a resource group
To create a resource group, use the az group create command. An Azure resource group is a logical container in which Azure resources are deployed and managed.
$ az group create --name GoldenGateOnAzureLab --location westus
Create and configure network
Create virtual network
Use following command to create the virtual network that hosts resources we create in this lab.
$ az network vnet create \
  --name ggVnet \
  --resource-group GoldenGateOnAzureLab \
  --address-prefixes "10.0.0.0/16" \
  --subnet-name ggSubnet1 \
  --subnet-prefixes "10.0.0.0/24"
Create a Network Security Group (NSG)
Create network security group (NSG) to lock down your virtual network.
$ az network nsg create \
  --resource-group GoldenGateOnAzureLab \
  --name ggVnetNSG
Create NSG rule to allow communication within virtual network.
$ az network nsg rule create  --resource-group GoldenGateOnAzureLab --nsg-name ggVnetNSG \
    --name ggAllowVnet \
    --protocol '*' --direction inbound --priority 3400 \
    --source-address-prefix 'VirtualNetwork' --source-port-range '*' \
    --destination-address-prefix 'VirtualNetwork' --destination-port-range '*' --access allow
Create NSG rule to deny all inbound connections
$ az network nsg rule create \
  --resource-group GoldenGateOnAzureLab \
  --nsg-name ggVnetNSG \
  --name ggDenyAllInBound \
  --protocol '*' --direction inbound --priority 3500 \
  --source-address-prefix '*' --source-port-range '*' \
  --destination-address-prefix '*' --destination-port-range '*' --access deny
Assign NSG to Subnet where we host our servers.
$ az network vnet subnet update --resource-group GoldenGateOnAzureLab --vnet-name ggVNet --name ggSubnet1 --network-security-group ggVnetNSG
Create Bastion Network
Create Bastion subnet. Name of the subnet must be AzureBastionSubnet
$ az network vnet subnet create  \
    --resource-group GoldenGateOnAzureLab \
    --name AzureBastionSubnet \
    --vnet-name ggVnet \
    --address-prefixes 10.0.1.0/24
Create public IP for Bastion
$ az network public-ip create \
    --resource-group GoldenGateOnAzureLab \
    --name ggBastionIP \
    --sku Standard
Create Azure Bastion resource. It takes about 10 minutes for the resource to deploy.
$ az network bastion create \
    --resource-group GoldenGateOnAzureLab \
    --name ggBastion \
    --public-ip-address ggBastionIP \
    --vnet-name ggVnet \
    --sku Standard \
    --enable-tunneling \
    --enable-ip-connect true
Create X Server VM (ggXServer)
Replace your password and run following command to create a Windows workstation VM where we deploy X Server.
$ az vm create \
     --resource-group GoldenGateOnAzureLab \
     --name ggXServer \
     --image MicrosoftWindowsDesktop:Windows-10:win10-22h2-pro-g2:19045.2604.230207 \
     --size Standard_DS1_v2  \
     --vnet-name ggVnet \
     --subnet ggSubnet1 \
     --public-ip-sku Standard \
     --nsg "" \
     --data-disk-delete-option Delete \
     --os-disk-delete-option Delete \
     --nic-delete-option Delete \
     --admin-username azureuser \
     --admin-password <ENTER_YOUR_PASSWORD_HERE>
Connect to ggXServer through Bastion
Connect to ggXServer using Bastion.
- Navigate to ggXServer from Azure portal.
- Go to Overview in the left blade
- Select Connect > Bastion on the menu at the top
- Select Bastion tab
- Click Use Bastion
Prepare ggXServer to run X Server
X Server is required for later steps of this lab. Perform following steps to install and start X Server.
Download Xming X Server for Windows to ggXServer and install with all default options.
Ensure that you didn't select Launch at the end of installation
Launch "XLAUNCH" application from start menu.
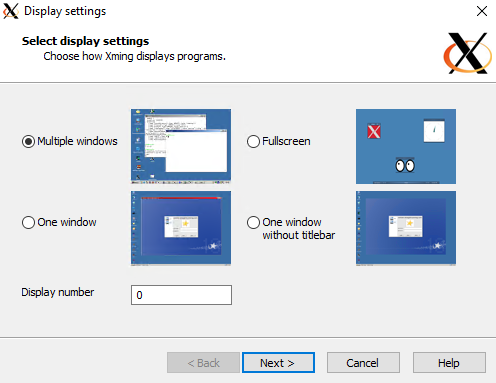
Select Multiple Windows
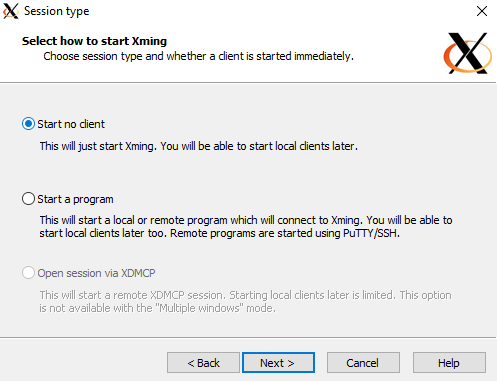
Select Start no client
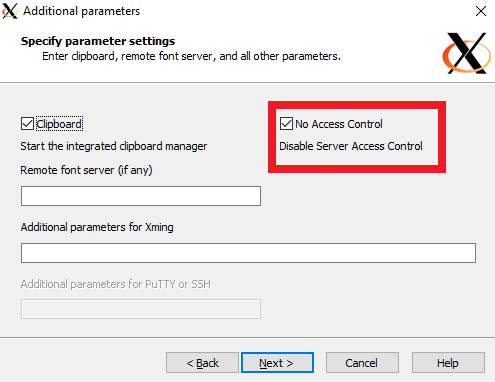
Select No access control
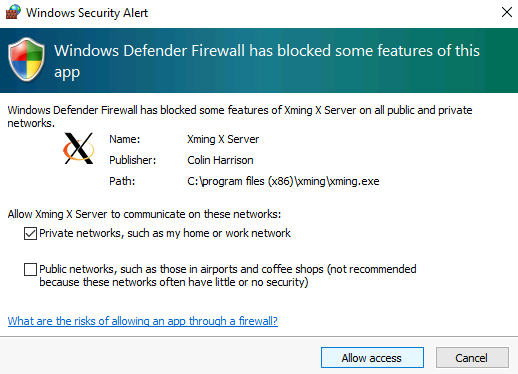
Select Allow Access to allow X Server through Windows Firewall
If you restart your ggXServer VM, follow steps 2-6 above to restart X Server application.
Create Oracle database virtual machines
For this lab, we create virtual machines ggVM1 and ggVM2 from Oracle Database 19c image. If they don't already exist in the default key location, this command also creates SSH keys. To use a specific set of keys, use the --ssh-key-value option. If you have already created your SSH keys in Generate authentication keys section, those keys will be used.
When creating a new virtual machine size parameter indicates the size and type of virtual machine created. Depending on the Azure region you selected to create virtual machine and your subscription settings, some virtual machine sizes and types may not be available for you to use. The following example uses minimum required size for this lab Standard_DS1_v2. If you want to change specs of virtual machine, select one of the available sizes from Azure VM Sizes. For test purposes, you may choose from General Purpose (D-Series) virtual machine types. For production or pilot deployments, Memory Optimized (E-Series and M-Series) are more suitable.
Create ggVM1 (primary)
$ az vm create \
     --resource-group GoldenGateOnAzureLab \
     --name ggVM1 \
     --image Oracle:oracle-database-19-3:oracle-database-19-0904:19.3.1 \
     --size Standard_DS1_v2 \
     --generate-ssh-keys \
    --admin-username azureuser \
    --vnet-name ggVnet \
    --subnet ggSubnet1 \
    --public-ip-address "" \
    --nsg "" \
    --zone 1
Create ggVM2 (replicate)
$ az vm create \
    --resource-group GoldenGateOnAzureLab \
    --name ggVM2 \
    --image Oracle:oracle-database-19-3:oracle-database-19-0904:19.3.1 \
    --size Standard_DS1_v2  \
    --generate-ssh-keys \
    --admin-username azureuser \
    --vnet-name ggVnet \
    --subnet ggSubnet1 \
    --public-ip-address "" \
    --nsg "" \
    --zone 2
Connect to ggVM1 (primary)
Connect to ggVM1 using Bastion.
- Navigate to ggVM1 from Azure portal.
- Go to Overview in the left pane.
- Select Connect > Bastion on the menu at the top
- Select Bastion tab
- Click Use Bastion
Create the database on ggVM1 (primary)
The Oracle software is already installed on the Marketplace image, so the next step is to create the database.
- Run the software as the
oracleuser.
$ sudo su - oracle
- Create the database using following command. This command may take 30-40 minutes to complete.
$ dbca -silent \
   -createDatabase \
   -templateName General_Purpose.dbc \
   -gdbname cdb1 \
   -sid cdb1 \
   -responseFile NO_VALUE \
   -characterSet AL32UTF8 \
   -sysPassword OraPasswd1 \
   -systemPassword OraPasswd1 \
   -createAsContainerDatabase true \
   -numberOfPDBs 1 \
   -pdbName pdb1 \
   -pdbAdminPassword OraPasswd1 \
   -databaseType MULTIPURPOSE \
   -automaticMemoryManagement false \
   -storageType FS \
   -datafileDestination "/u01/app/oracle/oradata/" \
   -ignorePreReqs
Output should look similar to the following response.
Copying database files
1% complete
2% complete
8% complete
13% complete
19% complete
27% complete
Creating and starting Oracle instance
29% complete
32% complete
33% complete
34% complete
38% complete
42% complete
43% complete
45% complete
Completing Database Creation
48% complete
51% complete
53% complete
62% complete
70% complete
72% complete
Creating Pluggable Databases
78% complete
100% complete
Look at the log file "/u01/app/oracle/cfgtoollogs/dbca/cdb1/cdb1.log" for more details.
- Set the ORACLE_SID and LD_LIBRARY_PATH variables.
$ export ORACLE_SID=cdb1
$ export LD_LIBRARY_PATH=$ORACLE_HOME/lib
- Run following to add ORACLE_SID and LD_LIBRARY_PATH to the .bashrc file, so that these settings are saved for future sign-ins. ORACLE_HOME variable should already be set in .bashrc file.
$ sed -i '$ a export ORACLE_SID=cdb1' .bashrc
$ sed -i '$ a export LD_LIBRARY_PATH=$ORACLE_HOME/lib' .bashrc
- Start Oracle listener
$ lsnrctl start
Connect to ggVM2 (replicate)
Connect to ggVM2 using Bastion.
- Navigate to ggVM2 from Azure portal.
- Go to Overview in the left pane.
- Select Connect > Bastion on the menu at the top
- Select Bastion tab
- Click Use Bastion
Open firewall ports for ggVM1
Configure firewall to allow connections from ggVM1. Following command is run on ggVM2.
$ sudo su -
$ firewall-cmd --permanent --zone=trusted --add-source=10.0.0.5
$ firewall-cmd --reload
$ exit
Create the database on ggVM2 (replicate)
- Switch to
oracleuser if necessary
$ sudo su - oracle
- Create the database
$ dbca -silent \
   -createDatabase \
   -templateName General_Purpose.dbc \
   -gdbname cdb1 \
   -sid cdb1 \
   -responseFile NO_VALUE \
   -characterSet AL32UTF8 \
   -sysPassword OraPasswd1 \
   -systemPassword OraPasswd1 \
   -createAsContainerDatabase true \
   -numberOfPDBs 1 \
   -pdbName pdb1 \
   -pdbAdminPassword OraPasswd1 \
   -databaseType MULTIPURPOSE \
   -automaticMemoryManagement false \
   -storageType FS \
   -datafileDestination "/u01/app/oracle/oradata/" \
   -ignorePreReqs
- Set the ORACLE_SID and ORACLE_HOME variables.
$ export ORACLE_SID=cdb1
$ export LD_LIBRARY_PATH=$ORACLE_HOME/lib
- Run following to add ORACLE_SID and LD_LIBRARY_PATH to the .bashrc file, so that these settings are saved for future sign-ins. ORACLE_HOME variable should already be set in .bashrc file.
$ sed -i '$ a export ORACLE_SID=cdb1' .bashrc
$ sed -i '$ a export LD_LIBRARY_PATH=$ORACLE_HOME/lib' .bashrc
- Start Oracle listener
$ lsnrctl start
Configure Golden Gate on ggVM1
Follow the steps in this section to install and configure Golden Gate.
Enable archive log mode on ggVM1 (primary)
- Connect to
sqlplus
$ sqlplus / as sysdba
- Enable archive log
SQL> SELECT log_mode FROM v$database;

LOG_MODE
------------
NOARCHIVELOG

SQL> SHUTDOWN IMMEDIATE;
SQL> STARTUP MOUNT;
SQL> ALTER DATABASE ARCHIVELOG;
SQL> ALTER DATABASE OPEN;
- Enable force logging, and make sure at least one log file is present.
SQL> ALTER DATABASE FORCE LOGGING;
SQL> ALTER SYSTEM SWITCH LOGFILE;
SQL> ALTER SYSTEM set enable_goldengate_replication=true;
SQL> ALTER PLUGGABLE DATABASE PDB1 OPEN;
SQL> ALTER SESSION SET CONTAINER=CDB$ROOT;
SQL> ALTER DATABASE ADD SUPPLEMENTAL LOG DATA;
SQL> ALTER SESSION SET CONTAINER=PDB1;
SQL> ALTER DATABASE ADD SUPPLEMENTAL LOG DATA;
SQL> EXIT;
Download Golden Gate software
Download the 213000_fbo_ggs_Linux_x64_Oracle_shiphome.zip file from the Oracle Golden Gate download page. Under the download title Oracle GoldenGate 21.3.0.0.0 for Oracle on Linux x86-64.
After you download the .zip file to your client computer, you can use Secure Copy Protocol (SCP) to copy the files to your virtual machines (ggVM1 and ggVM2). Make sure that
scpcommand points to correct path of .zip file.Copy to ggVM1
Login and ensure you're using the correct subscription as necessary as described in Sign in to Azure
Open the tunnel to your target VM using the following PowerShell command
$ggVM1id=$(az vm show --resource-group GoldenGateOnAzureLab --name ggVM1 --query 'id' --output tsv)
az network bastion tunnel --name ggBastion --resource-group GoldenGateOnAzureLab --target-resource-id $ggVM1id --resource-port 22 --port 57500
Leave the first command prompt running and open a second command prompt to connect to your target VM through the tunnel. In this second command prompt window, you can upload files from your local machine to your target VM using the following command. The correct
id_rsakeyfile to access virtual machine must reside in.sshdirectory or you can point to a different key file using-iparameter toscpcommand.scp -P 57500 "213000_fbo_ggs_Linux_x64_Oracle_shiphome.zip" azureuser@127.0.0.1:.
Copy to ggVM2
Open the tunnel to your target VM using the following PowerShell command
$ggVM2id=$(az vm show --resource-group GoldenGateOnAzureLab --name ggVM2 --query 'id' --output tsv)
az network bastion tunnel --name ggBastion --resource-group GoldenGateOnAzureLab --target-resource-id $ggVM2id --resource-port 22 --port 57501
Leave the first command prompt running and open a second command prompt to connect to your target VM through the tunnel. In this second command prompt window, you can upload files from your local machine to your target VM using the following command. The correct
id_rsakeyfile to access virtual machine must reside in.sshdirectory or you can point to a different key file using-iparameter toscpcommand.scp -P 57501 "213000_fbo_ggs_Linux_x64_Oracle_shiphome.zip" azureuser@127.0.0.1:.
Install Golden Gate software
Connect to ggVM1 using Bastion.
- Navigate to ggVM1 from Azure portal.
- Go to Overview in the left panel
- Select Connect > Bastion on the menu at the top
- Select Bastion tab
- Click Use Bastion
Move the .zip file to the /opt folder, then change the owner
$ sudo su -
$ mv /home/azureuser/*.zip /opt
Unzip the files (install unzip utility if it's not already installed)
$ yum install unzip
$ cd /opt
$ unzip 213000_fbo_ggs_Linux_x64_Oracle_shiphome.zip
Change permission
$ chown -R oracle:oinstall /opt/fbo_ggs_Linux_x64_Oracle_shiphome
$ exit
Start Golden Gate installer
$ sudo su - oracle
$ export DISPLAY=10.0.0.4:0.0
$ cd /opt/fbo_ggs_Linux_x64_Oracle_shiphome/Disk1
$ ./runInstaller
The installer opens on ggXServer.
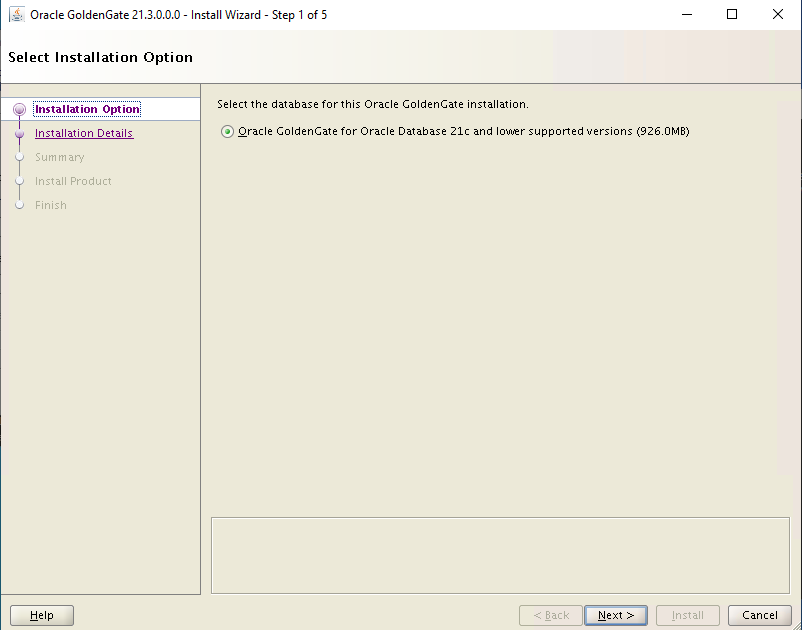
Select 'Oracle GoldenGate for Oracle Database 21c'. Then select Next to continue.
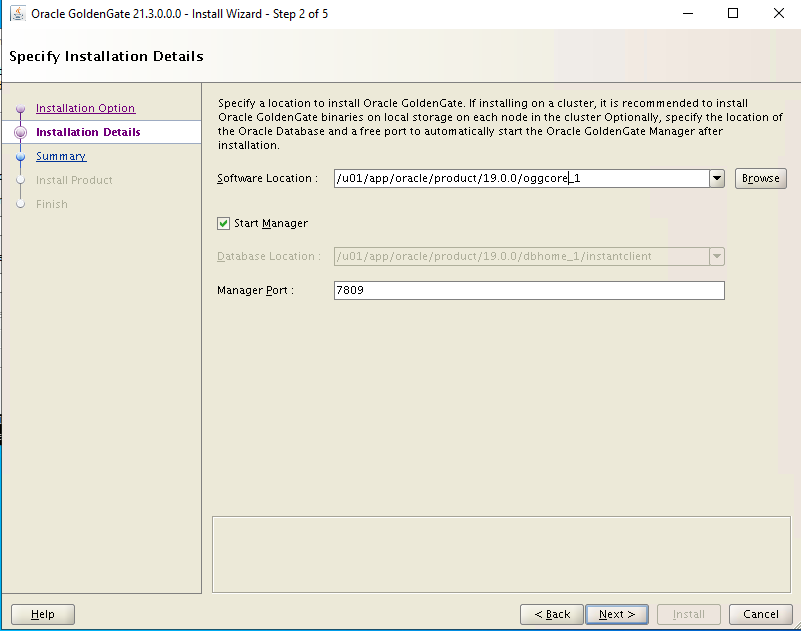
Set the software location to /u01/app/oracle/product/19.0.0/oggcore_1, make sure Start Manager box is selected and select Next to continue.
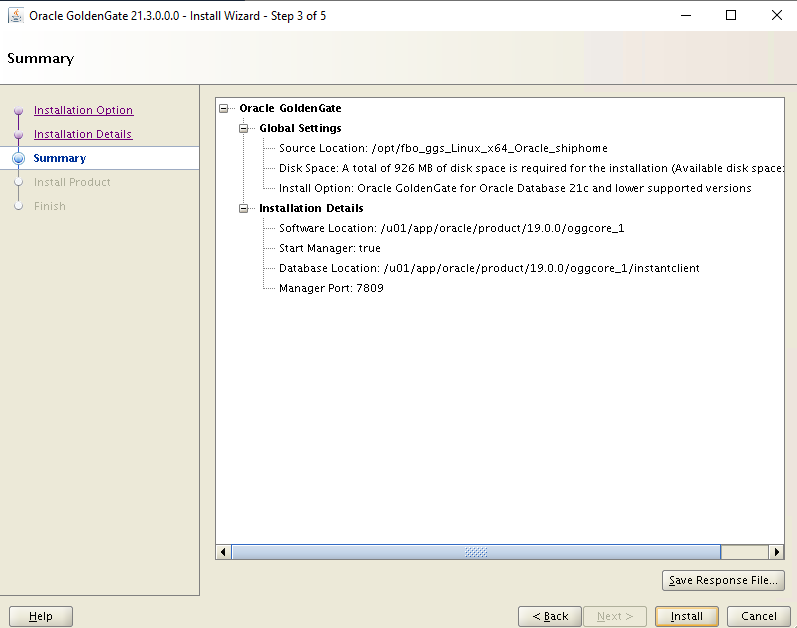
On the Summary screen, select Install to continue.
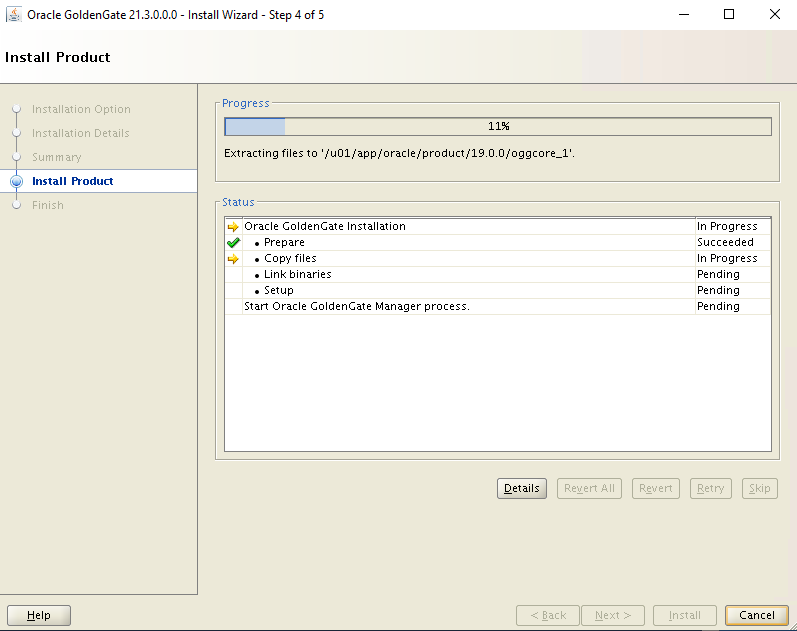
Wait for installation to finish.
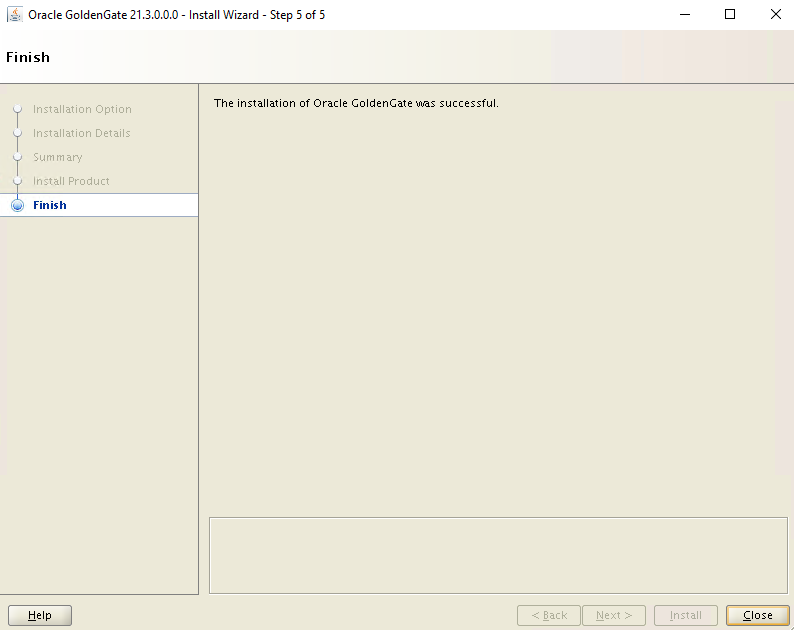
Select Close to continue.
Connect to ggVM2 using Bastion.
- Navigate to ggVM2 from Azure portal.
- Go to Overview in the left pane
- Select Connect > Bastion on the menu at the top
- Select Bastion tab
- Click Use Bastion
Repeat steps 2-10 above on ggVM2
Set up service on ggVM1 (primary)
Create or update the tnsnames.ora file.
$ sudo su - oracle
$ cd $ORACLE_HOME/network/admin
$ vi tnsnames.ora
When vi editor opens you have to press
ito switch to insert mode, then copy and paste file contents and pressEsckey,:wq!to save file.cdb1= (DESCRIPTION= (ADDRESS= (PROTOCOL=TCP) (HOST=localhost) (PORT=1521) ) (CONNECT_DATA= (SERVER=dedicated) (SERVICE_NAME=cdb1) ) ) pdb1= (DESCRIPTION= (ADDRESS= (PROTOCOL=TCP) (HOST=localhost) (PORT=1521) ) (CONNECT_DATA= (SERVER=dedicated) (SERVICE_NAME=pdb1) ) )Create the Golden Gate owner and user accounts.
Note
The owner account must have C## prefix.
$ sqlplus / as sysdbaSQL> CREATE USER C##GGADMIN identified by ggadmin; SQL> EXEC dbms_goldengate_auth.grant_admin_privilege('C##GGADMIN',container=>'ALL'); SQL> GRANT DBA to C##GGADMIN container=all; SQL> connect C##GGADMIN/ggadmin SQL> ALTER SESSION SET CONTAINER=PDB1; SQL> EXIT;Create the Golden Gate test user account
$ cd /u01/app/oracle/product/19.0.0/oggcore_1
$ sqlplus system/OraPasswd1@pdb1
SQL> CREATE USER test identified by test DEFAULT TABLESPACE USERS TEMPORARY TABLESPACE TEMP; SQL> GRANT connect, resource, dba TO test; SQL> ALTER USER test QUOTA 100M on USERS; SQL> connect test/test@pdb1 SQL> @demo_ora_create SQL> @demo_ora_insert SQL> EXIT;Configure the extract parameter file.
Start the Golden gate command-line interface (ggsci):
$ sudo su - oracle
$ cd /u01/app/oracle/product/19.0.0/oggcore_1
$ ./ggsci
GGSCI> DBLOGIN USERID test@pdb1, PASSWORD test Successfully logged into database pdb1 GGSCI> ADD SCHEMATRANDATA pdb1.test 2017-05-23 15:44:25 INFO OGG-01788 SCHEMATRANDATA has been added on schema test. 2017-05-23 15:44:25 INFO OGG-01976 SCHEMATRANDATA for scheduling columns has been added on schema test. GGSCI> EDIT PARAMS EXTORAPress
ikey to switch to insert mode and copy and paste (right click on the SSH window) following to the EXTRACT parameter file. Press Esc key,:wq!to save file.EXTRACT EXTORA USERID C##GGADMIN@cdb1, PASSWORD ggadmin RMTHOST 10.0.0.5, MGRPORT 7809 RMTTRAIL ./dirdat/rt DDL INCLUDE MAPPED DDLOPTIONS REPORT LOGALLSUPCOLS UPDATERECORDFORMAT COMPACT TABLE pdb1.test.TCUSTMER; TABLE pdb1.test.TCUSTORD;Register extract--integrated extract.
GGSCI> dblogin userid C##GGADMIN@cdb1, password ggadmin
Successfully logged into database CDB$ROOT.

GGSCI> REGISTER EXTRACT EXTORA DATABASE CONTAINER(pdb1)

2023-03-03 19:37:01  INFO    OGG-02003  Extract group EXTORA successfully registered with database at SCN 2142014.

GGSCI> exit
Set up extract checkpoints and start real-time extract
$ ./ggsciGGSCI> ADD EXTRACT EXTORA, INTEGRATED TRANLOG, BEGIN NOW EXTRACT (Integrated) added. GGSCI> ADD RMTTRAIL ./dirdat/rt, EXTRACT EXTORA, MEGABYTES 10 RMTTRAIL added. GGSCI> START EXTRACT EXTORA Sending START request to MANAGER ... EXTRACT EXTORA starting GGSCI > INFO ALL Program Status Group Lag at Chkpt Time Since Chkpt MANAGER RUNNING EXTRACT RUNNING EXTORA 00:00:11 00:00:04 GGSCI > EXITIn this step, you find the starting SCN, which is used later, in a different section.
$ sqlplus / as sysdbaSQL> alter session set container = pdb1; SQL> SELECT current_scn from v$database; CURRENT_SCN ----------- 2172191 SQL> EXIT;$ ./ggsci GGSCI> EDIT PARAMS INITEXTWhen vi editor opens you have to press
ito switch to insert mode, then copy and paste file contents and pressEsckey,:wq!to save file.EXTRACT INITEXT USERID C##GGADMIN@cdb1, PASSWORD ggadmin RMTHOST 10.0.0.6, MGRPORT 7809 RMTTASK REPLICAT, GROUP INITREP TABLE pdb1.test.*, SQLPREDICATE 'AS OF SCN 2172191';GGSCI> ADD EXTRACT INITEXT, SOURCEISTABLE Extract added. GGSCI> EXIT
Set up service on ggVM2 (replicate)
Create or update the tnsnames.ora file.
$ cd $ORACLE_HOME/network/admin
$ vi tnsnames.ora
When vi editor opens you have to press
ito switch to insert mode, then copy and paste file contents and pressEsckey,:wq!to save file.cdb1= (DESCRIPTION= (ADDRESS= (PROTOCOL=TCP) (HOST=localhost) (PORT=1521) ) (CONNECT_DATA= (SERVER=dedicated) (SERVICE_NAME=cdb1) ) ) pdb1= (DESCRIPTION= (ADDRESS= (PROTOCOL=TCP) (HOST=localhost) (PORT=1521) ) (CONNECT_DATA= (SERVER=dedicated) (SERVICE_NAME=pdb1) ) )Create a replicate account.
$ sqlplus / as sysdbaSQL> ALTER SYSTEM set enable_goldengate_replication=true; SQL> ALTER SESSION SET CONTAINER = pdb1; SQL> CREATE USER REPUSER IDENTIFIED BY REP_PASS CONTAINER=CURRENT; SQL> GRANT DBA TO REPUSER; SQL> EXEC DBMS_GOLDENGATE_AUTH.GRANT_ADMIN_PRIVILEGE('REPUSER',CONTAINER=>'PDB1'); SQL> CONNECT REPUSER/REP_PASS@PDB1 SQL> EXIT;Create a Golden Gate test user account.
$ cd /u01/app/oracle/product/19.0.0/oggcore_1
$ sqlplus system/OraPasswd1@pdb1
SQL> CREATE USER test identified by test DEFAULT TABLESPACE USERS TEMPORARY TABLESPACE TEMP; SQL> GRANT connect, resource, dba TO test; SQL> ALTER USER test QUOTA 100M on USERS; SQL> CONNECT test/test@pdb1 SQL> @demo_ora_create SQL> EXIT;REPLICAT parameter file to replicate changes.
$ cd /u01/app/oracle/product/19.0.0/oggcore_1
$ ./ggsci
GGSCI> EDIT PARAMS REPORAWhen vi editor opens you have to press
ito switch to insert mode, then copy and paste file contents and pressEsckey,:wq!to save file.REPLICAT REPORA ASSUMETARGETDEFS DISCARDFILE ./dirrpt/repora.dsc, PURGE, MEGABYTES 100 DDL INCLUDE MAPPED DDLOPTIONS REPORT DBOPTIONS INTEGRATEDPARAMS(parallelism 6) USERID repuser@pdb1, PASSWORD REP_PASS MAP pdb1.test.*, TARGET pdb1.test.*;Set up a replicate checkpoint.
GGSCI> ADD REPLICAT REPORA, INTEGRATED, EXTTRAIL ./dirdat/rt
GGSCI> EDIT PARAMS INITREP
When vi editor opens you have to press
ito switch to insert mode, then copy and paste file contents and pressEsckey,:wq!to save file.REPLICAT INITREP ASSUMETARGETDEFS DISCARDFILE ./dirrpt/tcustmer.dsc, APPEND USERID repuser@pdb1, PASSWORD REP_PASS MAP pdb1.test.*, TARGET pdb1.test.*;GGSCI> ADD REPLICAT INITREP, SPECIALRUN GGSCI> EXIT
Set up replication (ggVM1 and ggVM2)
1. Set up the replication on ggVM2 (replicate)
Logon to ggsci.
$ cd /u01/app/oracle/product/12.1.0/oggcore_1
$ ./ggsci
GGSCI> EDIT PARAMS MGR
Update the file with the following.
PORT 7809
ACCESSRULE, PROG *, IPADDR *, ALLOW
Restart the Manager service.
GGSCI> STOP MGR
GGSCI> START MGR
GGSCI> EXIT
2. Set up the replication on ggVM1 (primary)
Start the initial load and check for errors.
$ cd /u01/app/oracle/product/19.0.0/oggcore_1
$ ./ggsci
GGSCI> START EXTRACT INITEXT
GGSCI> VIEW REPORT INITEXT
3. Set up the replication on ggVM2 (replicate)
Change the SCN number with the number you obtained before.
$ cd /u01/app/oracle/product/19.0.0/oggcore_1
$ ./ggsci
START REPLICAT REPORA, AFTERCSN 2172191
The replication has begun, and you can test it by inserting new records to TEST tables.
View job status and troubleshooting
View reports
To view reports on ggVM1, run the following commands.
GGSCI> VIEW REPORT EXTORATo view reports on ggVM2, run the following commands.
GGSCI> VIEW REPORT REPORA
View status and history
To view status and history on ggVM1, run the following commands.
GGSCI> DBLOGIN USERID C##GGADMIN@CDB1, PASSWORD ggadmin
GGSCI> INFO EXTRACT EXTORA, DETAIL
To view status and history on ggVM2, run the following commands.
GGSCI> DBLOGIN USERID REPUSER@PDB1 PASSWORD REP_PASS
GGSCI> INFO REP REPORA, DETAIL
$ sqlplus test/test@pdb1SQL> select * from TCUSTMER; SQL> select * from TCUSTORD;
Observe Data Replication
Connect to primary database on ggVM1
$ sqlplus test/test@pdb1Select existing records from table
SQL> select * from TCUSTORD;Create a test record
SQL> INSERT INTO TCUSTORD VALUES ('OLLJ',TO_DATE('11-APR-99'),'CYCLE',400,16000,1,102);
SQL> COMMIT;
SQL> EXIT;
Observe transaction picked up by Golden Gate (Note Total inserts value)
$ cd /u01/app/oracle/product/19.0.0/oggcore_1
$ ./ggsci
GGSCI> STATS EXTORA
  Sending STATS request to Extract group EXTORA ...

  Start of statistics at 2023-03-24 19:41:54.

  DDL replication statistics (for all trails):

  *** Total statistics since extract started     ***
  Operations                           0.00
  Mapped operations                    0.00
  Unmapped operations                    0.00
  Other operations                    0.00
  Excluded operations                    0.00

  Output to ./dirdat/rt:

  Extracting from PDB1.TEST.TCUSTORD to PDB1.TEST.TCUSTORD:

  *** Total statistics since 2023-03-24 19:41:34 ***
     Total inserts                              1.00
     Total updates                              0.00
     Total deletes                              0.00
     Total upserts                              0.00
     Total discards                             0.00
     Total operations                           1.00

  *** Daily statistics since 2023-03-24 19:41:34 ***
     Total inserts                              1.00
     Total updates                              0.00
     Total deletes                              0.00
     Total upserts                              0.00
     Total discards                             0.00
     Total operations                           1.00

  *** Hourly statistics since 2023-03-24 19:41:34 ***
     Total inserts                              1.00
     Total updates                              0.00
     Total deletes                              0.00
     Total upserts                              0.00
     Total discards                             0.00
     Total operations                           1.00

  *** Latest statistics since 2023-03-24 19:41:34 ***
     Total inserts                              1.00
     Total updates                              0.00
     Total deletes                              0.00
     Total upserts                              0.00
     Total discards                             0.00
     Total operations                           1.00

  End of statistics.
Connect to primary database on ggVM2
$ sqlplus test/test@pdb1Verify new record is replicated
SQL> select * from TCUSTORD;CUST ORDER_DAT PRODUCT_ ORDER_ID PRODUCT_PRICE PRODUCT_AMOUNT TRANSACTION_ID ---- --------- -------- ---------- ------------- -------------- -------------- OLLJ 11-APR-99 CYCLE 400 16000 1 102 WILL 30-SEP-94 CAR 144 17520 3 100 JANE 11-NOV-95 PLANE 256 133300 1 100
The installation and configuration of Golden Gate on Oracle linux is now complete.
Delete the ggXServer VM
ggXServer VM is only used during setup. You can safely delete it after completing this lab document but keep your GoldenGate on Azure lab setup intact.
$ az vm delete --resource-group GoldenGateOnAzureLab --name ggXServer --force-deletion yes

$ az network public-ip delete --resource-group GoldenGateOnAzureLab --name ggXServerPublicIP
Delete Golden Gate On Azure Lab Setup
When it's no longer needed, the following command can be used to remove the resource group, VM, and all related resources for this lab.
$ az group delete --name GoldenGateOnAzureLab
Next steps
Feedback
Coming soon: Throughout 2024 we will be phasing out GitHub Issues as the feedback mechanism for content and replacing it with a new feedback system. For more information see: https://aka.ms/ContentUserFeedback.
Submit and view feedback for