Use Azure PowerShell to create a VM with Accelerated Networking
This article describes how to use Azure PowerShell to create a Windows virtual machine (VM) with Accelerated Networking (AccelNet) enabled. The article also discusses how to enable and manage Accelerated Networking on existing VMs.
You can also create a VM with Accelerated Networking enabled by using the Azure portal. For more information about using the Azure portal to manage Accelerated Networking on VMs, see Manage Accelerated Networking through the portal.
To use Azure CLI to create a Linux or Windows VM with Accelerated Networking enabled, see Use Azure CLI to create a VM with Accelerated Networking.
Prerequisites
An Azure account with an active subscription. You can create an account for free.
Azure PowerShell 1.0.0 or later installed. To find your currently installed version, run
Get-Module -ListAvailable Az. If you need to install or upgrade, install the latest version of the Az module from the PowerShell Gallery.In PowerShell, sign in to your Azure account by using Connect-AzAccount.
Create a VM with Accelerated Networking
In the following examples, you can replace the example parameters such as <myResourceGroup>, <myNic>, and <myVm> with your own values.
Create a virtual network
Use New-AzResourceGroup to create a resource group to contain the resources.
New-AzResourceGroup -Name "<myResourceGroup>" -Location "<myAzureRegion>"Use New-AzVirtualNetworkSubnetConfig to create a subnet configuration.
$subnet = New-AzVirtualNetworkSubnetConfig `
  -Name "<mySubnet>" `
  -AddressPrefix "<192.168.1.0/24>"
Use New-AzVirtualNetwork to create a virtual network with the subnet.
$vnet = New-AzVirtualNetwork -ResourceGroupName "<myResourceGroup>" `
  -Location "<myAzureRegion>" `
  -Name "<myVnet>" `
  -AddressPrefix "<192.168.0.0/16>" `
  -Subnet $Subnet
Create a network security group
A network security group (NSG) contains several default rules, one of which disables all inbound access from the internet. Use New-AzNetworkSecurityRuleConfig to create a new rule so that you can remotely connect to the VM via Remote Desktop Protocol (RDP).
$rdp = New-AzNetworkSecurityRuleConfig `
  -Name "Allow-RDP-All" `
  -Description "Allow RDP" `
  -Access Allow `
  -Protocol Tcp `
  -Direction Inbound `
  -Priority 100 `
  -SourceAddressPrefix * `
  -SourcePortRange * `
  -DestinationAddressPrefix * `
  -DestinationPortRange 3389
Use New-AzNetworkSecurityGroup to create the NSG and assign the
Allow-RDP-Allrule to the NSG.$nsg = New-AzNetworkSecurityGroup ` -ResourceGroupName "<myResourceGroup>" ` -Location "<myAzureRegion>" ` -Name "<myNsg>" ` -SecurityRules $rdpUse Set-AzVirtualNetworkSubnetConfig to associate the NSG to the subnet. The NSG rules are effective for all resources deployed in the subnet.
Set-AzVirtualNetworkSubnetConfig `
  -VirtualNetwork $vnet `
  -Name "<mySubnet>" `
  -AddressPrefix "<192.168.1.0/24>" `
  -NetworkSecurityGroup $nsg
Create a network interface with accelerated networking
Use New-AzPublicIpAddress to create a public IP address. The VM doesn't need a public IP address if you don't access it from the internet, but you need the public IP to complete the steps for this article.
$publicIp = New-AzPublicIpAddress `
  -ResourceGroupName "<myResourceGroup>" `
  -Name "<myPublicIp>" `
  -Location "<myAzureRegion>" `
  -AllocationMethod Dynamic
Use New-AzNetworkInterface to create a network interface (NIC) with Accelerated Networking enabled, and assign the public IP address to the NIC.
$nic = New-AzNetworkInterface `
  -ResourceGroupName "<myResourceGroup>" `
  -Name "<myNic>" `
  -Location "<myAzureRegion>" `
  -SubnetId $vnet.Subnets[0].Id `
  -PublicIpAddressId $publicIp.Id `
  -EnableAcceleratedNetworking
Create a VM and attach the network interface
Use Get-Credential to set a user name and password for the VM and store them in the
$credvariable.$cred = Get-CredentialUse New-AzVMConfig to define a VM with a VM size that supports accelerated networking, as listed in Windows Accelerated Networking. For a list of all Windows VM sizes and characteristics, see Windows VM sizes.
$vmConfig = New-AzVMConfig -VMName "<myVm>" -VMSize "Standard_DS4_v2"Use Set-AzVMOperatingSystem and Set-AzVMSourceImage to create the rest of the VM configuration. The following example creates a Windows Server 2019 Datacenter VM:
$vmConfig = Set-AzVMOperatingSystem -VM $vmConfig `
  -Windows `
  -ComputerName "<myVM>" `
  -Credential $cred `
  -ProvisionVMAgent `
  -EnableAutoUpdate
$vmConfig = Set-AzVMSourceImage -VM $vmConfig `
  -PublisherName "MicrosoftWindowsServer" `
  -Offer "WindowsServer" `
  -Skus "2019-Datacenter" `
  -Version "latest"
Use Add-AzVMNetworkInterface to attach the NIC that you previously created to the VM.
$vmConfig = Add-AzVMNetworkInterface -VM $vmConfig -Id $nic.IdUse New-AzVM to create the VM with Accelerated Networking enabled.
New-AzVM -VM $vmConfig -ResourceGroupName "<myResourceGroup>" -Location "<myAzureRegion>"
Confirm the Ethernet controller is installed
Once you create the VM in Azure, connect to the VM and confirm that the Ethernet controller is installed in Windows.
In the Azure portal, search for and select virtual machines.
On the Virtual machines page, select your new VM.
On the VM's Overview page, select Connect.
On the Connect screen, select Native RDP.
On the Native RDP screen, select Download RDP file.
Open the downloaded RDP file, and then sign in with the credentials you entered when you created the VM.
On the remote VM, right-click Start and select Device Manager.
In the Device Manager window, expand the Network adapters node.
Confirm that the Mellanox ConnectX-4 Lx Virtual Ethernet Adapter appears, as shown in the following image:
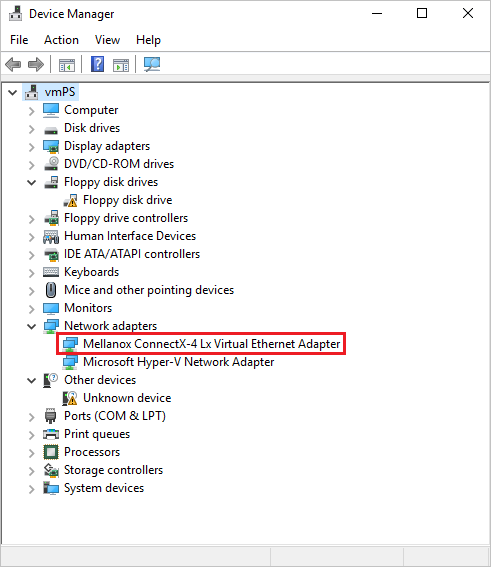
The presence of the adapter confirms that Accelerated Networking is enabled for your VM.
Note
If the Mellanox adapter fails to start, open an administrator command prompt on the remote VM and enter the following command:
netsh int tcp set global rss = enabled
Manage Accelerated Networking on existing VMs
You can enable Accelerated Networking on an existing VM. The VM must meet the following requirements to support Accelerated Networking:
- Be a supported size for Accelerated Networking.
- Be a supported Azure Marketplace image.
- Be stopped or deallocated before you can enable Accelerated Networking on any NIC. This requirement applies to all individual VMs or VMs in an availability set or Azure Virtual Machine Scale Sets.
Enable Accelerated Networking on individual VMs or VMs in availability sets
Stop or deallocate the VM or, if an availability set, all the VMs in the set:
Stop-AzVM -ResourceGroup "<myResourceGroup>" -Name "<myVM>"If you created your VM individually without an availability set, you must stop or deallocate only the individual VM to enable Accelerated Networking. If you created your VM with an availability set, you must stop or deallocate all VMs in the set, so the VMs end up on a cluster that supports Accelerated Networking.
The stop or deallocate requirement is unnecessary to disable Accelerated Networking. Clusters that support Accelerated Networking also work fine with NICs that don't use Accelerated Networking.
Enable Accelerated Networking on the NIC of your VM:
$nic = Get-AzNetworkInterface -ResourceGroupName "<myResourceGroup>" -Name "<myNic>"

$nic.EnableAcceleratedNetworking = $true

$nic | Set-AzNetworkInterface
Restart your VM, or all the VMs in the availability set, and confirm that Accelerated Networking is enabled.
Start-AzVM -ResourceGroup "<myResourceGroup>" -Name "<myVM>"
Enable Accelerated Networking on Virtual Machine Scale Sets
Azure Virtual Machine Scale Sets is slightly different but follows the same workflow.
Stop the VMs:
Stop-AzVmss -ResourceGroupName "<myResourceGroup>" -VMScaleSetName "<myScaleSet>"Update the Accelerated Networking property under the NIC:
$vmss = Get-AzVmss -ResourceGroupName "<myResourceGroup>" -VMScaleSetName "<myScaleSet>"

$vmss.VirtualMachineProfile.NetworkProfile.NetworkInterfaceConfigurations[0].EnableAcceleratedNetworking = $true

Update-AzVmss
  -ResourceGroupName "<myResourceGroup>" `
  -VMScaleSetName "<myScaleSet>" `
  -VirtualMachineScaleSet $vmss
Virtual Machine Scale Sets has an upgrade policy that applies updates by using automatic, rolling, or manual settings. Set the upgrade policy to automatic so that the changes are immediately picked up.
$vmss.UpgradePolicy.Mode = "Automatic"

Update-AzVmss
  -ResourceGroupName "<myResourceGroup>" `
  -VMScaleSetName "<myScaleSet>" `
  -VirtualMachineScaleSet $vmss
Restart the scale set:
Start-AzVmss -ResourceGroupName "<myResourceGroup>" -VMScaleSetName "<myScaleSet>"
Once you restart and the upgrades finish, the virtual function (VF) appears inside VMs that use a supported OS and VM size.
Resize existing VMs with Accelerated Networking
VMs with Accelerated Networking enabled can be resized only to sizes that also support Accelerated Networking. You can't resize a VM with Accelerated Networking to a VM instance that doesn't support Accelerated Networking by using the resize operation. Instead, use the following process to resize these VMs:
- Stop and deallocate the VM or all the VMs in the availability set or Virtual Machine Scale Sets.
- Disable Accelerated Networking on the NIC of the VM or all the VMs in the availability set or Virtual Machine Scale Sets.
- Move the VM or VMs to a new size that doesn't support Accelerated Networking, and restart them.
Manage Accelerated Networking through the portal
When you create a VM in the Azure portal, you can select the Enable accelerated networking checkbox on the Networking tab of the Create a virtual machine screen. If the VM uses a supported operating system and VM size for Accelerated Networking, the checkbox is automatically selected. If Accelerated Networking isn't supported, the checkbox isn't selected, and a message explains the reason.
Note
You can enable Accelerated Networking during portal VM creation only for Azure Marketplace supported operating systems. To create and enable Accelerated Networking for a VM with a custom OS image, you must use PowerShell or Azure CLI.
To enable or disable Accelerated Networking for an existing VM through the Azure portal:
- From the Azure portal page for the VM, select Networking from the left menu.
- On the Networking page, select the Network Interface.
- At the top of the NIC Overview page, select Edit accelerated networking.
- Select Automatic, Enabled, or Disabled, and then select Save.
To confirm whether Accelerated Networking is enabled for an existing VM:
- From the Azure portal page for the VM, select Networking from the left menu.
- On the Networking page, select the Network Interface.
- On the NIC Overview page, under Essentials, note whether Accelerated networking is set to Enabled or Disabled.
Next steps
Feedback
Coming soon: Throughout 2024 we will be phasing out GitHub Issues as the feedback mechanism for content and replacing it with a new feedback system. For more information see: https://aka.ms/ContentUserFeedback.
Submit and view feedback for