Hosted machine group
Hosted machine group allows you to run unattended automation at scale without providing or setting up any machines. You can create hosted machine groups like any other machine group, and Power Automate will automatically provision the machines based on the specified configuration.
Desktop flows assigned to a hosted machine group get queued to it when triggered to run. Then, like for any machine group, the next desktop flow in the queue runs when a bot in the group is available. To find more information about queues, go to Monitor desktop flow queues.
Here are some of the key features of hosted machine group:
- Run unattended desktop flows at scale.
- Autoscale the number of bots in your hosted machine group based on current workloads.
- Load balance bots across all hosted machine groups in an environment.
- Work or school account integration: Enables access to resources that are part of the business plan linked to your organization, such as Office, SharePoint, and Azure.
- Vanilla or Custom VM images: Use a vanilla VM image provided by Microsoft or personalize your hosted machine group by providing your own Windows image directly from your Azure Compute Gallery.
Licensing requirements
To use hosted machine group, you need the following licensing option:
Use your existing Power Automate Premium plan (formerly, Power Automate per user plan with attended RPA), or Power Automate Process plan (formerly, Power Automate per flow plan) and the Power Automate hosted RPA add-on.
You need to assign to your environment as many add-ons as the number of hosted bots you want to run in parallel in your environment.
Trial licenses for evaluation
To evaluate the hosted machine group, you need one of the following trial licensing options:
Use the Power Automate Premium plan (previously Power Automate per user with attended RPA) and the Power Automate hosted RPA add-on trials.
The Power Automate hosted RPA add-ons have trial versions that last 30 days and can be extended once to a total of 60 days. Organization admins can obtain up to 25 seats from the Microsoft 365 admin center, and assign the hosted RPA add-ons to the targeted environment.
Use the 90-days self-assisted premium trial.
Trial users can create up to 10 hosted machine groups and have up to two bots running in parallel in a given environment. To start a trial, select Try free under Power Automate Premium in the Power Automate pricing page or the desktop flow page of the Power Automate portal.
Prerequisites
This section presents all the prerequisites to create and use hosted machine groups.
Get access to the default VM image
To create a hosted machine group, you need access to the default VM image that is part of your environment. You can view the default image in Monitor > Machines > VM images.

Note
- Users need either the System Administrator or Desktop Flow Machine Image Admin role to see and manage the default image.
- For other users, the System Administrator or Desktop Flow Machine Image Admin has to share the default image with them before they can use it.
Share the default image
Sign in to Power Automate.
Go to Monitor > Machines > VM images.
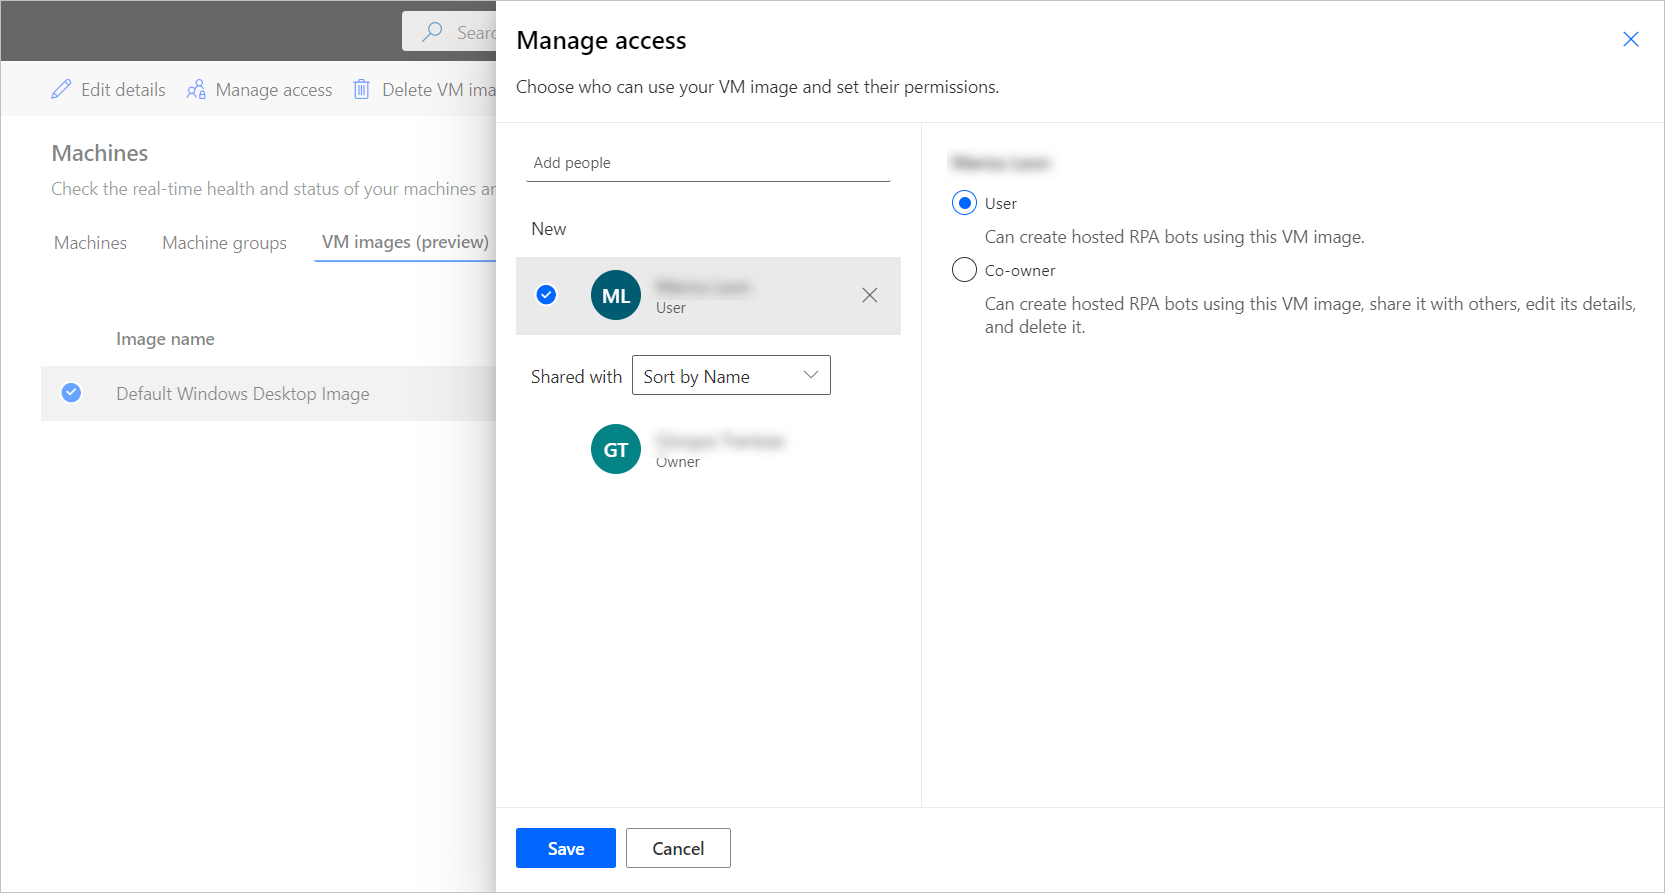
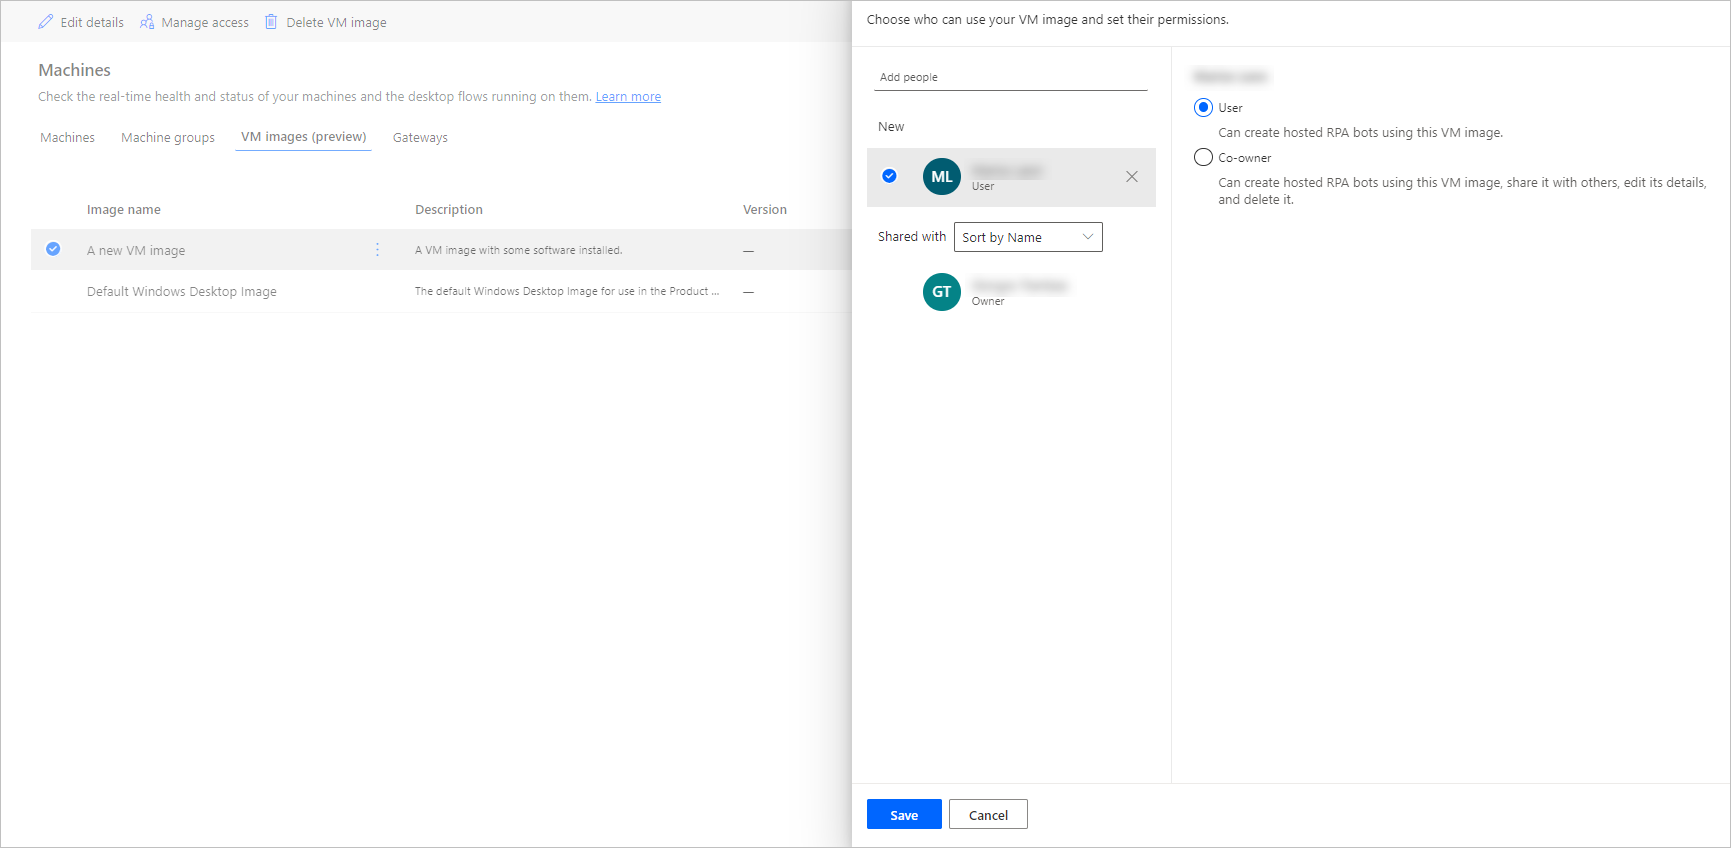
Select the default windows desktop image from the list, and then Manage access.
Select Add people, and then enter the names of the persons in your organization with whom you'd like to share the image.
Select the names of the persons and which permissions they have to get access to the machine or co-own it as well.
Select Save.
Note
When users aren't part of an environment anymore, you can continue to see them as deactivated users. You'll be notified in the Manage access section of the image if it's shared with deactivated users. In this situation, remove access to them.
Create hosted machine groups
To create a hosted machine group:
Sign in to Power Automate.
Go to Monitor > Machines.
Select New > Hosted machine group.
In the hosted machine group creation wizard
Enter a name for your hosted machine group, then optionally add a description.
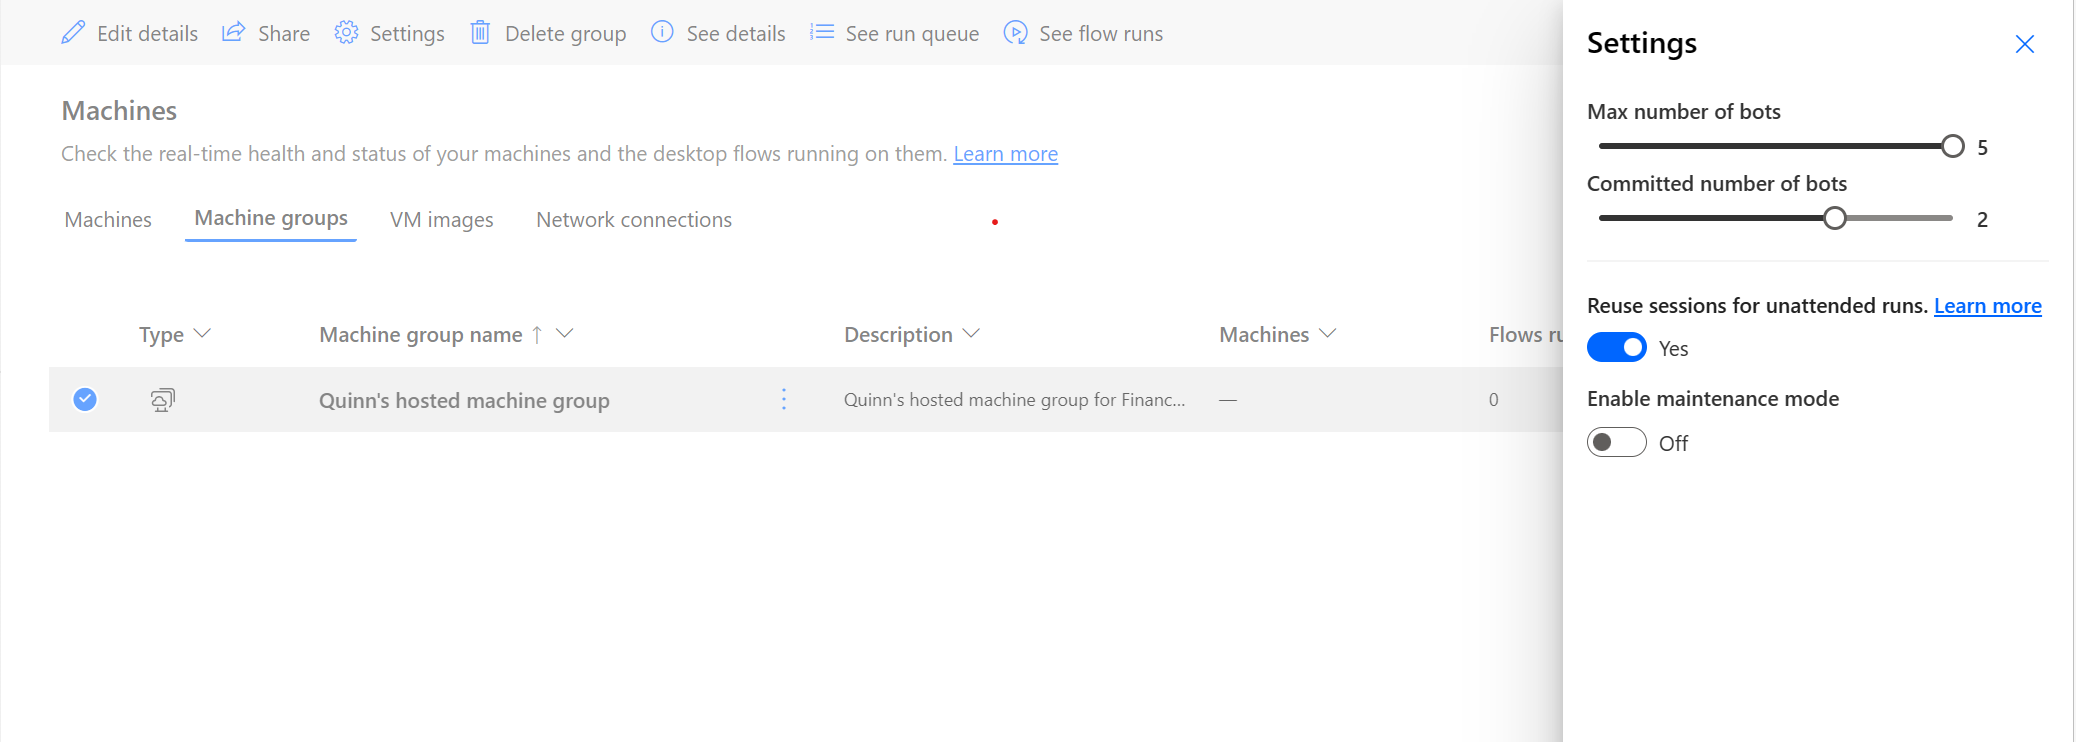
Determine if you want to reuse a Windows session in unattended mode.
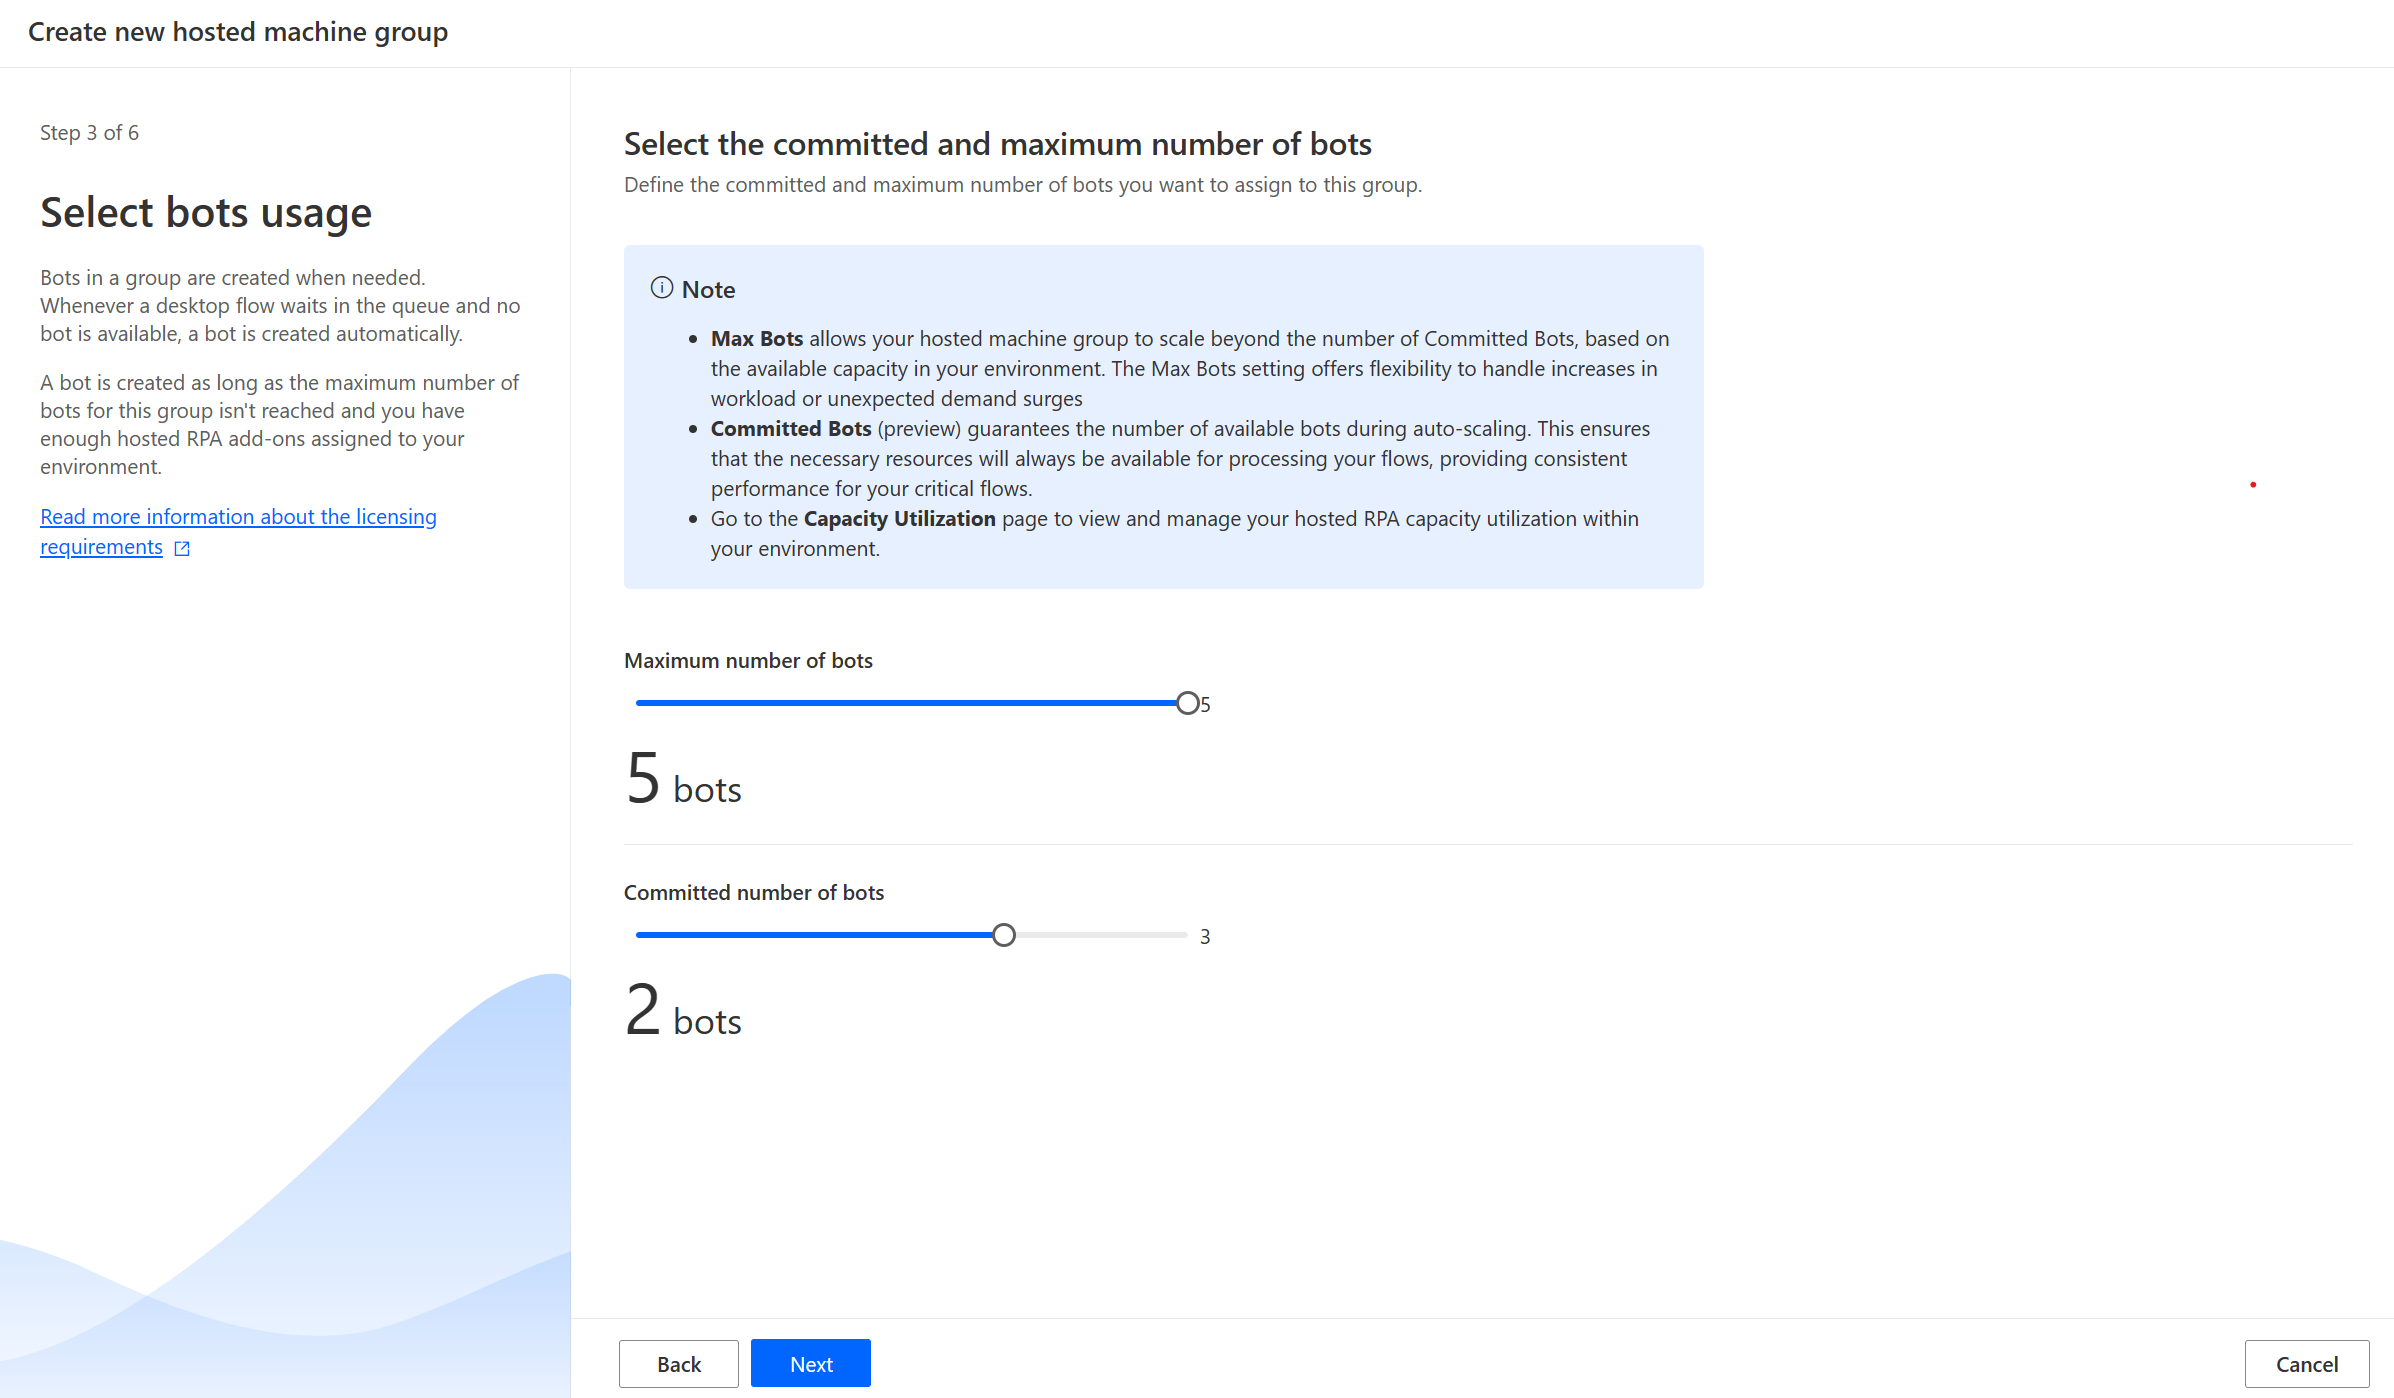
Define the maximum number of bots you want to assign to this group.
Note
- Max bots allow your hosted machine group to automatically scale to the max bots configuration when required and when resources are available.
- If multiple hosted machine groups are used in the same environment, bots are automatically load balanced between the groups.
- You can't exceed the total number of hosted RPA capacity assigned to your environment.
- To find more information about load balancing, go to Load balance hosted machine groups.
- Define the committed number of bots (optional) you want to assign to this group.
Note
- Committed bots guarantee your hosted machine group to automatically scale to the committed bots configuration when required.
- The sum of hosted machines and committed bots configured in your environment can't exceed the hosted RPA capacity assigned to the environment. View usage of hosted RPA capacity in your environment in the Hosted RPA capacity utilization dashboard.
Select the VM image to use for your hosted machine group. A proposed default Windows 11 image called Default Windows Desktop Image is available. If you don't see it, make sure you followed the steps described in Prerequisites.
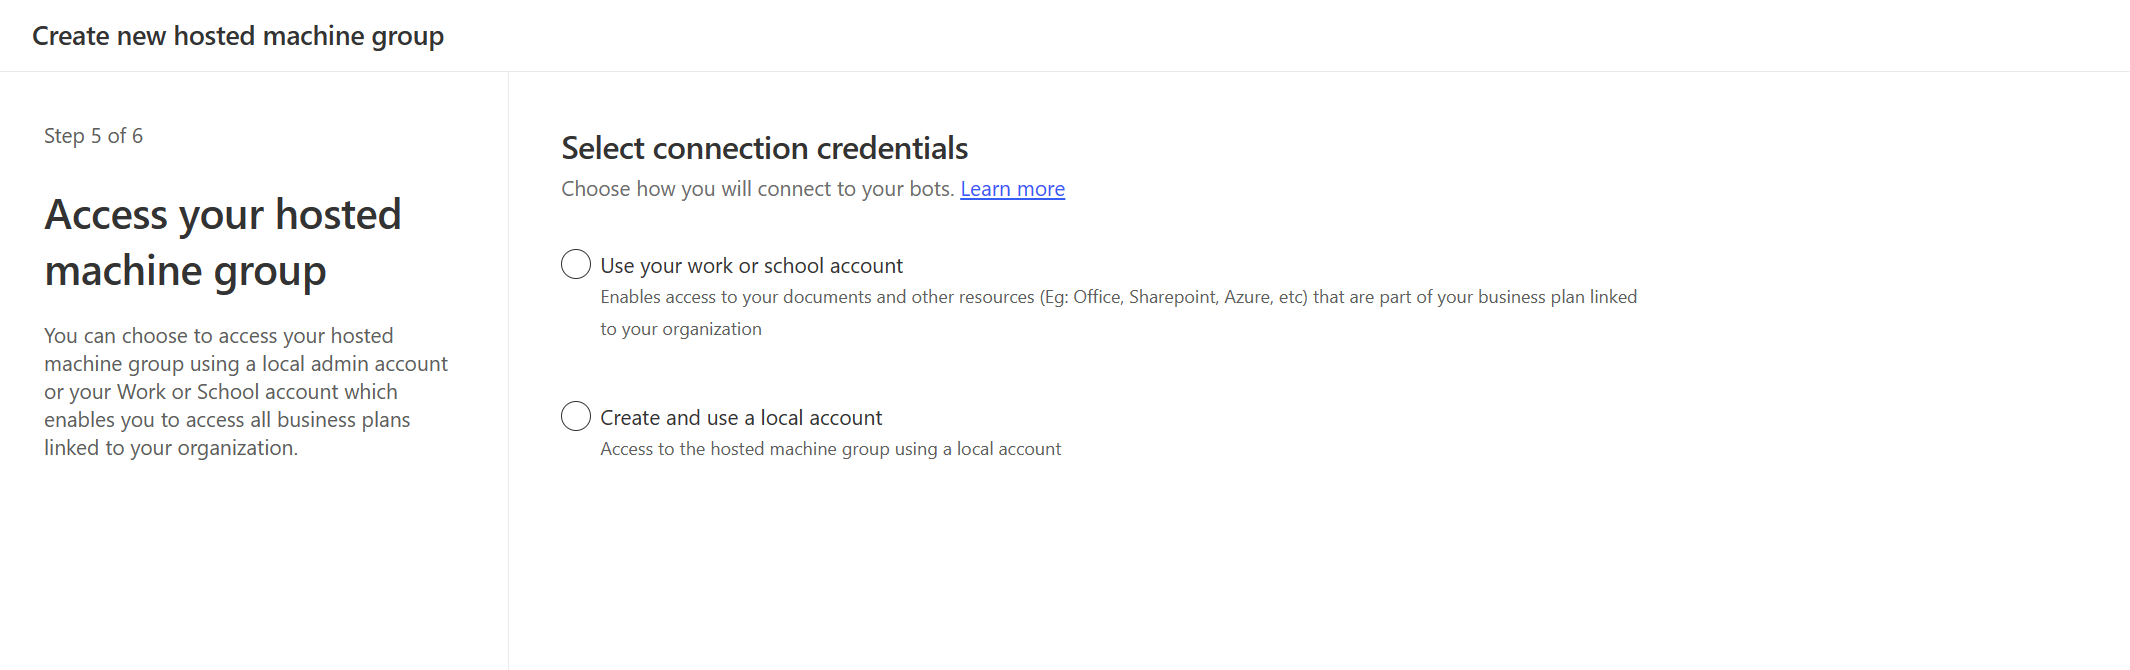
Select how you would like to access your hosted machine group. You can use your work or school account or use a local admin account you want created. This account is used to run your automations by the bots.
Note
If you select work or school account, enter your email address (and not domain\username) when creating a connection to the hosted machine group.
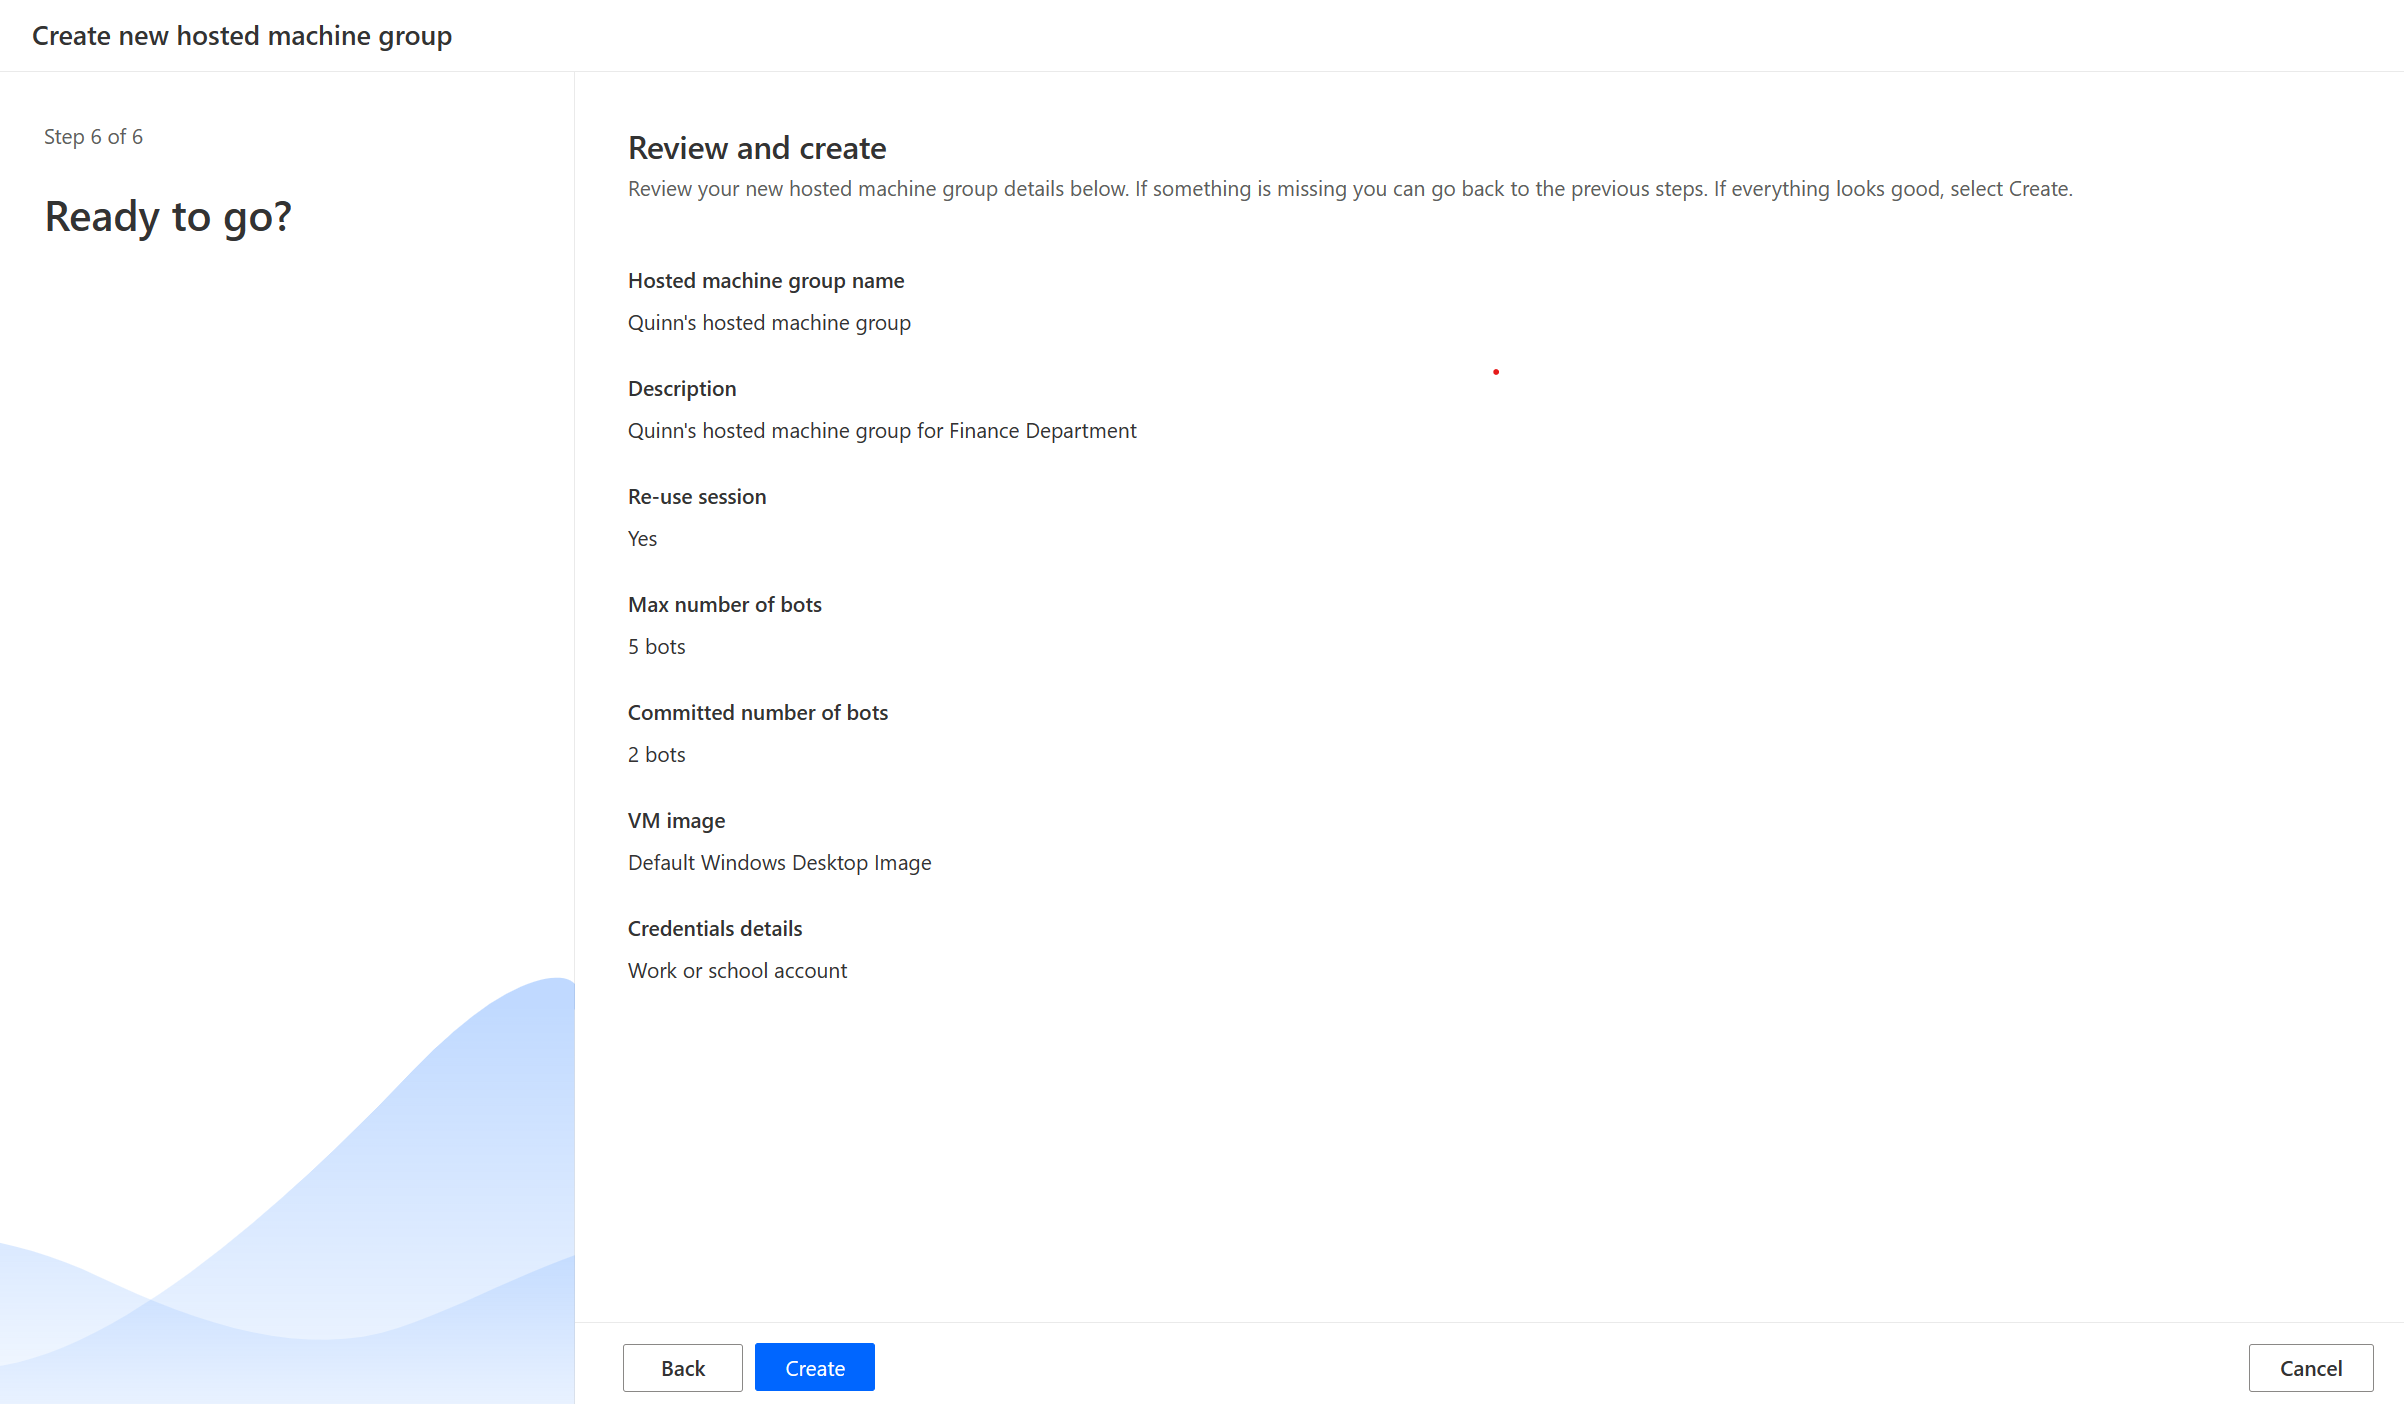
- Review and create your hosted machine group.
Hosted machine groups availability
Hosted bots in a hosted machine group are created when needed. Whenever a desktop flow waits in the queue and no bot is available, a bot is created automatically. A bot is created as long as the maximum number of bots for this group isn't reached and you have enough unattended add-ons assigned to your environment. You can find more information about licensing requirements in Licensing requirements.
Note
If the hosted machine group has just been created or hasn't been used for more than three hours, hosted bots are created before a run gets addressed from the queue. The creation of a bot can take more than 10 minutes depending on its configuration.
Use custom VM images for your hosted machine groups
You can personalize your hosted machine groups by providing your own Windows image directly from your Azure Compute Gallery. This feature allows you to have all your applications installed on your hosted machine group.
Image requirements
Custom VM images must meet the following requirements:
- Generation 2 images
- Generalized VM image
- 127-GB limit on VM image size
- Microsoft Edge version 80 or higher
- The image definition is recommended to have trusted launch enabled as the security type
Learn how to create a generalized VM image in Azure in Upload a generalized Windows VHD and use it to create new VMs in Azure.
Create an Azure compute gallery in Azure and add an image
Go to the Azure portal.
Create a new Azure Compute Gallery and select Role based access control (RBAC) in the Sharing tab.
Select Review + create, and once you've validated all the settings, select Create.
Once you've created an Azure Compute Gallery, create an image definition following the steps in Create an image definition and an image version. You should create the image in the exact location where we deploy your hosted machine group. You can find the following mapping with your environment Geo:
- Asia: East Asia
- Australia: Australia East
- Brazil: Brazil South
- Canada: Canada Central
- Europe: North Europe
- France: France Central
- Germany: Germany West Central
- India: Central India
- Japan: Japan East
- Korea: Korea Central
- Norway: Norway East
- South Africa - South Africa North
- Southeast Asia - Singapore
- Switzerland: Switzerland North
- United Arab Emirates: UAE North
- United Kingdom: UK West (UK South from May 2nd, 2024)
- United States: West US (East US from May 2nd, 2024)
Important
Starting May 2nd, 2024, we will be updating the region mapping for environments in the United States and United Kingdom to ensure our services are deployed in regions with Azure Availability Zones support. For more information, see the geographic availability and restrictions.
Share the Azure compute gallery with Power Automate Hosted Machine Groups service principal
To use the image in Power Automate, you need to share the image with Power Automate through the Azure portal.
In the Azure portal, go to your Azure Compute Gallery.
Go to the Access Control (IAM) settings.
Select Add > Add role assignment.
Select the role Reader and search for the Hosted machine group application: Power Automate Hosted Machine Groups. This allows our service to access the image to create the Hosted machine group.
Note
If you can't find the application above, verify that the application exists in your tenant and provision it if necessary. To verify that the application exists, go to Azure portal > Microsoft Entra > Enterprise applications > All applications, and search for application id: 51699864-8078-4c9e-a688-09a1db1b2e09. If you can't find the application, provision it using the following command:
az ad sp create --id 51699864-8078-4c9e-a688-09a1db1b2e09
Share the gallery with Power Automate makers
The last step before using your image in Power Automate is to share the image with the Power Automate makers.
In the Azure portal, go to your Azure Compute Gallery.
Go to the Access Control (IAM) settings.
Select Add > Add role assignment.
Assign at least Reader permissions access to the Power Automate makers you want to share the gallery with. Then select Next.
Select Select members and search for the Power Automate makers you want to share with.
Once you've selected all the members to add, review the permissions and users, and assign them.
Add a new custom VM image
Sign in to Power Automate.
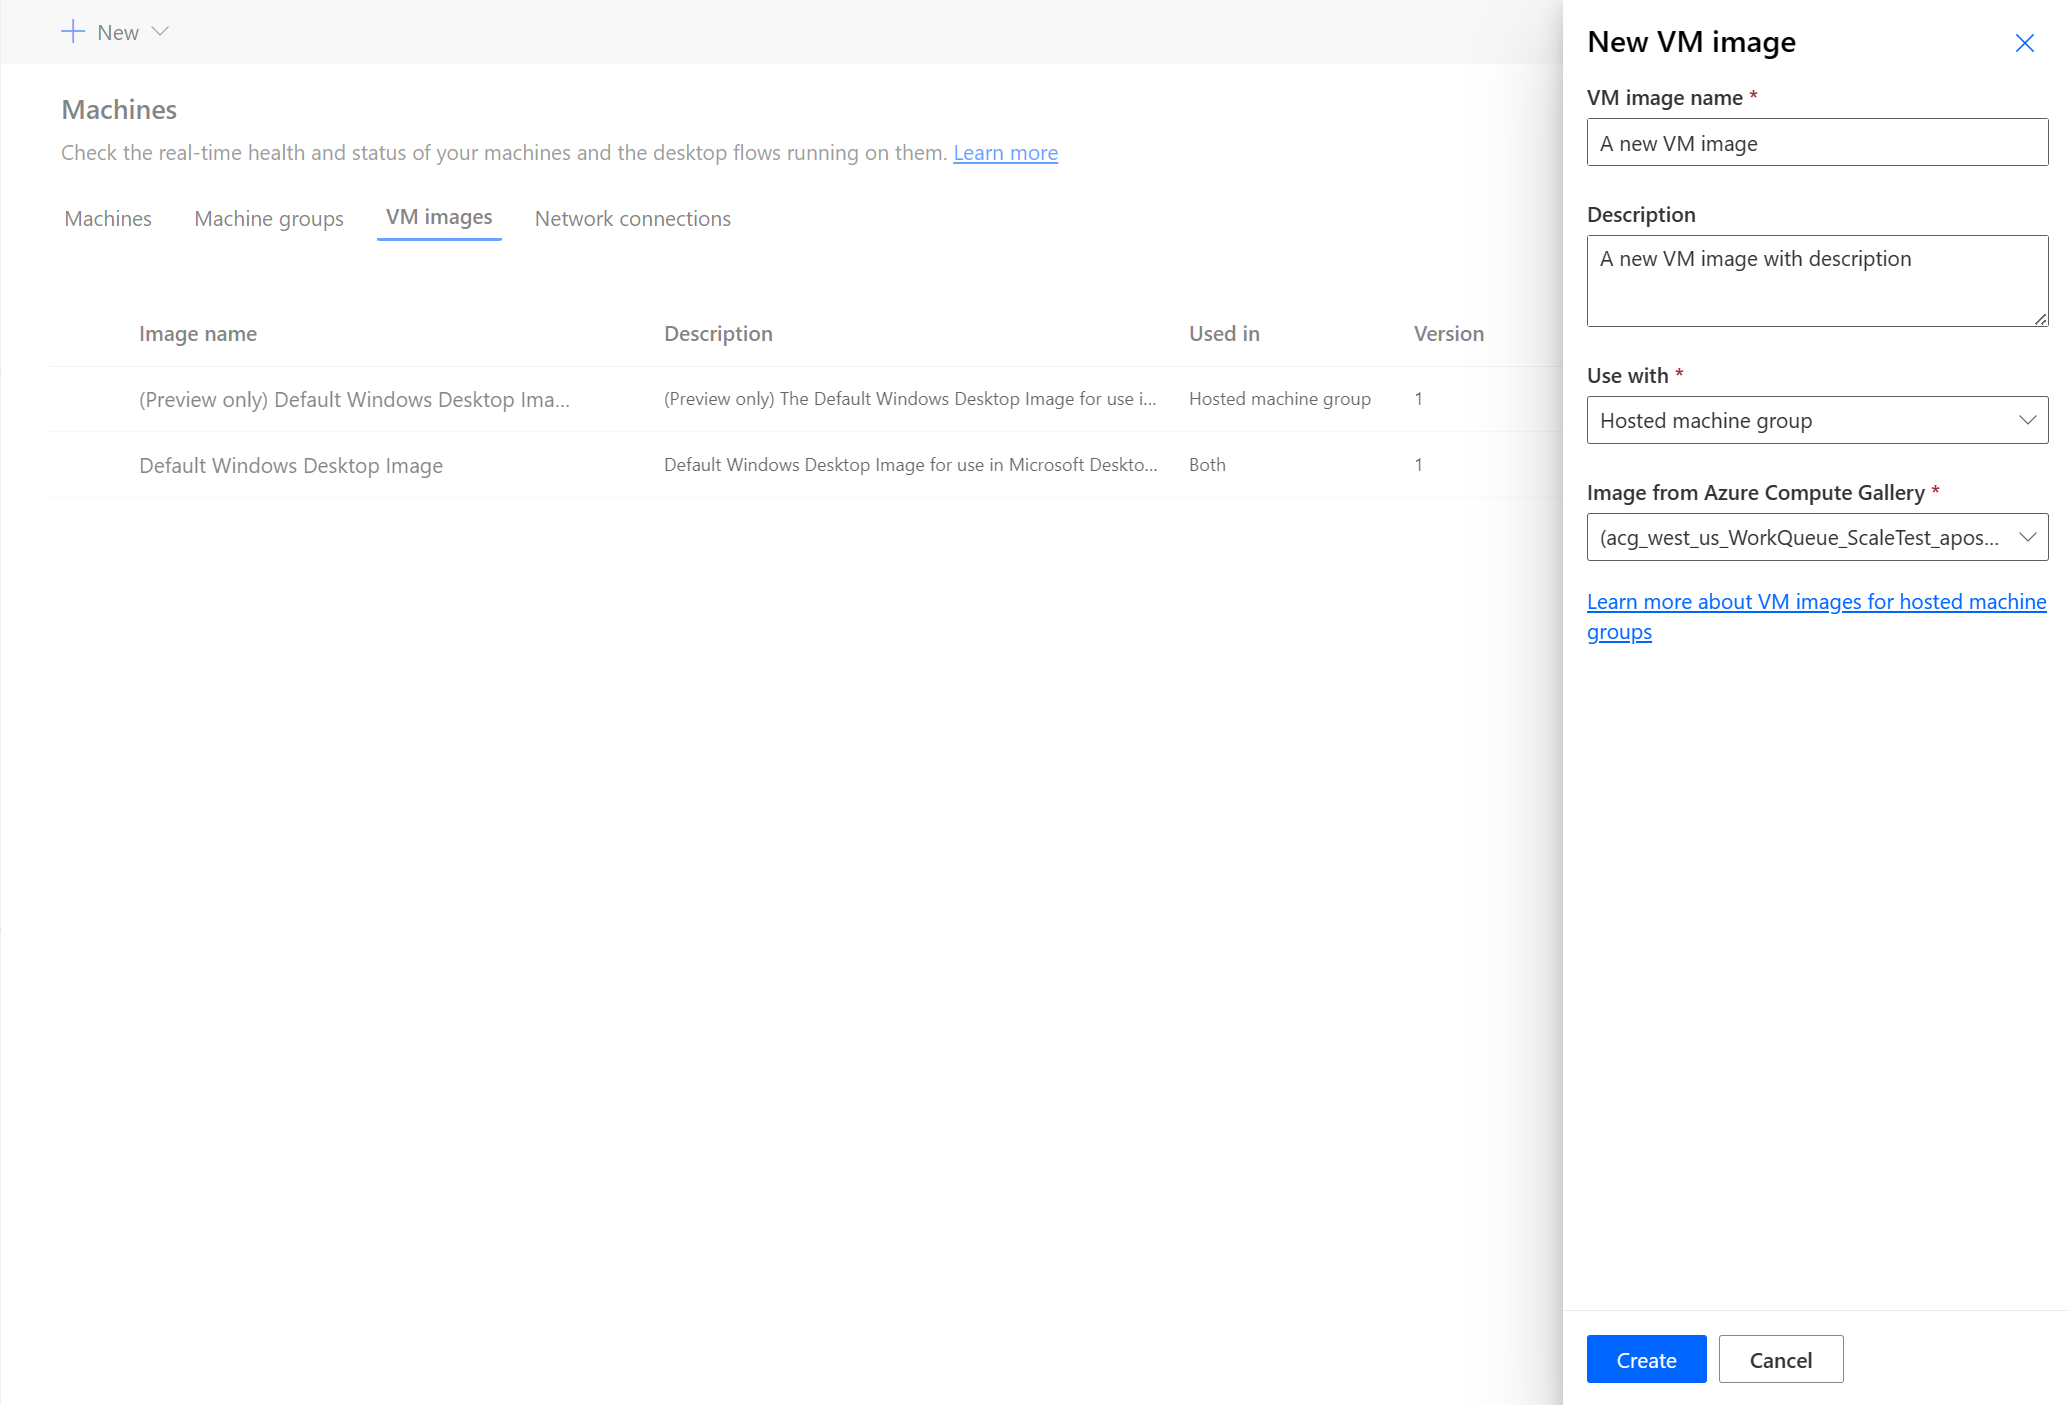
Select New > VM image.
Enter an image name, a description, and the usage.
- Image name: A unique name to identify the image.
- Image description: An optional description for the image.
- Use with: Select either Hosted machine group or Both, if you want the image to work with both hosted machines and hosted machine groups.
Select one of the images that you have access to from the Azure Compute Gallery.
Note
- The image needs to be replicated in the same Azure region as the hosted machine group.
- The list of images available may vary depending on the usage you are selecting.
Share the image
Sign in to Power Automate.
Go to Monitor > Machines > VM images.
Select the image you've created.
Select Manage access.
Select Add people and enter the names of the persons in your organization with whom you'd like to share the image.
Select the names of the persons and choose with which permissions they can access the image.
Select Save.
Note
When a user isn't part of an environment anymore, you can continue to see it as a deactivated user. You'll be notified in the Manage access section of the image if it's shared with deactivated users. In this situation, remove access to them.
View list of hosted machine groups
Once you've created your hosted machine group in an environment, you can view its details in the Power Automate portal.
Sign in to Power Automate.
Go to Monitor > Machines.
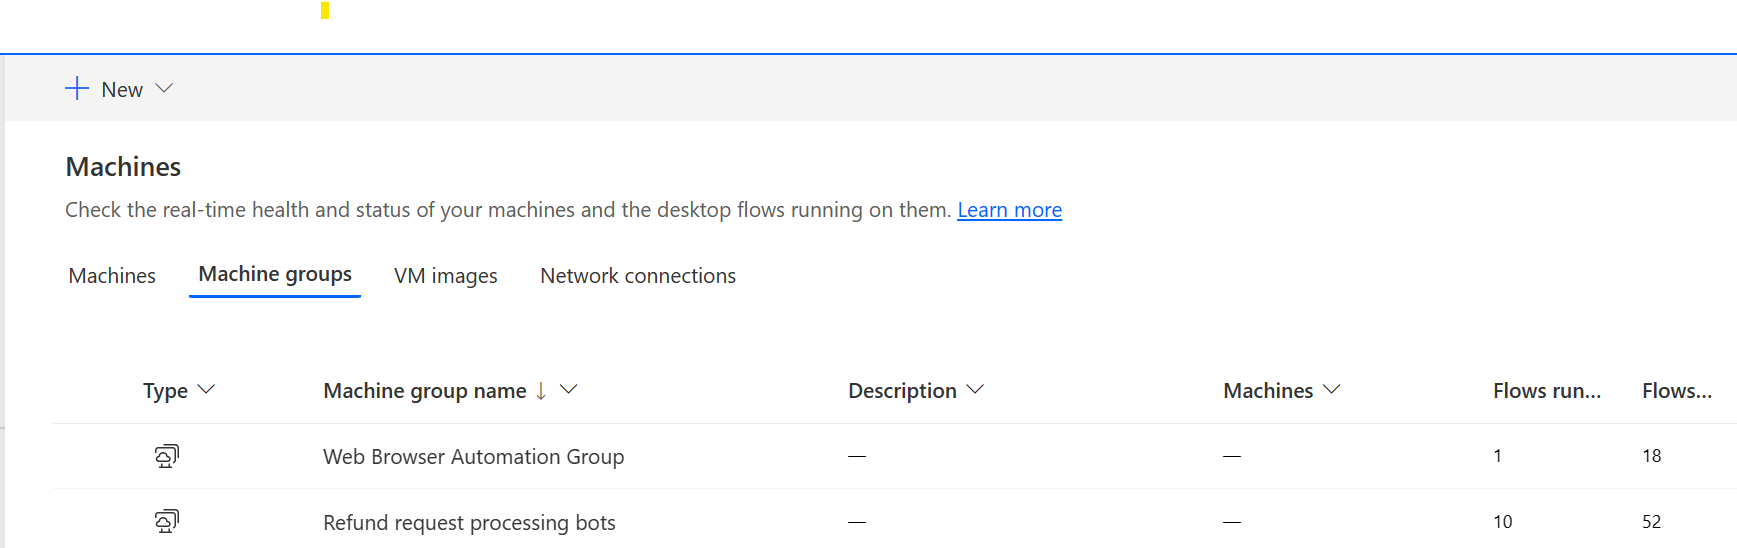
Select Machine groups.
The list contains both hosted machine groups and standard machine groups. For each item in the list, you can see:
- The name of the item.
- The description of the item.
- The number of the machines in the group (only for standard machine groups).
- The number of flows running in the item.
- The number of flows queued in the item.
- The type of access you have to the item.
- The owner of the item.
Selecting a hosted machine group in the list takes you to the machine group's details page where you can:
- View and edit the details of the hosted machine group.
- Update the VM image used by the hosted machine group.
- Monitor the machine group's run queue.
- View past runs.
- List existing connections referencing the hosted machine group.
- View provisioning errors on the hosted machine group, if any.
- Manage access by sharing (or not) the hosted machine group.
- Delete the hosted machine group.
Share hosted machine groups
You can share your hosted machine groups with other users so they can create connections and run desktop flows on them. To share a hosted machine group:
Sign in to Power Automate.
Select Monitor > Machines.
Select the Machine groups tab.
Select a hosted machine group in the list, or navigate to the details page of the desired hosted machine group.
Select Manage access.
Populate the username or email you want to share the hosted machine group with, and select the user you want to add.
For each user you can grant different permissions: User or Co-owner.
User permission only allows the targeted user to run desktop flows on the selected hosted machine group. A Co-Owner can also edit the hosted machine's group details.
Note
When a user isn't part of an environment anymore, you may continue to see the user as a deactivated user. You'll be notified in the Manage access section of the hosted machine if it's shared with deactivated users. In this situation, remove access to them.
Run desktop flows on hosted machine groups
Power Automate enables you to trigger desktop flows on your hosted machine groups as you do on standard machine groups. To implement this functionality, you need a desktop flow connection to your hosted machine group.
To find more information about triggering desktop flows from cloud flows, go to Trigger desktop flows from cloud flows.
Important
- Only direct connectivity connections are supported for hosted machine groups.
- Only available for unattended run mode.
- Desktop flows targeting hosted machine groups aren't yet compatible with the Test flow feature. It's possible that you observe errors when trying to test your flow. This problem is due to the nature of the machine groups availability. The scheduled test run will still be accessible from the flow run history.
Monitor your hosted machine groups
You can't directly access or sign in to your hosted machine groups. They're not persisted unless they're running desktop flows. Hosted bots in a group are created based on the current size of the queue, the configuration of the group, and the licenses assigned to the current environment.
For instance, if the hosted machine group is newly created or it wasn't used for more than 3 hours, new hosted bots might need to be provisioned before desktop flow runs. The creation of a bot takes at least 10 minutes, depending on the type of VM Image in use. It's expected that the queue would appear stuck for more than 10 minutes before desktop flows start running.
After this process, new hosted bots are provisioned to run desktop flows in the queue as efficiently as possible.
To monitor your hosted bots:
Sign in to Power Automate.
Go to Monitor > Machines.
Select Machine groups.
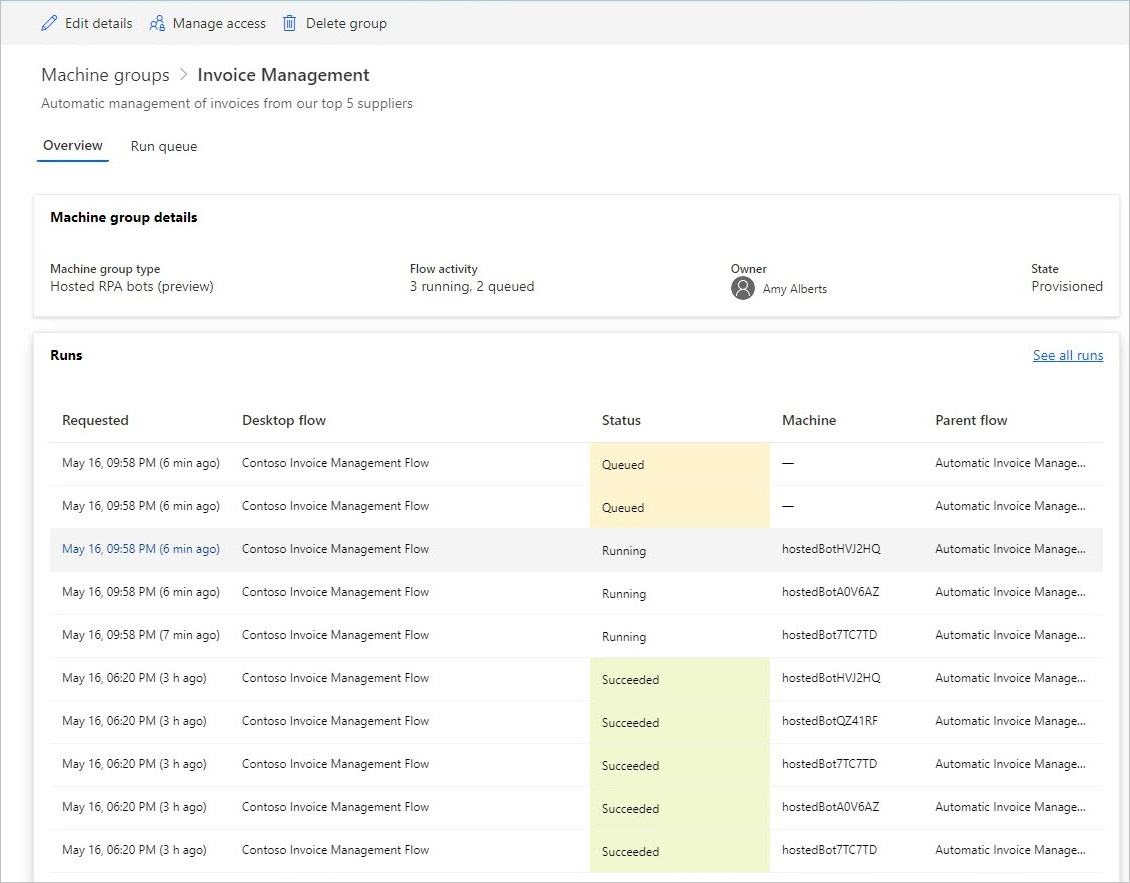
Select one of your hosted machine groups.
In the following example, two hosted bots are available to pick up the first two desktop flows in the queue, and three other desktop flows are queued. The desktop flow runs are marked as Running or Queued to indicate their state.

After a few minutes, another bot is provisioned to run a third flow as the queue is large enough.
Load balance hosted machine group
The key feature of hosted machine groups is the ability to automatically load balance hosted bots between different groups, hence optimizing your automation resources seamlessly between your different workloads.
The number of hosted bots that can run in your environment is equal to the number of hosted RPA capacity you've assigned to your environment excluding the number of hosted machines provisioned in the environment (for example, if you have 10 Hosted RPA assigned to your environment, and two hosted machines provisioned, then the number of hosted bots that can run in your environment will be eight). This capacity is then load balanced across all the hosted machine groups you have in your environment. Each hosted machine group has a max bot and committed bot configuration that enables you to control the scaling capabilities of the hosted machine group.
The hosted machine group requests to scale out when there aren't enough hosted bots to run desktop flows. It takes into consideration the max and committed bot configuration in the hosted machine group and the available capacity in the environment. The hosted machine group scale-in when the desktop flow queue is lesser than the number of available hosted bots. This capacity then becomes available to other hosted machine groups in the environment.
Note
- Max bots allow your hosted machine group to automatically scale to the max bots configuration when required and when resources are available.
- Committed bots guarantee your hosted machine group to automatically scale to the committed bots configuration when required.
- View usage of hosted RPA capacity in your environment in the Hosted RPA capacity utilization dashboard.
To update the scaling configuration of your hosted machine group:
Sign in to Power Automate.
Select Monitor > Machines.
Select Machine groups.
Select one of your hosted machine groups.
Select Settings at the top of the page.
Hosted machine group scaling & load balancing example
In this example, the customer has 10 hosted RPA capacity assigned to the environment and has configured three hosted machine groups with the following configuration.
| Hosted machine group name | Max bots | Committed bots |
|---|---|---|
| Invoice Processing | 10 | 4 |
| New Sales Processing | 10 | 4 |
| Refund Request Processing | 10 | 2 |
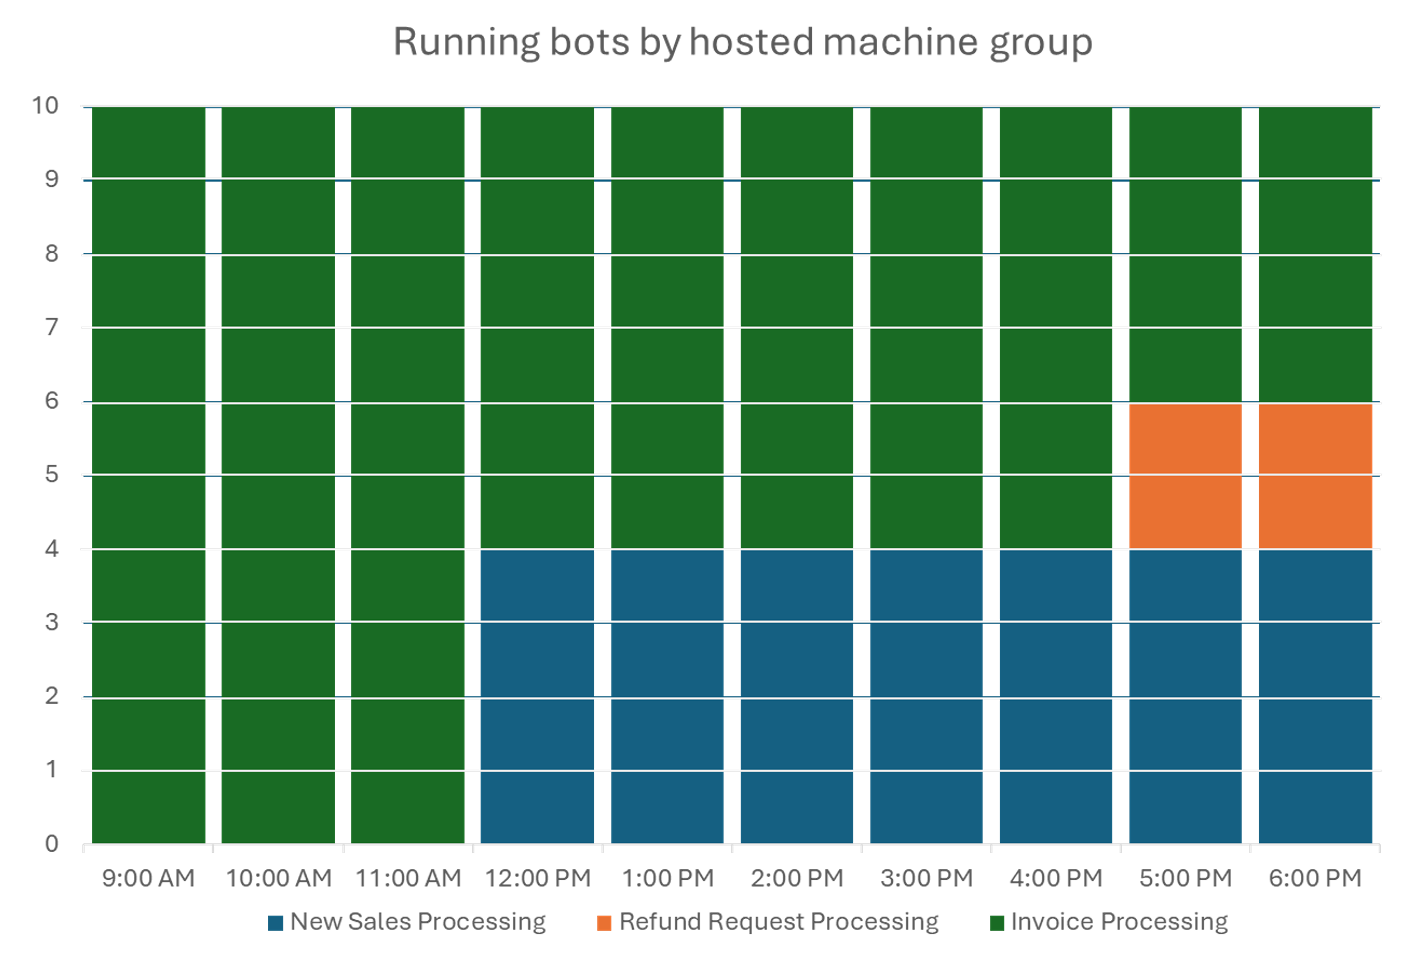
| Time | Event |
|---|---|
| 9AM - 11:59 AM | The Invoice Processing group has a high volume of desktop flow jobs and autoscales to 10 hosted bots (Max bots configuration) as no other groups have desktop flow jobs. |
| 12PM - 4:59 PM | In addition to the high volume of desktop flow jobs for the Invoice Processing group, the New Sales Processing group now also has a high volume of desktop flow jobs queued, and therefore consumes the committed capacity of four hosted bots. |
| 5PM - 6:59 PM | In addition to the high volume of desktop flow jobs for the Invoice Processing and New Sales Processing groups, the Refund Request Processing group now also has a high volume of desktop flow jobs queued, and therefore consumes the committed capacity of two hosted bots. |
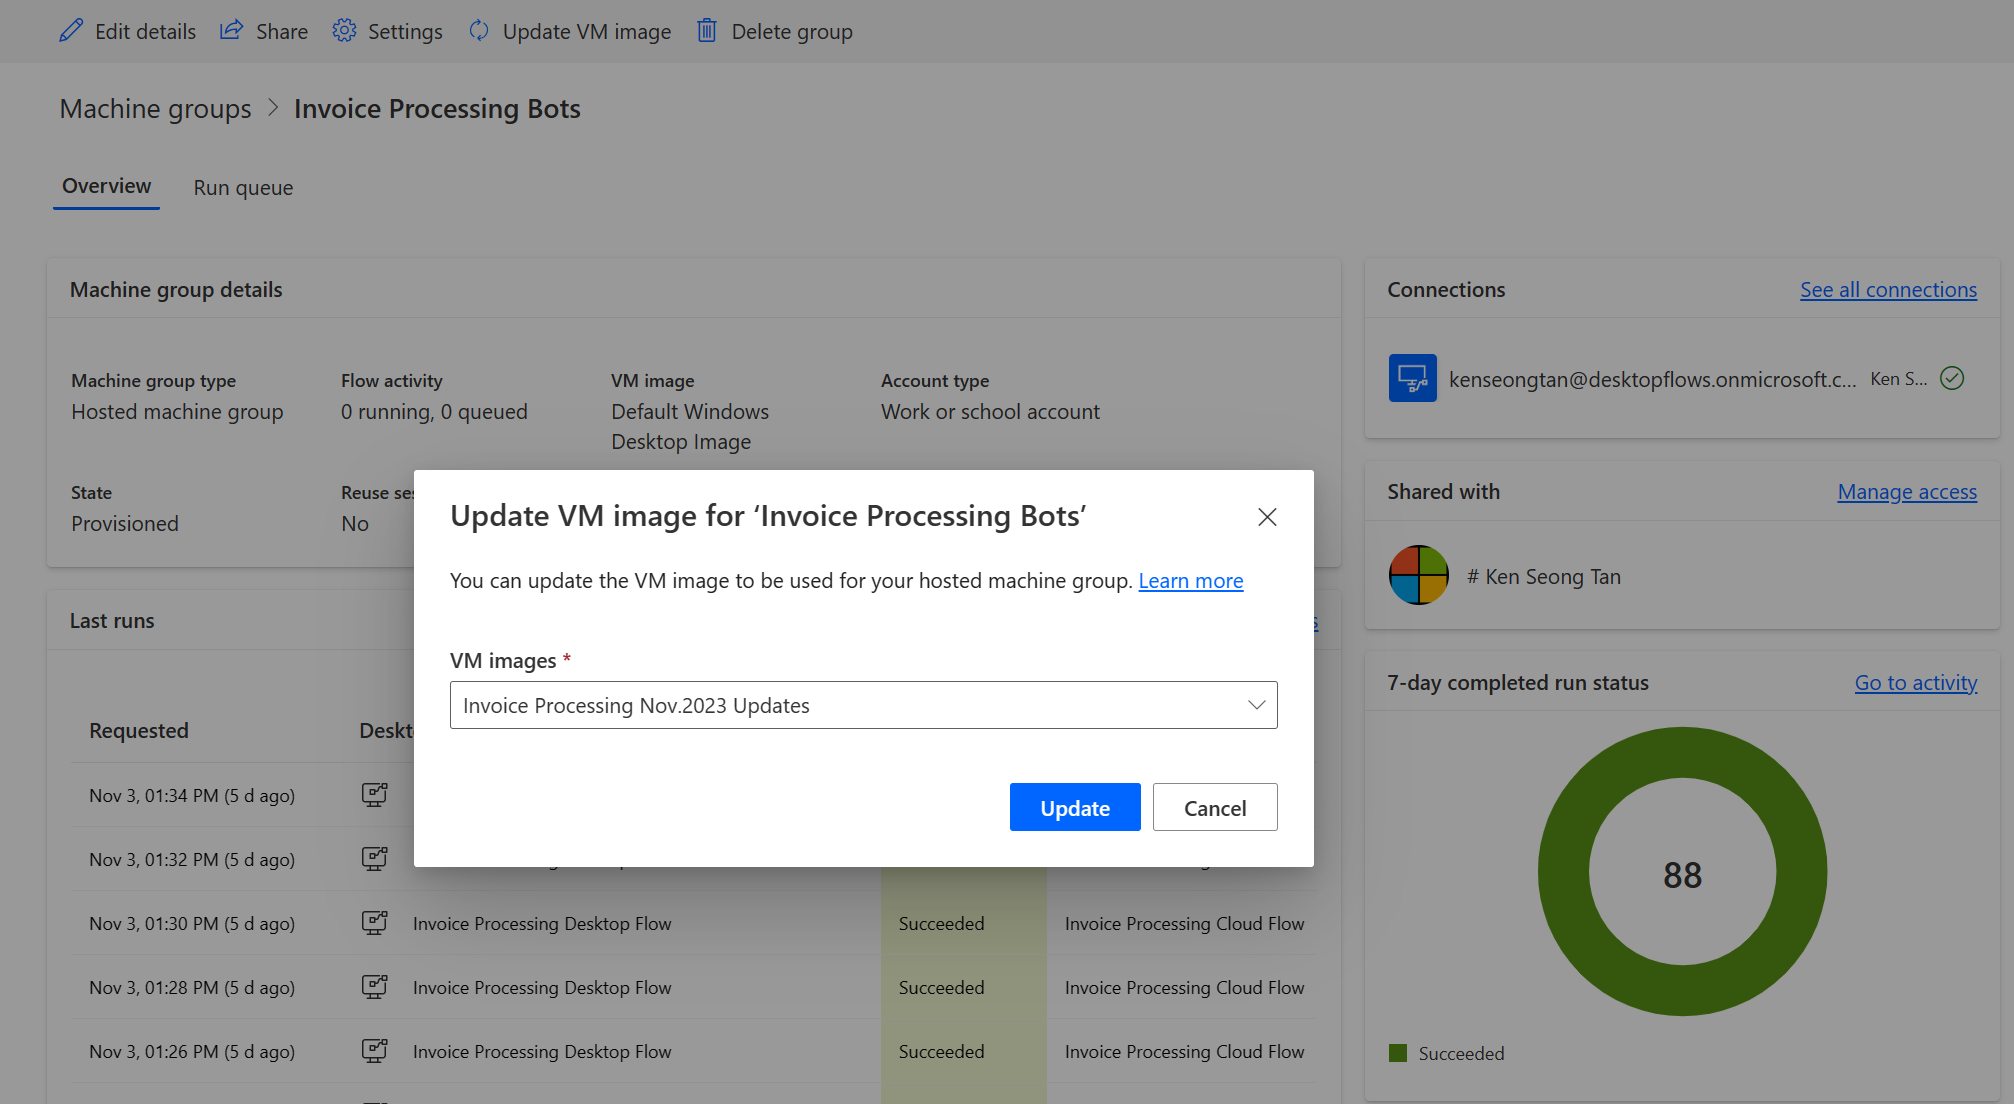
Update VM Image used by the hosted machine group
You can update the VM image that is used by your hosted machine group. This is beneficial in situations where a custom VM image requires software updates and additional customization to run desktop flows. This feature allows you to update the VM image to be used when creating new hosted bots in your hosted machine group, eliminating the need to delete and recreate it. To update VM image:
Sign in to Power Automate.
Select Monitor > Machines.
Select Machine groups.
Select one of your hosted machine groups.
Select Update VM image at the top of the page.
From the drop-down list, select the updated VM image to be used by the hosted machine group.
Note
- Upon updating of VM image, all existing hosted bots complete their ongoing desktop flow runs prior to being reprovisioned with the new VM image.
- The current and updated VM image must have the same security type. For example, you can't update from non-trusted launch enabled to trusted launch enabled, and vice versa.
Permissions based on security roles
Hosted machine group permissions and roles are iterations on top of Desktop Flows Machine Management permissions and roles. Hosted machine groups follow the same rules and privileges as regular machine groups.
Environment Maker role
By default, users with the Environment Maker role can create hosted machine groups in their environment. The four tables that require privileges to use hosted machine groups are:
- Flow Capacity Assignment
- Flow Machine
- Flow Machine Group
- Flow Machine Image
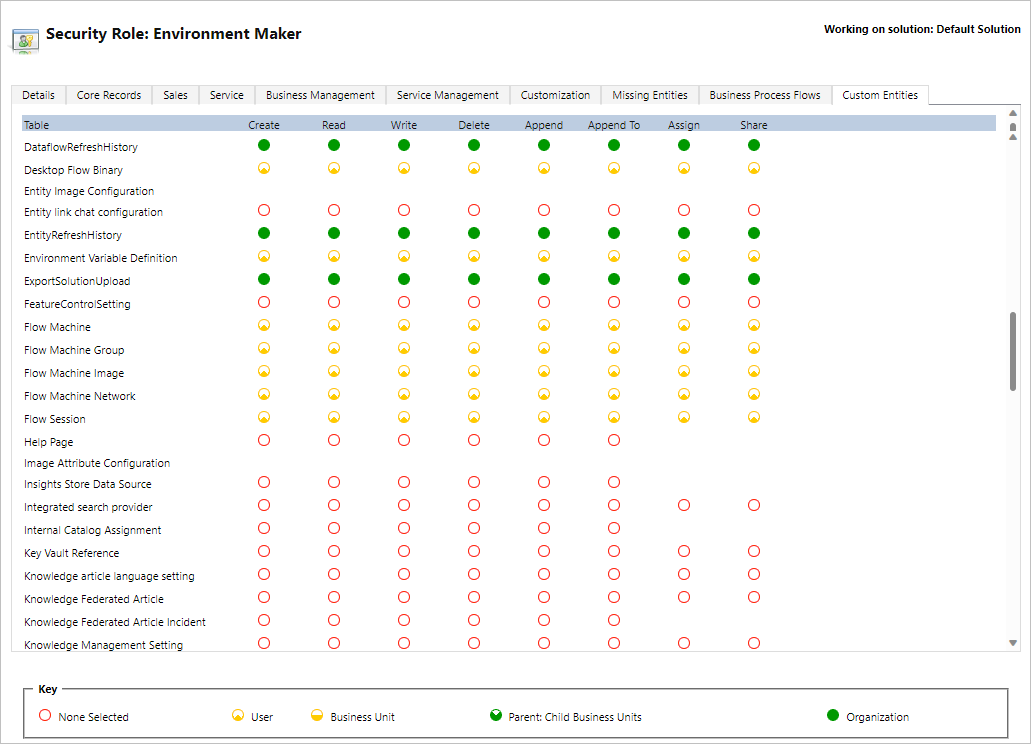
Environment Maker role can create and share custom VM images, as this functionality requires create and append privileges on the Flow Machine Image.
Admins can also use the roles provided as part of Desktop Flows. You can find more information about desktop flow security roles in Manage Machines.
Desktop Flows Machine Owner role
By default, Desktop Flows Machine owners can create hosted machine groups but can't create custom VM images. They can only use previously shared custom VM images in their own hosted machine groups.

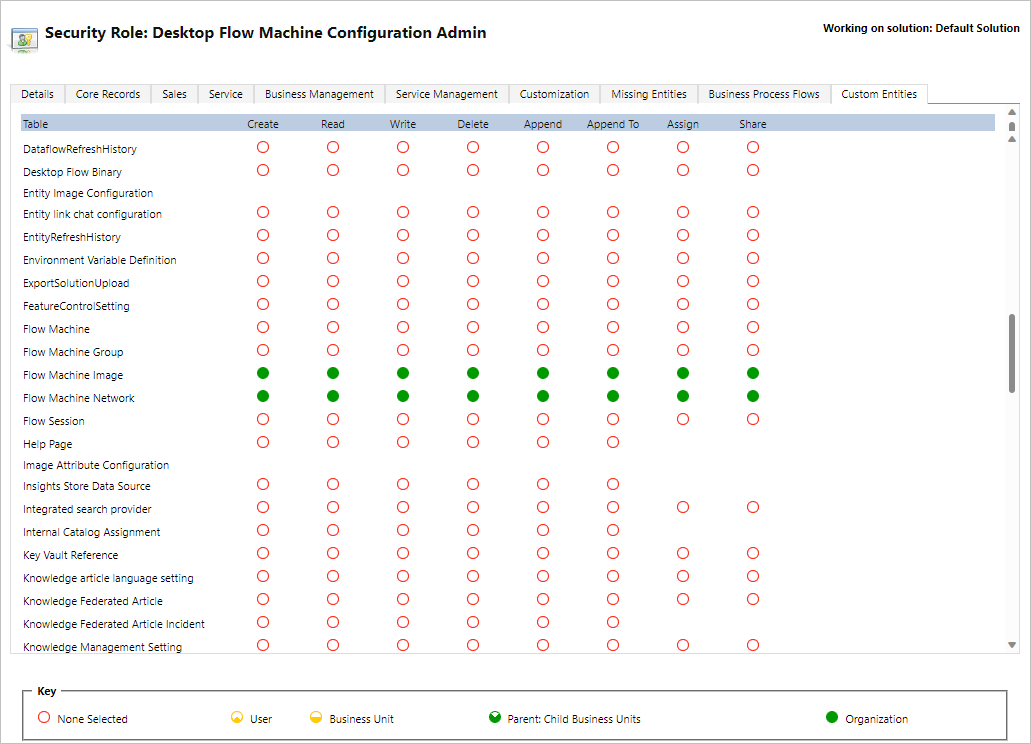
Desktop Flows Machine Configuration Admin role
The Desktop Flows Machine Image Admin role only brings full privileges on the Flow Machine Image entity. In particular, it allows users with this role to share/unshare VM images to be used for created hosted machine group in their environment. You can find more information about sharing pre-provisioned VM Images in Create hosted machine groups.
Use your work or school account
Hosted machine groups support work and school accounts. If you use your work or school account, your hosted machine group will have access to your resources that are part of the business plan linked to your organization, such as Office, SharePoint, Azure, and more.
When you register a hosted machine group with this access option, you won't be prompted for credentials. Instead, the machine will be registered to your Microsoft Entra, and you'll be able to sign in with your Microsoft Entra credentials. To create a desktop flow connection to target the hosted machine group, enter your work or school account email address and the associated password.
Disable/enable work or school accounts in an environment
The work or school accounts feature is enabled by default. System admins and environment admins can disable or enable the feature from the Power Platform admin center.
Sign in to the Power Platform admin center.
Go to Environments, and select the appropriate environment.
Select Settings > Features.
Under Hosted RPA, select the toggle for Enable work or school accounts for hosted machine groups to disable or enable this feature.
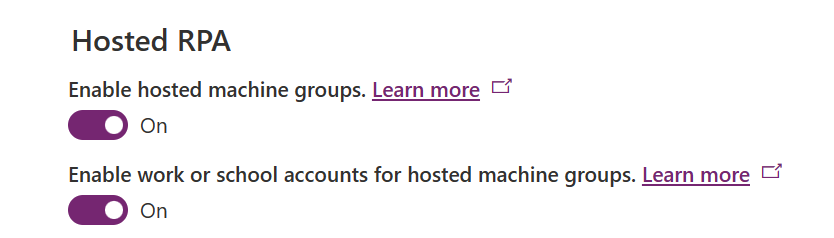
Select Save.
Note
Disabling this feature at the environment level will remove the Work or school account option in the hosted machine group creation wizard. Also, it will prevent any desktop flows from running using hosted machine groups configured with work or school accounts.
Disable work or school accounts at tenant level
To prevent users from creating hosted machine groups with work or school accounts at the tenant level, send a request to support to disable the feature at the tenant level.
Note
- Disabling this feature at tenant level won't hide the Work or school account option in the hosted machine group creation wizard. However, the hosted machine group creation will fail with an error.
- Desktop flows will continue to run using work or school account connection. You need to manually remove hosted machine groups that have been created with the Work or school account option.
Hosted machine groups limitations
This section presents all the limitation of hosted machine groups.
Geographic availability and restrictions
Important
Starting May 2nd, 2024, we will be updating the region mapping for environments in the United States and United Kingdom to ensure our services are deployed in regions with Azure Availability Zones support. This change will enhance the resiliency and availability of our services. The updated region mapping is as follows:
- United States: West US -> East US
- United Kingdom: UK West -> UK South
After the transition date, all new hosted machine groups will be provisioned in the updated region. If you have an existing hosted machine group that was provisioned before the transition, you will have the option to reprovision your hosted machine group via the Power Automate portal. If you’re using a custom VM image, please ensure that the VM image version has been replicated to the updated region before you reprovision your hosted machine group. Please ensure there are no desktop flow runs queued on the hosted machine group before you run the reprovision process.
The following list displays all the supported geographies in the public clouds:
- Asia
- Australia
- Brazil
- Canada
- Europe
- France
- Germany
- India
- Japan
- Korea
- Norway
- South Africa
- Southeast Asia
- Switzerland
- United Arab Emirates
- United Kingdom
- United States
The following list displays all supported sovereign clouds:
- Government Community Cloud (GCC): US Gov Virginia
- Government Community Cloud High (GCC High): US Gov Virginia
- Department of Defense (DoD) : US DoD East
Hosted machine groups aren't yet available in the following sovereign cloud:
- China
Sovereign clouds limitations for hosted machine groups
The following features aren't supported in sovereign clouds:
| Feature not supported | Sovereign cloud(s) |
|---|---|
| Work or school account | GCC, GCC High, DoD |
| Custom VM images | GCC, DoD |
Network limitations for hosted machine groups
Hosted machine groups don't have access to on-premises data sources or other on-premises resources. Hosted machine group can't be accessed from the Internet, as the inbound traffic is blocked.
Remote desktop to hosted machine groups
Remote desktop to hosted machine groups isn't supported. Hosted machine groups are meant to be used for unattended runs only, and remote desktop access from the Internet isn't required to run Power Automate desktop flows.
Limit on the number of hosted machine groups per environment
The number of hosted machine groups is limited to 10 for each environment. If you reach this limit, delete an existing hosted machine group to create a new one.
Limit on the number of bots per hosted machine group
The maximum number of hosted bots per hosted machine group is limited to 50.
Delete unused resources
We delete unused resources to ensure the service is available for everyone. Therefore, all hosted machine groups that are inactive for more than 28 days are automatically deleted. The deleted groups remain visible, but they can't be used. An inactive group is a group that hasn't run any desktop flows for the last 28 days.
Note
You must delete the hosted machine group and create a new one to continue using its features. You'll need to reconfigure the connection that's associated with your cloud flow.
Feedback
Coming soon: Throughout 2024 we will be phasing out GitHub Issues as the feedback mechanism for content and replacing it with a new feedback system. For more information see: https://aka.ms/ContentUserFeedback.
Submit and view feedback for