Testing iOS Apps
Important
Visual Studio App Center is scheduled for retirement on March 31, 2025. While you can continue to use Visual Studio App Center until it is fully retired, there are several recommended alternatives that you may consider migrating to.
After getting invited to test an iOS Application in App Center, you'll receive an email notifying you of your pending invitation. The following sections outline the steps you need to take to get started testing this app.
Adding your Device
Linking your device to your App Center account is a necessary step in the iOS installation process if you've received an email from App Center to create an account and test an app. The device registration process allows apps to be installed onto your device. Without it, you can't install the app you're supposed to be testing.
If you don't already have a device added to your account, you can add it when a new release is available to you. You can add the device via the link in the release email, or directly from the App Center install portal.
Adding your device consists of the following steps:
Navigate to the App Center install portal device menu on the device you're attempting to add. This can be done through either of the following methods:
- Click the add device button located in the email you received when a release was distributed.
- Click the profile icon in the upper-right corner of the App Center portal.
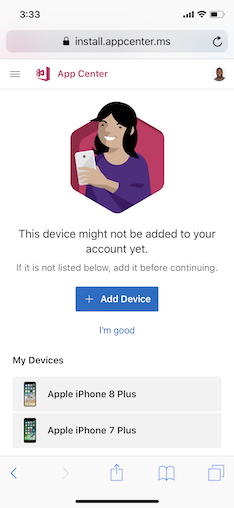
Click the Add new device button within the App Center install portal. App Center will display a dialog asking to show you a configuration profile. If you are not seeing Add new device option then go to https://install.appcenter.ms/register-device on your mobile device.
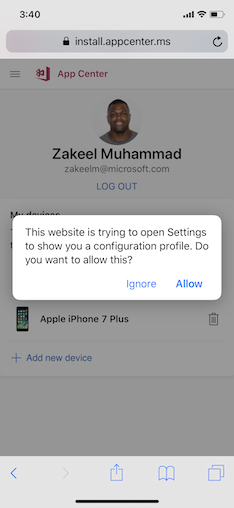
In the phone's Settings, select General, VPN & Device Management, then Install profile, and enable Allow. This profile is a necessary part of adding your device.

Click the install button in the upper-right corner of this screen to install this profile.
Once the profile installs, App center will direct you to the install portal. The device you're using will now be in the "My Devices" table.
Note
If the developer has made the app available publicly for testing and you receive a direct installation link, then adding your device isn't necessary.
Installing an app
Installing an app on your iOS device is done primarily from the App Center install portal, which is explained in the next section. Installing your apps can be done in two different ways depending on the developer's preference:
You'll receive an email from App Center that directs you to the release in the App Center. You can also go directly to the App Center Install Portal to see apps you've been added to and app releases.
The developer sends you an installation link. By using this link, you'll be navigated directly to the app in the install portal where you can view and download a release.
Once you've navigated to the install portal, you'll see a list of all available apps you've been added to as a tester.
When you click on an app, App Center displays additional information about the app. Click the blue install button to install the app.
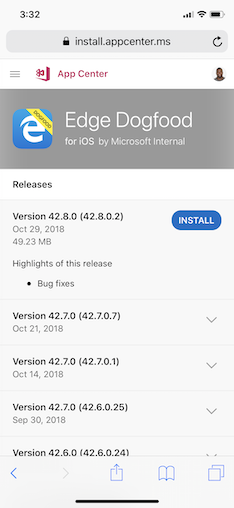
Clicking this button starts installing the app, which adds it to your home screen.
You can use a QR code reader to select the application you're testing from our App Center Developer Portal. The QR code links directly to the app's download page.
Troubleshooting
Here are some common issues along with their solutions we've seen in the installation process:
I get the message “Untrusted Enterprise Developer”
In order for the app to be available for use, you'll need to trust the developer's certificate. From your phone’s home screen, tap Settings > General > Profiles or Profiles & Device Management. Under the Enterprise App heading, you see will see a profile for the developer. Tap the name of the developer profile and then confirm you trust them. You can now launch the app.
While installing the app, I get an “Unable to Download App” error, and the app isn't installed
This error could be caused by many reasons, and you should contact the app developer to help resolve the issue. If you're the app developer, this error could be caused by one of the following reasons:
- UDID isn't included in the provisioning profile
- The build was incorrectly signed or has broken entitlements
- Device or iOS version is incompatible with the build
- Device storage is full
- Actual download error
- App is over 50 MB and downloaded over a cellular connection
When I press the “Install” button, the installation alert never shows up and the app isn't installed
If you've previously installed the app from the App Store, and it carries the same version of the app that's being installed, there'll be no alert to confirm the installation. As a workaround, try uninstalling the existing version of the app, and then tap the Install button again.
When I press the "+ Add new device" button nothing happens
Typically this occurs on iPads when Safari requests a desktop version of App Center instead of a mobile version. To resolve this, tap on the 'AA' and select the option 'Request Mobile Website'. On older versions of iOS, Safari has this feature integrated into the refresh button. To handle this case, press and hold the refresh button and the same option should appear.
Feedback
Coming soon: Throughout 2024 we will be phasing out GitHub Issues as the feedback mechanism for content and replacing it with a new feedback system. For more information see: https://aka.ms/ContentUserFeedback.
Submit and view feedback for