This information relates to a pre-release product that may be substantially modified before it's commercially released. Microsoft makes no warranties, express or implied, with respect to the information provided here.
This tutorial teaches ASP.NET Core MVC web development with controllers and views. If you're new to ASP.NET Core web development, consider the Razor Pages version of this tutorial, which provides an easier starting point. See Choose an ASP.NET Core UI, which compares Razor Pages, MVC, and Blazor for UI development.
This is the first tutorial of a series that teaches ASP.NET Core MVC web development with controllers and views.
At the end of the series, you'll have an app that manages and displays movie data. You learn how to:
The Visual Studio Code instructions use the .NET CLI for ASP.NET Core development functions such as project creation. You can follow these instructions on macOS, Linux, or Windows and with any code editor. Minor changes may be required if you use something other than Visual Studio Code.
Microsoft has announced the retirement of Visual Studio for Mac. Visual Studio for Mac will no longer be supported starting August 31, 2024. Alternatives include:
Start Visual Studio and select Create a new project.
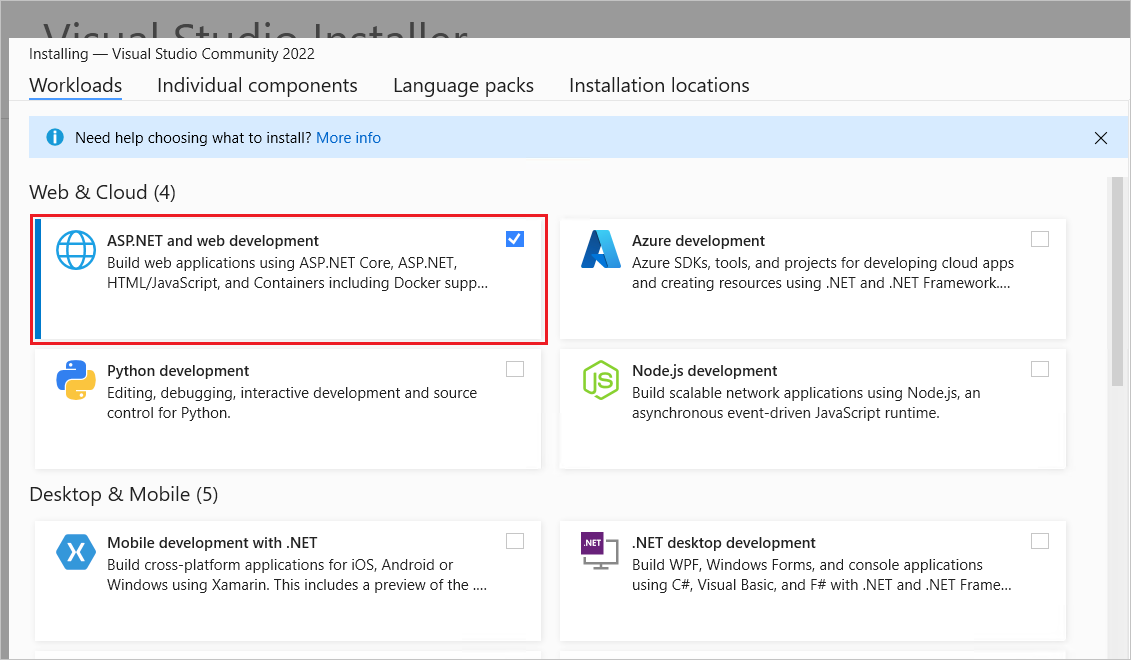
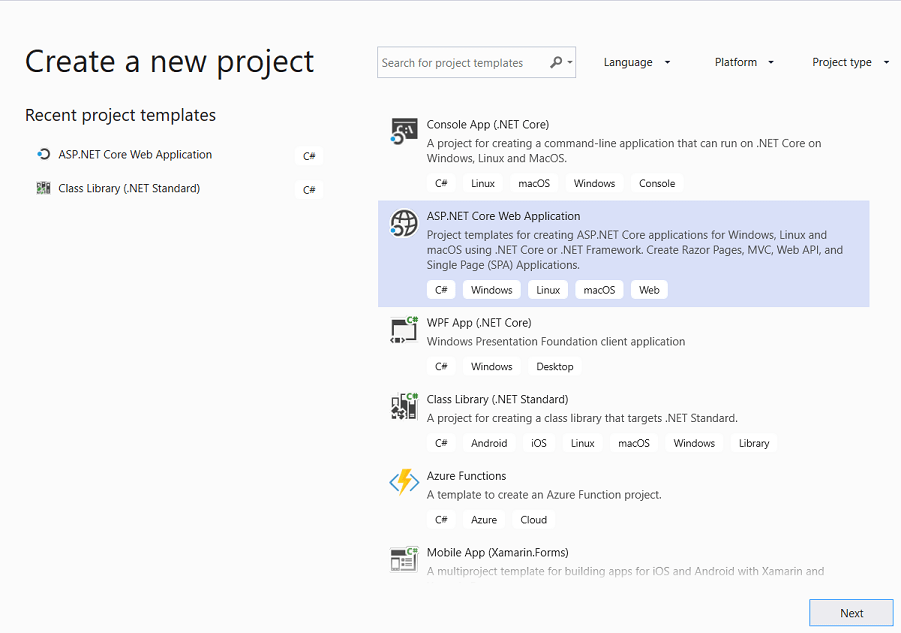
In the Create a new project dialog, select ASP.NET Core Web App (Model-View-Controller) > Next.
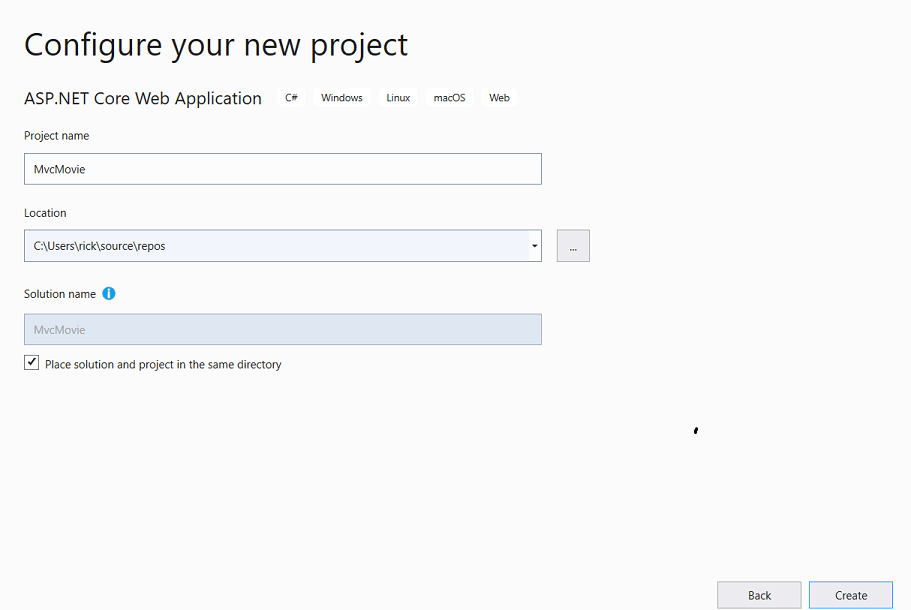
In the Configure your new project dialog, enter MvcMovie for Project name. It's important to name the project MvcMovie. Capitalization needs to match each namespace when code is copied.
Select Next.
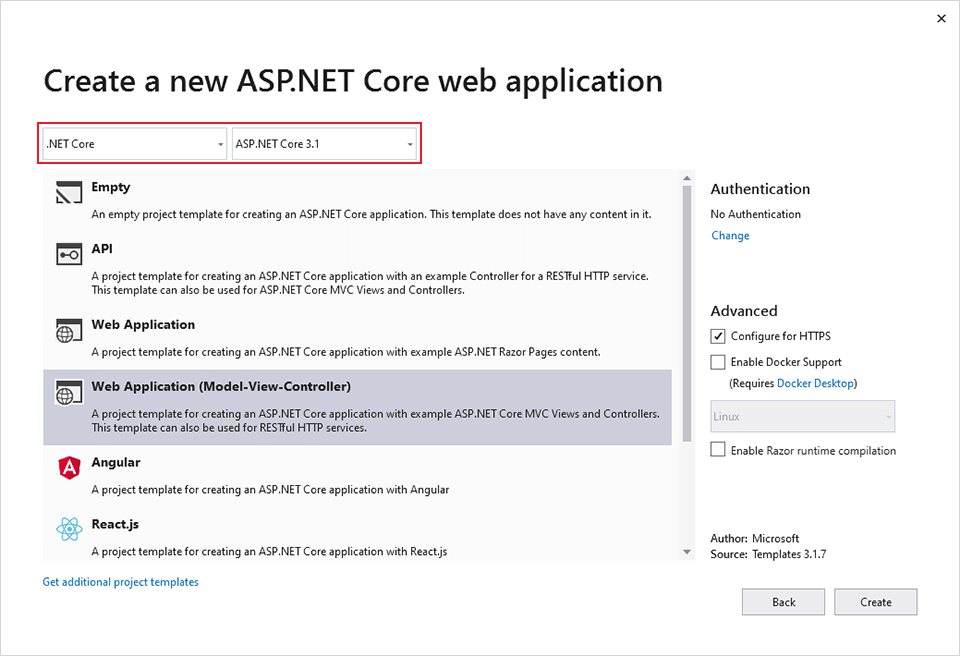
In the Additional information dialog:
Select .NET 8.0 (Long Term Support).
Verify that Do not use top-level statements is unchecked.
Change to the directory (cd) that will contain the project.
Run the following commands:
dotnet new mvc -o MvcMovie
code -r MvcMovie
The dotnet new command creates a new ASP.NET Core MVC project in the MvcMovie folder.
The code command opens the MvcMovie project folder in the current instance of Visual Studio Code.
Visual Studio Code might display a dialog box that asks: Do you trust the authors of the files in this folder?
If you trust all files in the parent folder, select Trust the authors of all files in the parent folder.
Select Yes, I trust the authors since the project folder has files generated by .NET.
When Visual Studio Code requests that you add assets to build and debug the project, select Yes. If Visual Studio Code doesn't offer to add build and debug assets, select View > Command Palette and type ".NET" into the search box. From the list of commands, select the .NET: Generate Assets for Build and Debug command.
Visual Studio Code adds a .vscode folder with generated launch.json and tasks.json files.
Select File > New Project....
Select Web and Console > App > Web Application (Model-View-Controller) > Continue.
In the Configure your new Web Application (Model-View-Controller) dialog:
Select .NET 8.0 for the Target Framework.
Verify that Do not use top-level statements is unchecked.
Select Continue.
Enter MvcMovie for Project name. It's important to name the project MvcMovie. Capitalization needs to match each namespace when code is copied.
Visual Studio runs the app and opens the default browser.
The address bar shows localhost:<port#> and not something like example.com. The standard hostname for your local computer is localhost. When Visual Studio creates a web project, a random port is used for the web server.
Launching the app without debugging by pressing Ctrl+F5 allows you to:
Make code changes.
Save the file.
Quickly refresh the browser and see the code changes.
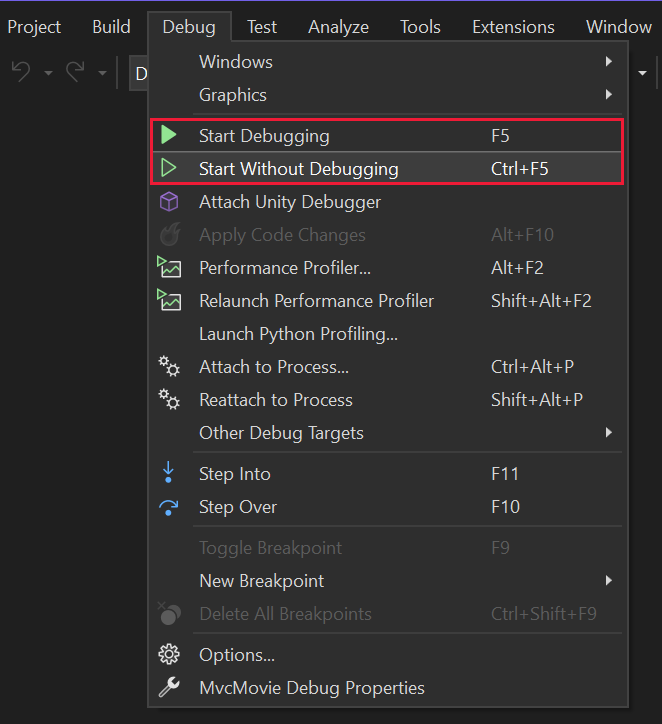
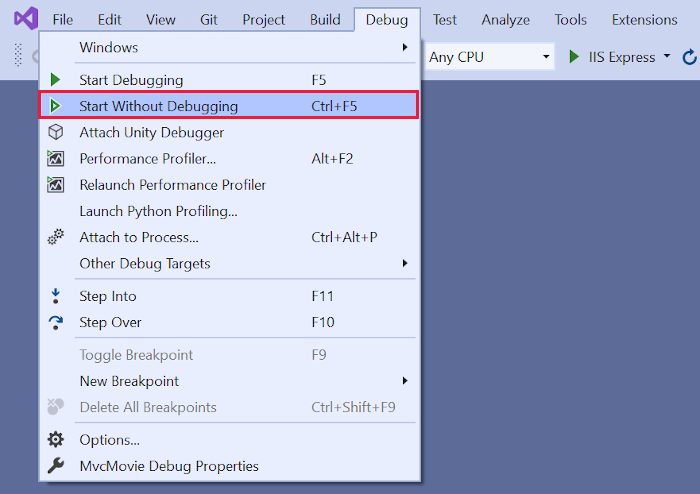
You can launch the app in debug or non-debug mode from the Debug menu:
You can debug the app by selecting the https button in the toolbar:
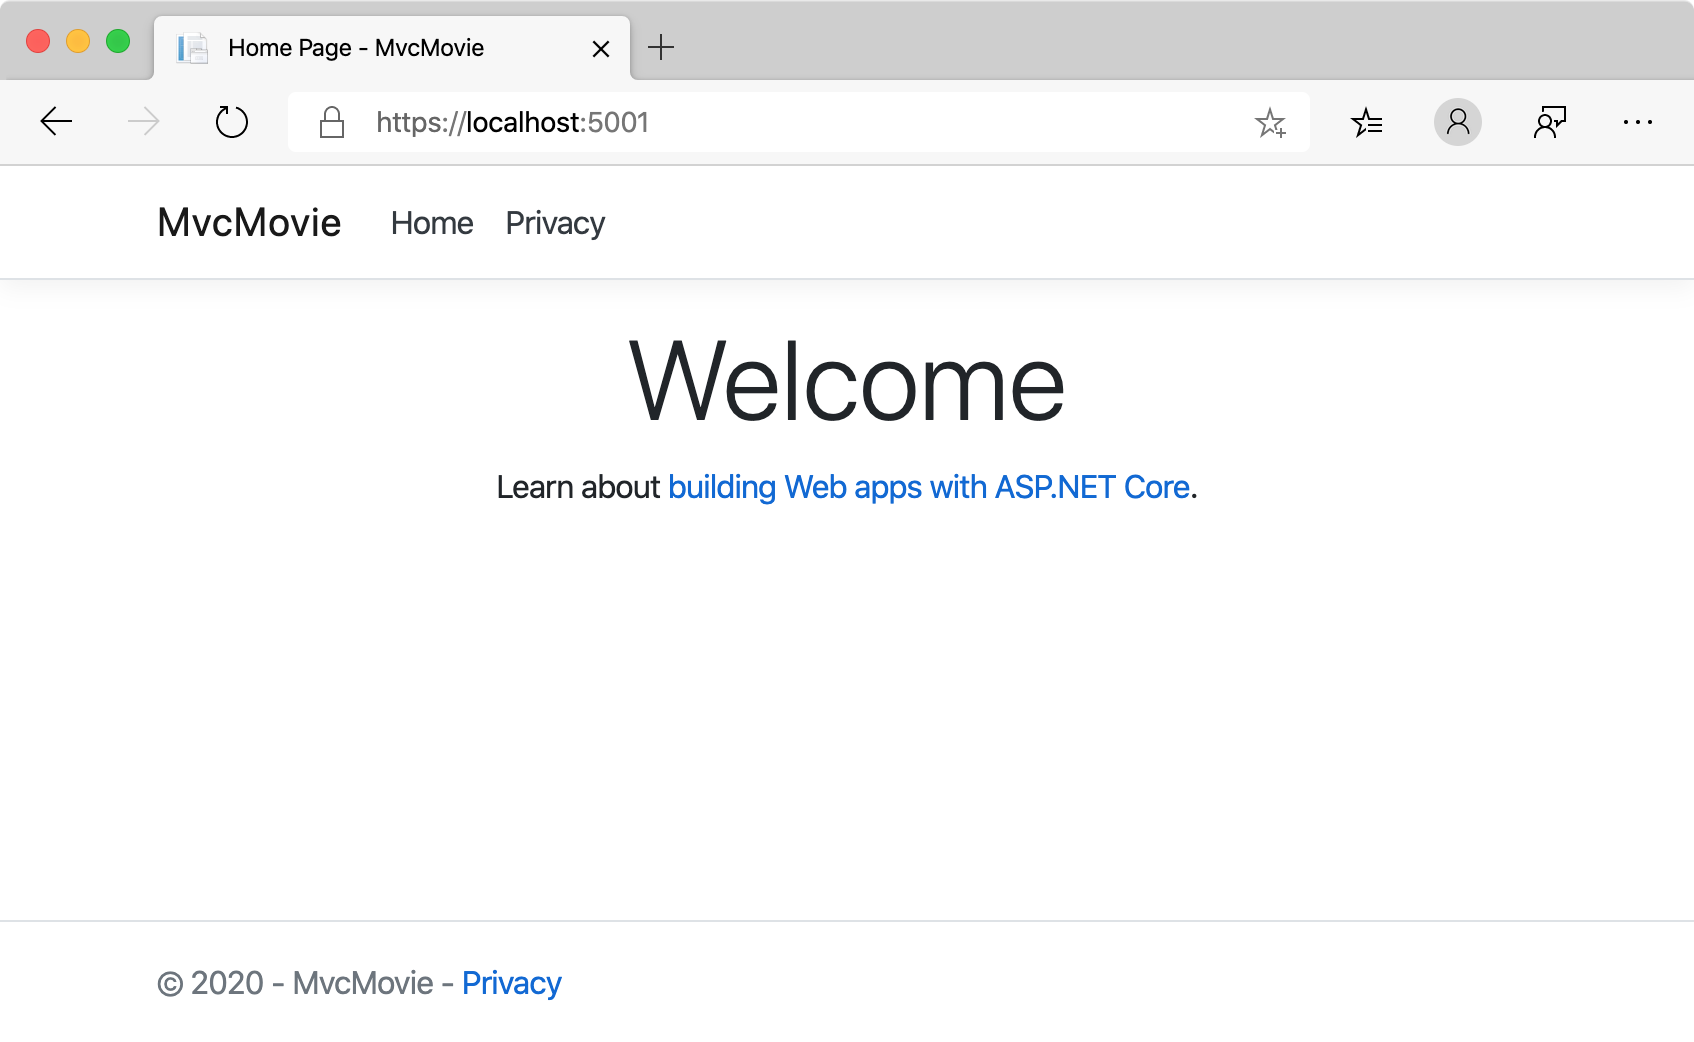
The following image shows the app:
Close the browser window. Visual Studio will stop the application.
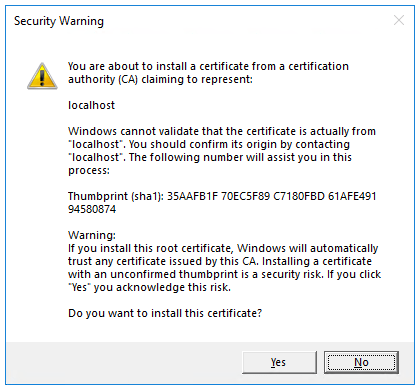
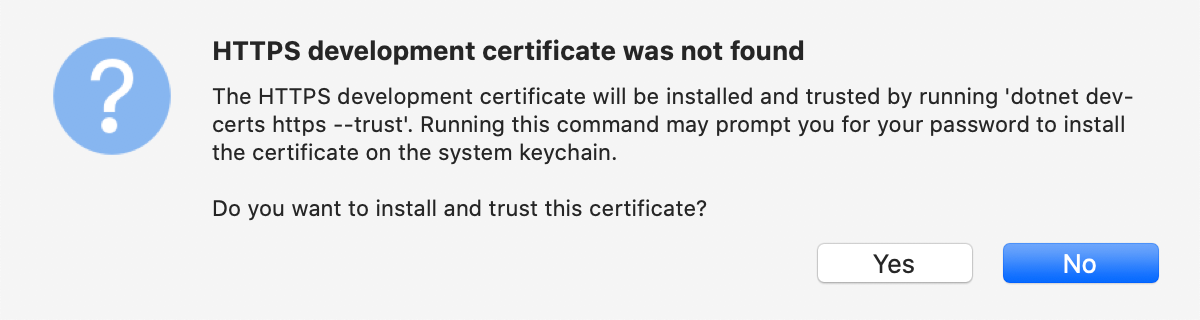
Trust the HTTPS development certificate by running the following command:
dotnet dev-certs https --trust
The preceding command doesn't work on Linux. See your Linux distribution's documentation for trusting a certificate.
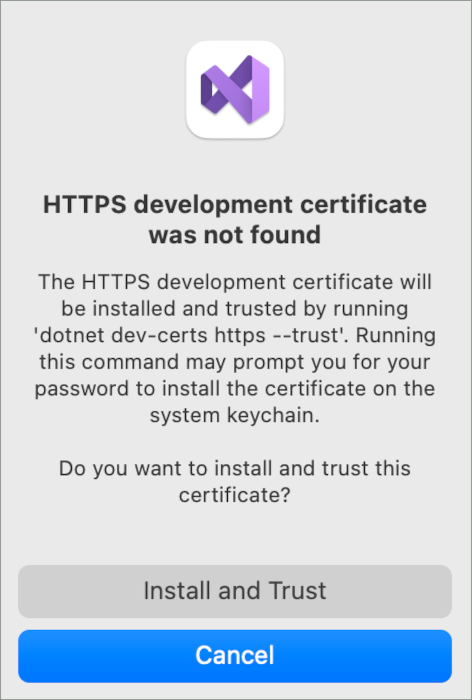
The preceding command displays the following dialog, provided the certificate was not previously trusted:
Select Yes if you agree to trust the development certificate.
The address bar shows localhost:<port#> and not something like example.com. The standard hostname for your local computer is localhost. Localhost only serves web requests from the local computer.
Launching the app without debugging by selecting Ctrl+F5 allows you to:
Make code changes.
Save the file.
Quickly refresh the browser and see the code changes.
Close the browser window.
In Visual Studio Code, from the Run menu, select Stop Debugging or press Shift+F5 to stop the app.
Select Option+Command+Return to run the app without the debugger.
The address bar shows localhost:<port#> and not something like example.com. The standard hostname for your local computer is localhost. Localhost only serves web requests from the local computer.
You can launch the app in debug or non-debug mode from the Debug menu.
The following image shows the app:
Close the browser window. Visual Studio for Mac will stop the application.
This tutorial teaches ASP.NET Core MVC web development with controllers and views. If you're new to ASP.NET Core web development, consider the Razor Pages version of this tutorial, which provides an easier starting point. See Choose an ASP.NET Core UI, which compares Razor Pages, MVC, and Blazor for UI development.
This is the first tutorial of a series that teaches ASP.NET Core MVC web development with controllers and views.
At the end of the series, you'll have an app that manages and displays movie data. You learn how to:
The Visual Studio Code instructions use the .NET CLI for ASP.NET Core development functions such as project creation. You can follow these instructions on macOS, Linux, or Windows and with any code editor. Minor changes may be required if you use something other than Visual Studio Code.
Microsoft has announced the retirement of Visual Studio for Mac. Visual Studio for Mac will no longer be supported starting August 31, 2024. Alternatives include:
Start Visual Studio and select Create a new project.
In the Create a new project dialog, select ASP.NET Core Web App (Model-View-Controller) > Next.
In the Configure your new project dialog, enter MvcMovie for Project name. It's important to name the project MvcMovie. Capitalization needs to match each namespace when code is copied.
Select Next.
In the Additional information dialog:
Select .NET 7.0.
Verify that Do not use top-level statements is unchecked.
Change to the directory (cd) that will contain the project.
Run the following commands:
dotnet new mvc -o MvcMovie
code -r MvcMovie
The dotnet new command creates a new ASP.NET Core MVC project in the MvcMovie folder.
The code command opens the MvcMovie project folder in the current instance of Visual Studio Code.
Visual Studio Code might display a dialog box that asks: Do you trust the authors of the files in this folder?
If you trust all files in the parent folder, select Trust the authors of all files in the parent folder.
Select Yes, I trust the authors since the project folder has files generated by .NET.
When Visual Studio Code requests that you add assets to build and debug the project, select Yes. If Visual Studio Code doesn't offer to add build and debug assets, select View > Command Palette and type ".NET" into the search box. From the list of commands, select the .NET: Generate Assets for Build and Debug command.
Visual Studio Code adds a .vscode folder with generated launch.json and tasks.json files.
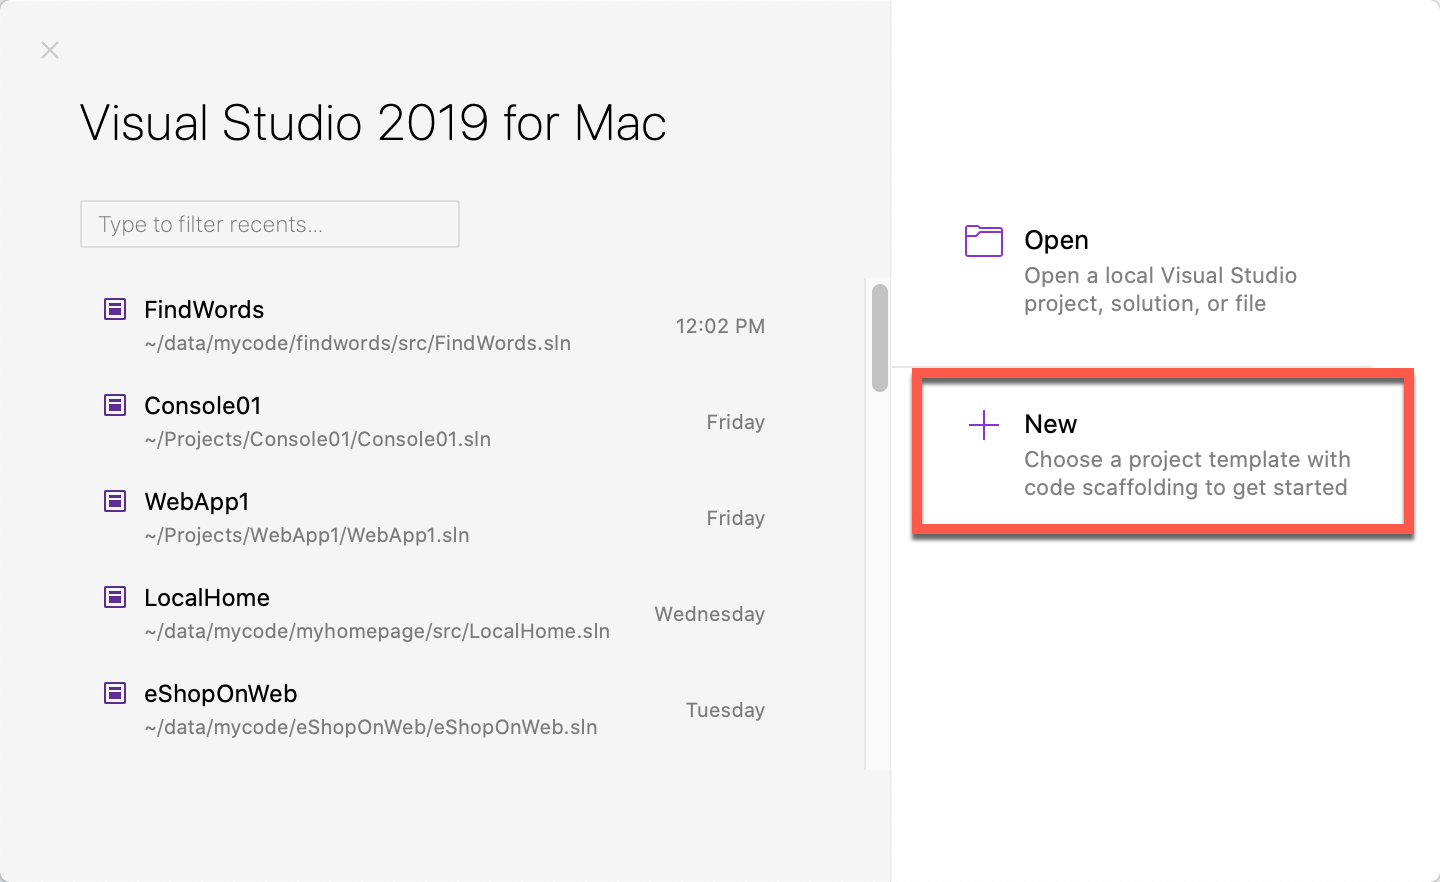
Start Visual Studio for Mac and select File > New Project....
In Visual Studio for Mac select Web and Console > App > Web Application (Model-View-Controller) > Continue.
In the Configure your new Web Application (Model-View-Controller) dialog:
Select .NET 7.0 for the Target Framework.
Verify that Do not use top-level statements is unchecked.
Select Continue.
Enter MvcMovie for Project name. It's important to name the project MvcMovie. Capitalization needs to match each namespace when code is copied.
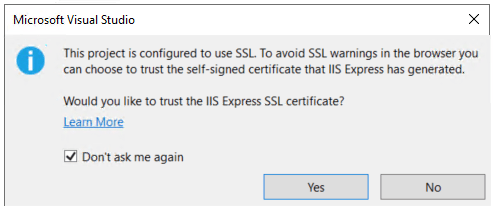
Press Ctrl+F5 to run the app without the debugger.Visual Studio displays the following dialog when a project is not yet configured to use SSL:Select Yes if you trust the IIS Express SSL certificate.The following dialog is displayed:Select Yes if you agree to trust the development certificate.For information on trusting the Firefox browser, see Firefox SEC_ERROR_INADEQUATE_KEY_USAGE certificate error.
Visual Studio runs the app and opens the default browser.
The address bar shows localhost:<port#> and not something like example.com. The standard hostname for your local computer is localhost. When Visual Studio creates a web project, a random port is used for the web server.
Launching the app without debugging by pressing Ctrl+F5 allows you to:
Make code changes.
Save the file.
Quickly refresh the browser and see the code changes.
You can launch the app in debug or non-debug mode from the Debug menu:
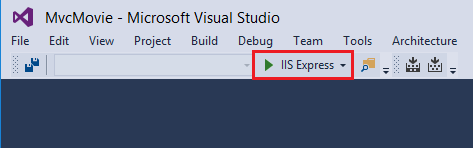
You can debug the app by selecting the https button in the toolbar:
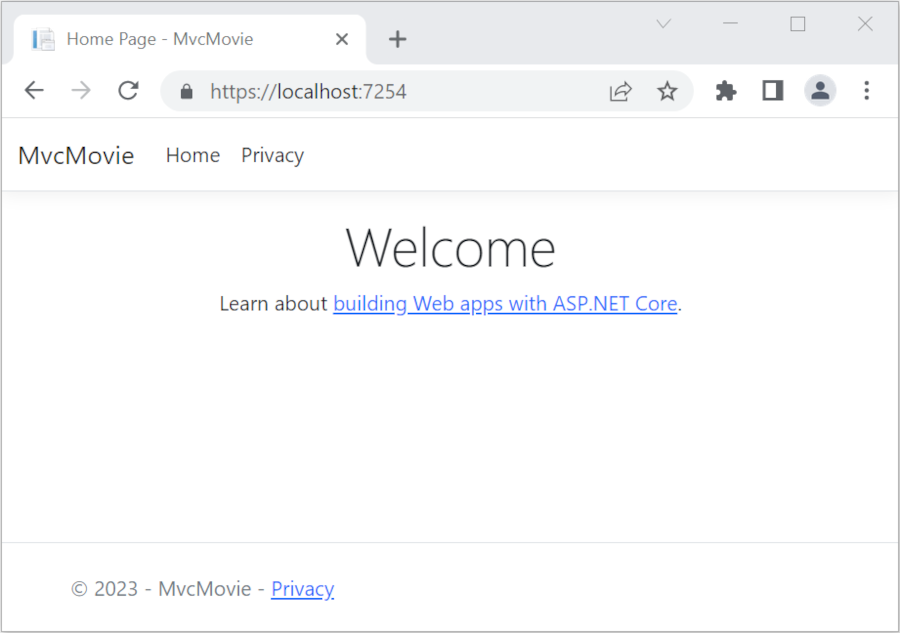
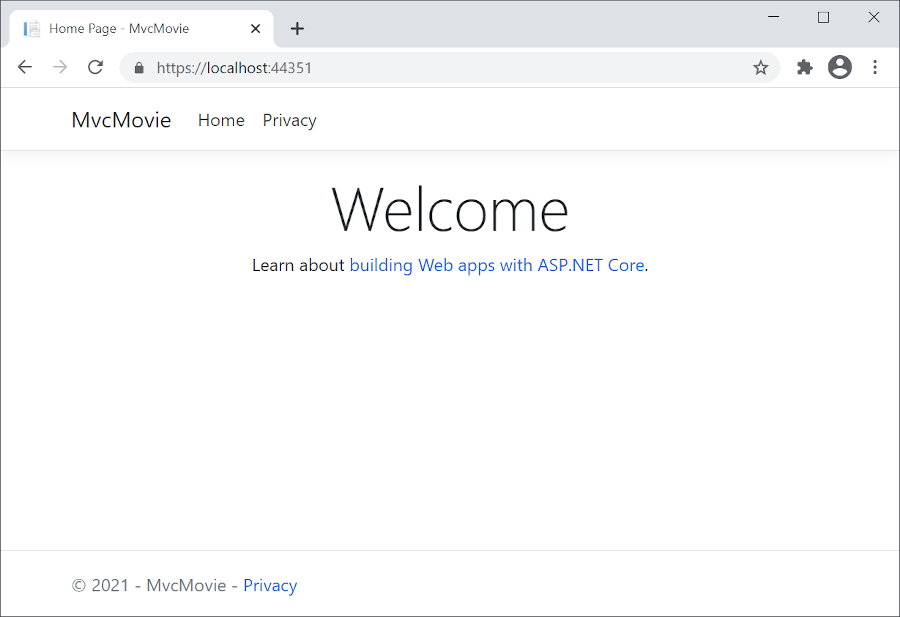
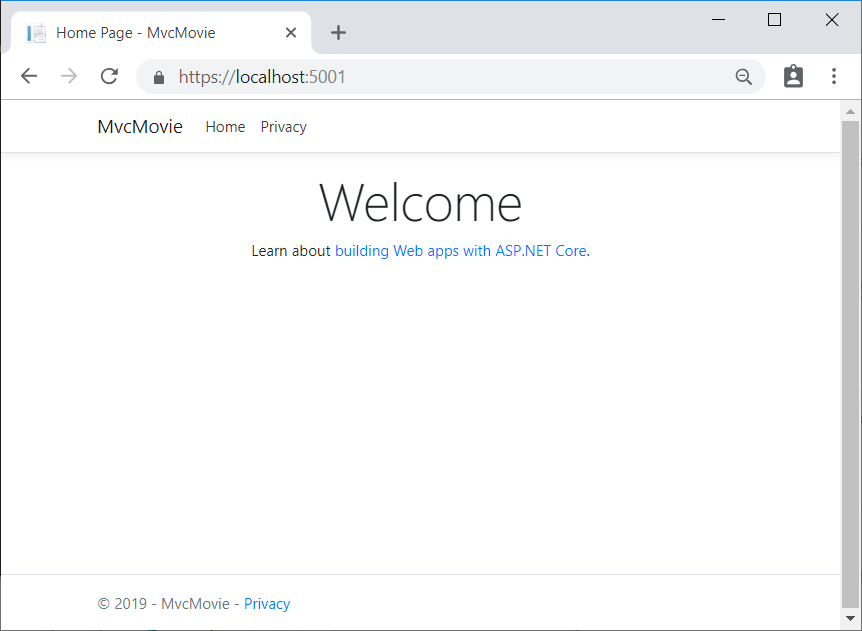
The following image shows the app:
Close the browser window. Visual Studio will stop the application.
Trust the HTTPS development certificate by running the following command:
dotnet dev-certs https --trust
The preceding command doesn't work on Linux. See your Linux distribution's documentation for trusting a certificate.
The preceding command displays the following dialog, provided the certificate was not previously trusted:
Select Yes if you agree to trust the development certificate.
The address bar shows localhost:<port#> and not something like example.com. The standard hostname for your local computer is localhost. Localhost only serves web requests from the local computer.
Launching the app without debugging by selecting Ctrl+F5 allows you to:
Make code changes.
Save the file.
Quickly refresh the browser and see the code changes.
Close the browser window.
In Visual Studio Code, from the Run menu, select Stop Debugging or press Shift+F5 to stop the app.
Select Option+Command+Return to run the app without the debugger.
The address bar shows localhost:<port#> and not something like example.com. The standard hostname for your local computer is localhost. Localhost only serves web requests from the local computer.
You can launch the app in debug or non-debug mode from the Debug menu.
The following image shows the app:
Close the browser window. Visual Studio for Mac will stop the application.
This tutorial teaches ASP.NET Core MVC web development with controllers and views. If you're new to ASP.NET Core web development, consider the Razor Pages version of this tutorial, which provides an easier starting point. See Choose an ASP.NET Core UI, which compares Razor Pages, MVC, and Blazor for UI development.
This is the first tutorial of a series that teaches ASP.NET Core MVC web development with controllers and views.
At the end of the series, you'll have an app that manages and displays movie data. You learn how to:
The Visual Studio Code instructions use the .NET CLI for ASP.NET Core development functions such as project creation. You can follow these instructions on macOS, Linux, or Windows and with any code editor. Minor changes may be required if you use something other than Visual Studio Code.
For Visual Studio for Mac, see the .NET 7 version of this tutorial.
Start Visual Studio and select Create a new project.
In the Create a new project dialog, select ASP.NET Core Web App (Model-View-Controller) > Next.
In the Configure your new project dialog, enter MvcMovie for Project name. It's important to name the project MvcMovie. Capitalization needs to match each namespace when code is copied.
Select Next.
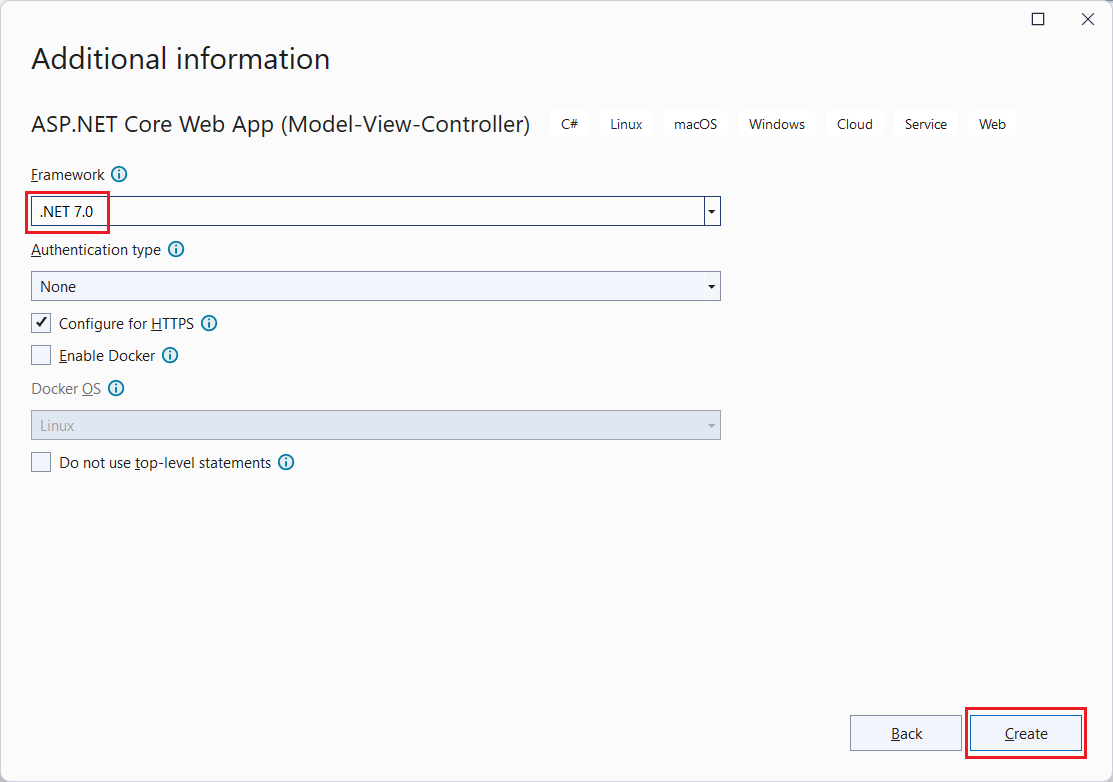
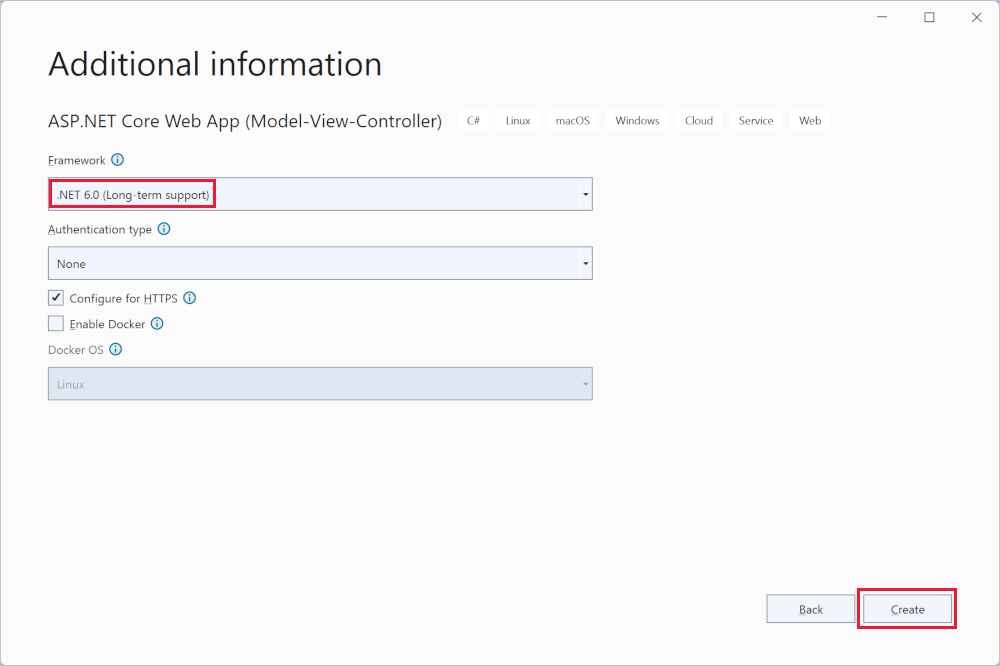
In the Additional information dialog, select .NET 6.0 (Long-term support).
Change to the directory (cd) that will contain the project.
Run the following commands:
dotnet new mvc -o MvcMovie
code -r MvcMovie
The dotnet new command creates a new ASP.NET Core MVC project in the MvcMovie folder.
The code command opens the MvcMovie project folder in the current instance of Visual Studio Code.
Visual Studio Code might display a dialog box that asks: Do you trust the authors of the files in this folder?
If you trust all files in the parent folder, select Trust the authors of all files in the parent folder.
Select Yes, I trust the authors since the project folder has files generated by .NET.
When Visual Studio Code requests that you add assets to build and debug the project, select Yes. If Visual Studio Code doesn't offer to add build and debug assets, select View > Command Palette and type ".NET" into the search box. From the list of commands, select the .NET: Generate Assets for Build and Debug command.
Visual Studio Code adds a .vscode folder with generated launch.json and tasks.json files.
For Visual Studio for Mac, see the .NET 7 version of this tutorial.
Visual Studio runs the app and opens the default browser.
The address bar shows localhost:<port#> and not something like example.com. The standard hostname for your local computer is localhost. When Visual Studio creates a web project, a random port is used for the web server.
Launching the app without debugging by selecting Ctrl+F5 allows you to:
Make code changes.
Save the file.
Quickly refresh the browser and see the code changes.
You can launch the app in debug or non-debug mode from the Debug menu:
You can debug the app by selecting the MvcMovie button in the toolbar:
The following image shows the app:
Select Ctrl+F5 to run without the debugger.
Trust the HTTPS development certificate by running the following command:
dotnet dev-certs https --trust
The preceding command doesn't work on Linux. See your Linux distribution's documentation for trusting a certificate.
The preceding command displays the following dialog, provided the certificate was not previously trusted:
Select Yes if you agree to trust the development certificate.
The address bar shows localhost:<port#> and not something like example.com. The standard hostname for your local computer is localhost. Localhost only serves web requests from the local computer.
Launching the app without debugging by selecting Ctrl+F5 allows you to:
Make code changes.
Save the file.
Quickly refresh the browser and see the code changes.
For Visual Studio for Mac, see the .NET 7 version of this tutorial.
This tutorial teaches ASP.NET Core MVC web development with controllers and views. If you're new to ASP.NET Core web development, consider the Razor Pages version of this tutorial, which provides an easier starting point. See Choose an ASP.NET Core UI, which compares Razor Pages, MVC, and Blazor for UI development.
This is the first tutorial of a series that teaches ASP.NET Core MVC web development with controllers and views.
At the end of the series, you'll have an app that manages and displays movie data. You learn how to:
The Visual Studio Code instructions use the .NET CLI for ASP.NET Core development functions such as project creation. You can follow these instructions on macOS, Linux, or Windows and with any code editor. Minor changes may be required if you use something other than Visual Studio Code.
Start Visual Studio and select Create a new project.
In the Create a new project dialog, select ASP.NET Core Web Application > Next.
In the Configure your new project dialog, enter MvcMovie for Project name. It's important to name the project MvcMovie. Capitalization needs to match each namespace matches when code is copied.
Select Create.
In the Create a new ASP.NET Core web application dialog, select:
Change to the directory (cd) that will contain the project.
Run the following commands:
dotnet new mvc -o MvcMovie
code -r MvcMovie
The dotnet new command creates a new ASP.NET Core MVC project in the MvcMovie folder.
The code command opens the MvcMovie project folder in the current instance of Visual Studio Code.
Visual Studio Code might display a dialog box that asks: Do you trust the authors of the files in this folder?
If you trust all files in the parent folder, select Trust the authors of all files in the parent folder.
Select Yes, I trust the authors since the project folder has files generated by .NET.
When Visual Studio Code requests that you add assets to build and debug the project, select Yes. If Visual Studio Code doesn't offer to add build and debug assets, select View > Command Palette and type ".NET" into the search box. From the list of commands, select the .NET: Generate Assets for Build and Debug command.
Visual Studio Code adds a .vscode folder with generated launch.json and tasks.json files.
Select File > New Solution.
In Visual Studio for Mac earlier than version 8.6, select .NET Core > App > Web Application (Model-View-Controller) > Next. In version 8.6 or later, select Web and Console > App > Web Application (Model-View-Controller) > Next.
In the Configure your new Web Application dialog:
Confirm that Authentication is set to No Authentication.
If an option to select a Target Framework is presented, select the latest 5.x version.
Select Next.
Name the project MvcMovie, and then select Create.
The address bar shows localhost:port# and not something like example.com. The standard hostname for your local computer is localhost. When Visual Studio creates a web project, a random port is used for the web server.
Launching the app without debugging by selecting Ctrl+F5 allows you to:
Make code changes.
Save the file.
Quickly refresh the browser and see the code changes.
You can launch the app in debug or non-debug mode from the Debug menu item:
You can debug the app by selecting the IIS Express button
The following image shows the app:
Select Ctrl+F5 to run without the debugger.
Trust the HTTPS development certificate by running the following command:
dotnet dev-certs https --trust
The preceding command doesn't work on Linux. See your Linux distribution's documentation for trusting a certificate.
The preceding command displays the following dialog, provided the certificate was not previously trusted:
Select Yes if you agree to trust the development certificate.
The address bar shows localhost:port:5001 and not something like example.com. The standard hostname for your local computer is localhost. Localhost only serves web requests from the local computer.
Launching the app without debugging by selecting Ctrl+F5 allows you to:
Make code changes.
Save the file.
Quickly refresh the browser and see the code changes.
Select Run > Start Without Debugging to launch the app.
The address bar shows localhost:port# and not something like example.com. The standard hostname for your local computer is localhost. When Visual Studio creates a web project, a random port is used for the web server.
You can launch the app in debug or non-debug mode from the Run menu.
This tutorial teaches ASP.NET Core MVC web development with controllers and views. If you're new to ASP.NET Core web development, consider the Razor Pages version of this tutorial, which provides an easier starting point. See Choose an ASP.NET Core UI, which compares Razor Pages, MVC, and Blazor for UI development.
This is the first tutorial of a series that teaches ASP.NET Core MVC web development with controllers and views.
At the end of the series, you'll have an app that manages and displays movie data. You learn how to:
The Visual Studio Code instructions use the .NET Core CLI for ASP.NET Core development functions such as project creation. You can follow these instructions on any platform (macOS, Linux, or Windows) and with any code editor. Minor changes may be required if you use something other than Visual Studio Code. For more information on installing Visual Studio Code on macOS, see Visual Studio Code on macOS.
Change directories (cd) to a folder that will contain the project.
Run the following command:
dotnet new mvc -o MvcMovie
code -r MvcMovie
A dialog box appears with Required assets to build and debug are missing from 'MvcMovie'. Add them?, select Yes.
dotnet new mvc -o MvcMovie: Creates a new ASP.NET Core MVC project in the MvcMovie folder.
code -r MvcMovie: Loads the MvcMovie.csproj project file in Visual Studio Code.
Select File > New Solution.
In Visual Studio for Mac earlier than version 8.6, select .NET Core > App > Web Application (Model-View-Controller) > Next. In version 8.6 or later, select Web and Console > App > Web Application (Model-View-Controller) > Next.
In the Configure your new Web Application dialog:
Confirm that Authentication is set to No Authentication.
If an option to select a Target Framework is presented, select the latest 3.x version.
Select Next.
Name the project MvcMovie, and then select Create.
The address bar shows localhost:port# and not something like example.com. The standard hostname for your local computer is localhost. When Visual Studio creates a web project, a random port is used for the web server.
Launching the app without debugging by selecting Ctrl+F5 allows you to:
Make code changes.
Save the file.
Quickly refresh the browser and see the code changes.
You can launch the app in debug or non-debug mode from the Debug menu item:
You can debug the app by selecting the IIS Express button
The following image shows the app:
Select Ctrl+F5 to run the app without debugging.
Trust the HTTPS development certificate by running the following command:
dotnet dev-certs https --trust
The preceding command doesn't work on Linux. See your Linux distribution's documentation for trusting a certificate.
The preceding command displays the following dialog, provided the certificate was not previously trusted:
Select Yes if you agree to trust the development certificate.
The address bar shows localhost:port:5001 and not something like example.com. The standard hostname for your local computer is localhost. Localhost only serves web requests from the local computer.
Launching the app without debugging by selecting Ctrl+F5 allows you to:
Make code changes.
Save the file.
Quickly refresh the browser and see the code changes.
Select Run > Start Without Debugging to launch the app.
Visual Studio for Mac: starts Kestrel server, launches a browser, and navigates to http://localhost:port, where port is a randomly chosen port number.
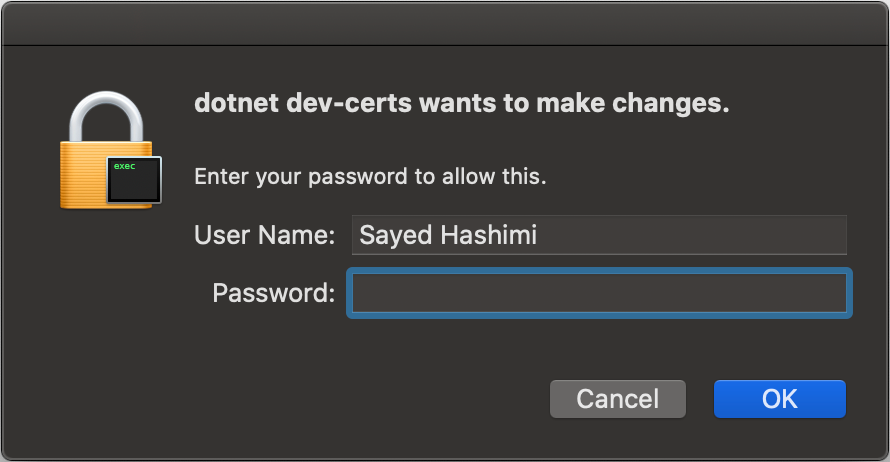
Visual Studio for Mac displays the following popup:
Select Yes if you trust the development certificate.
The following dialog is displayed:
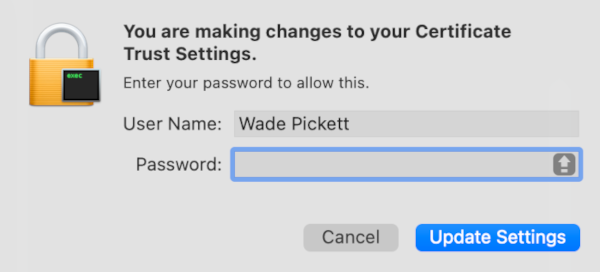
Enter your password and select OK
Select Yes if you agree to trust the development certificate.
The address bar shows localhost:port# and not something like example.com. The standard hostname for your local computer is localhost. When Visual Studio creates a web project, a random port is used for the web server. When you run the app, you'll see a different port number.
You can launch the app in debug or non-debug mode from the Run menu.
The source for this content can be found on GitHub, where you can also create and review issues and pull requests. For more information, see our contributor guide.
Coming soon: Throughout 2024 we will be phasing out GitHub Issues as the feedback mechanism for content and replacing it with a new feedback system. For more information see: https://aka.ms/ContentUserFeedback.