Tutorial: Set up a geofence by using Azure Maps
This tutorial walks you through the basics of creating and using Azure Maps geofence services.
Consider the following scenario:
A construction site manager must track equipment as it enters and leaves the perimeters of a construction area. Whenever a piece of equipment exits or enters these perimeters, an email notification is sent to the Operations Manager.
Azure Maps provides services to support the tracking of equipment entering and exiting the construction area. In this tutorial, you will:
- Upload Geofencing GeoJSON data that defines the construction site areas you want to monitor. You'll use the Data Upload API to upload geofences as polygon coordinates to your Azure Maps account.
- Set up two logic apps that, when triggered, send email notifications to the construction site operations manager when equipment enters and exits the geofence area.
- Use Azure Event Grid to subscribe to enter and exit events for your Azure Maps geofence. You set up two webhook event subscriptions that call the HTTP endpoints defined in your two logic apps. The logic apps then send the appropriate email notifications of equipment moving beyond or entering the geofence.
- Use Spatial Geofence Get API to receive notifications when a piece of equipment exits and enters the geofence areas.
Prerequisites
This tutorial uses the Postman application, but you can use a different API development environment.
Important
In the URL examples, replace {Your-Azure-Maps-Subscription-key} with your Azure Maps subscription key.
Create an Azure Maps account with a global region
The Geofence API async event requires the region property of your Azure Maps account be set to Global. This setting isn't given as an option when creating an Azure Maps account in the Azure portal, however you do have several other options for creating a new Azure Maps account with the global region setting. This section lists the three methods that can be used to create an Azure Maps account with the region set to global.
Note
The location property in both the ARM template and PowerShell New-AzMapsAccount command refer to the same property as the Region field in the Azure portal.
Upload geofencing GeoJSON data
This tutorial demonstrates how to upload geofencing GeoJSON data that contains a FeatureCollection. The FeatureCollection contains two geofences that define polygonal areas within the construction site. The first geofence has no time expiration or restrictions. The second can only be queried against during business hours (9:00 AM-5:00 PM in the Pacific Time zone), and will no longer be valid after January 1, 2022. For more information on the GeoJSON format, see Geofencing GeoJSON data.
Tip
You can update your geofencing data at any time. For more information, see Data Upload API. To upload the geofencing GeoJSON data:
In the Postman app, select New.
In the Create New window, select HTTP Request.
Enter a Request name for the request, such as POST GeoJSON Data Upload.
Select the POST HTTP method.
Enter the following URL. The request should look like the following URL:
https://{geography}.atlas.microsoft.com/mapData?subscription-key={Your-Azure-Maps-Subscription-key}&api-version=2.0&dataFormat=geojsonThe
geojsonparameter in the URL path represents the data format of the data being uploaded.Note
Replace {geography} with your geographic scope. For more information, see Azure Maps service geographic scope and the Spatial Geofence Get API.
Select the Body tab.
In the dropdown lists, select raw and JSON.
Copy the following GeoJSON data, and then paste it in the Body window:
{
   "type": "FeatureCollection",
   "features": [
     {
       "type": "Feature",
       "geometry": {
         "type": "Polygon",
         "coordinates": [
           [
             [
               -122.13393688201903,
               47.63829579223815
             ],
             [
               -122.13389128446579,
               47.63782047131512
             ],
             [
               -122.13240802288054,
               47.63783312249837
             ],
             [
               -122.13238388299942,
               47.63829037035086
             ],
             [
               -122.13393688201903,
               47.63829579223815
             ]
           ]
         ]
       },
       "properties": {
         "geometryId": "1"
       }
     },
     {
       "type": "Feature",
       "geometry": {
         "type": "Polygon",
         "coordinates": [
           [
             [
               -122.13374376296996,
               47.63784758098976
             ],
             [
               -122.13277012109755,
               47.63784577367854
             ],
             [
               -122.13314831256866,
               47.6382813338708
             ],
             [
               -122.1334782242775,
               47.63827591198201
             ],
             [
               -122.13374376296996,
               47.63784758098976
             ]
           ]
         ]
       },
       "properties": {
         "geometryId": "2",
         "validityTime": {
         "expiredTime": "2022-01-01T00:00:00",
         "validityPeriod": [
             {
               "startTime": "2020-07-15T16:00:00",
               "endTime": "2020-07-15T24:00:00",
               "recurrenceType": "Daily",
               "recurrenceFrequency": 1,
               "businessDayOnly": true
             }
           ]
         }
       }
     }
   ]
}
Select Send.
In the response window, select the Headers tab.
Copy the value of the Operation-Location key, which is the
status URL. Thestatus URLis used to check the status of the GeoJSON data upload.https://{geography}.atlas.microsoft.com/mapData/operations/{operationId}?api-version=2.0
Check the GeoJSON data upload status
To check the status of the GeoJSON data and retrieve its unique ID (udid):
Select New.
In the Create New window, select HTTP Request.
Enter a Request name for the request, such as GET Data Upload Status.
Select the GET HTTP method.
Enter the
status URLyou copied in Upload Geofencing GeoJSON data. The request should look like the following URL:https://{geography}.atlas.microsoft.com/mapData/{operationId}?api-version=2.0&subscription-key={Your-Azure-Maps-Subscription-key}Select Send.
In the response window, select the Headers tab.
Copy the value of the Resource-Location key, which is the
resource location URL. Theresource location URLcontains the unique identifier (udid) of the uploaded data. Save theudidto query the Get Geofence API in the last section of this tutorial.
(Optional) Retrieve GeoJSON data metadata
You can retrieve metadata from the uploaded data. The metadata contains information like the resource location URL, creation date, updated date, size, and upload status.
To retrieve content metadata:
Select New.
In the Create New window, select HTTP Request.
Enter a Request name for the request, such as GET Data Upload Metadata.
Select the GET HTTP method.
Enter the
resource Location URLyou copied in Check the GeoJSON data upload status. The request should look like the following URL:https://{geography}.atlas.microsoft.com/mapData/metadata/{udid}?api-version=2.0&subscription-key={Your-Azure-Maps-Subscription-key}In the response window, select the Body tab. The metadata should look like the following JSON fragment:
{
    "udid": "{udid}",
    "location": "https://{geography}.atlas.microsoft.com/mapData/6ebf1ae1-2a66-760b-e28c-b9381fcff335?api-version=2.0",
    "created": "5/18/2021 8:10:32 PM +00:00",
    "updated": "5/18/2021 8:10:37 PM +00:00",
    "sizeInBytes": 946901,
    "uploadStatus": "Completed"
}
Create workflows in Azure Logic Apps
Next, create two logic app endpoints that trigger an email notification.
To create the logic apps:
Sign in to the Azure portal.
In the upper-left corner of the Azure portal, select Create a resource.
In the Search services and marketplace box, type Logic App.
From the results, select Logic App. Then, select Create.
On the Logic App page, enter the following values:
- The Subscription that you want to use for this logic app.
- The Resource group name for this logic app. You can choose to Create new or Use existing resource group.
- The Logic App name of your logic app. In this case, use
Equipment-Enteras the name. - Select Consumption as the Plan type. For more information, see Billing and pricing models in the Logic App documentation.
For the purposes of this tutorial, keep all other values on their default settings.

When you're done, select Review + Create. After Azure validates the information about your logic app resource, select Create.
When the deployment completes successfully, select Go to resource.
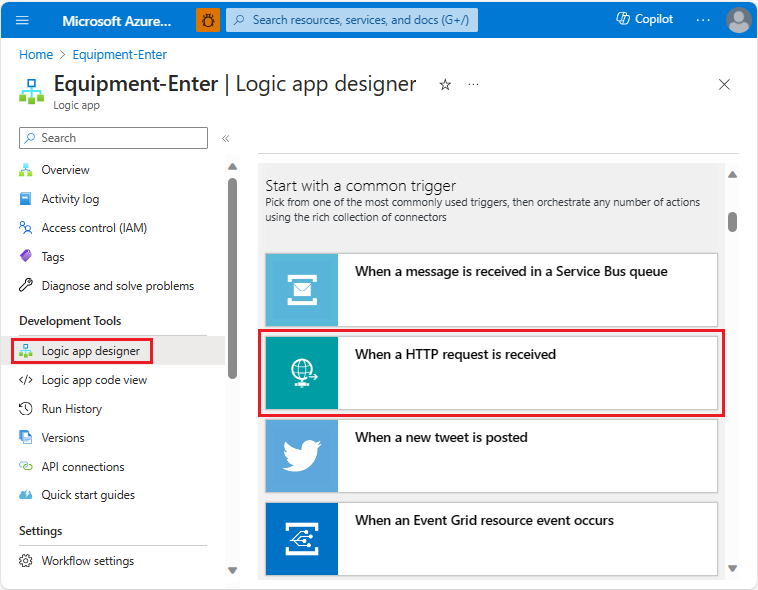
Select Logic app designer in the Development Tools section in the menu of the left, scroll down to the Start with a common trigger section. Select When an HTTP request is received.
In the upper-right corner of Logic App Designer, select Save. The HTTP POST URL is automatically generated. Save the URL. You need it in the next section to create an event endpoint.

Select + New Step.
In the search box, type
outlook.com email. In the Actions list, scroll down and select Send an email (V2).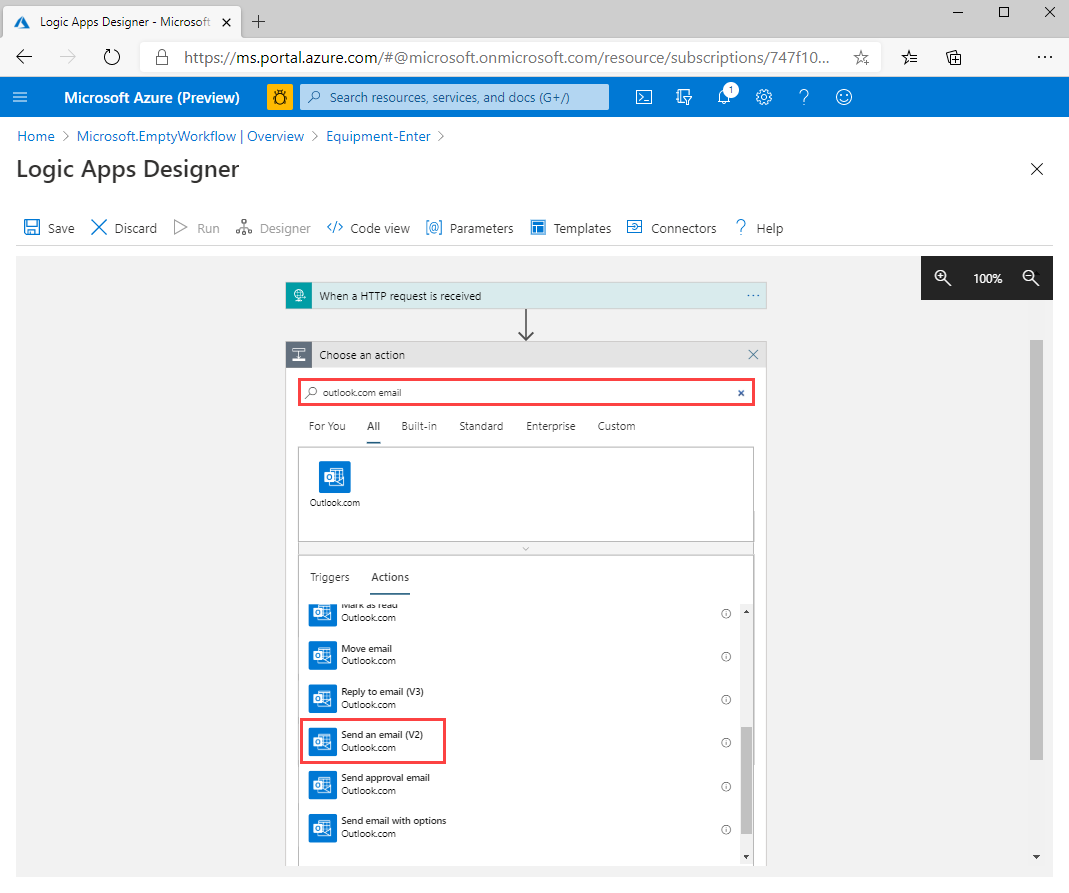
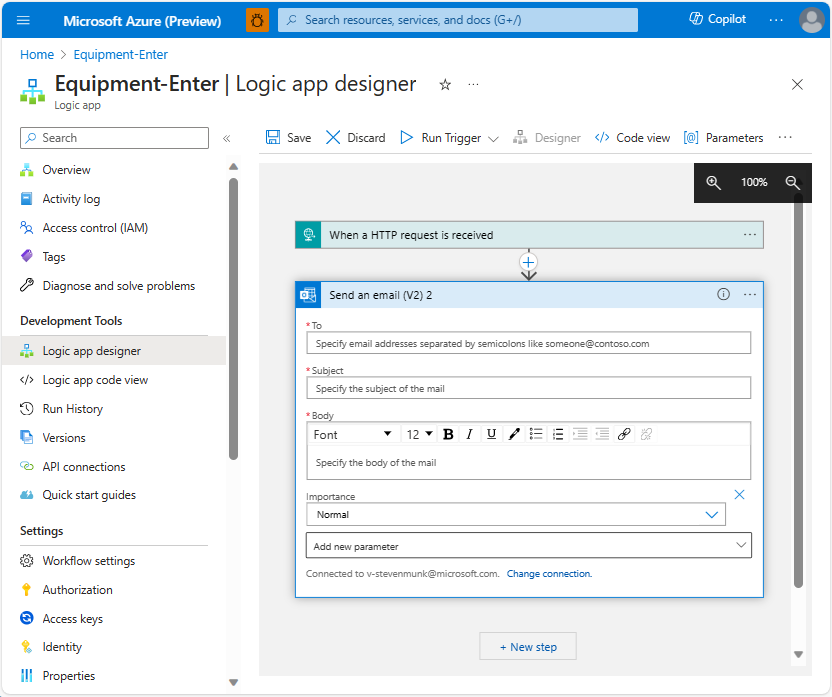
Sign in to your Outlook account. Make sure to select Yes to allow the logic app to access the account. Fill in the fields for sending an email.
Tip
You can retrieve GeoJSON response data, such as
geometryIdordeviceId, in your email notifications. You can configure Logic Apps to read the data sent by Event Grid. For information on how to configure Logic Apps to consume and pass event data into email notifications, see Tutorial: Send email notifications about Azure IoT Hub events using Event Grid and Logic Apps.In the upper-left corner of Logic App Designer, select Save.
To create a second logic app to notify the manager when equipment exits the construction site, repeat the same process. Name the logic app
Equipment-Exit.
Create Azure Maps events subscriptions
Azure Maps supports three event types. This tutorial demonstrates how to create subscriptions to the following two events:
- Geofence enter events
- Geofence exit events
Create geofence exit and enter event subscriptions:
In your Azure Maps account, select Subscriptions.
Select your subscription name.
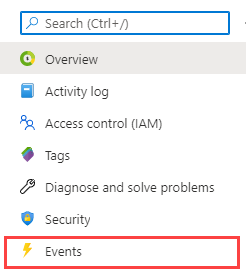
In the settings menu, select events.
In the events page, Select + Event Subscription.

On the Create Event Subscription page, enter the following values:
- The Name of the event subscription.
- The Event Schema should be Event Grid Schema.
- The System Topic Name for this event subscription, which in this case is
Contoso-Construction. - For Filter to Event Types, choose
Geofence Enteredas the event type. - For Endpoint Type, choose
Web Hook. - For Endpoint, copy the HTTP POST URL for the logic app enter endpoint that you created in the previous section. If you forgot to save it, you can just go back into Logic App Designer and copy it from the HTTP trigger step.
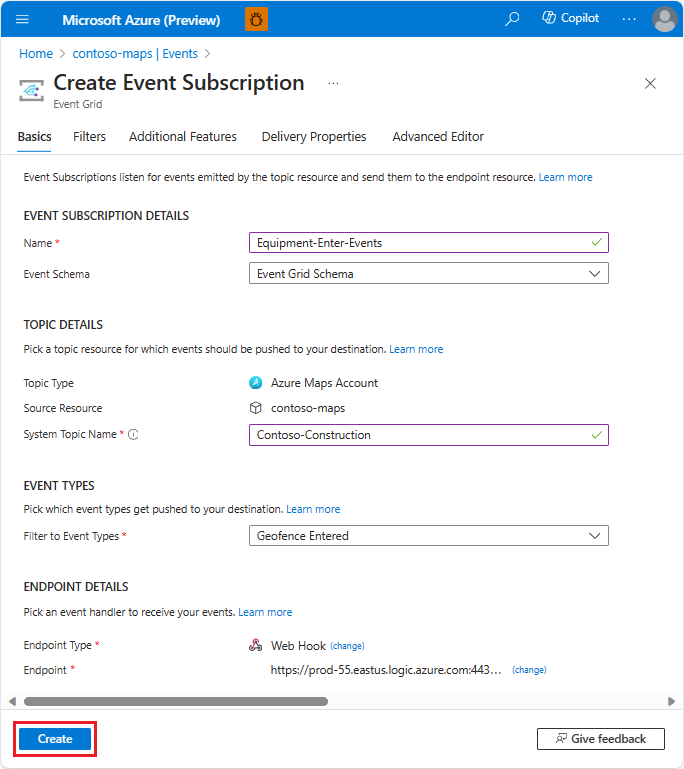
Select Create.
Repeat the same process for the geofence exit event. Make sure to choose
Geofence Exitedas the event type.
Use Spatial Geofence Get API
Next, we use the Spatial Geofence Get API to send email notifications to the Operations Manager when a piece of equipment enters or exits the geofences.
Each piece of equipment has a deviceId. In this tutorial, you're tracking a single piece of equipment, with a unique ID of device_1.
The following diagram shows the five locations of the equipment over time, beginning at the Start location, which is somewhere outside the geofences. For the purposes of this tutorial, the Start location is undefined, because you don't query the device at that location.
When you query the Spatial Geofence Get API with an equipment location that indicates initial geofence entry or exit, Event Grid calls the appropriate logic app endpoint to send an email notification to the Operations Manager.
Each of the following sections makes API requests by using the five different location coordinates of the equipment.

Equipment location 1 (47.638237,-122.132483)
In the Postman app, select New.
In the Create New window, select HTTP Request.
Enter a Request name for the request, such as Location 1.
Select the GET HTTP method.
Enter the following URL. The request should look like the following URL (replace
{udid}with theudidyou saved in the Upload Geofencing GeoJSON data section).https://{geography}.atlas.microsoft.com/spatial/geofence/json?subscription-key={Your-Azure-Maps-Subscription-key}&api-version=2022-08-01&deviceId=device_01&udid={udid}&lat=47.638237&lon=-122.1324831&searchBuffer=5&isAsync=True&mode=EnterAndExitSelect Send.
The response should like the following GeoJSON fragment:
{
  "geometries": [
    {
      "deviceId": "device_1",
      "udId": "64f71aa5-bbee-942d-e351-651a6679a7da",
      "geometryId": "1",
      "distance": -999.0,
      "nearestLat": 47.638291,
      "nearestLon": -122.132483
    },
    {
      "deviceId": "device_1",
      "udId": "64f71aa5-bbee-942d-e351-651a6679a7da",
      "geometryId": "2",
      "distance": 999.0,
      "nearestLat": 47.638053,
      "nearestLon": -122.13295
    }
  ],
  "expiredGeofenceGeometryId": [],
  "invalidPeriodGeofenceGeometryId": [],
  "isEventPublished": true
}
In the preceding GeoJSON response, the negative distance from the main site geofence means that the equipment is inside the geofence. The positive distance from the subsite geofence means that the equipment is outside the subsite geofence. Since it's the first time this device was located inside the main site geofence, the isEventPublished parameter is set to true. The Operations Manager receives an email notification that equipment entered the geofence.
Location 2 (47.63800,-122.132531)
In the Postman app, select New.
In the Create New window, select HTTP Request.
Enter a Request name for the request, such as Location 2.
Select the GET HTTP method.
Enter the following URL. The request should look like the following URL (replace
{udid}with theudidyou saved in the Upload Geofencing GeoJSON data section).https://{geography}.atlas.microsoft.com/spatial/geofence/json?subscription-key={Your-Azure-Maps-Subscription-key}&api-version=2022-08-01&deviceId=device_01&udId={udId}&lat=47.63800&lon=-122.132531&searchBuffer=5&isAsync=True&mode=EnterAndExitSelect Send.
The response should like the following GeoJSON fragment:
{
  "geometries": [
    {
      "deviceId": "device_01",
      "udId": "64f71aa5-bbee-942d-e351-651a6679a7da",
      "geometryId": "1",
      "distance": -999.0,
      "nearestLat": 47.637997,
      "nearestLon": -122.132399
    },
    {
      "deviceId": "device_01",
      "udId": "64f71aa5-bbee-942d-e351-651a6679a7da",
      "geometryId": "2",
      "distance": 999.0,
      "nearestLat": 47.63789,
      "nearestLon": -122.132809
    }
  ],
  "expiredGeofenceGeometryId": [],
  "invalidPeriodGeofenceGeometryId": [],
  "isEventPublished": false
}
In the preceding GeoJSON response, the equipment remained in the main site geofence and didn't enter the subsite geofence. As a result, the isEventPublished parameter is set to false, and the Operations Manager doesn't receive any email notifications.
Location 3 (47.63810783315048,-122.13336020708084)
In the Postman app, select New.
In the Create New window, select HTTP Request.
Enter a Request name for the request, such as Location 3.
Select the GET HTTP method.
Enter the following URL. The request should look like the following URL (replace
{udid}with theudidyou saved in the Upload Geofencing GeoJSON data section).https://{geography}.atlas.microsoft.com/spatial/geofence/json?subscription-key={Your-Azure-Maps-Subscription-key}&api-version=2022-08-01&deviceId=device_01&udid={udid}&lat=47.63810783315048&lon=-122.13336020708084&searchBuffer=5&isAsync=True&mode=EnterAndExitSelect Send.
The response should like the following GeoJSON fragment:
{
  "geometries": [
    {
      "deviceId": "device_01",
      "udId": "64f71aa5-bbee-942d-e351-651a6679a7da",
      "geometryId": "1",
      "distance": -999.0,
      "nearestLat": 47.638294,
      "nearestLon": -122.133359
    },
    {
      "deviceId": "device_01",
      "udId": "64f71aa5-bbee-942d-e351-651a6679a7da",
      "geometryId": "2",
      "distance": -999.0,
      "nearestLat": 47.638161,
      "nearestLon": -122.133549
    }
  ],
  "expiredGeofenceGeometryId": [],
  "invalidPeriodGeofenceGeometryId": [],
  "isEventPublished": true
}
In the preceding GeoJSON response, the equipment remained in the main site geofence, and entered the subsite geofence. As a result, the isEventPublished parameter is set to true. The Operations Manager receives an email notification indicating that the equipment entered a geofence.
Note
If the equipment had moved into the subsite after business hours, no event would be published and the operations manager wouldn't receive any notifications.
Location 4 (47.637988,-122.1338344)
In the Postman app, select New.
In the Create New window, select HTTP Request.
Enter a Request name for the request, such as Location 4.
Select the GET HTTP method.
Enter the following URL. The request should look like the following URL (replace
{udid}with theudidyou saved in the Upload Geofencing GeoJSON data section).https://{geography}.atlas.microsoft.com/spatial/geofence/json?subscription-key={Your-Azure-Maps-Subscription-key}&api-version=2022-08-01&deviceId=device_01&udid={udid}&lat=47.637988&userTime=2023-01-16&lon=-122.1338344&searchBuffer=5&isAsync=True&mode=EnterAndExitSelect Send.
The response should like the following GeoJSON fragment:
{
  "geometries": [
    {
      "deviceId": "device_01",
      "udId": "64f71aa5-bbee-942d-e351-651a6679a7da",
      "geometryId": "1",
      "distance": -999.0,
      "nearestLat": 47.637985,
      "nearestLon": -122.133907
    }
  ],
  "expiredGeofenceGeometryId": [
    "2"
  ],
  "invalidPeriodGeofenceGeometryId": [],
  "isEventPublished": false
}
In the preceding GeoJSON response, the equipment remained in the main site geofence, but exited the subsite geofence. Notice, however, that the userTime value is after the expiredTime as defined in the geofence data. As a result, the isEventPublished parameter is set to false, and the Operations Manager doesn't receive an email notification.
Location 5 (47.63799, -122.134505)
In the Postman app, select New.
In the Create New window, select HTTP Request.
Enter a Request name for the request, such as Location 5.
Select the GET HTTP method.
Enter the following URL. The request should look like the following URL (replace
{udid}with theudidyou saved in the Upload Geofencing GeoJSON data section).https://{geography}.atlas.microsoft.com/spatial/geofence/json?subscription-key={Your-Azure-Maps-Subscription-key}&api-version=2022-08-01&deviceId=device_01&udid={udid}&lat=47.63799&lon=-122.134505&searchBuffer=5&isAsync=True&mode=EnterAndExitSelect Send.
The response should like the following GeoJSON fragment:
{
  "geometries": [
  {
    "deviceId": "device_01",
    "udId": "64f71aa5-bbee-942d-e351-651a6679a7da",
    "geometryId": "1",
    "distance": -999.0,
    "nearestLat": 47.637985,
    "nearestLon": -122.133907
  },
  {
    "deviceId": "device_01",
    "udId": "64f71aa5-bbee-942d-e351-651a6679a7da",
    "geometryId": "2",
    "distance": 999.0,
    "nearestLat": 47.637945,
    "nearestLon": -122.133683
  }
  ],
  "expiredGeofenceGeometryId": [],
  "invalidPeriodGeofenceGeometryId": [],
  "isEventPublished": true
}
In the preceding GeoJSON response, the equipment exited the main site geofence. As a result, the isEventPublished parameter is set to true, and the Operations Manager receives an email notification indicating that the equipment exited a geofence.
You can also Send email notifications using Event Grid and Logic Apps. For more information, see Event handlers in Azure Event Grid.
Clean up resources
There are no resources that require cleanup.
Next steps
Feedback
Coming soon: Throughout 2024 we will be phasing out GitHub Issues as the feedback mechanism for content and replacing it with a new feedback system. For more information see: https://aka.ms/ContentUserFeedback.
Submit and view feedback for